Variables
Variables are placeholders that help administrators store values and assign it for users. This enables dynamic input parameterization for various operations. With this, you can dynamically filter the reports for each user. You can also create an aggregate formula with dynamic input using Variables. Zoho Analytics provides a set of system variables. You can also create your own custom variables.
Variables - Basic
- What is a Variable?
- What are System variables?
- How to create Custom Variables?
- Can I create multiple Custom Variables?
Using Variables
- Where can I use Variables?
- How to use a variable in share filter criteria?
- How to use Variables in filter criteria for Published Views?
- How do I create an Aggregate Formula using Variables?
- How to use the timeline filter as a variable?
- How do I create a User Filter using Variables?
- How to set as default User Filter value using a variable?
Managing Variables
Variables - Basic
1. What is a Variable?
Variables are placeholders that help the Administrators to assign dynamic values for various operations. Zoho Analytics provides a set of default variables. You can also create your own custom variables.
You can dynamically apply filters or set the default user filter value for your shared users. You can also create an aggregate formula with dynamic input using Variables.
2. What are System variables?
Zoho Analytics provides a set of predefined system variables that you can use in your filter criteria. They are listed below.
| System Variable Name | Description |
| system.login.email | Returns the email id of the user who has logged in. |
| system.login.firstname | Returns the first name of the user who has logged in. |
| system.login.lastname | Returns the last name of the user who has logged in. |
| system.login.fullname | Returns the full name of the user who has logged in. |
| system.timeline.date.from | Returns the start date chosen by the user in the timeline filter. |
| system.timeline.date.to | Returns the end date chosen by the user in the timeline filter. |
3. How to create Custom Variables?
Account Administrator, Organization Administrators, and Workspace Administrators can create variables for a Workspace.
The following presentation explains how to do this.
4. Can I create multiple Custom Variables?
Yes, you can create multiple variables in a Workspace. All of them will be listed in the Variables tab of the Settings page. You can view and manage all the Variables from this page.
Using Variables
1. Where can I use Variables?
You can use Variables in the following scenarios.
- Share Filter criteria
- Filter criteria for Published Views
- Aggregate Formula (Custom Variable)
- Create User Filter (Custom Variable)
- Default User Filter value (Custom Variable)
2. How to use a variable in share filter criteria?
You can apply dynamic filtering for shared users using variables.
Follow the below steps to filter data dynamically for shared users.
- Open the view to be shared.
- Click Share > Share this view.
- Specify the email addresses of users to whom you want to share the view, in the Enter email addresses or group names field.
- Click Apply Permissions & Filters and open the Filter Criteria tab.
- Specify the filter criteria in the following format. You can use the set of default system variables or your custom variables as needed.
"Table Name". "Column Name"=${Variable}
In the below example, we've set to map the login mail address of the user to the Agent Email column in the Tickets table and the records with his email address will be filtered.
"Tickets"."Agent Email"=${system.login.email} - Share the View.
- When agents access the view, they will view data for tickets that are assigned to them.
3. How to use Variables in filter criteria for Published Views?
You can apply dynamic filters for both private and public URLs.
Follow the below steps to apply filter criteria for Embedded views/Permalink with Login access.
- Publish the view with Login access.
- Enter the criteria in the Specify URL Criteria section.
- Specify the filter criteria in the following format. You can use the set of system Variables or your custom variables as needed.
"Table Name". "Column Name"=${Variable}
In the below example, we've used a custom variable in which a set of Departments are assigned to shared users' email addresses. When this custom variable is mapped to the Department Name, the agents will view only records for these departments.
"Department"."Department Name"=${Department} - Publish the views. When the agent views the report, their login address will be mapped to the department in the variable, and then the corresponding department records will be filtered.
4. How do I create an Aggregate Formula using Variables?
You can create an Aggregate Formula using Custom Variables. This allows you to change the formula input and thus make a dynamic calculation.
To add Aggregate Formula using Custom Variables, open the Add Aggregate Formula dialog. All custom variables in your workspace with List and Range as Variable value will be listed. You can construct a formula using the variable. The below slide explains this in detail.
5. How to use the timeline filter as a variable?
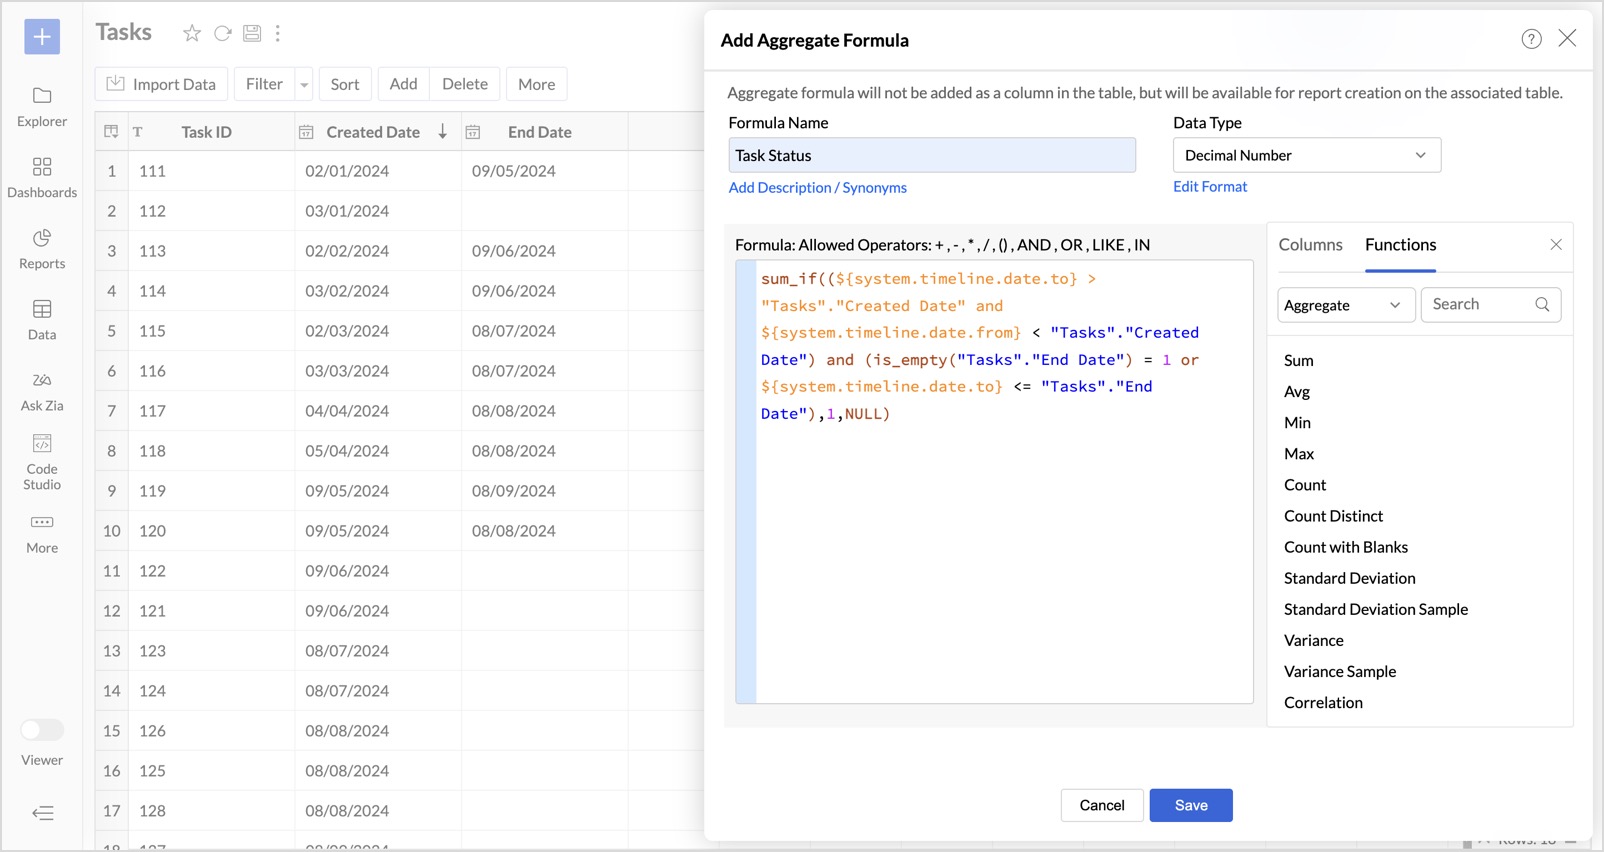
You can incorporate the timeline filter into reports by utilizing the system variables ${system.timeline.date.from} and ${system.timeline.date.to}.
Here's a step-by-step guide to using the timeline filter as a variable:
- Access the table where you want to create a report that includes the timeline variable.
Use the system variables ${system.timeline.date.from} and ${system.timeline.date.to} in an aggregate formula.
For instance, to analyze task status over a specific date range, you can create an aggregate formula similar to this:sum_if((${system.timeline.date.from} <= "Tasks"."Created Date" and ${system.timeline.date.to} >= "Tasks"."Created Date") and (is_empty("Tasks"."End Date") = 1 or ${system.timeline.date.to} <= "Tasks"."End Date"), 1, NULL)
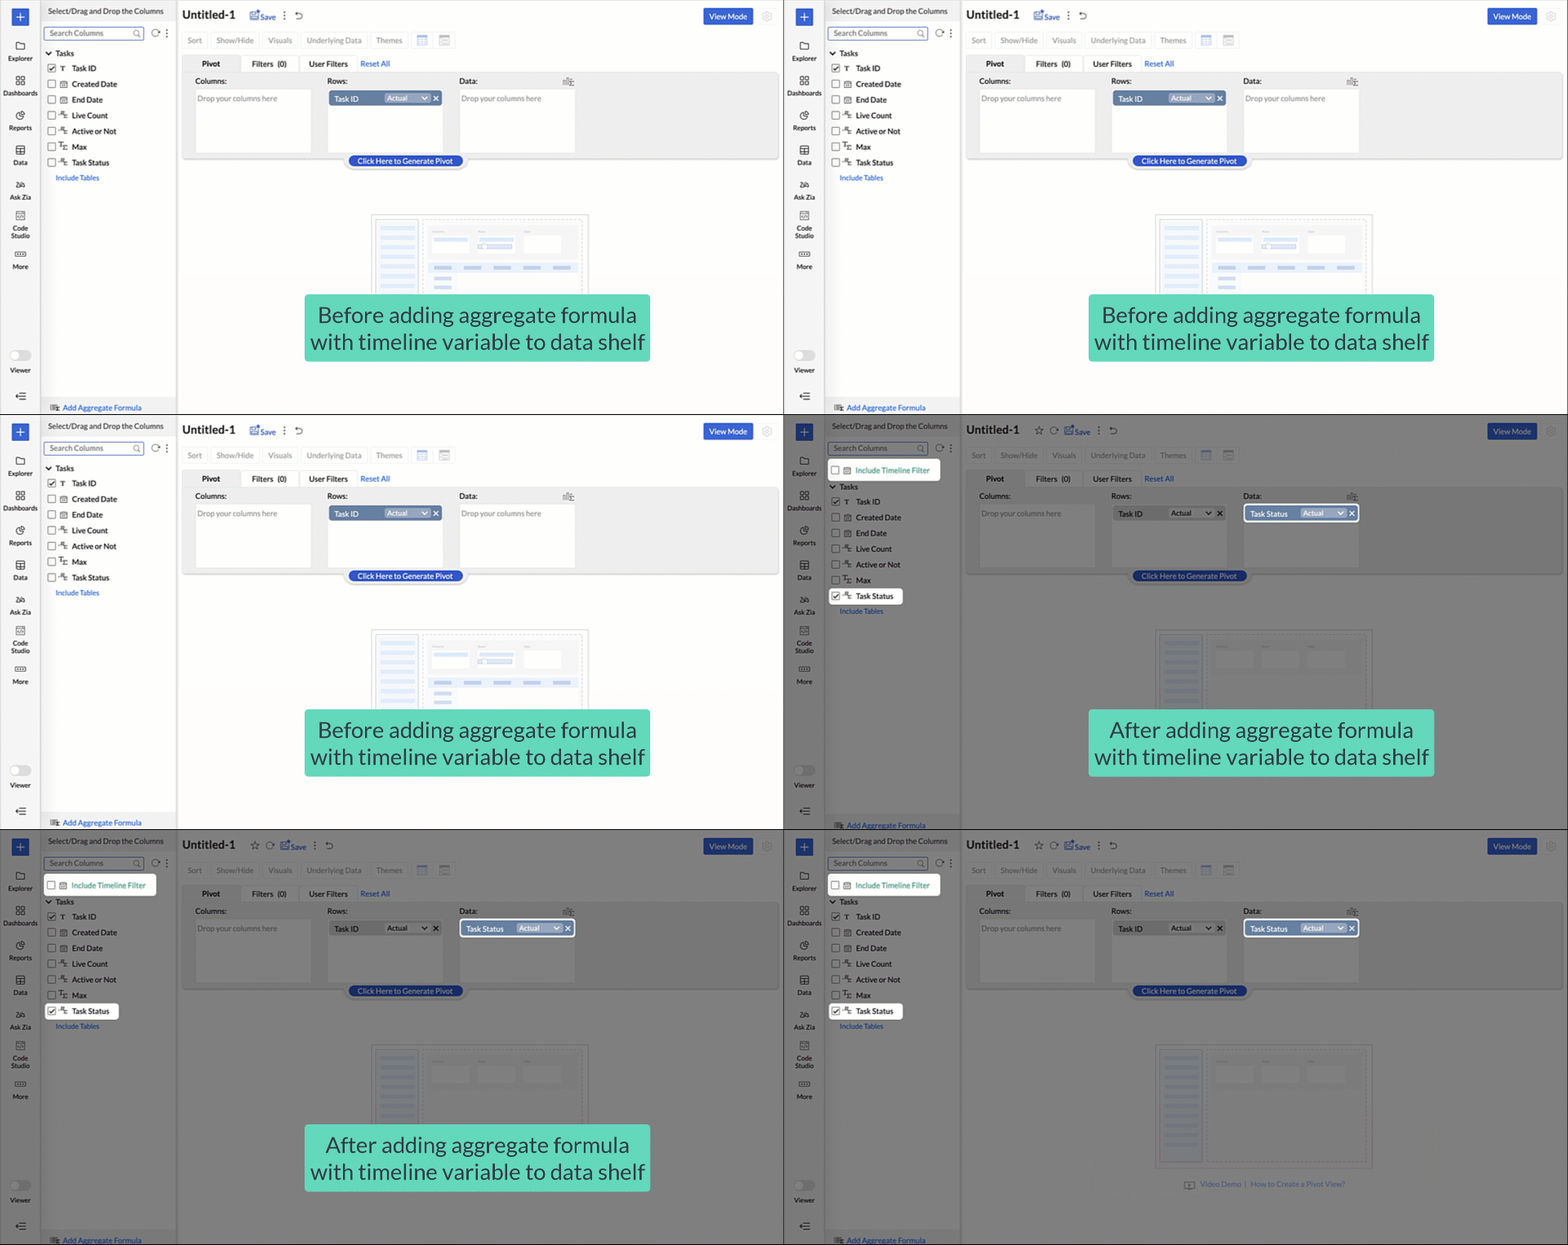
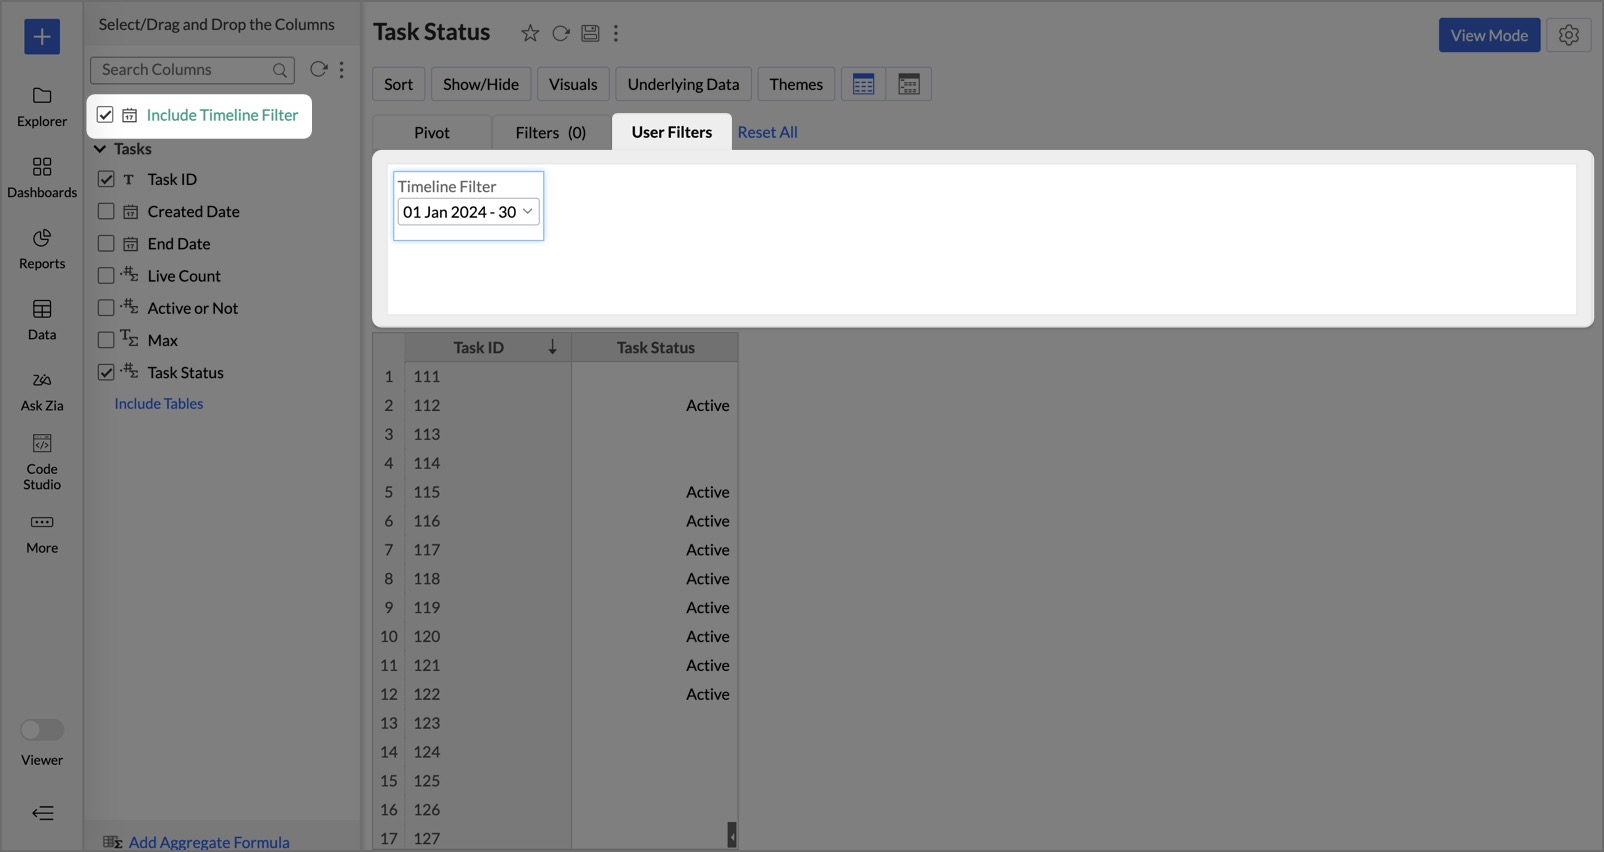
To learn about using variables in aggregate formula, click here.- Add the aggregate formula with the timeline variable to your report. When you do, the Include Timeline Filter option will appear on the Drag and Drop Columns tab on the left side.

- Add the timeline filter to your report.

Note:
- The timeline filter can only be included as a user filter.
- Ensure that the date values are assigned to the timeline variables (${system.timeline.date.from} and ${system.timeline.date.to}) when creating the aggregate formula.
- By default, these variables use the current date as both the start and end dates if no specific values are assigned.
- When reports containing timeline variables are added to a dashboard, the timeline filter mapping option is set to Used as Variable by default and cannot be modified.
- The timeline filter variables will not be listed in the system variables section of the share filter criteria.
6. How do I create a User Filter using Variables?
You can create User Filters based on Variables, provided an aggregate formula with a variable is used in the report. To add the User Filter, simply drag and drop the variable from the Variables tab. This will change the corresponding value in the formula used in Aggregate Formula.
7. How to set as default User Filter value using a variable?
You can set a dynamic default User Filter value using a custom variable. This is applicable for variables with Plain Text as Data Type.
Follow the below steps to set the default User Filter value using the variable.
- Open the view in Edit Mode.
- Open User Filter tab.
- Drop the categorical column for the user filter.
- In the Specify the default filter value field, enter $.
- All the text-based custom variables in the workspace will be listed. Select the required variable.
- Save the view. When the shared user accesses the view, the corresponding variable value mapped to their mail id will be set as the default user filter value.
Managing Variables
1. How do I manage all my Variables?
All Variables will be listed in the Variables tab of the Settings page. You can view and manage all the Variables from this page. On mouseover, a contextual menu to edit and delete the Variables will appear.
2. How to edit a Variable?
You can edit a variable from the Workspace Settings page by following the steps below.
- Open the Workspace Explorer.
- Click Settings and then open the Variables tab.
- Hover the mouse over the Variable you want to edit. A contextual menu will open.
- Click the Edit icon. The Edit Variable dialog will open.
- Make the required modification and click Update. The variable will be modified.
3. How to delete Variables?
You can delete a Variable from the Workspace Settings page by following the steps below.
- Open the Workspace Explorer.
- Click Settings and then open the Variables tab.
- Hover the mouse over the variable you want to delete. A contextual menu will open.
- Click the Delete icon. An Alert message will be shown to confirm the action.
- Click Yes to delete the Variable.


