Elasticsearch
Connect Elasticsearch data with Zoho Analytics securely. Create powerful dashboards to identify trends and extract meaningful insights. Establish a direct connection with the Elasticsearch server or use the Zoho Databridge and schedule import to enable near real-time analysis.
Import Data
Importing data from Elasticsearch server comprises of three steps:
- Configure Connection Details
- Choose Data to Import
- Schedule Data Import
Configure Connection Details
Follow the below steps to establish a connection between the Elasticsearch server and Zoho Analytics.
- Click Import Your Data from the Zoho Analytics home page.
- Choose Elasticsearch from the listed data sources.
- Enter the Workspace Name and Description.
- Specify the URL path.
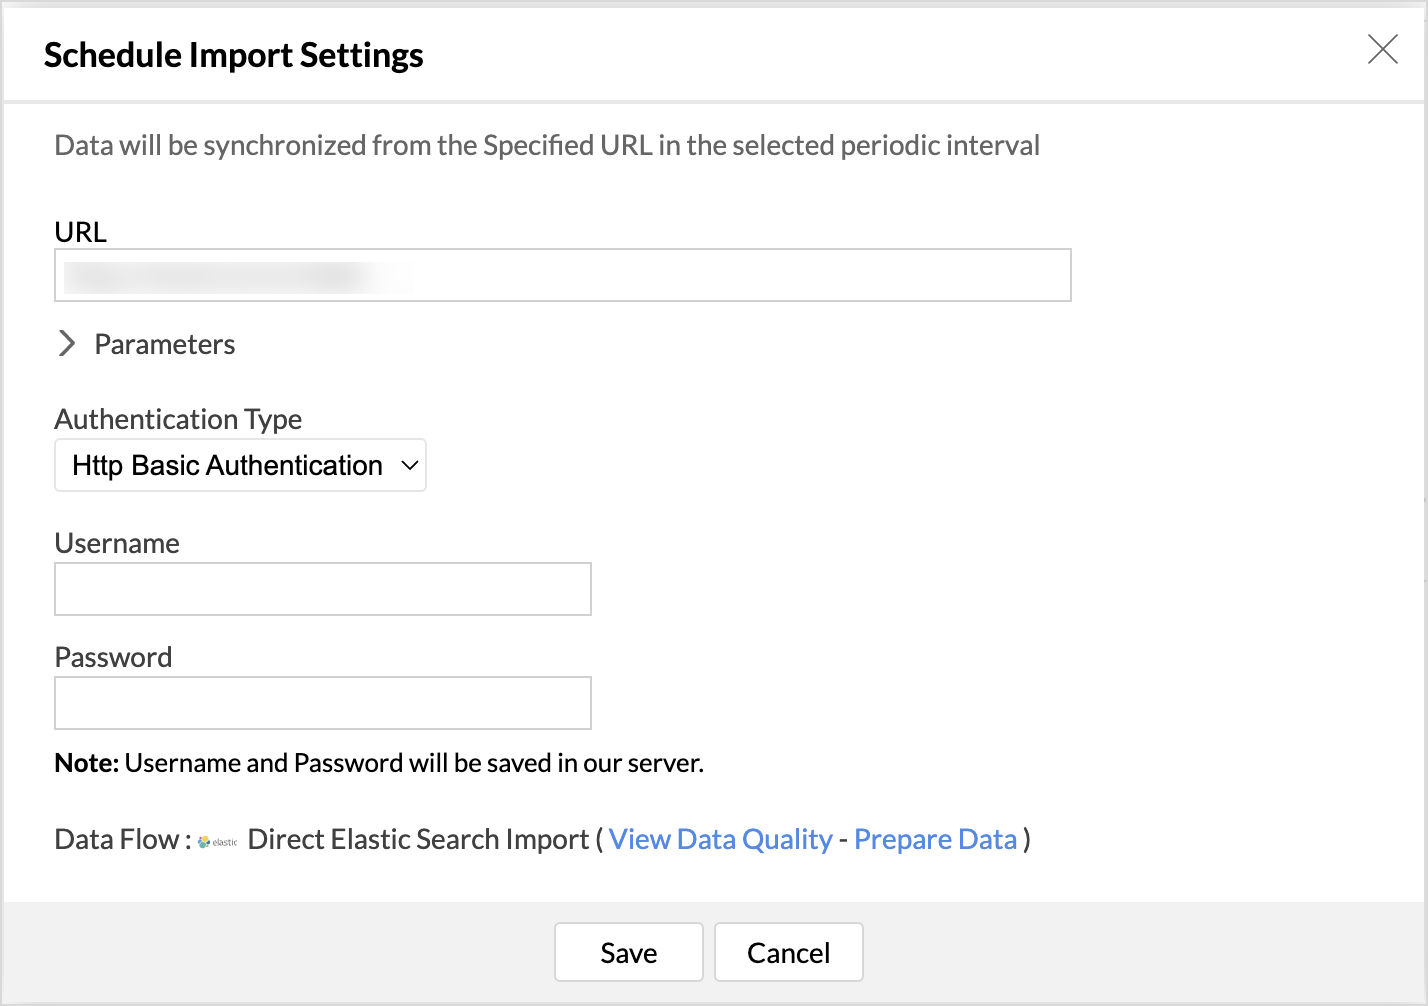
- Choose the Authentication Type.

- Enter the Username and Password.
- Choose How to Connect with the Elasticsearch Server.
- Connect directly to the Elasticsearch Server.
- Connect through agent (Zoho Databridge)
- Click Next.

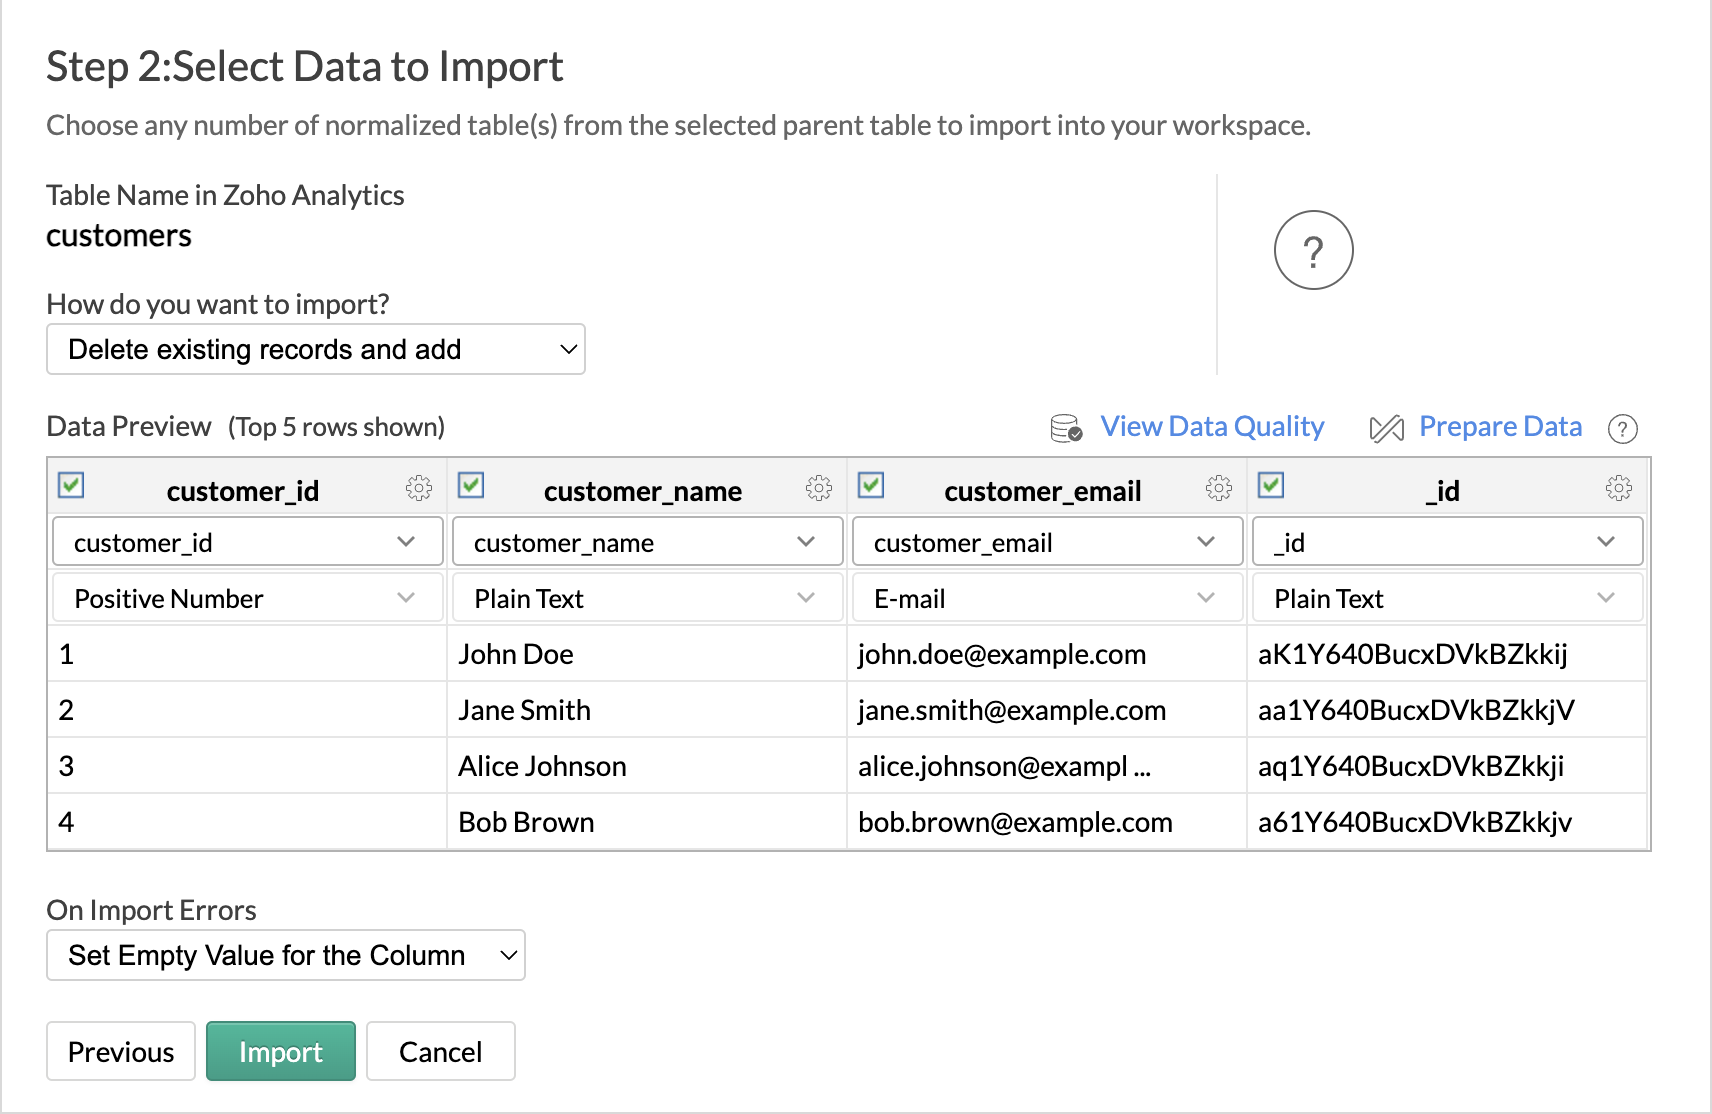
Choose Data to Import
Zoho Analytics provides the following options to import data:
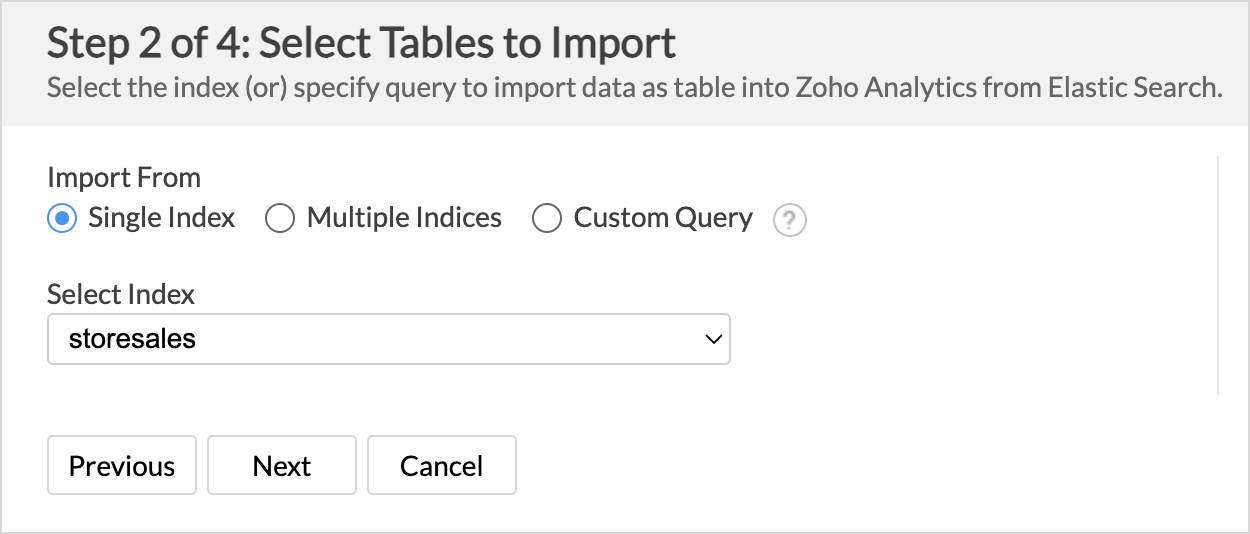
Single Index
- Select Single Index from the Import From section.
- Choose the table to import from the Select Table drop-down menu.
- Click Next to continue.
- The Import Settings and Preview wizard will open.
- Edit the Workspace Name, Table Name, and add a Description if needed.
- The Data Preview section displays the first few records of your data; you can verify the column name and the data type.
- On Import Errors section allows you to specify how to handle error conditions in case they occur while importing data. The following are the possible options:
- Set Empty Value for the Column (default): Sets an empty value to the corresponding column value that had problems while importing.
- Skip Corresponding Rows: Skips the corresponding rows in which an error occurs while importing.
- Don't Import the Data: Aborts the import process if any error occurs during importing.
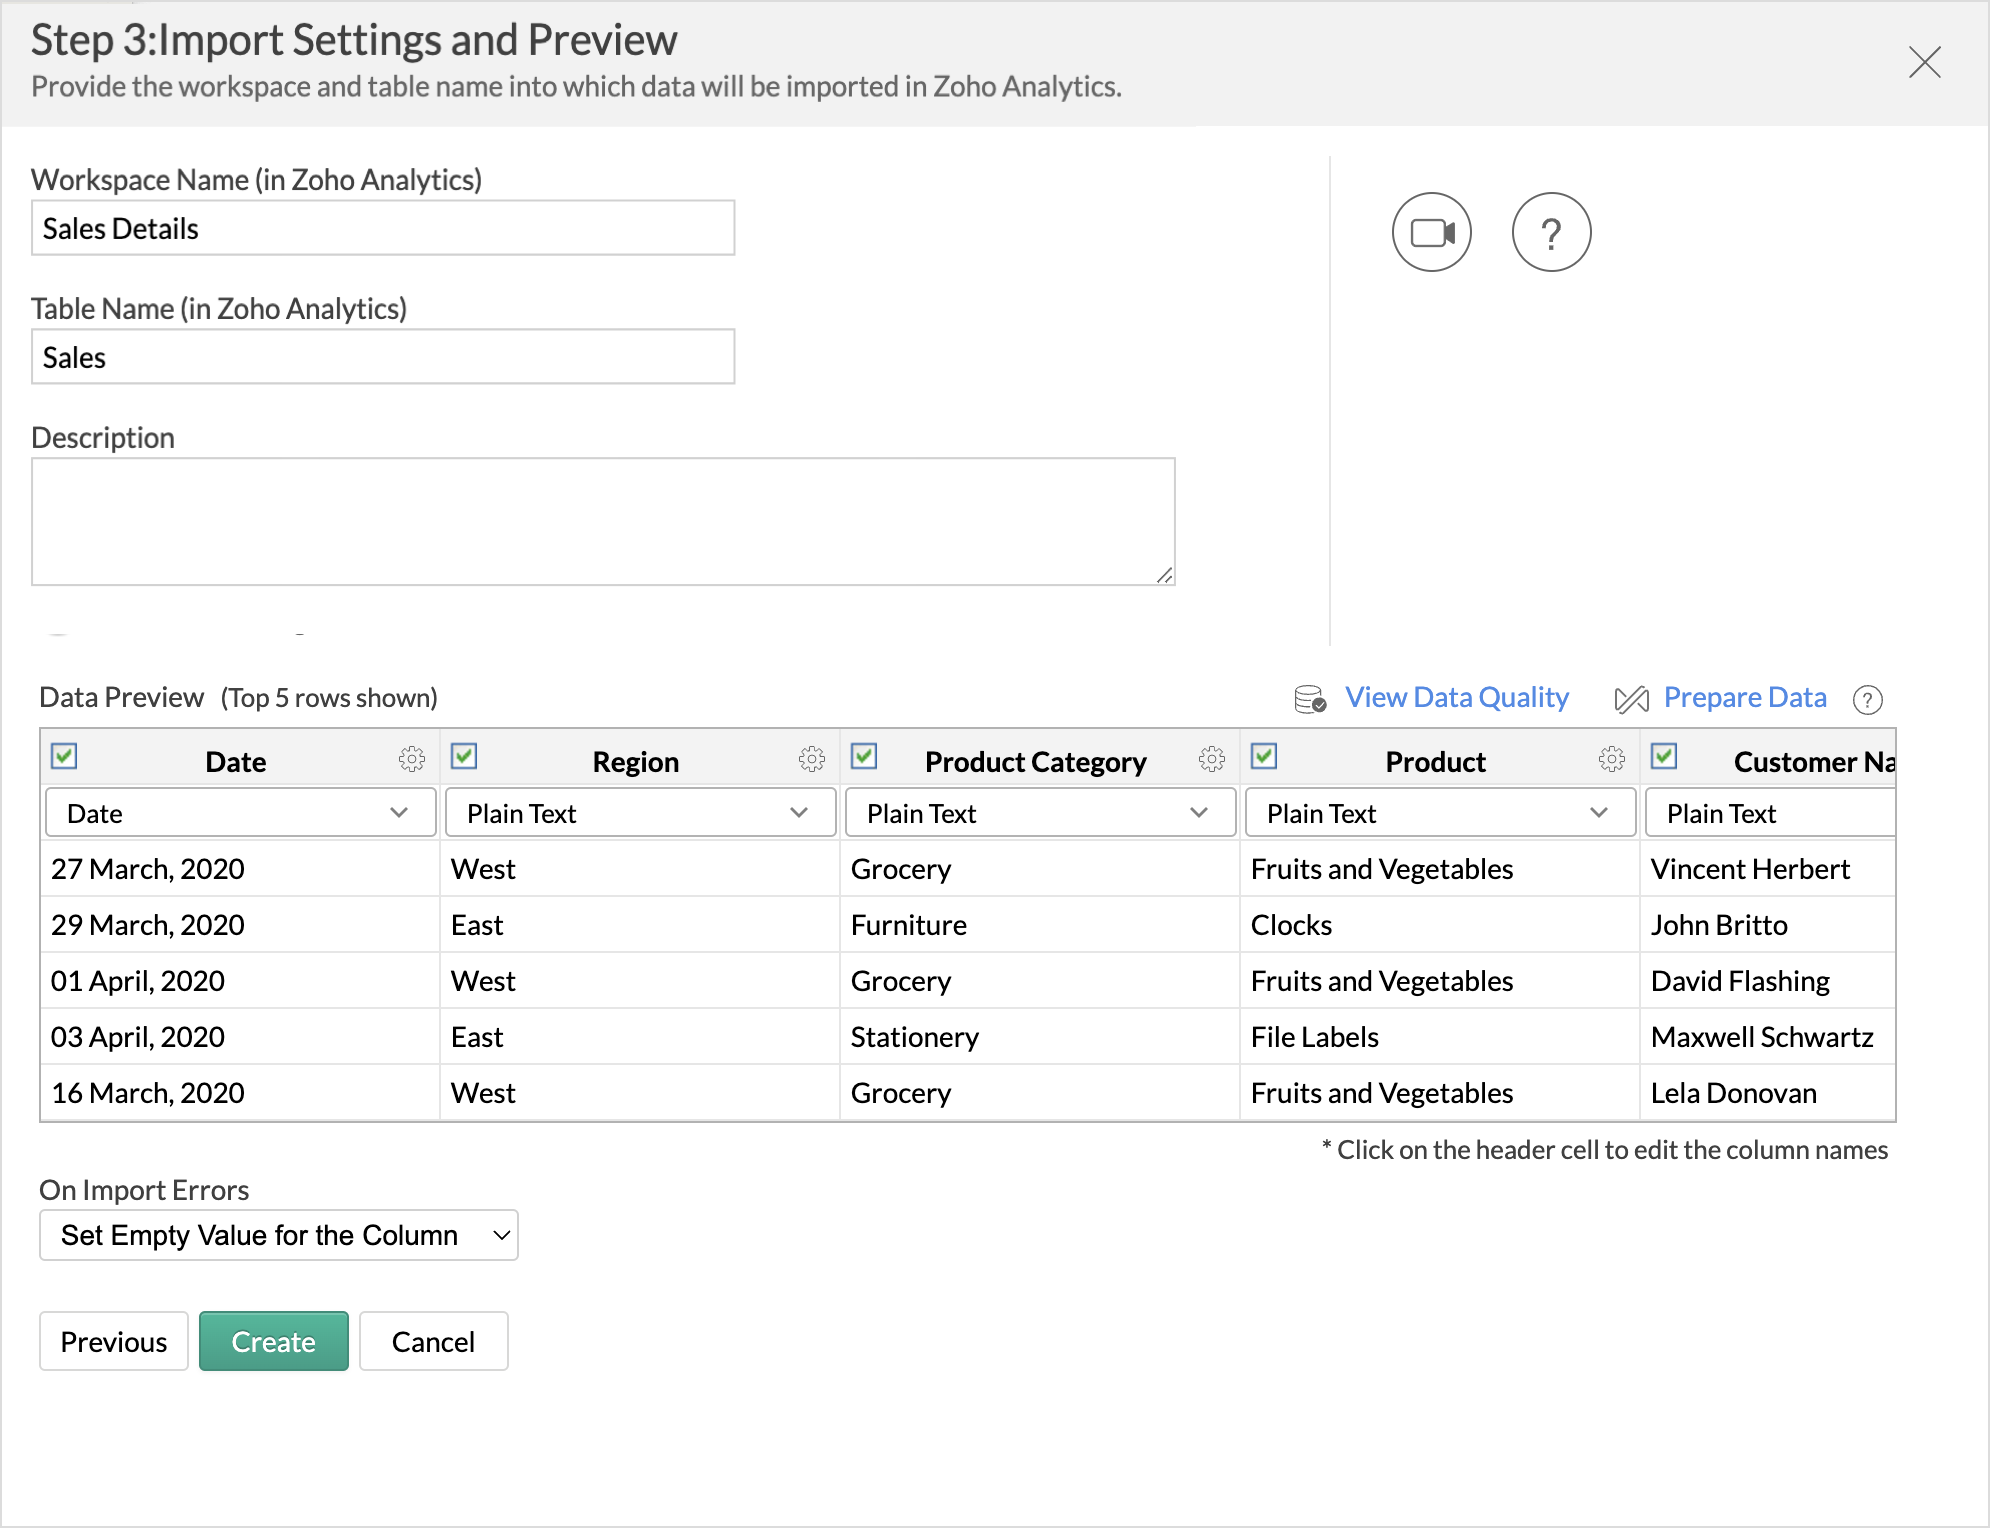
- Click Next. Data import will be initiated, and you can also choose to schedule the import.

Multiple Indices
- Select Multiple Indices from the Import From section.
- Choose the tables to be imported.
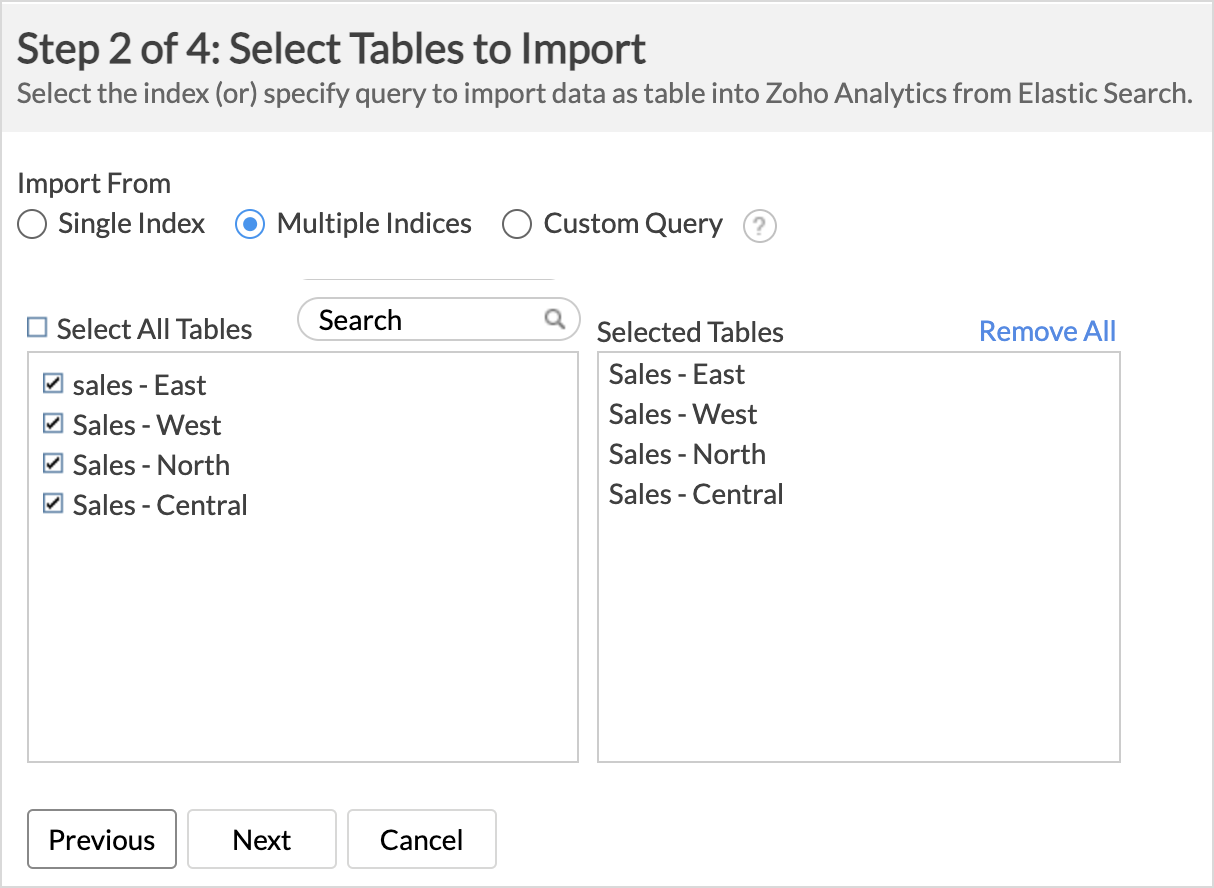
- Click Next to continue.
- In the Import Settings page that opens, specify the Workspace Name that is to be created in Zoho Analytics. You can also provide a Description about the workspace.
- Click the Edit icon that appears on mouse hover to edit the Table Name.
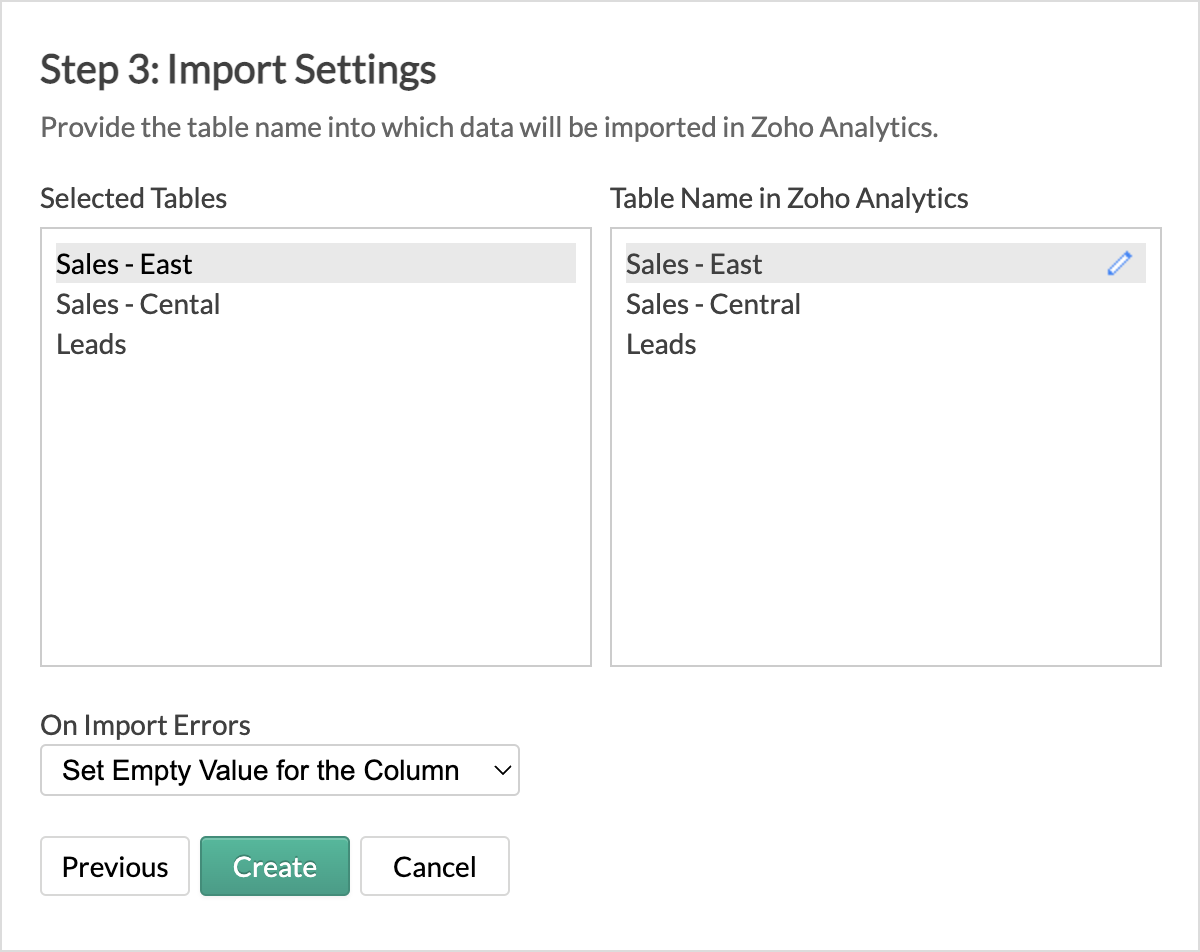
- Specify how to handle errors that occur during import in the On Import Errors section.
- Click Create. Data import will be initiated, and you can also schedule the import.

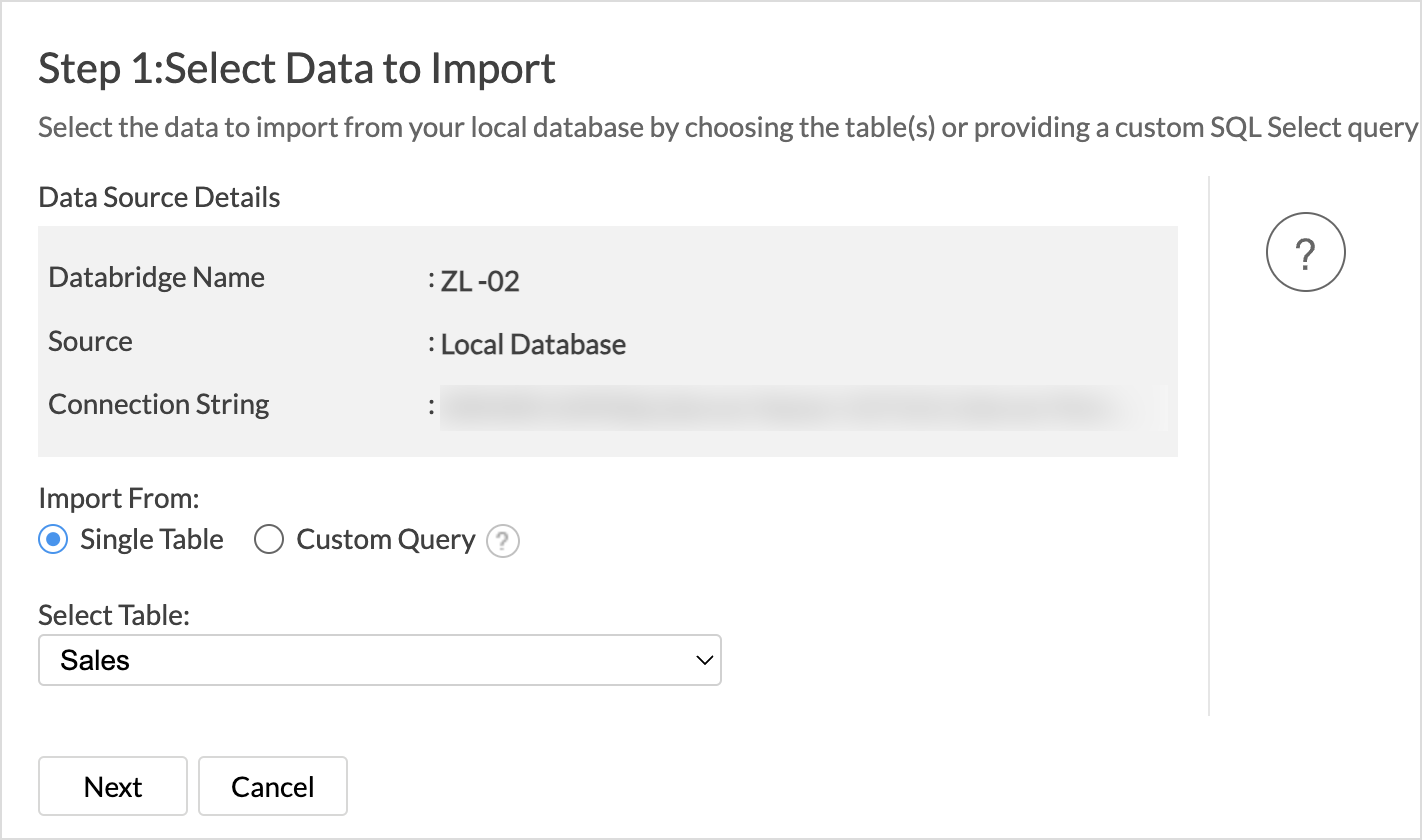
Custom Query
- Select the Custom Query option and provide the SQL SELECT query in the given text area.
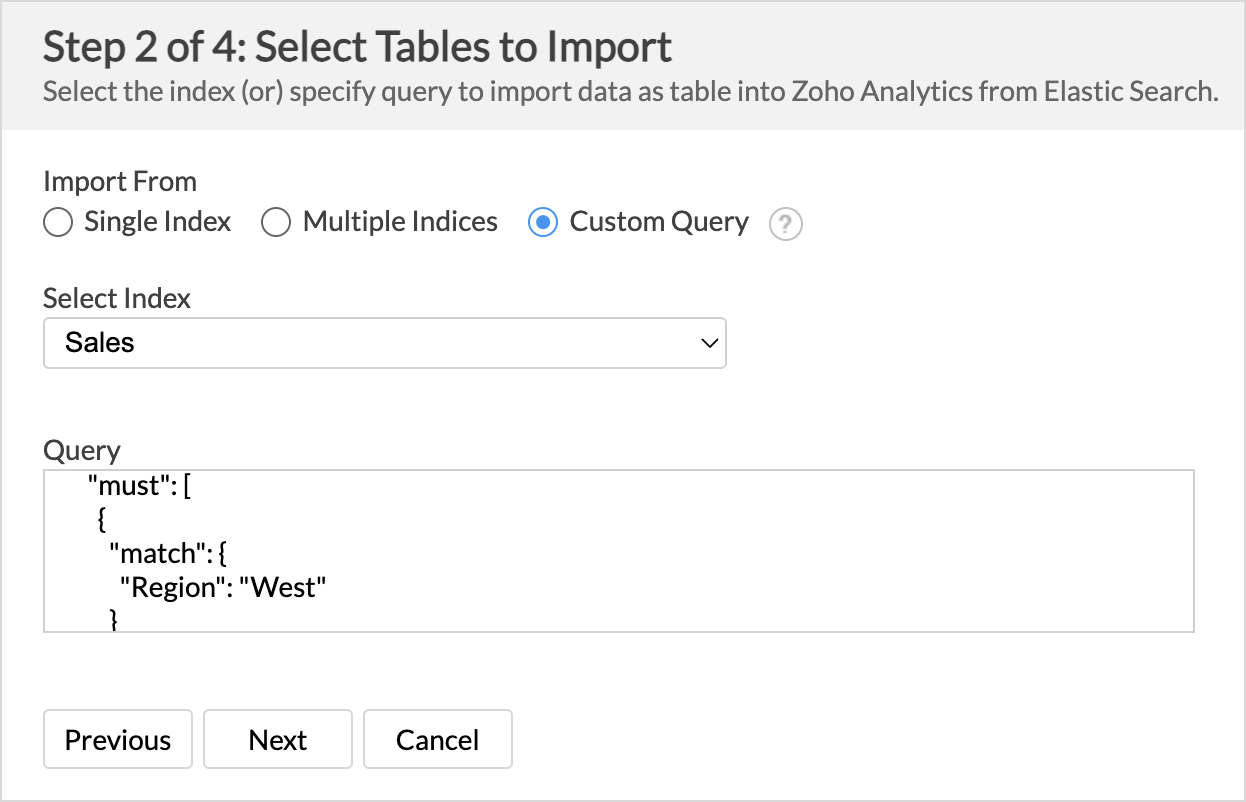
- Click Next to continue. The successive steps are similar to importing data from a single table.

Schedule Import
Zoho Analytics offers flexible sync schedules to ensure that the data is always up-to-date for effective analysis. It also allows you to configure which data should be fetched in each schedule.
- Select the period in which the data sync should happen from the Repeat drop-down menu.
- Choose how the records should be imported.
- Add records at the end: Appends the records to the end of the table
- Delete existing records and add: Deletes entire records in the table and adds the new records.
- Add records and replace if already exists: Updates the existing records in the table with the new values and appends the new records at the end of the table.
- Add new, replace existing, and delete missing records: Updates the existing records with the new values, appends new records to the end of the table, and deletes records that are not available in the source but present only in the Zoho Analytics table.
- Select Include new columns added in your cloud database automatically into Zoho Analytics table(s) to import data from newly created columns in the subsequent imports.

- Click Create. Import will be initiated.

Note: The initial fetch might take a few minutes depending on the volume of the data to be imported. An email and an in-app notification will be sent once the initial fetch is complete.
Edit Data Source Settings
Zoho Analytics allows you to modify the connection details if required. Users with administrator privileges can view and edit the connection settings.
To modify the connection settings,
- Access the Data Sources tab from the side navigation panel. All the data sources in that workspace will be listed.
- Click Edit Setup to modify or re-authenticate the connection details and then click Save.
- Click Sync Settings to make changes to the intervals in which the data is imported and then click Save.

- Sync now enables you to import the recent changes made to the data source without having to wait till the next data sync schedule.


Resolving Sync Failures
Data synchronization can fail if the credential provided is invalid or expired, or if the data type mismatches. Zoho Analytics sends an email to the workspace admin and also sends an in-app notification with the reason for failure along with the necessary action to be taken to resolve the issue. Access the Data Sources tab to resolve sync failure. Refer to the Edit Setup section for more details.
Data Blending
Combine data from various data sources, such as Files, Feeds, Cloud storage, Databases, and Business applications, for in-depth analysis. While importing data in an existing workspace, Zoho Analytics auto identifies columns of the same data type and provides suggestions for lookup. With Query Tables, you can combine data from different tables in the workspace.
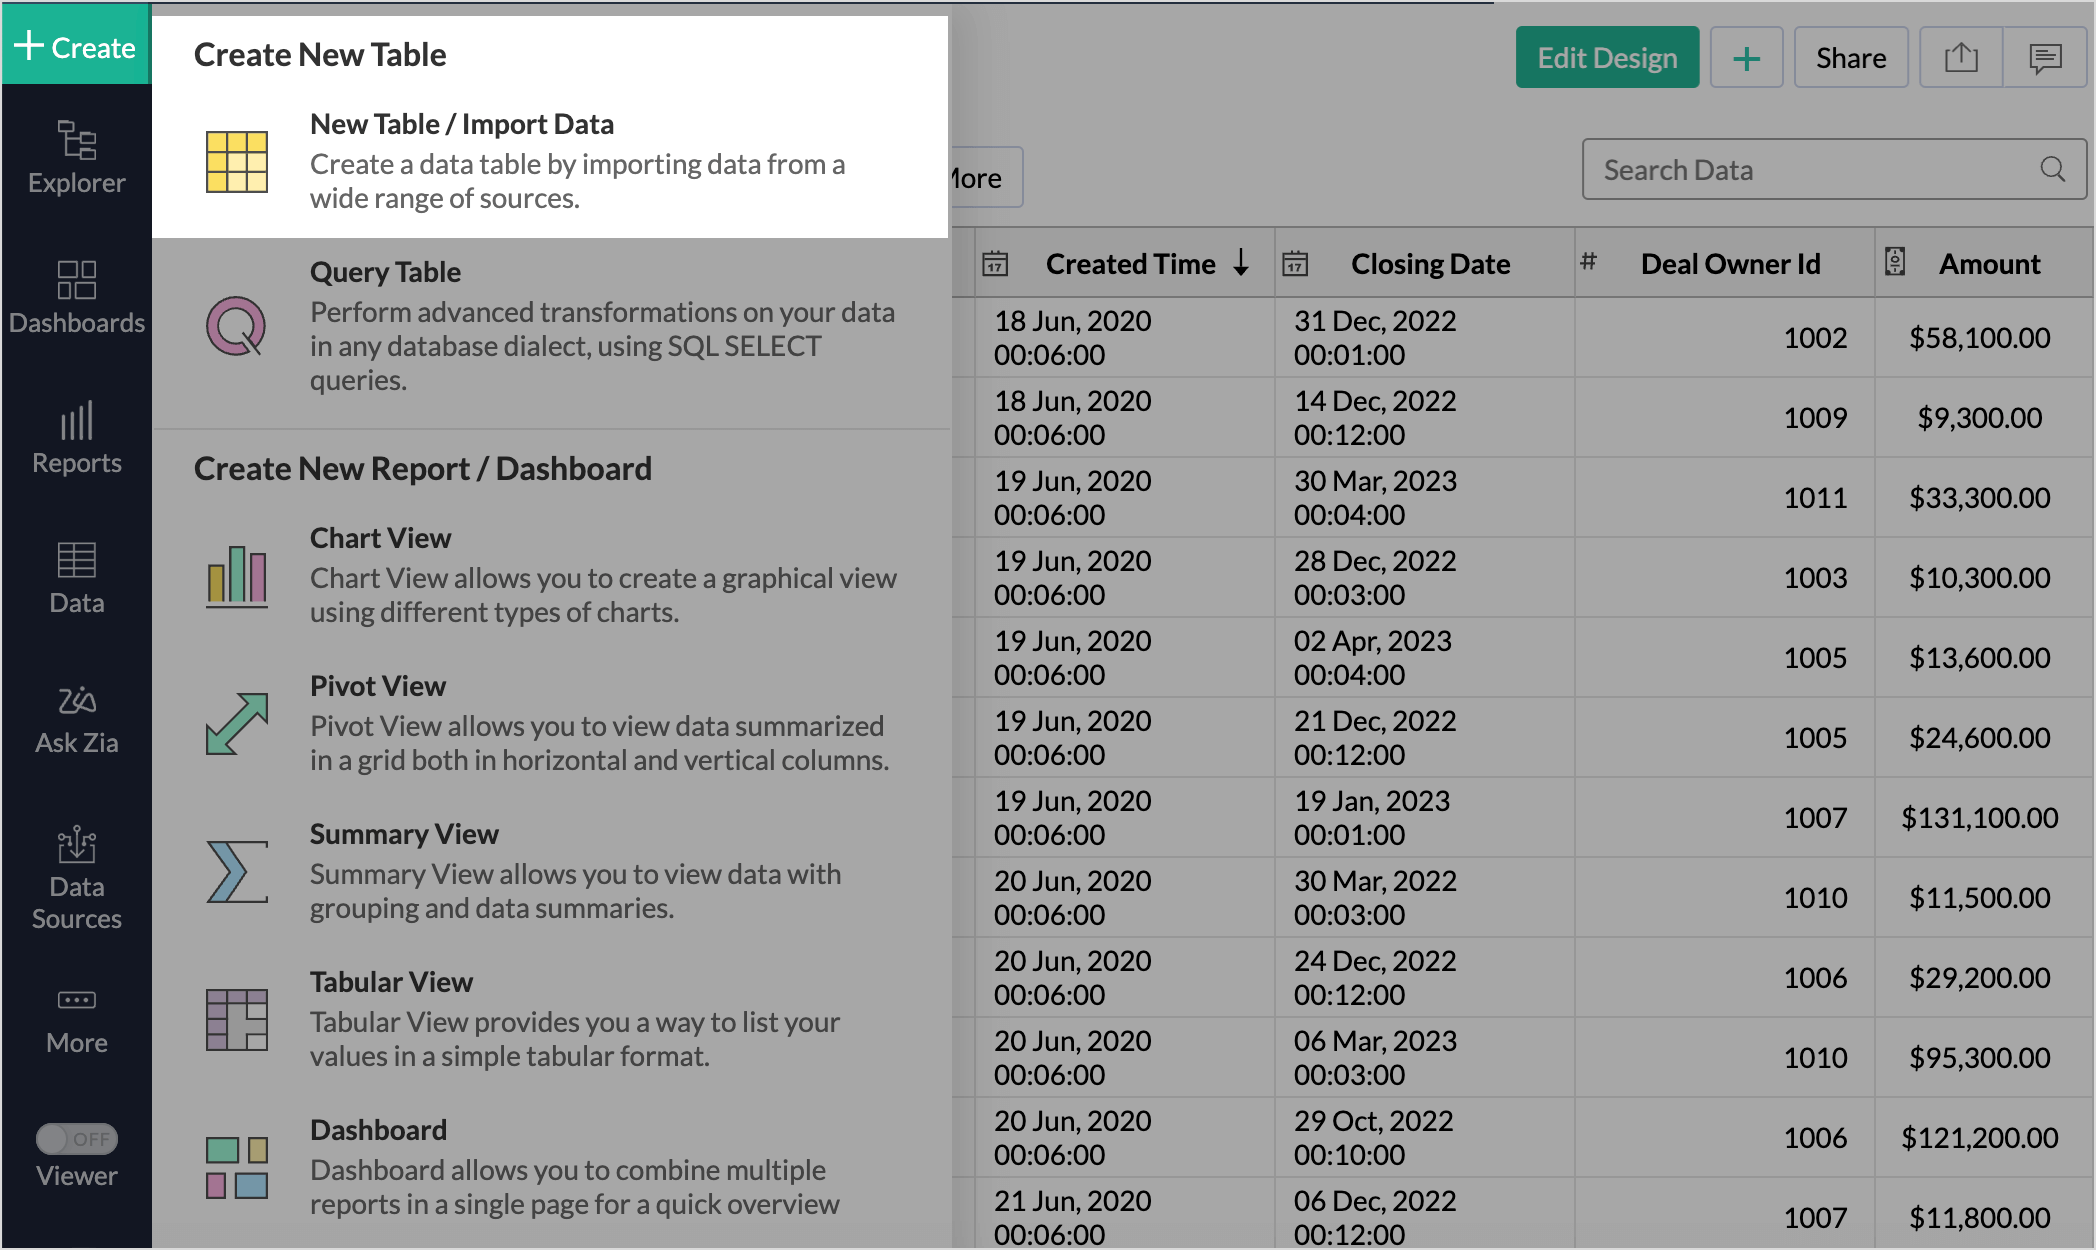
Import data into an existing workspace
- Click Create icon on the side navigation panel and choose New Table/Import Data from the drop-down menu.
- Successive steps are similar to the steps mentioned in the Import Data section.

Import Data into an existing table
- Click Import > Import data into this table.

- Choose the data source and the table you wish to import.
- Choose How you want to import the data into the existing table and select how to handle import errors.
- Click Import.


