Workato Integration with Zoho Calendar
Workato is a cloud-based platform that helps you automate business workflows across the cloud and on-premises apps. Workato platform has a powerful feature set to handle real-world problems, including the integration of applications and data.
Note:
Workato integration with Zoho Calendar is available only for users who have subscribed to one of our Zoho Mail paid plans.
Recipes
Workato recipes are set of instructions that automates complex workflows. Every recipe can be a REST endpoint that can be called from other recipes or apps.
Triggers
Triggers are conditions that prompt an action to happen automatically. They can be scheduled, move records in batches, and read from on-prem files. The supported triggers are:
- Event Created - Triggers when an event is created.
- Event Deleted - Triggers when an event is deleted.
- Event Updated - Triggers when an event is updated.
Actions
Actions perform certain operations in your target app, such as create, update, or search actions on records. Each action requires a specific input field and returns an output data. The supported actions are:
- Create an event - Creates an event in the specified calendar.
- Delete an event - Deletes an event from the specified calendar.
- Quick add an event - Creates an event from a piece of text.
- Update an event - Updates an event in the specified calendar.
Setting up Workato Integration
Setting up Workato integration with Zoho Calendar involves the below mentioned steps in the Workato environment:
Create a Project
To create a Project in Workato, below mentioned steps are followed:
- Log in to your Workato account.
- In the home page, select Projects from the left pane.
- Click Create project from the top right corner.
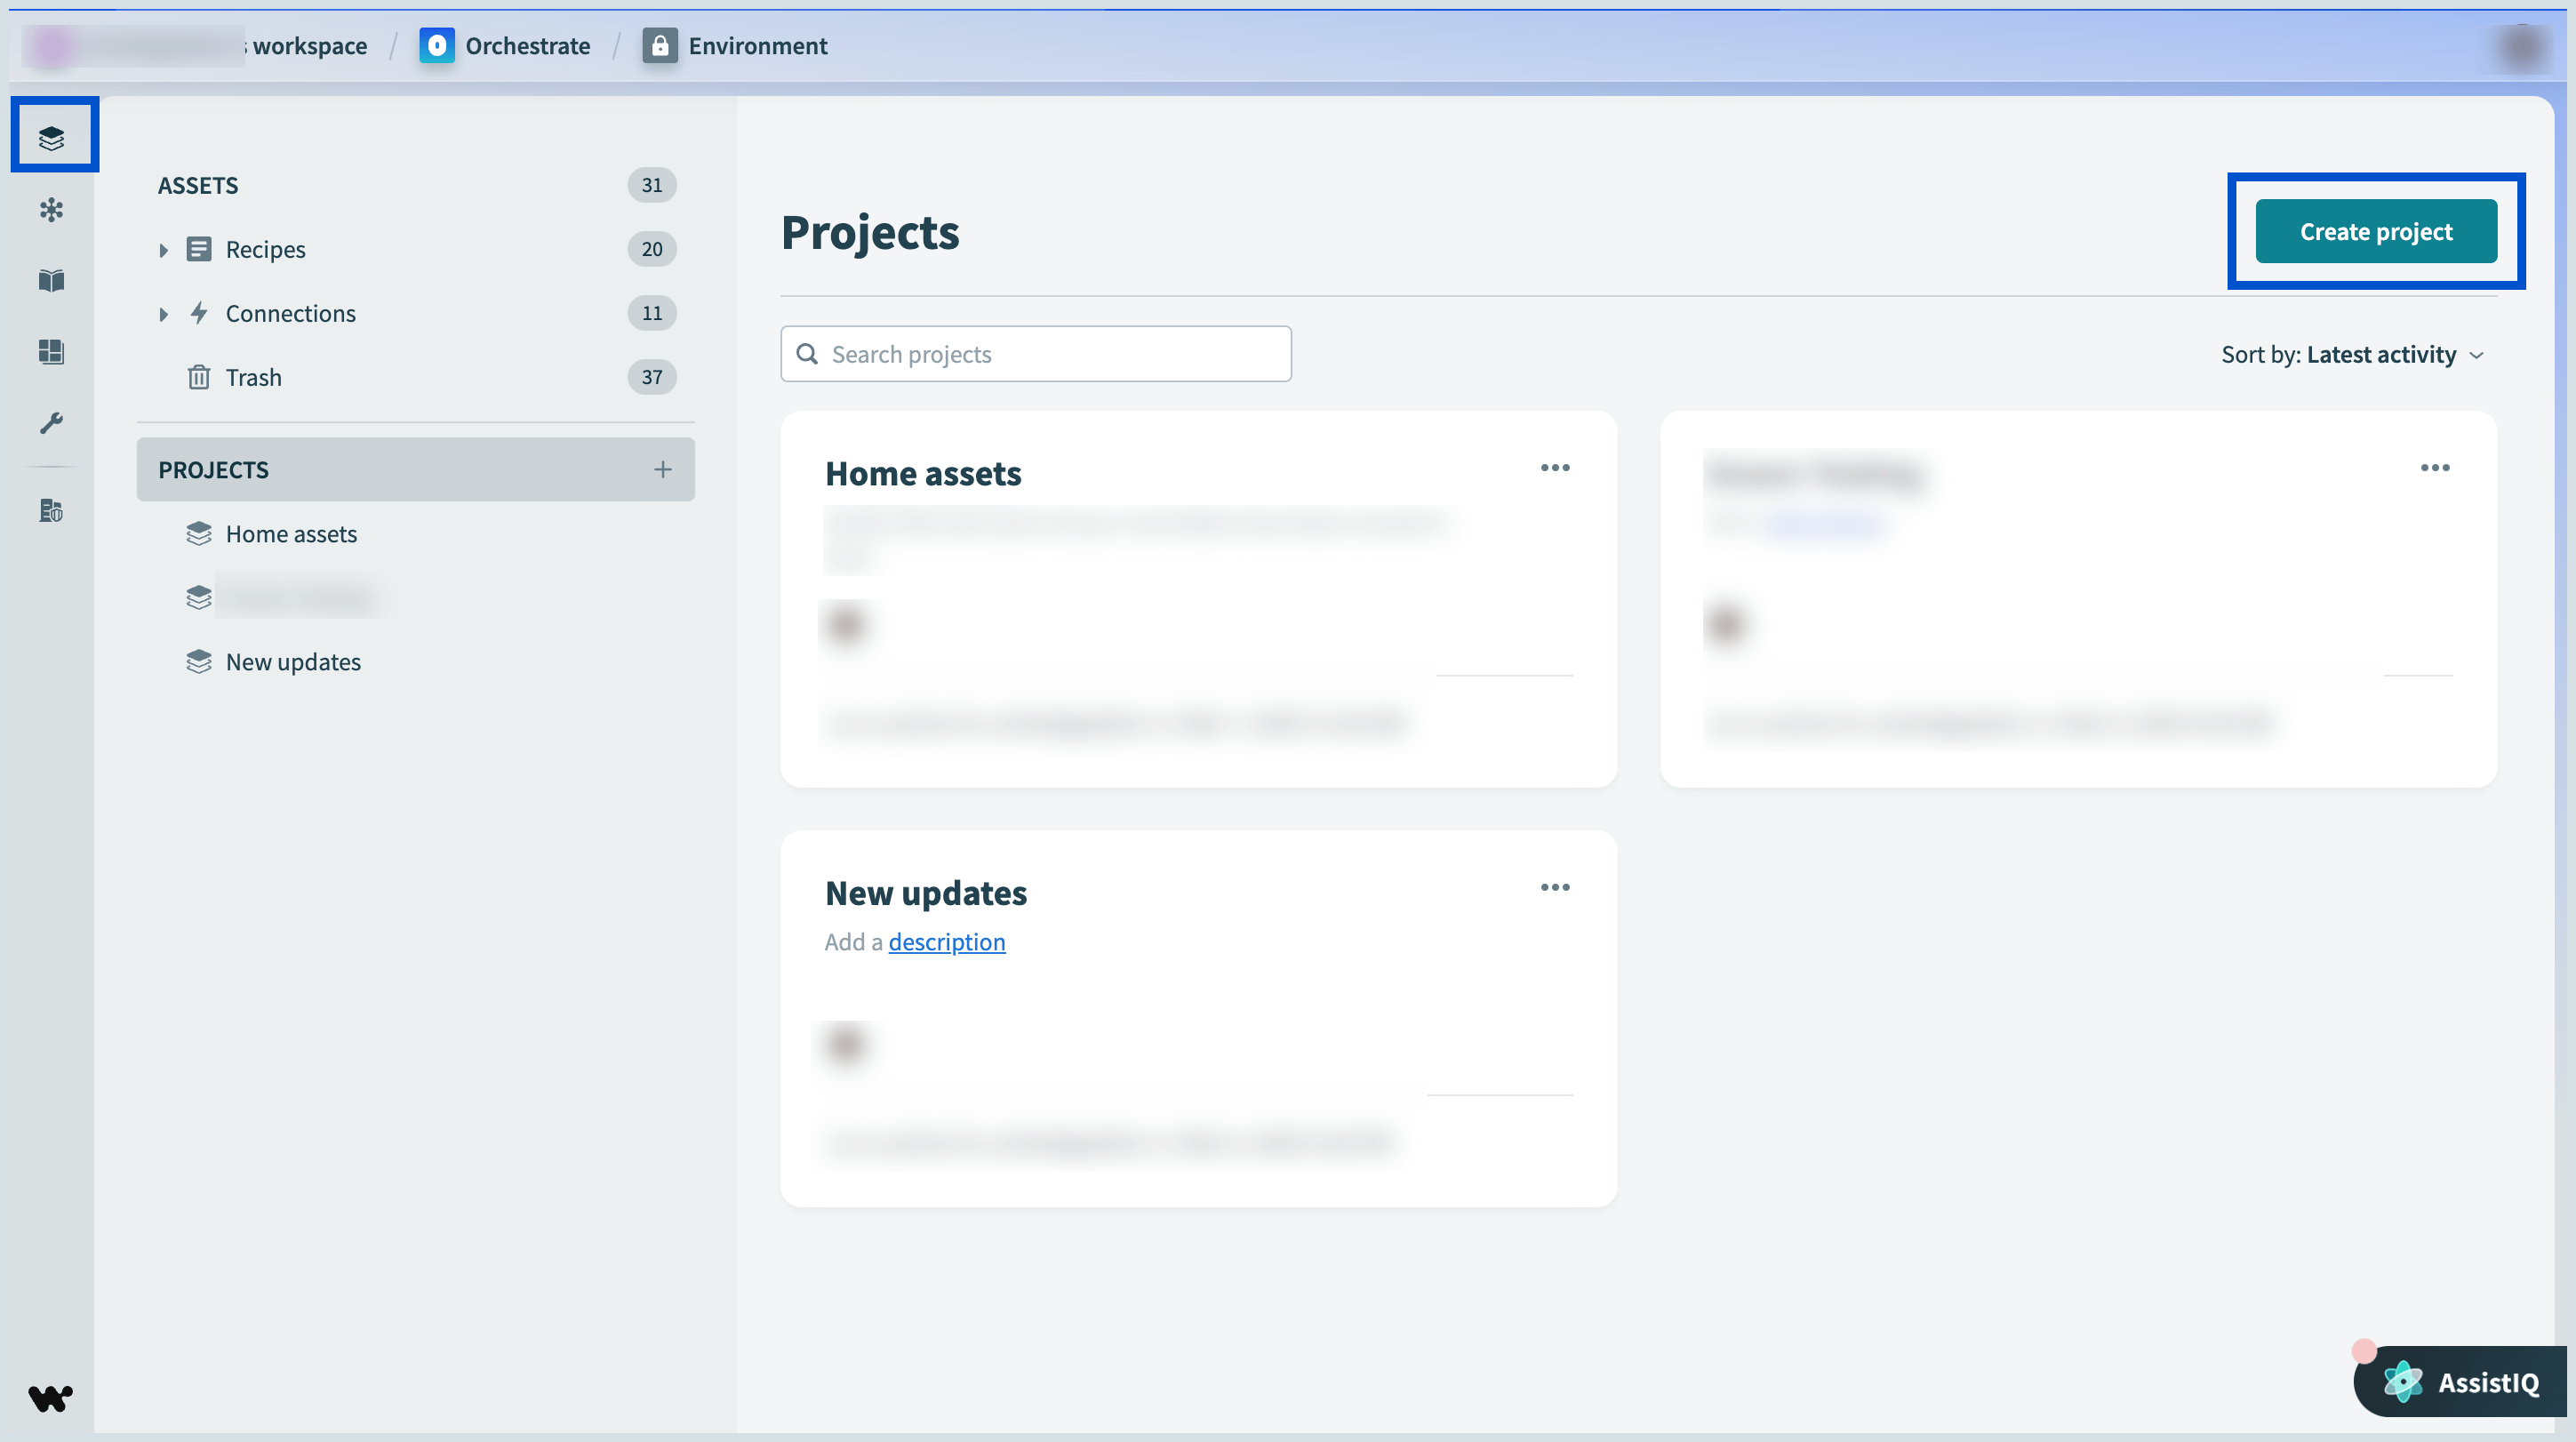
- Fill in the Project name and Project description field under the Set up a new project window and click Create project.

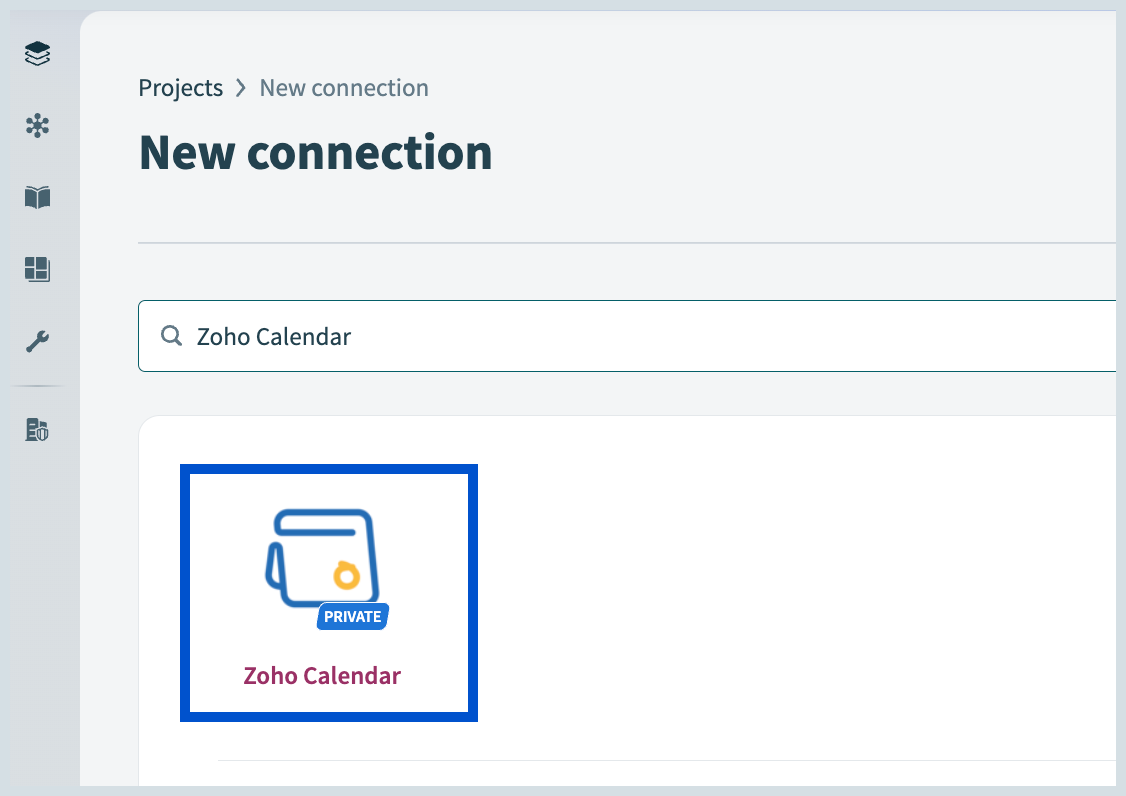
Create a Connection
- Once the project is created, click CREATE on the top right corner of the Workato home page and select Connection from the drop-down.
- In the New connection window, navigate to find and click Zoho Calendar. Alternatively, you can use the search bar to select Zoho Calendar from the list of apps provided.
- In the Connect to Zoho Calendar page, fill in the required details as explained below.
- Name your connection with Zoho Calendar in the Connection name field. You can reuse the same connection for other recipes.
- Select the project location where you want this connection to be saved under the Location field.
- Select the domain in which your connection has to be made. You can select across the available domains specified in the drop-down.
- Client ID and Client Secret - To find your client ID and Client Secret, follow the steps mentioned in the API Console.
- Click Connect to make the connection established.
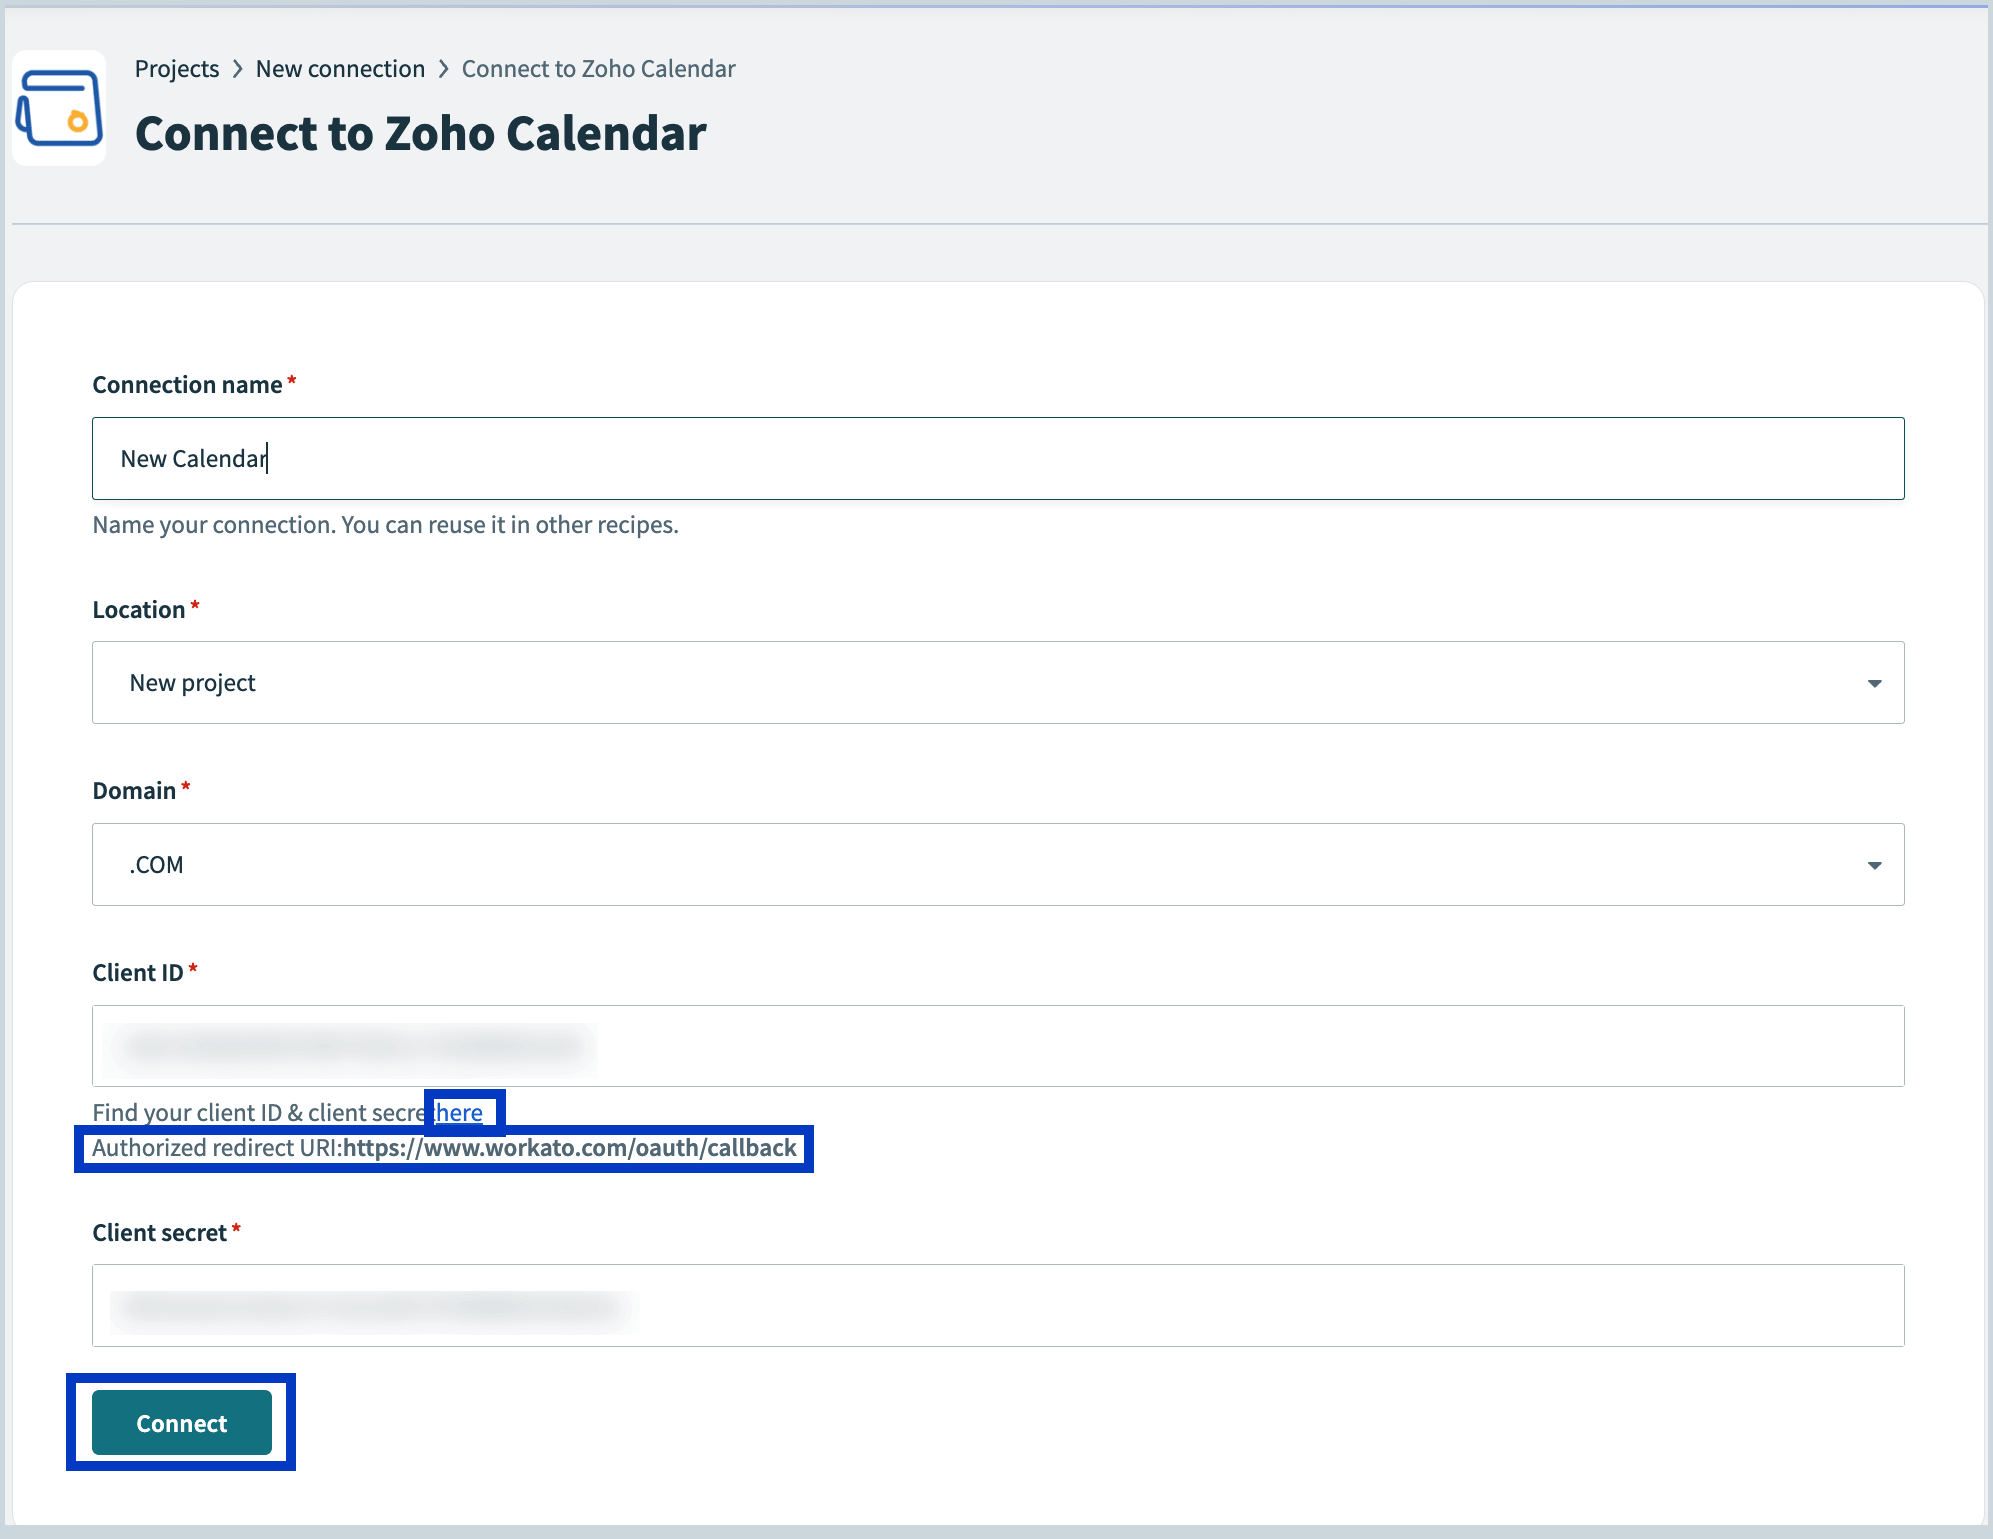


Note:
The Authorized redirect URI mentioned in the Connect to Zoho Calendar page should be given in the API Console while generating your client ID and client secret.
Create a Recipe for the Connection
Now that the connection is made between Workato and Zoho Calendar, the next step is to create a recipe with Triggers and Actions. The steps include:
- From the left pane of Workato's home page, select your project under the list of Projects displayed.
- On the top right corner, click Create and select Recipe from the drop-down.
- In the Set up your recipe page, fill in the required fields.
- Under Pick a starting point, select Trigger from an app (which is the default selection) and click Start building.
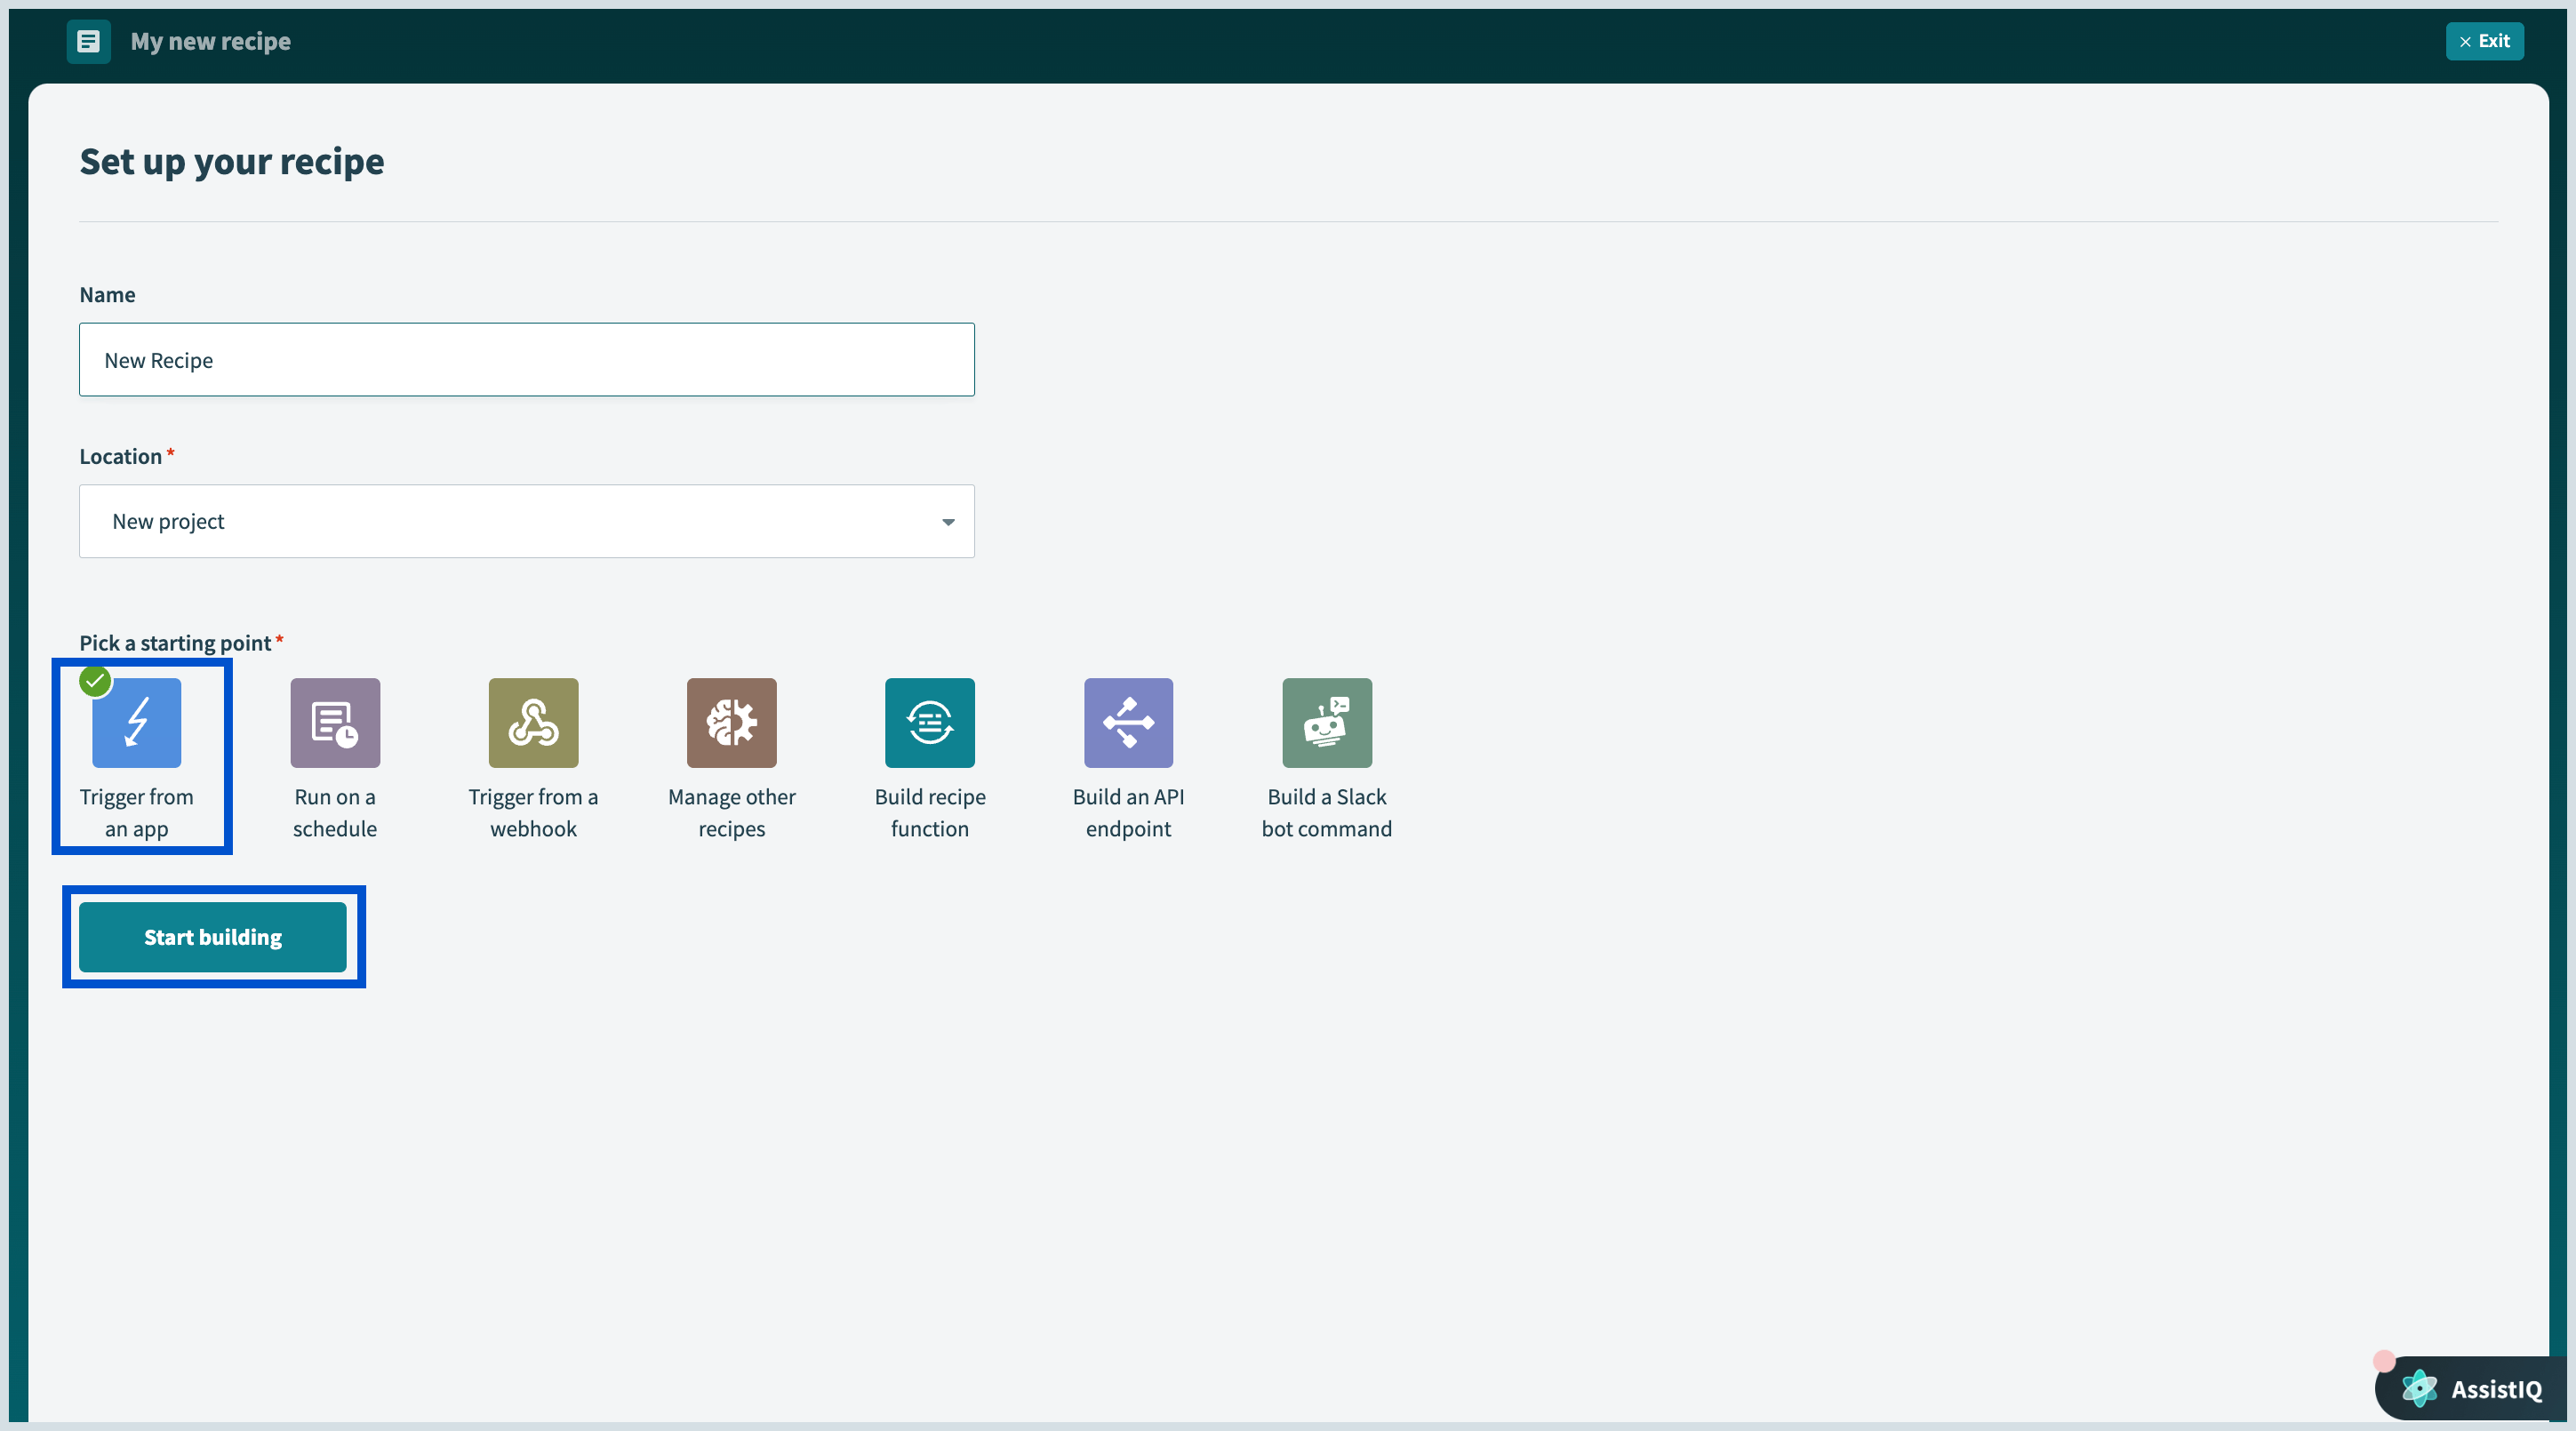

Follow the below mentioned flow to finish the recipe setup.
Build a Trigger
- App - Select Zoho Calendar from the Choose an app option on the right pane of the recipe page.
- Trigger - Select any one of the three events listed under the Choose a trigger tab.
- Connection - Select the connection name that you have given under the Connect to Zoho Calendar page.
- Setup - Enable the Set trigger condition toggle button ON to specify conditions on which the trigger should happen. Select the Trigger data, Condition, and Value to set up a trigger condition when the event occurs.
Build an Action
Under Actions, click the icon and select Action in app option.
- App - Select Zoho Calendar from the Choose an app option on the right pane of the recipe page.
- Action - Select any one of the four actions listed under the Choose an action tab.
- Connection - By default, the connection made for trigger is applied and the flow moves to the Setup tab.
- Setup - Fill in the Calendar account, Title, Start time, and End time and click Save on the top bar.
The recipe created is now successfully saved.
Test Recipe
You can test the recipe you have created by selecting the Test recipe on the right corner of the top bar. On receiving a trigger event that you have created, the recipe will be executed based on the conditions mentioned.
Steps in API Console
Go to the API console from the link provided in the " Find your client ID & Client secret here" option. Follow the below steps to generate client ID and client secret:
- From the client types listed, select Server-based Applications.
- On the Create New Client page, fill in your custom Client Name. For example, the Client Name can be "Connection", "Project", or any custom name.
- Next, fill in the home page URL from where the connection has to be made.
- Enter the Authorized Redirect URIs field. This value is provided below the Client ID field in the connections page.
- Click CREATE in the API Console.
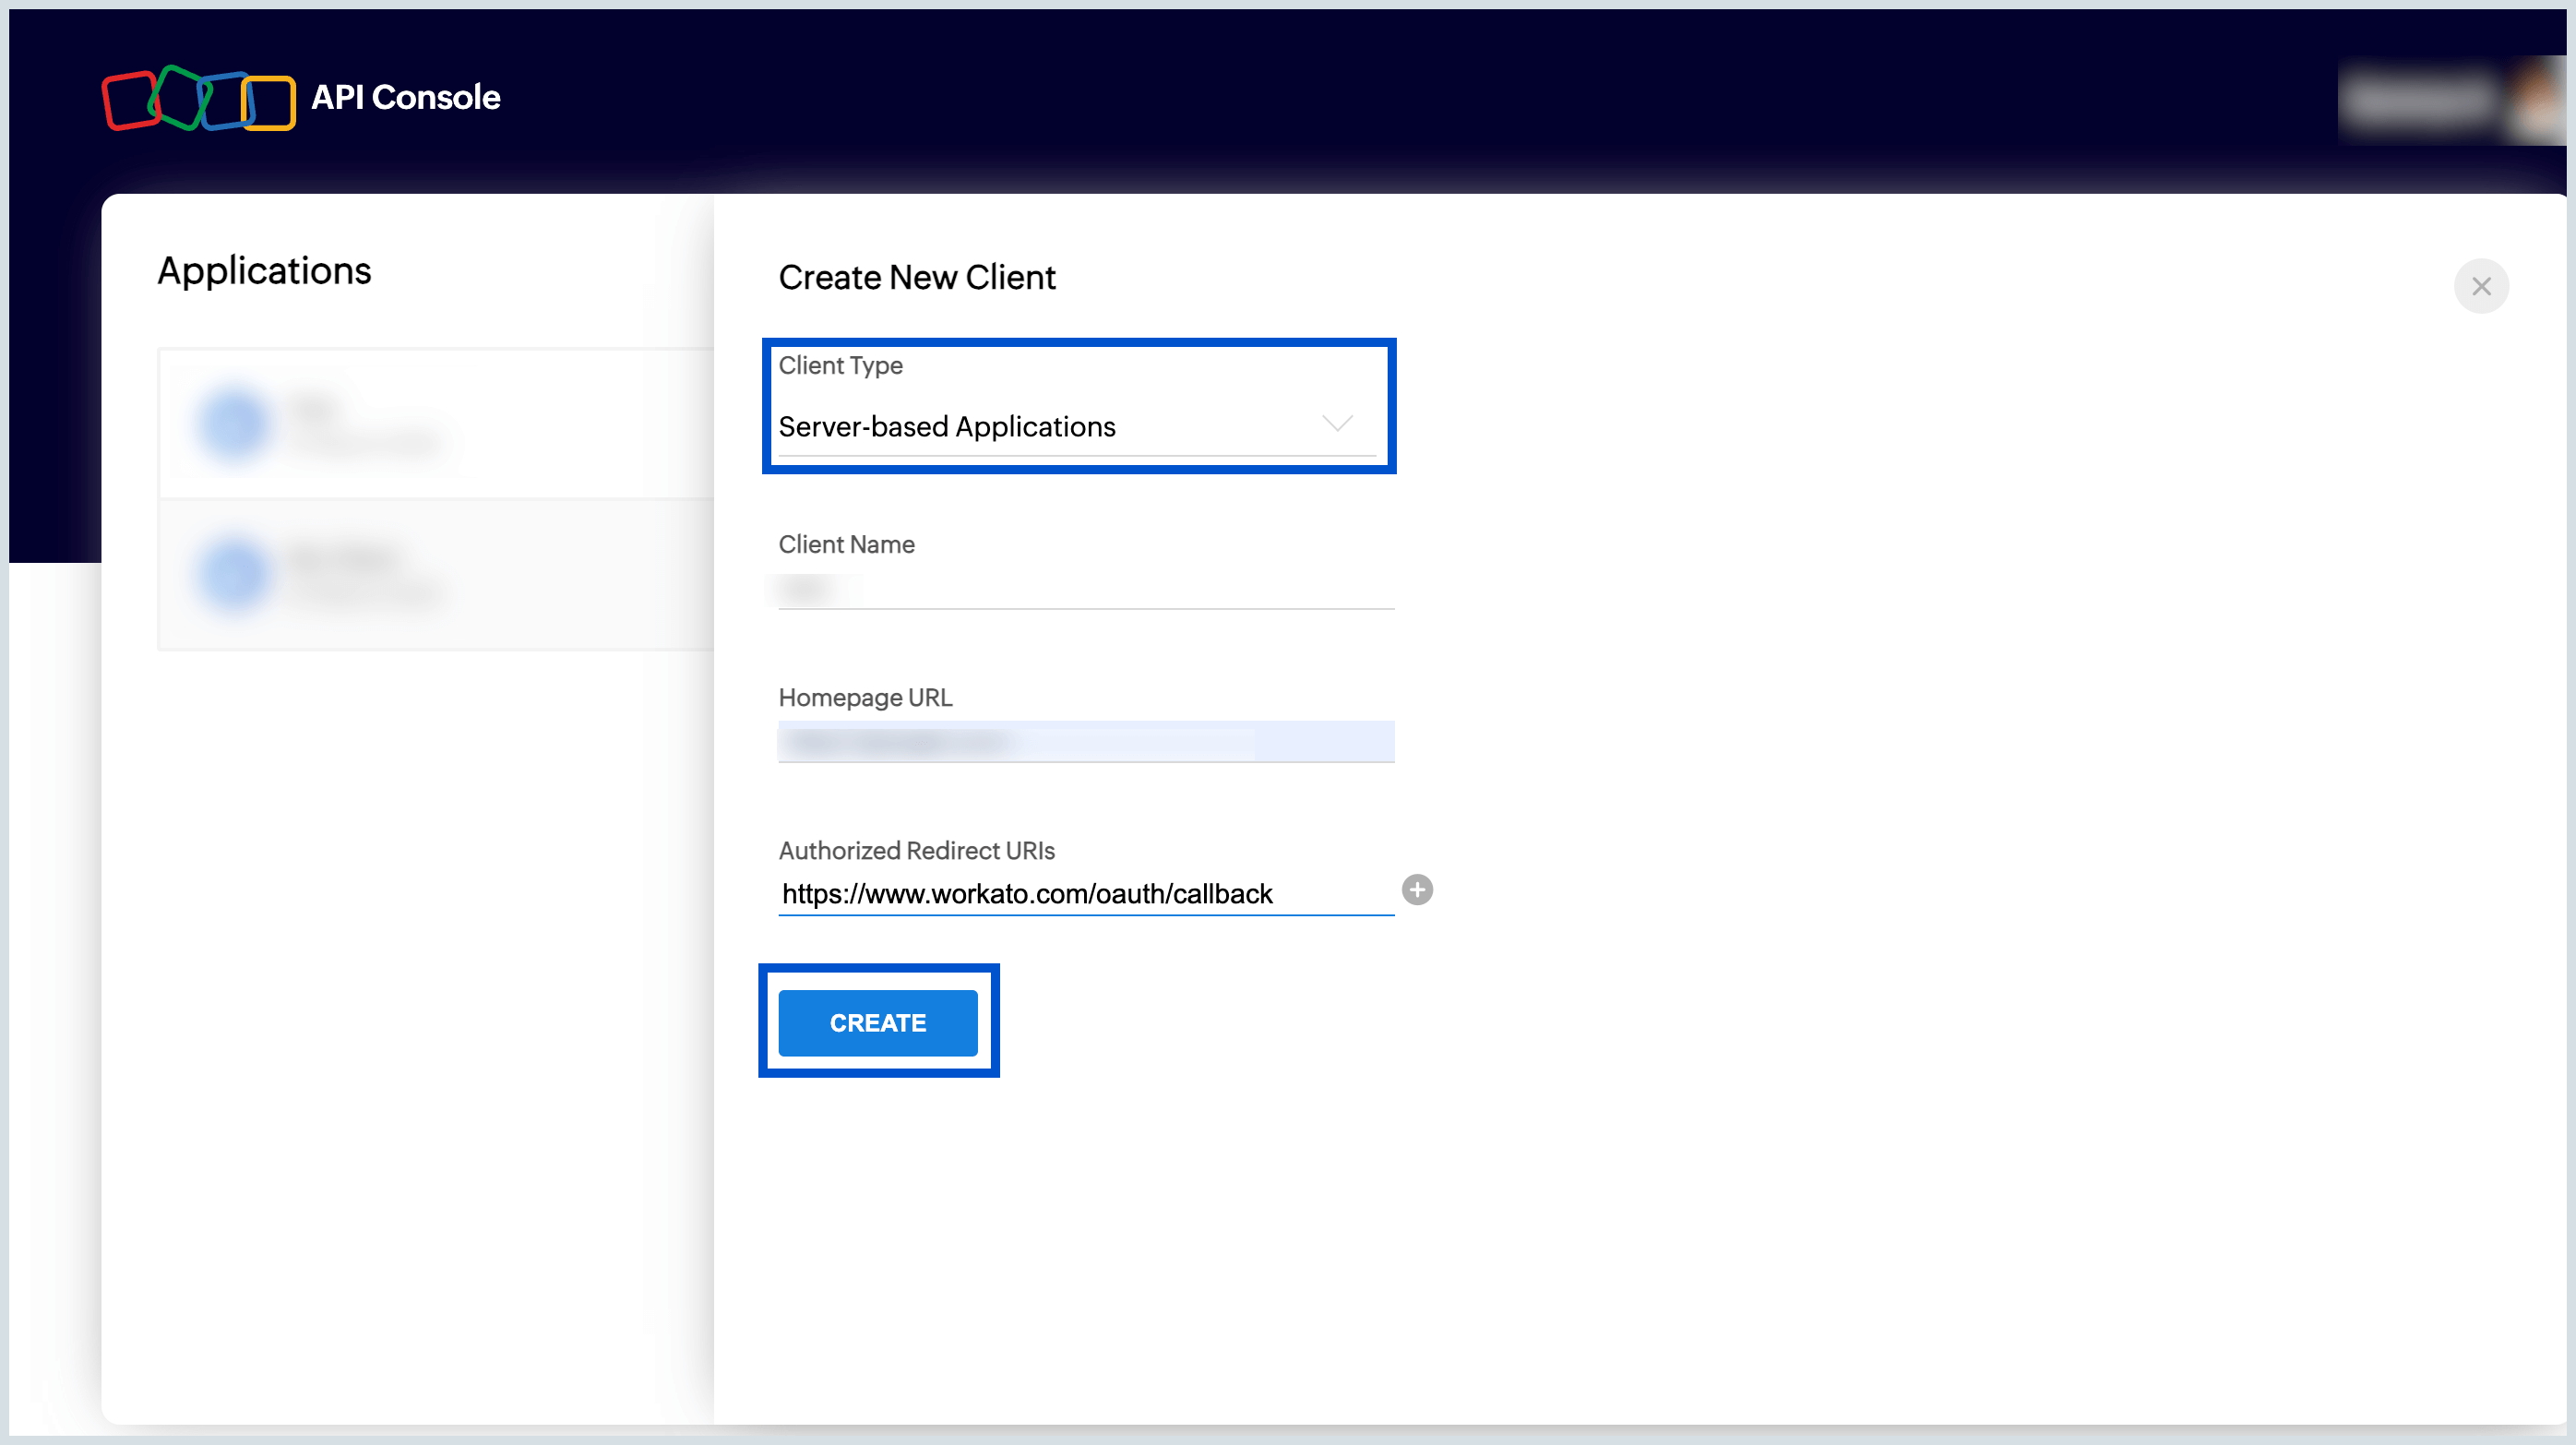

Your client ID and client secret are now generated. Scroll back to Create a Connection step.
Explore DC Settings in the API Console given below.
Settings in API Console
Once the Client ID and Client Secret are generated, navigate to the Settings tab in the API console. Check the option "Use the same OAuth credentials for all data centers" to enable Multi-DC settings.
However, you can choose to select particular DCs by enabling the toggle button .
Note:
When a particular DC is selected, the SHOW CODE button is enabled to generate a unique Client Secret exclusive to that DC alone.