Manage Room Booking
Room booking feature in Resource booking allows the members of an organization to find appropriate rooms and make a booking. All the members present in a single organization will be able to view the availability status of all the rooms in the organization. You can add or modify bookings as per your requirements and create these bookings as events on Zoho Calendar.
Add Booking
If you want to book a room using your resource booking application, you can do it in two different ways.
Quick Add
Quick add lets you create a booking in resource booking in just a single click and drag. Select the location of your room from the left pane of Resources. Once you have selected the location, all the rooms in the particular location will be listed. Check the availability of the room for the date you want to book and make your booking in one click.
Steps to create a booking using Quick Add
- Login to Zoho Calendar and navigate to Resources.
- Rooms available in your Default location will be visible. You can also select the Location from the list of locations displayed on the left pane of the Resources window.
- To check the availability of the room for the required date and time, navigate using the date picker from the top-center of the window.

- Once the date is selected, locate the time for which you want to book the room, click and drag the mouse from the start time to end time.
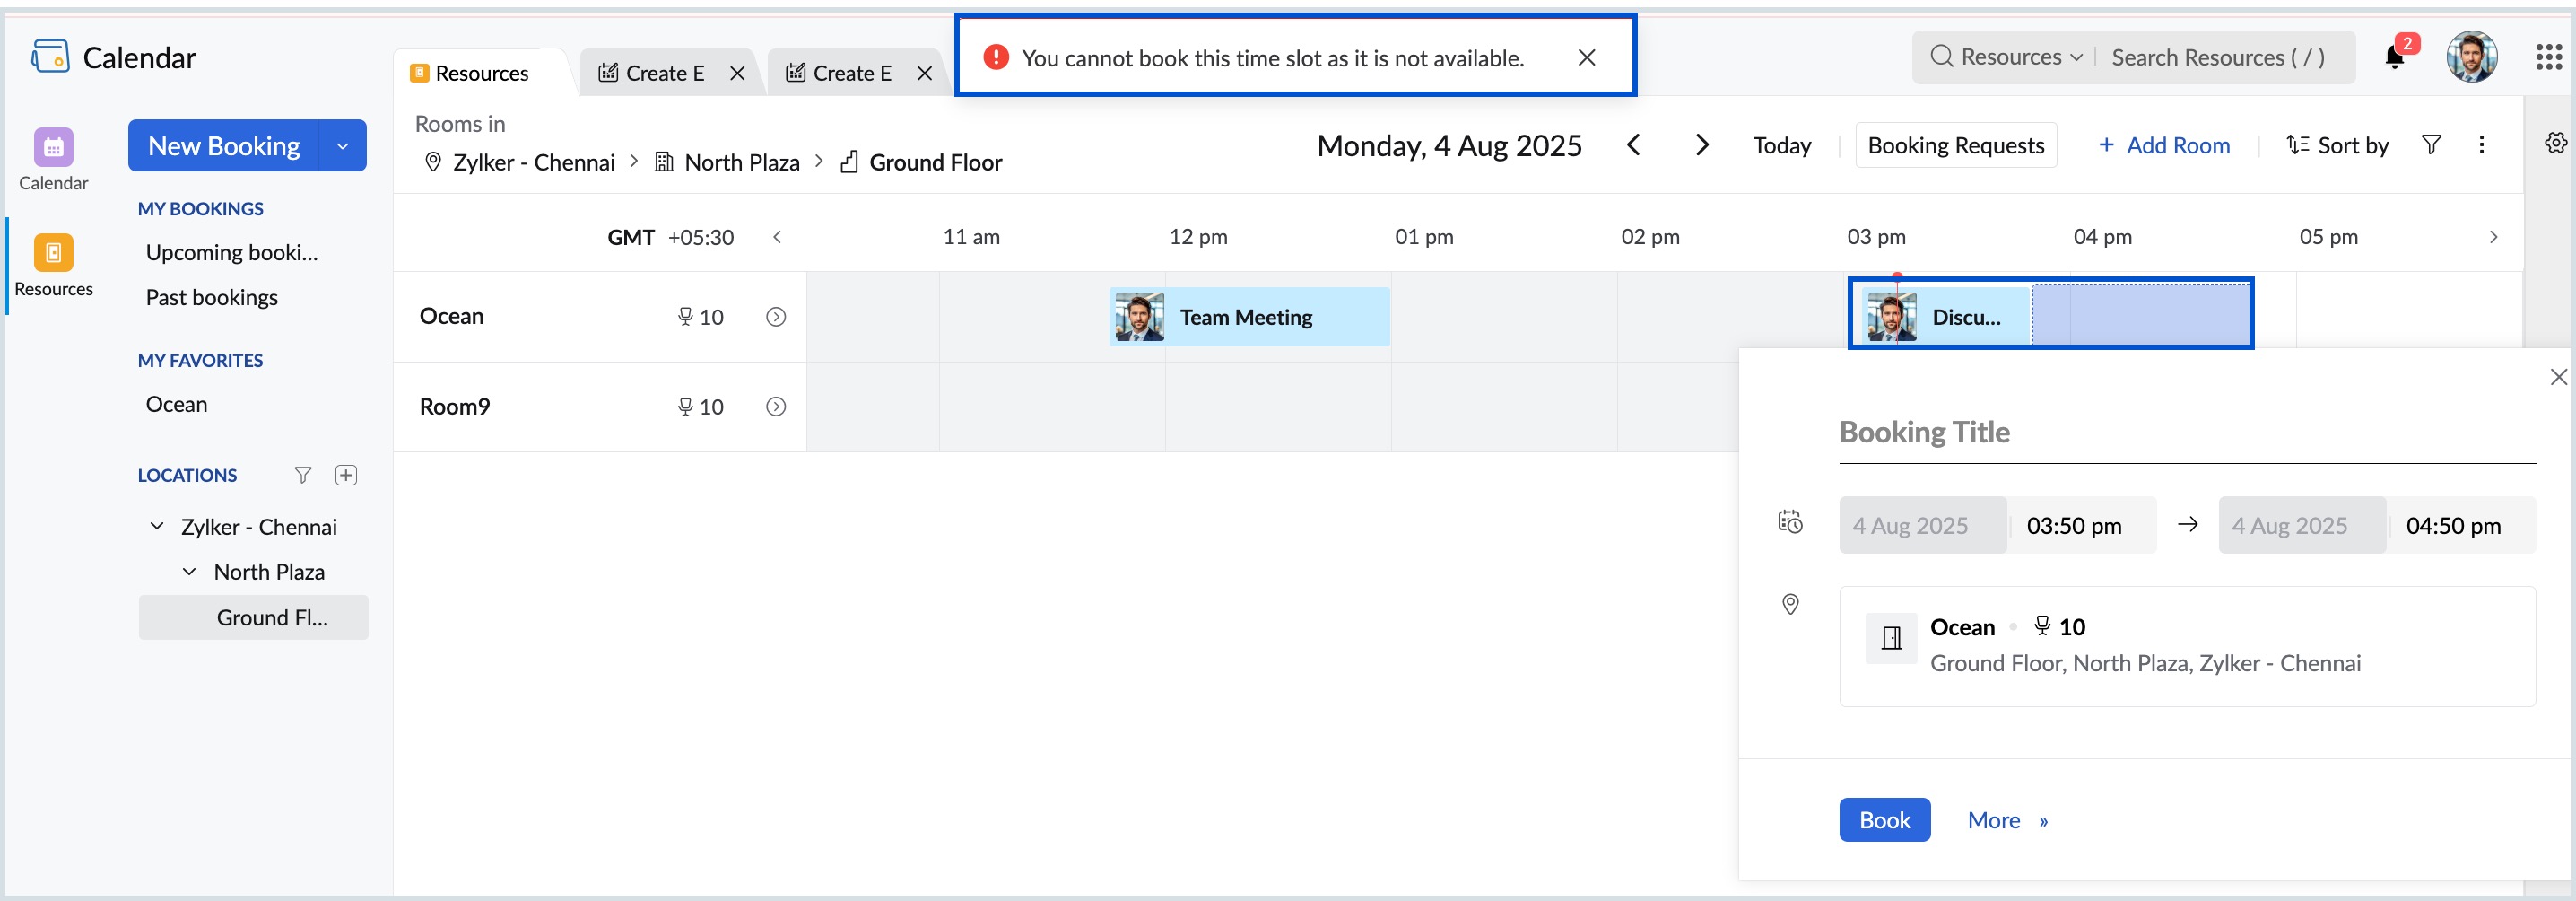
- The time slot, where the selected room is already booked, will be disabled and you will be able to select the room only after this booked time period.
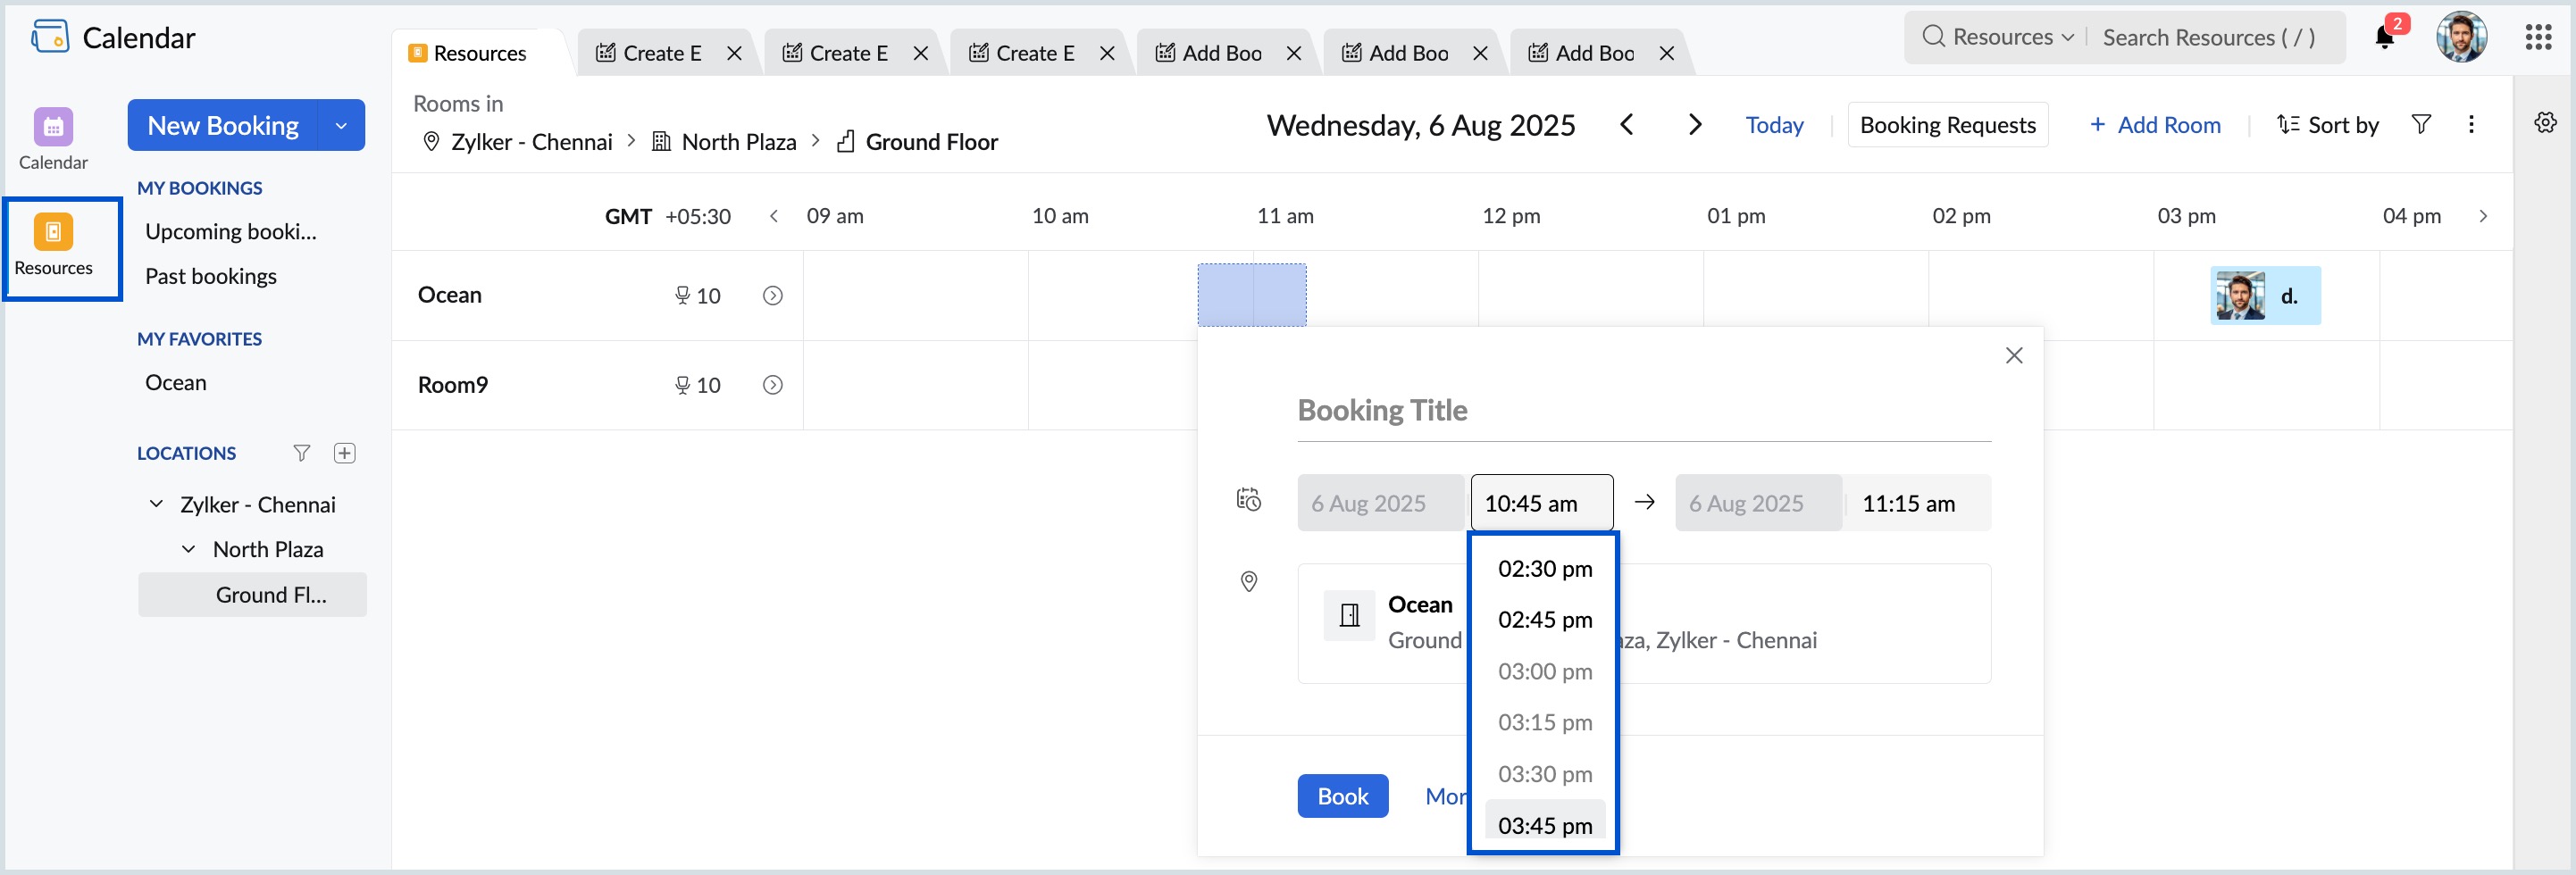
- In the booking pop-up, enter the booking title and click Book.

- The booking is done.
You cannot make a booking when the time slot of one event overlaps with the other.
Detailed Add
When you create bookings using the Detailed Add option, you can fill in extra details about the booking like description, participants and more.
Steps to create booking using Detailed Add
- Login to Zoho Calendar and navigate to Resources.
- Select the location from the list of locations displayed on the left pane of the Resources section.
- To create a booking, click on New Booking from the left pane of the window or click and drag the mouse for a room and click on More.
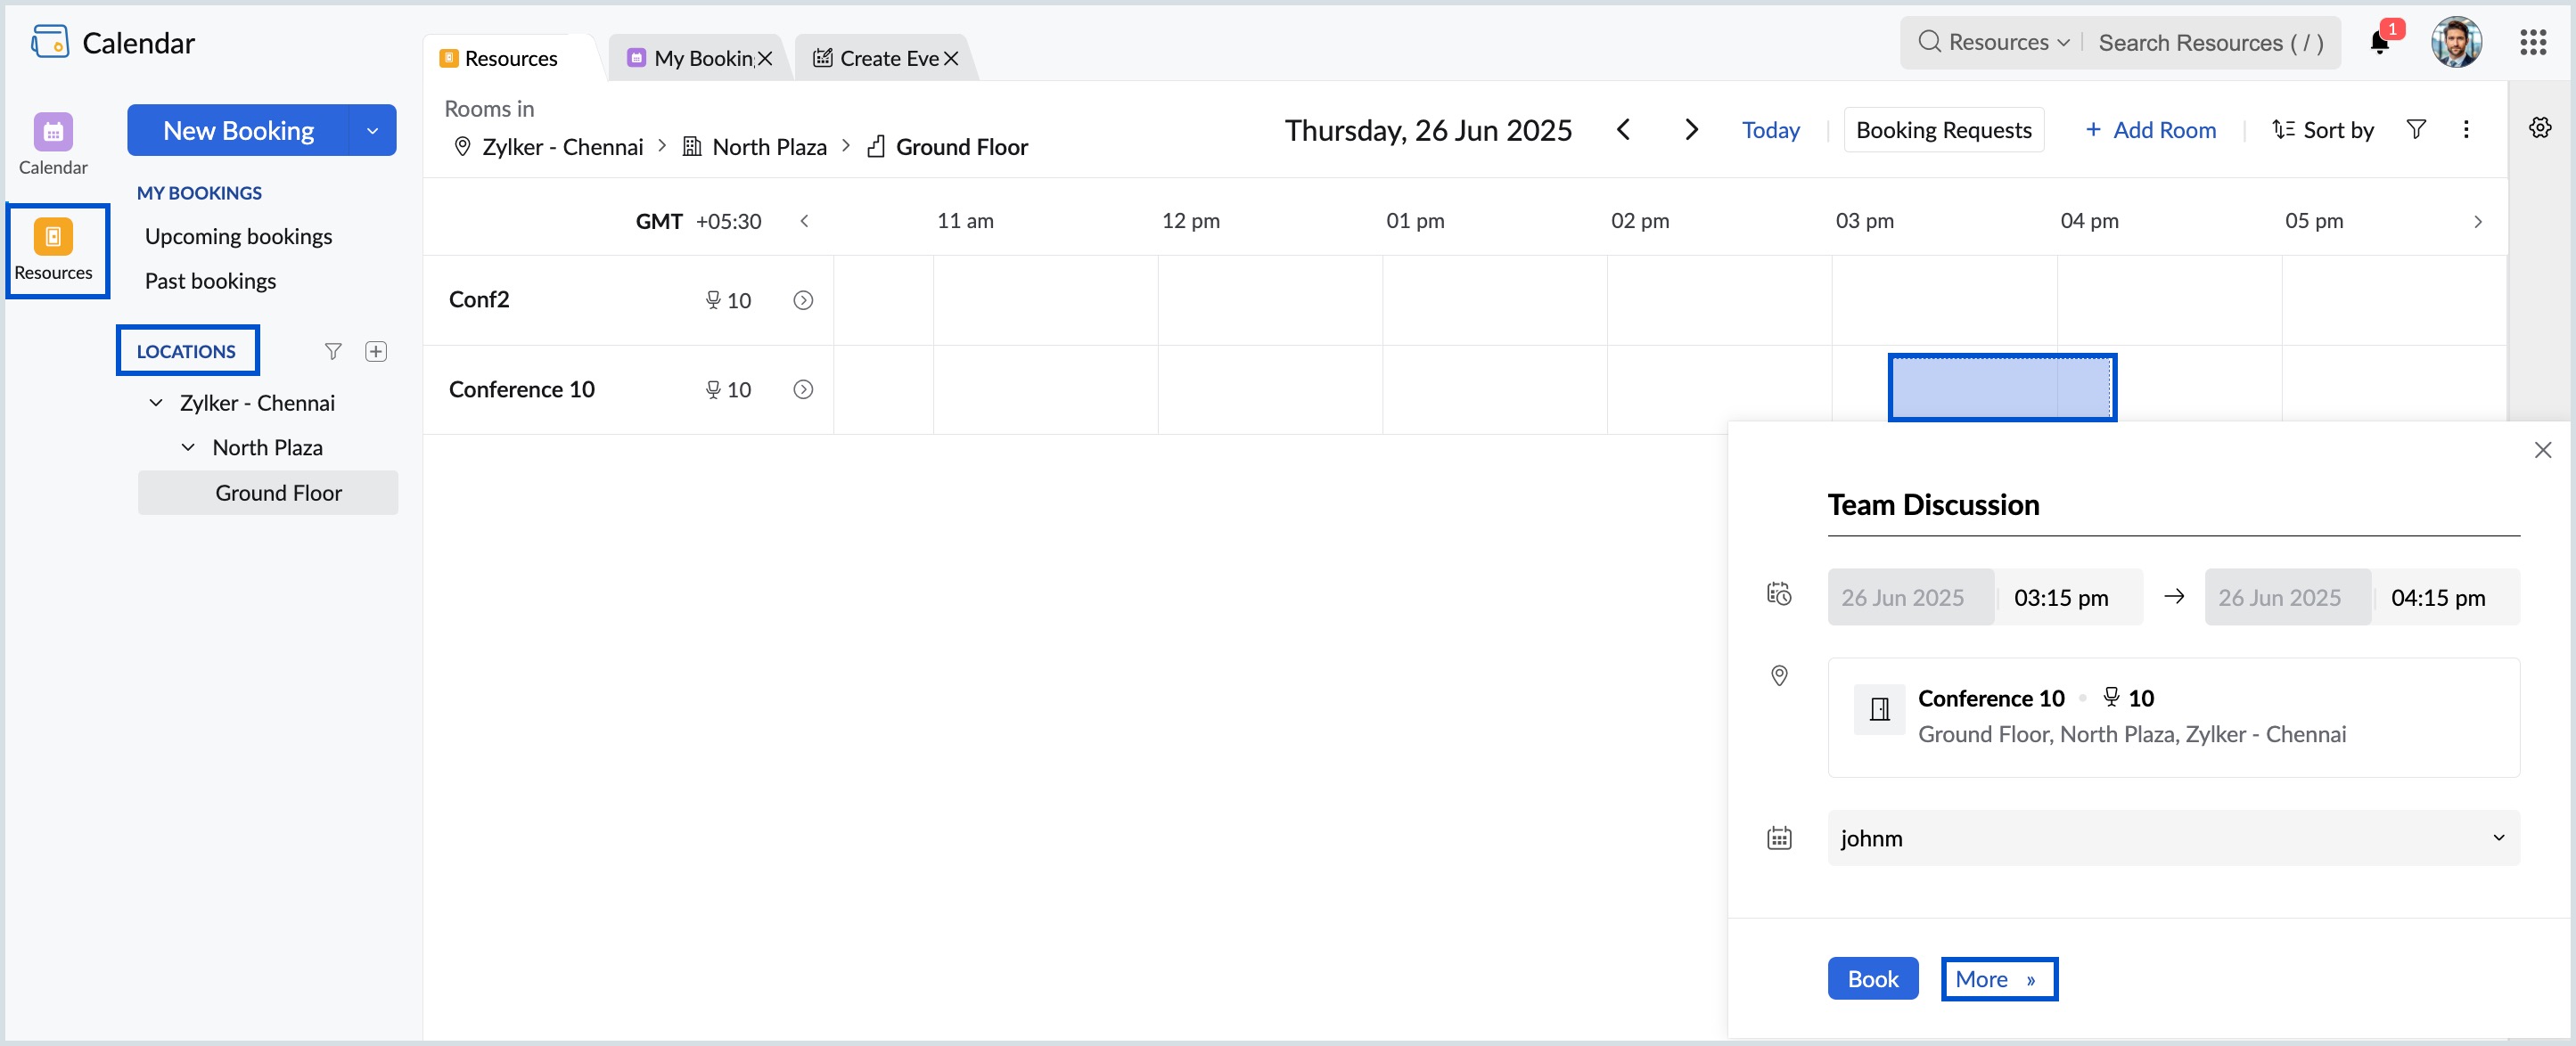
- Enter the booking title, edit the time if required, enter the description, add participants and click Save.
All Day Booking
If you need a particular room for an event for an entire day, you can make an all day booking and the room will be marked unavailable to others for the entire day.
Steps to create an all day booking
- Login to Zoho Calendar and navigate to Resources.
- Click on New Booking from the left pane of the window or click and drag the mouse for a room and click on More.
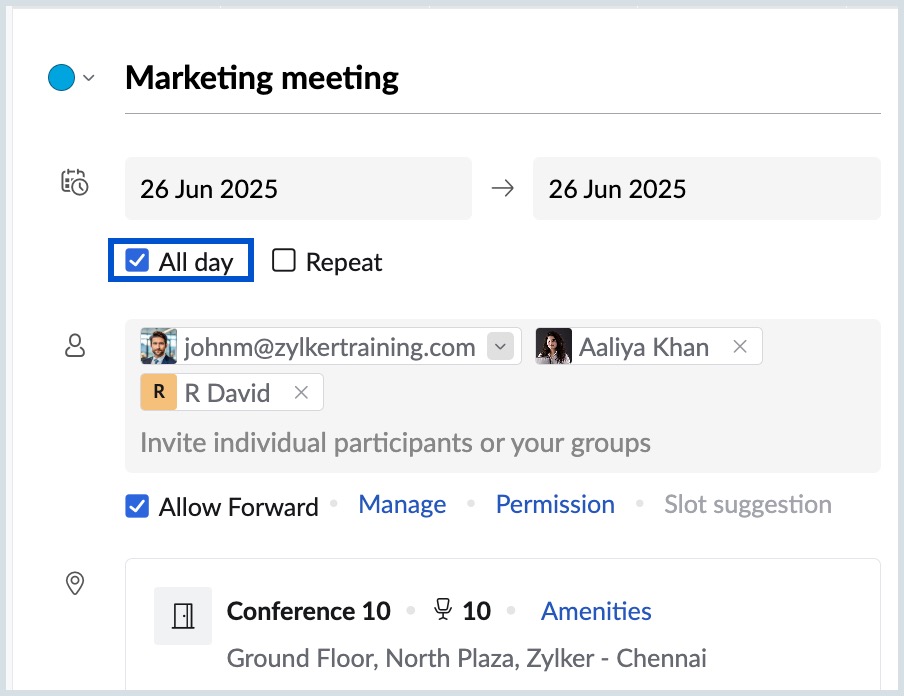
- Select the All Day check-box in the Create Event window.
- Click Save once the booking is done.
Note:
If you are trying to make an all day booking for a particular room, make sure there are no bookings done for any time slot for the given day. In that case, you won't be allowed to make an all day booking.
Private Booking
If you don't want the others in your organization to know the details of your booking, you can mark your booking as private. The room will be marked as occupied for the booked time slot in the grid.
Steps to create a Private Booking
- Login to Zoho Calendar and navigate to Resources.
- Click on New Booking from the left pane of the window or click and drag the mouse for a room and click on More.
- Select the Private check-box option in the Create Event window.
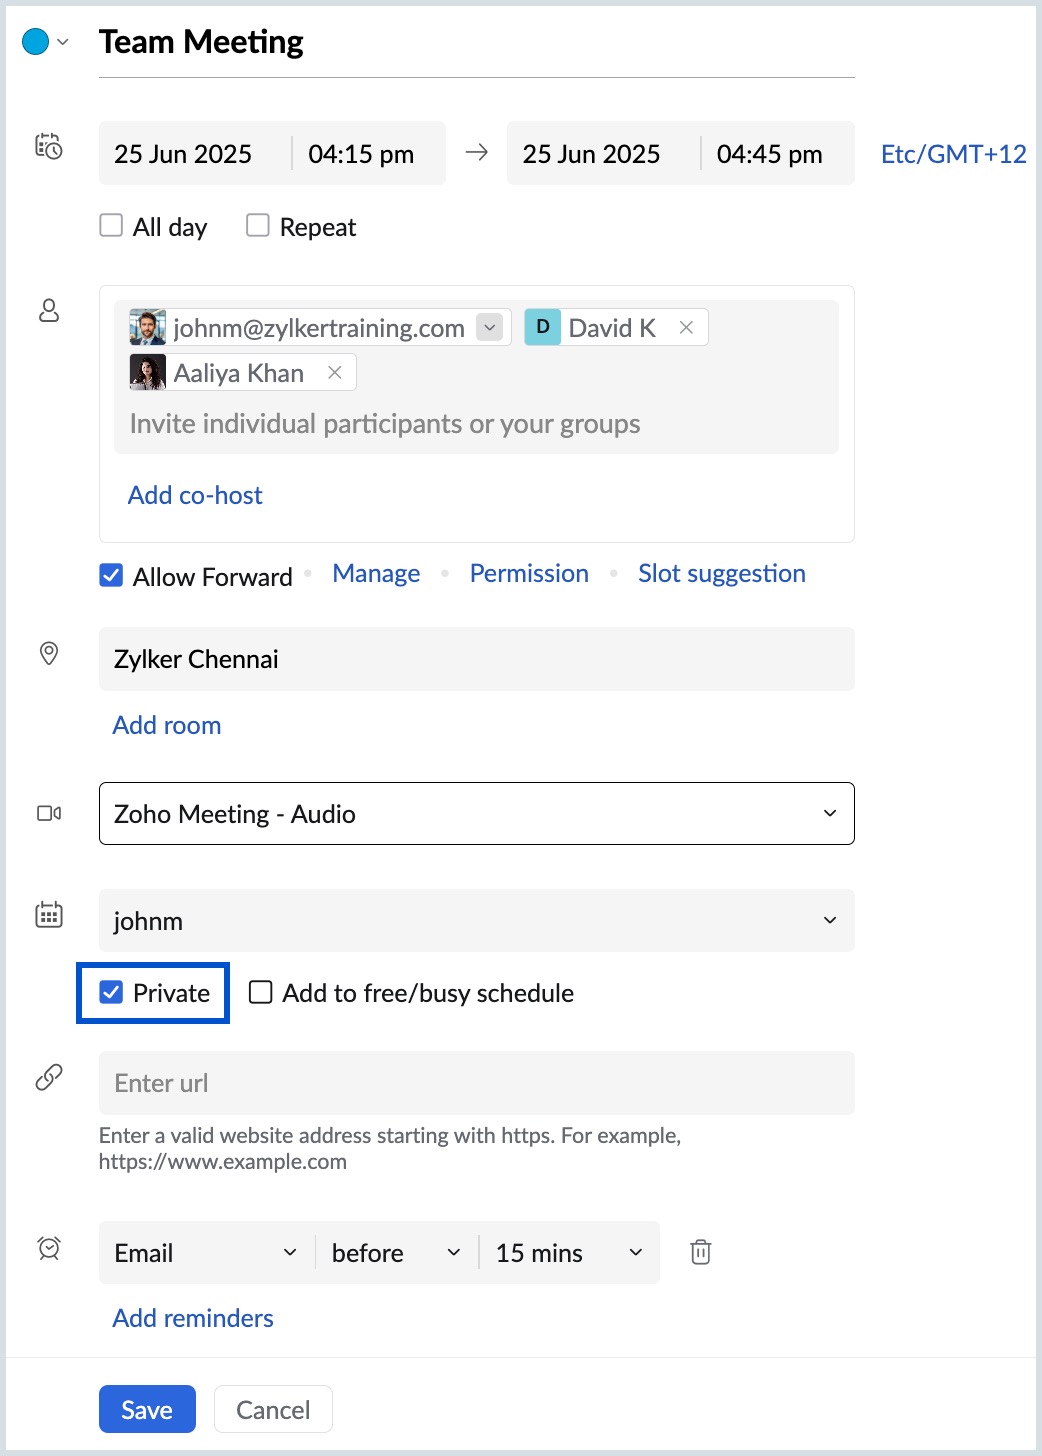
- Click Save once the required details are entered.
Repeat Booking
You can create repeat bookings for a period in Resource Booking. While creating a repeat booking, you need to set the recurrence conditions and the booking will be created.
Steps to create a Repeat Booking
- Login to Zoho Calendar and navigate to Resources.
- Click on New Booking from the left pane of the window or click and drag the mouse for a room and click on More.
- Select the Repeat check box in the Create Event window.
- Fill in the repeat criteria in the Repeat Event pop-up and click Save.
- Fill in other details like location, conference, and reminders and click Save.
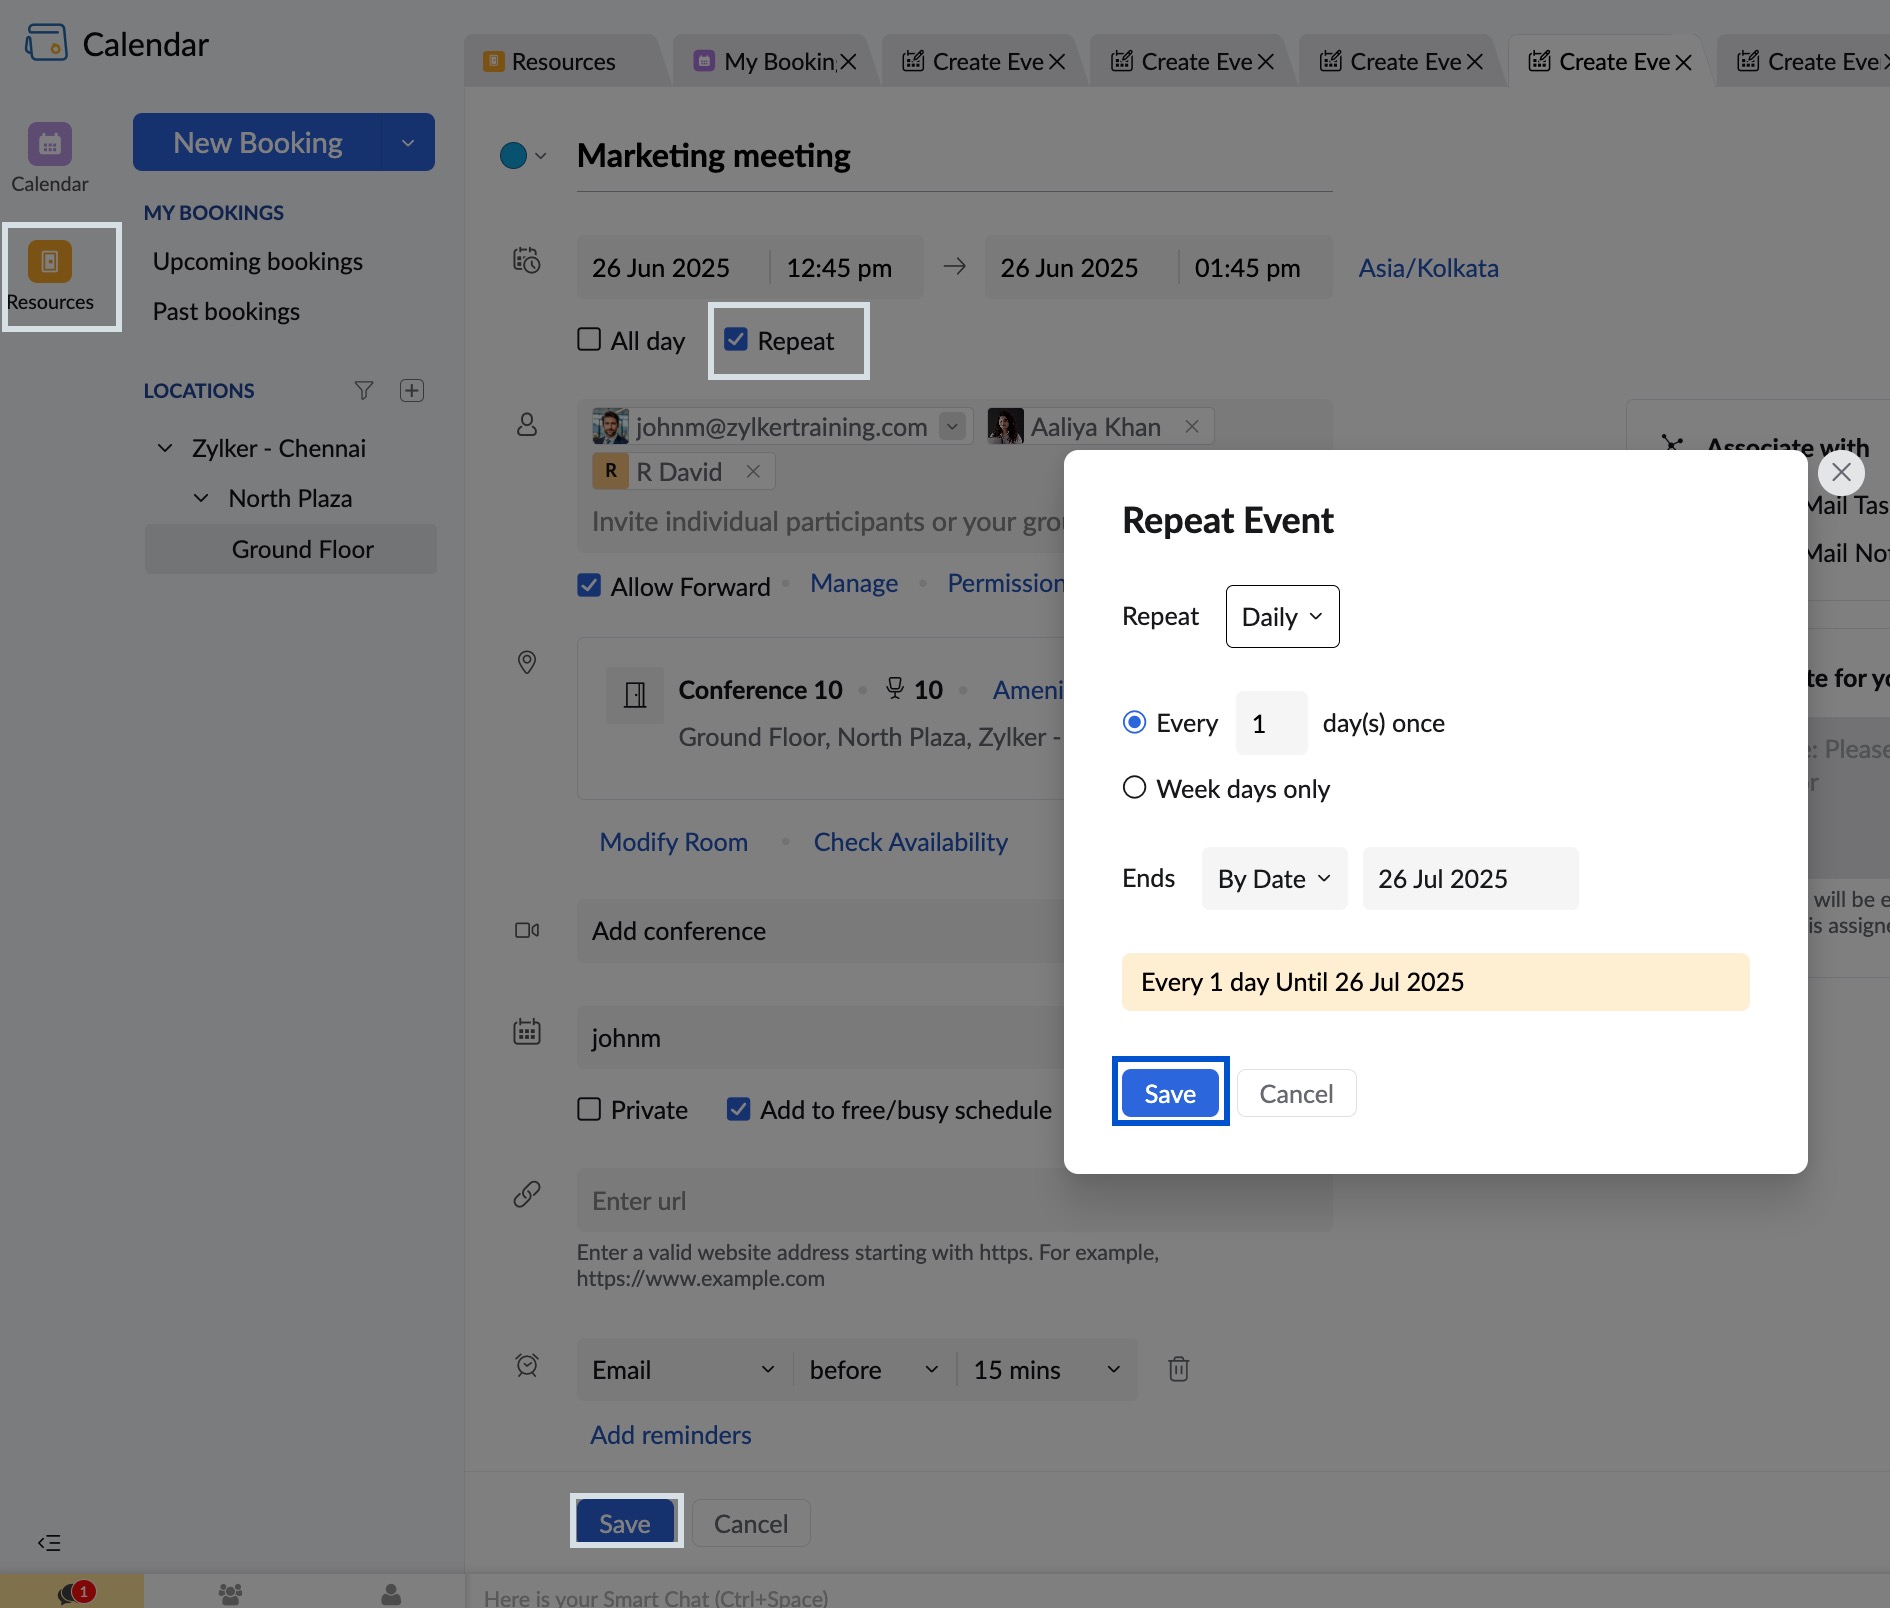
Learn more on how to set and organize a repeat event.
Add note to admin
You can now add notes to your admin while booking a resource. You can request the admin to get the projector ready or provide tea/ snacks and much more using the add note for your admin option. These notes will be intimated to the branch maintainer.
Steps to add note to the admin
- Login to Zoho Calendar and navigate to Resources.
- Click on New Booking from the left pane of the window or click and drag the mouse for a room and click on More.
- Enter your notes in the 'add note for the admin' dialogue box on the right side.
- Click Save after entering all the details.
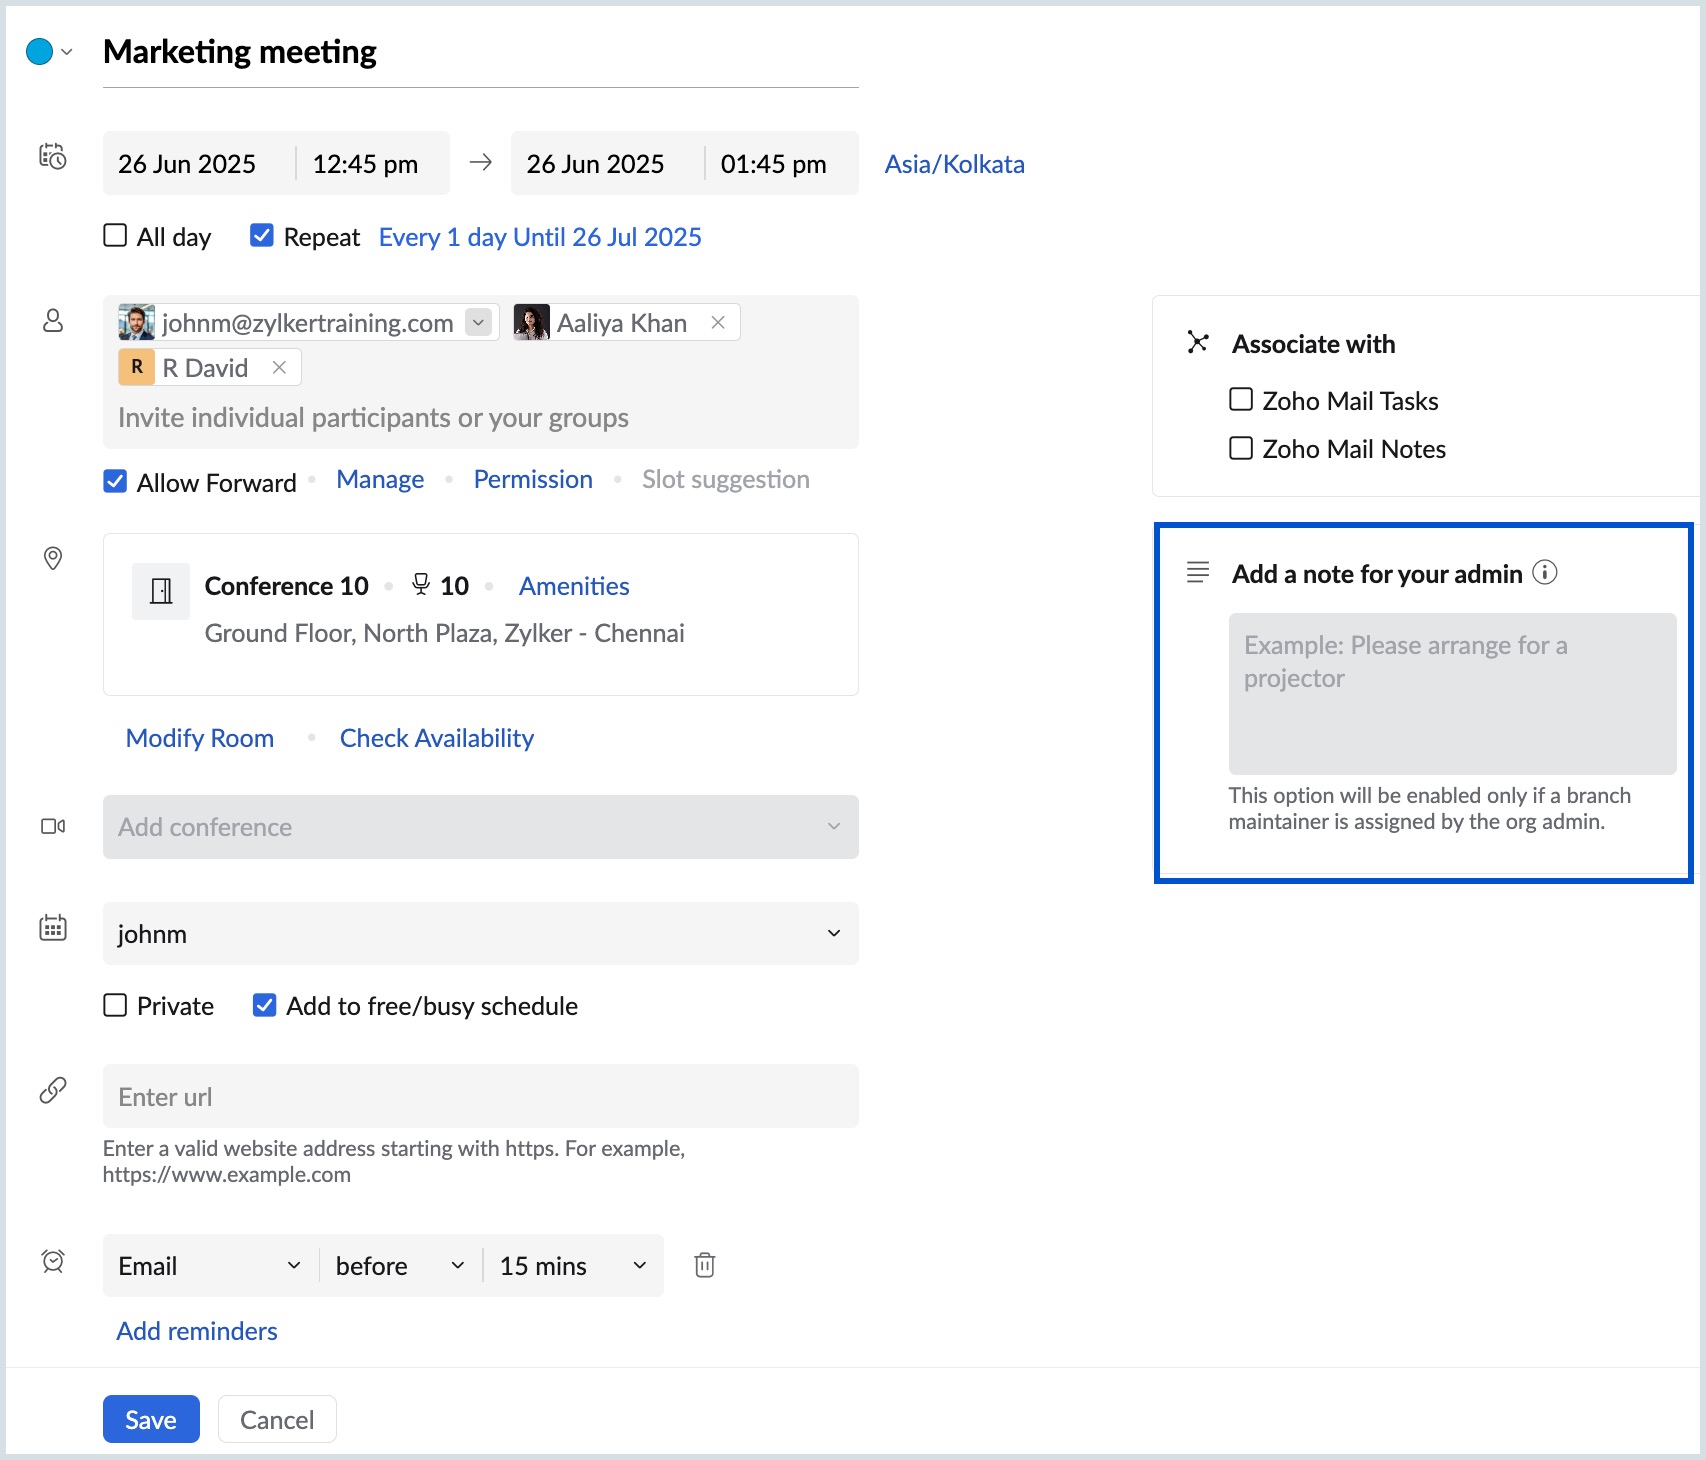
Note:
'Add note for the admin' section is enabled only if the location has a branch maintainer, assigned by the organization admin. Refer to know more on how to assign a branch maintainer.
View Booking
You can view the booking details of all the room bookings that you have made in resource booking. You can also view the booking details of the other bookings except for private bookings.
Steps to View Bookings
- Login to Zoho Calendar and navigate to Resources.
- To view your own booking details, click on the booking from the grid. The booking details appear in the pop-up.
- You can view the booking information in detail by clicking the Open in new tab arrow in the pop up.
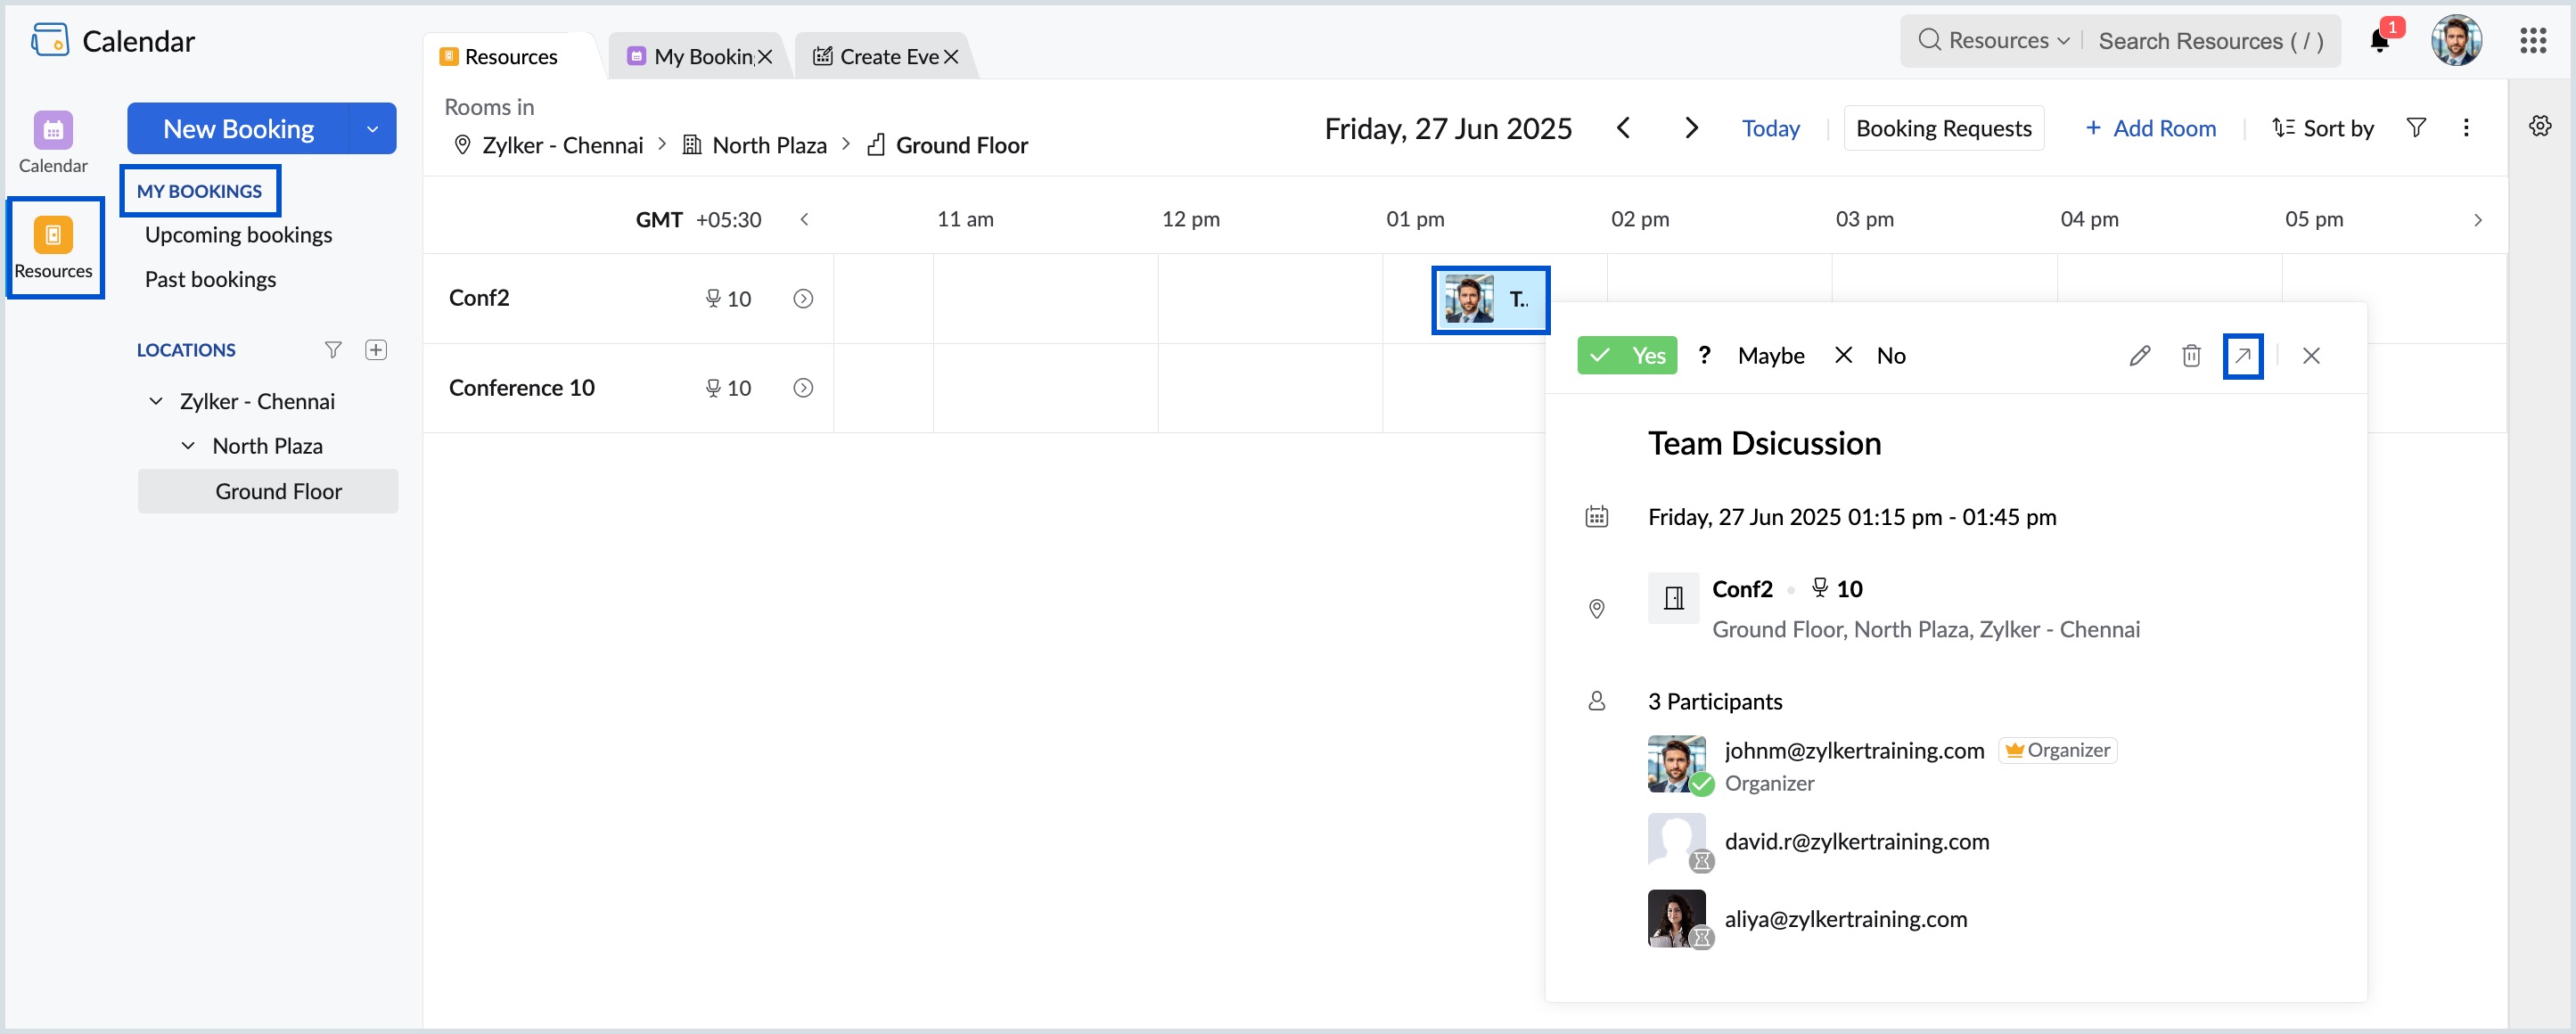
- The View event tab opens.
- To view the booking details of the bookings made by others, click the corresponding booking from the grid.
Steps to View Upcoming Bookings
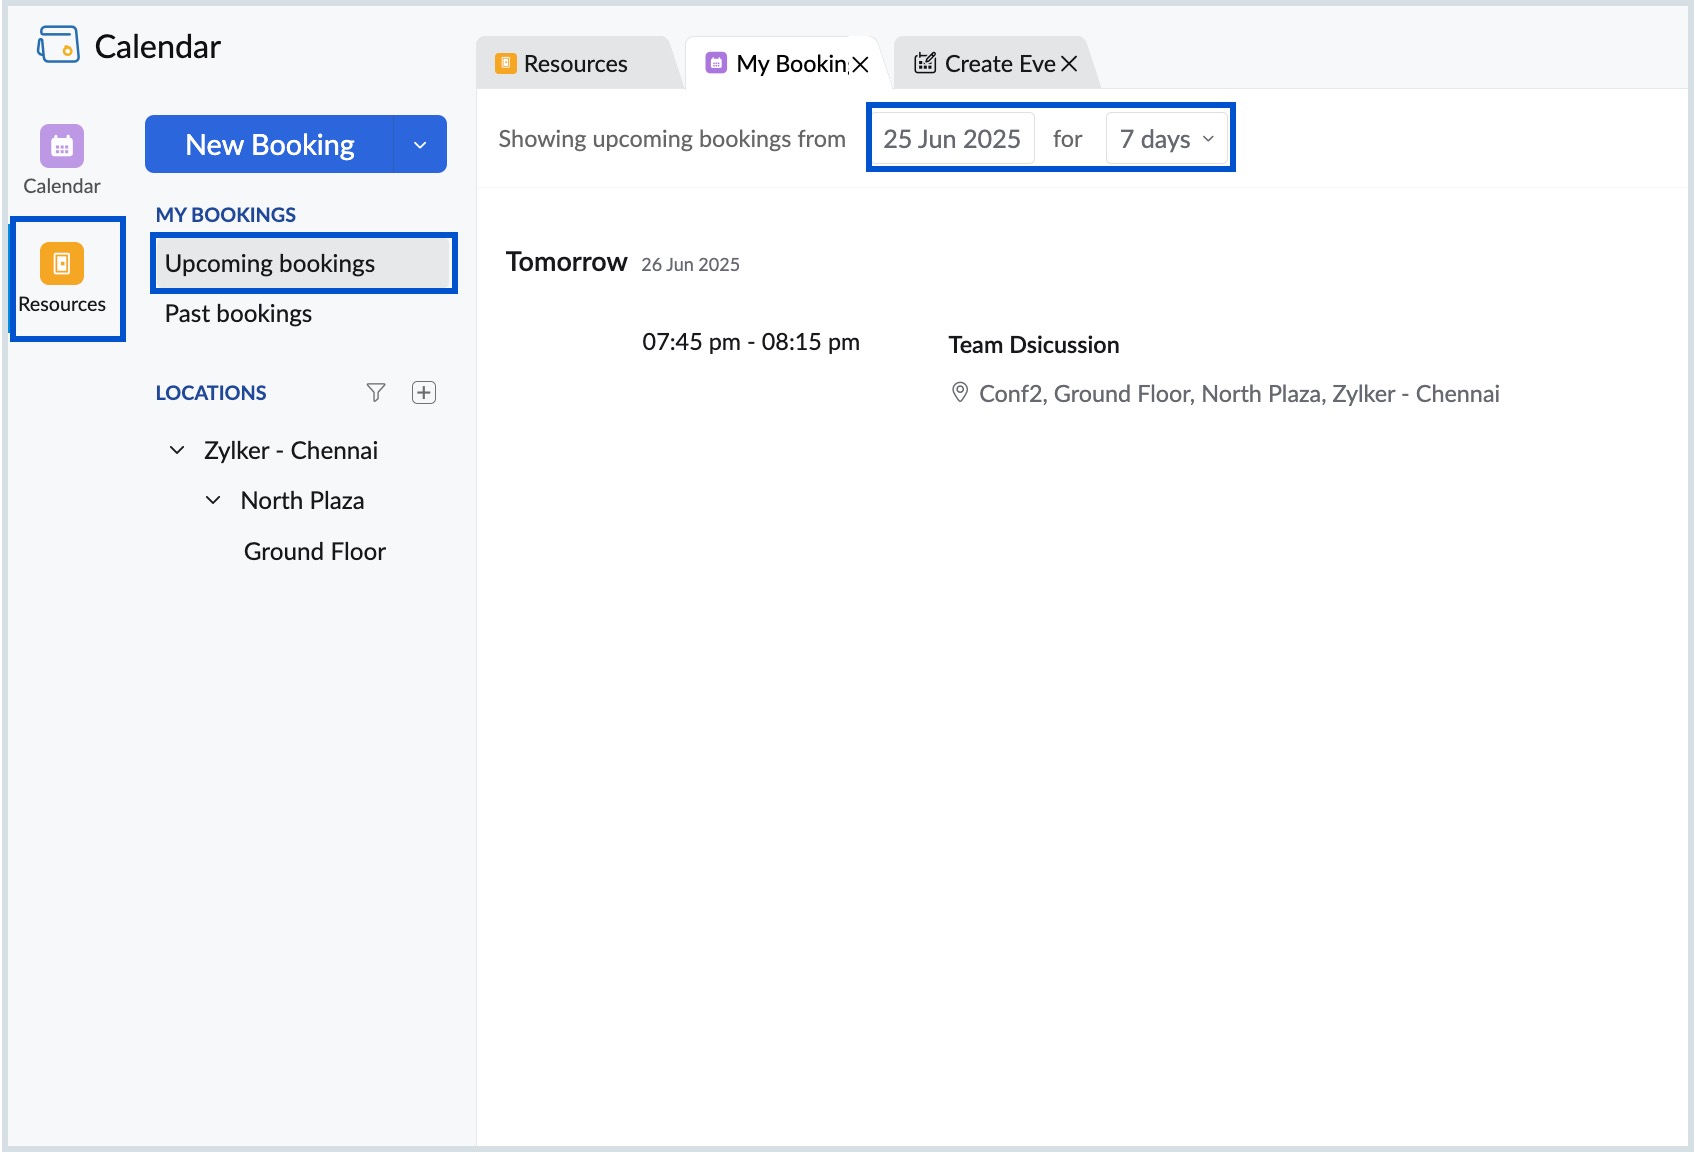
You can view a list of all your upcoming room bookings up to a certain time. To view your upcoming bookings:
- Login to Zoho Calendar and navigate to Resources.
- Click on Upcoming Bookings under My Bookings from the left pane of your Resource Booking screen.
- You can narrow down your search for upcoming bookings by limiting it to a particular period.
Steps to View Past Bookings
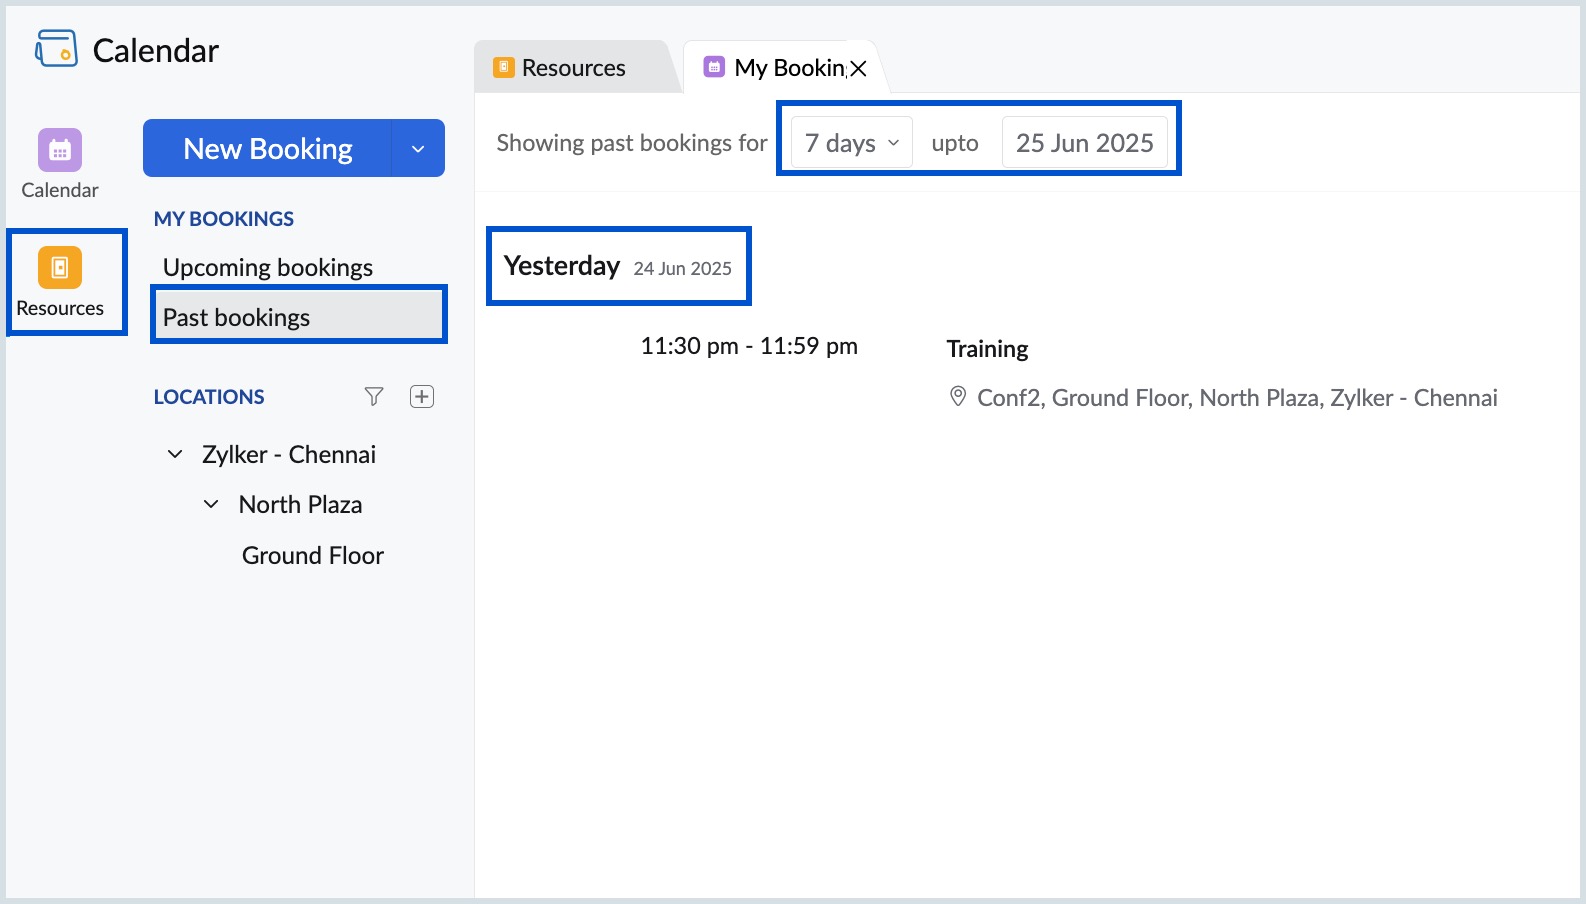
You can view a list of all the bookings that have been completed using the View Past Bookings option in Room Booking. To view your past bookings:
- Login to Zoho Calendar and navigate to Resources.
- Click on Past Bookings under My Bookings from the left pane of the Resource Booking screen.
- You can narrow down your search for your past bookings by limiting it to a particular time period by clicking on the drop down.
Edit Booking
If you want to make changes to the bookings you have made, you can use the edit option to modify the booking.
Steps to Edit a Booking
- Login to Zoho Calendar and navigate to Resources.
- Click on the booking you have made from the grid.
- In the view event pop up, click the Edit icon.
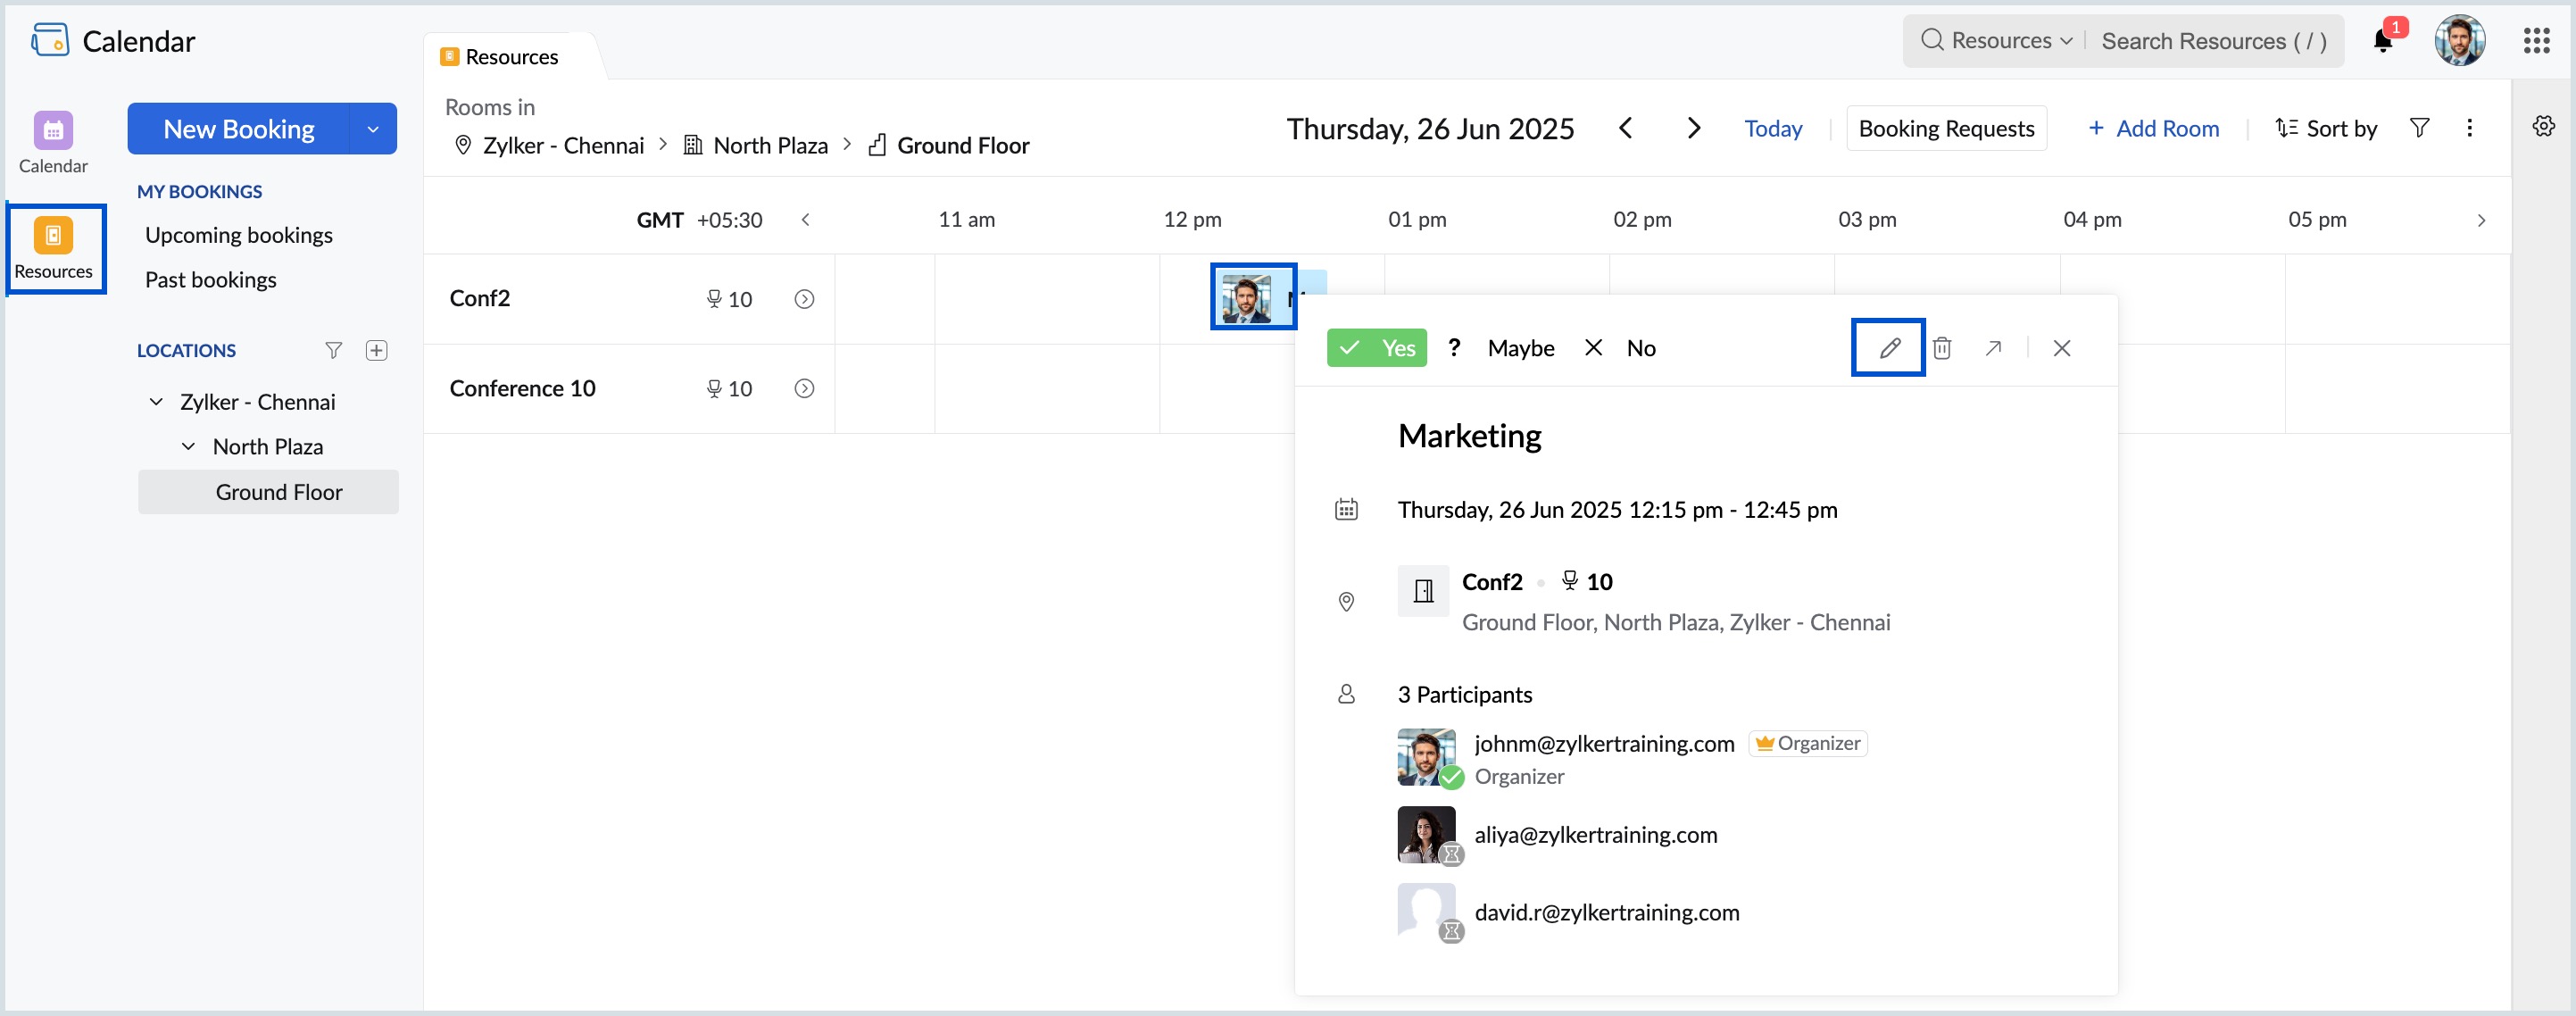
- Make changes to your booking and click Save.
Note:
For Past Bookings, you won't be able to edit the date/time, room, location and participants in the booking.
Delete Booking
You can delete bookings anytime you want to. Clicking on delete will permanently remove the room booking.
Steps to delete a booking
- Login to Zoho Calendar and navigate to Resources.
- Click on the booking you have made from the grid.
- In the view event pop up, click the Delete icon.
- If attendees are added to the booking, you will get a pop-up asking you to Send event delete notification to : Attendees and Myself, Attendees only and None. Select and click Confirm to proceed to delete the booking.
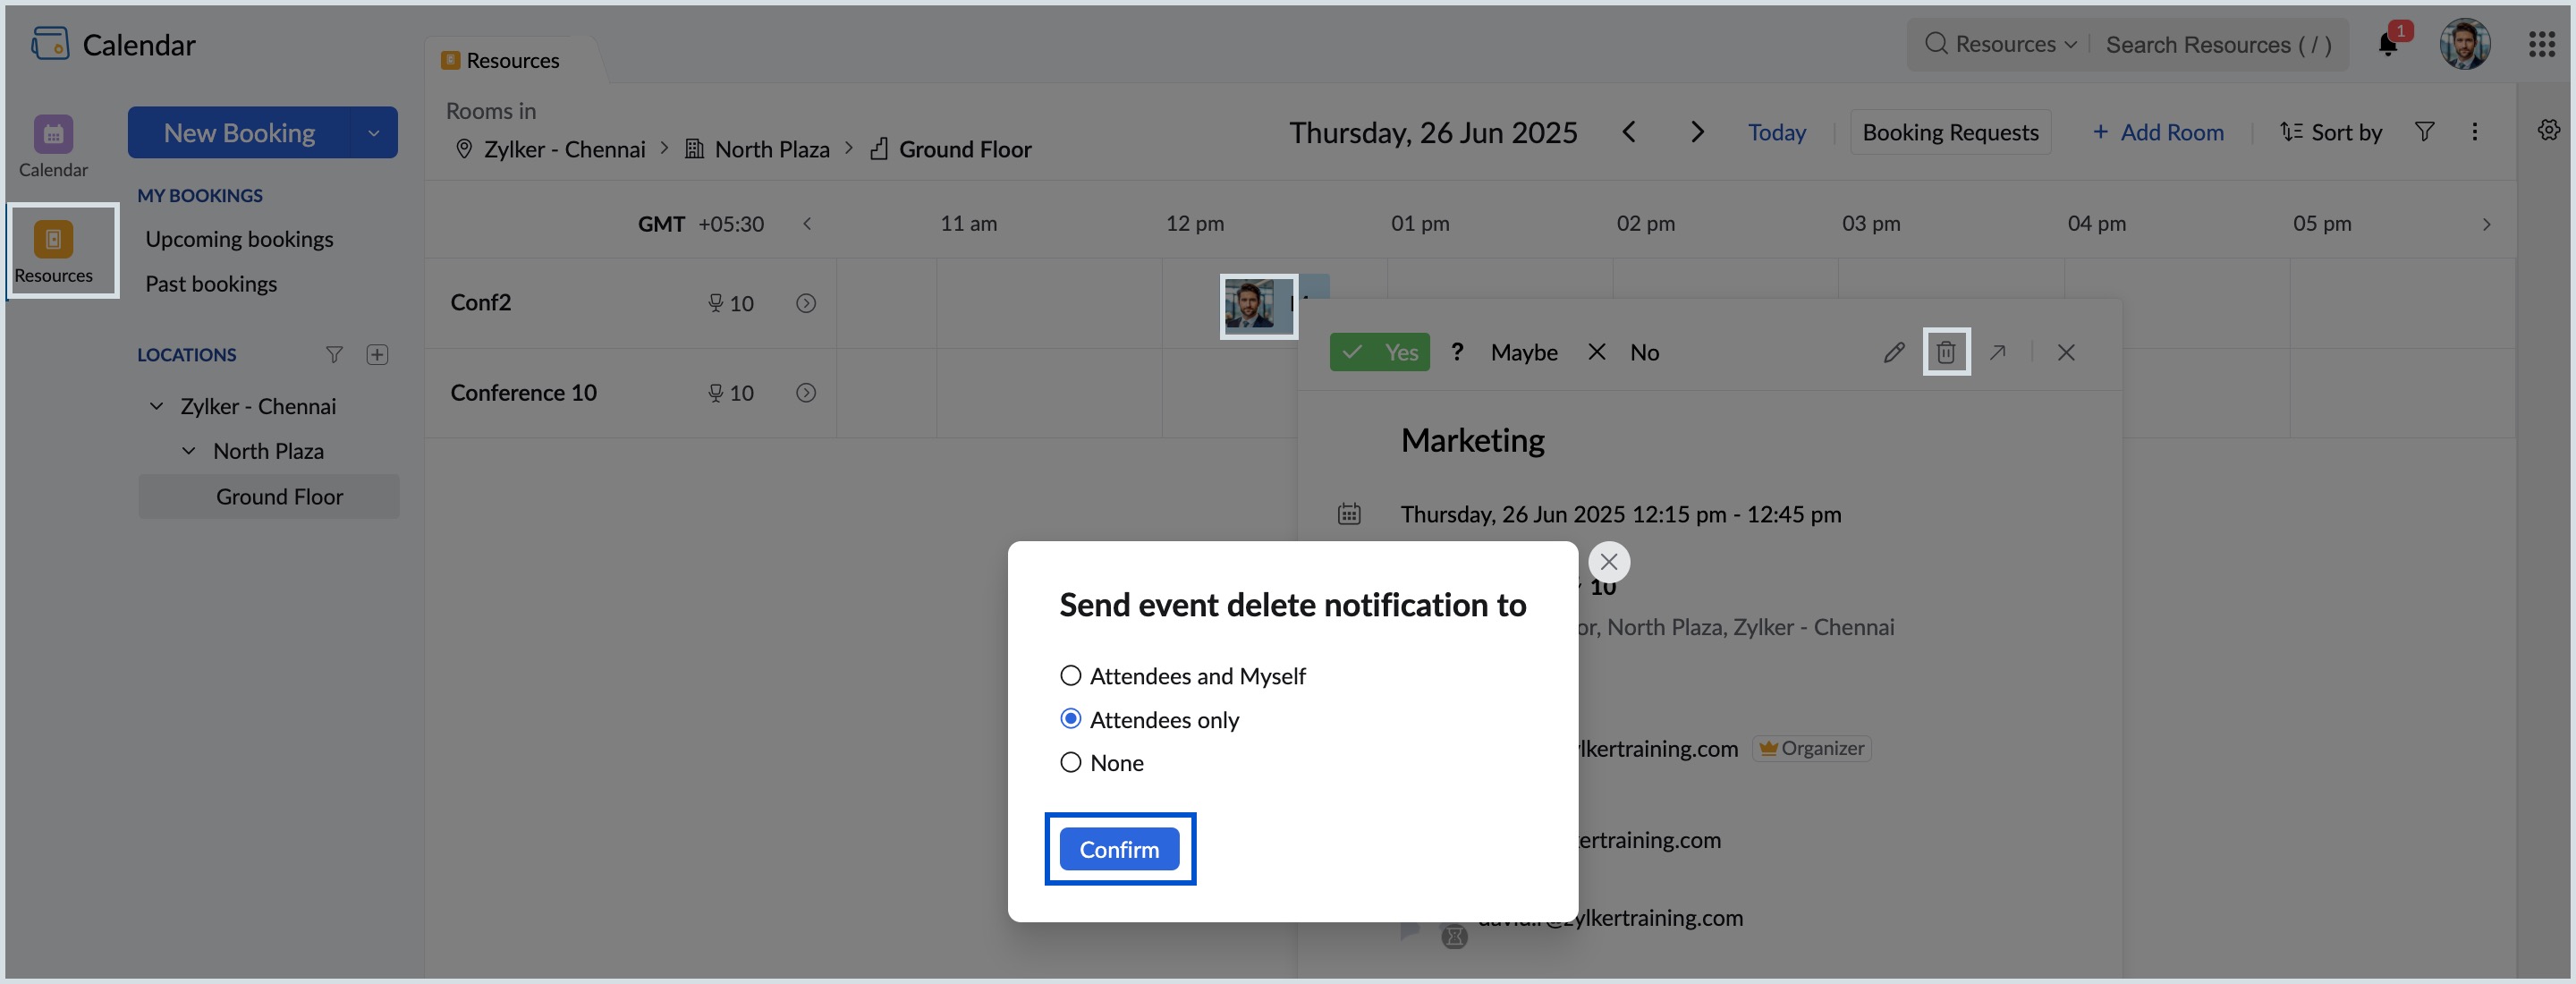
- To delete a booking created by others in your organization which you have been invited to, click on the booking and click the Delete icon to remove the booking.
Search Booking
Browse through and locate the booking that you have been searching for using the extensive search options in Resource Booking. Narrow down your search with terms like room name, branch name, capacity and more in our search bar.
Steps to search for bookings
- Login to Zoho Calendar and navigate to Resources.
- The search bar is present in the top right corner of the window.
- Fill in the search terms in the search bar and tap Enter.

Adding participants to bookings
While adding a room booking, you can directly add participants for the particular booking. All the participants added will receive an email notification regarding the booking.
Steps to add participants to a booking
- Login to Zoho Calendar and navigate to Resources.
- Create a booking or Edit an already existing booking.
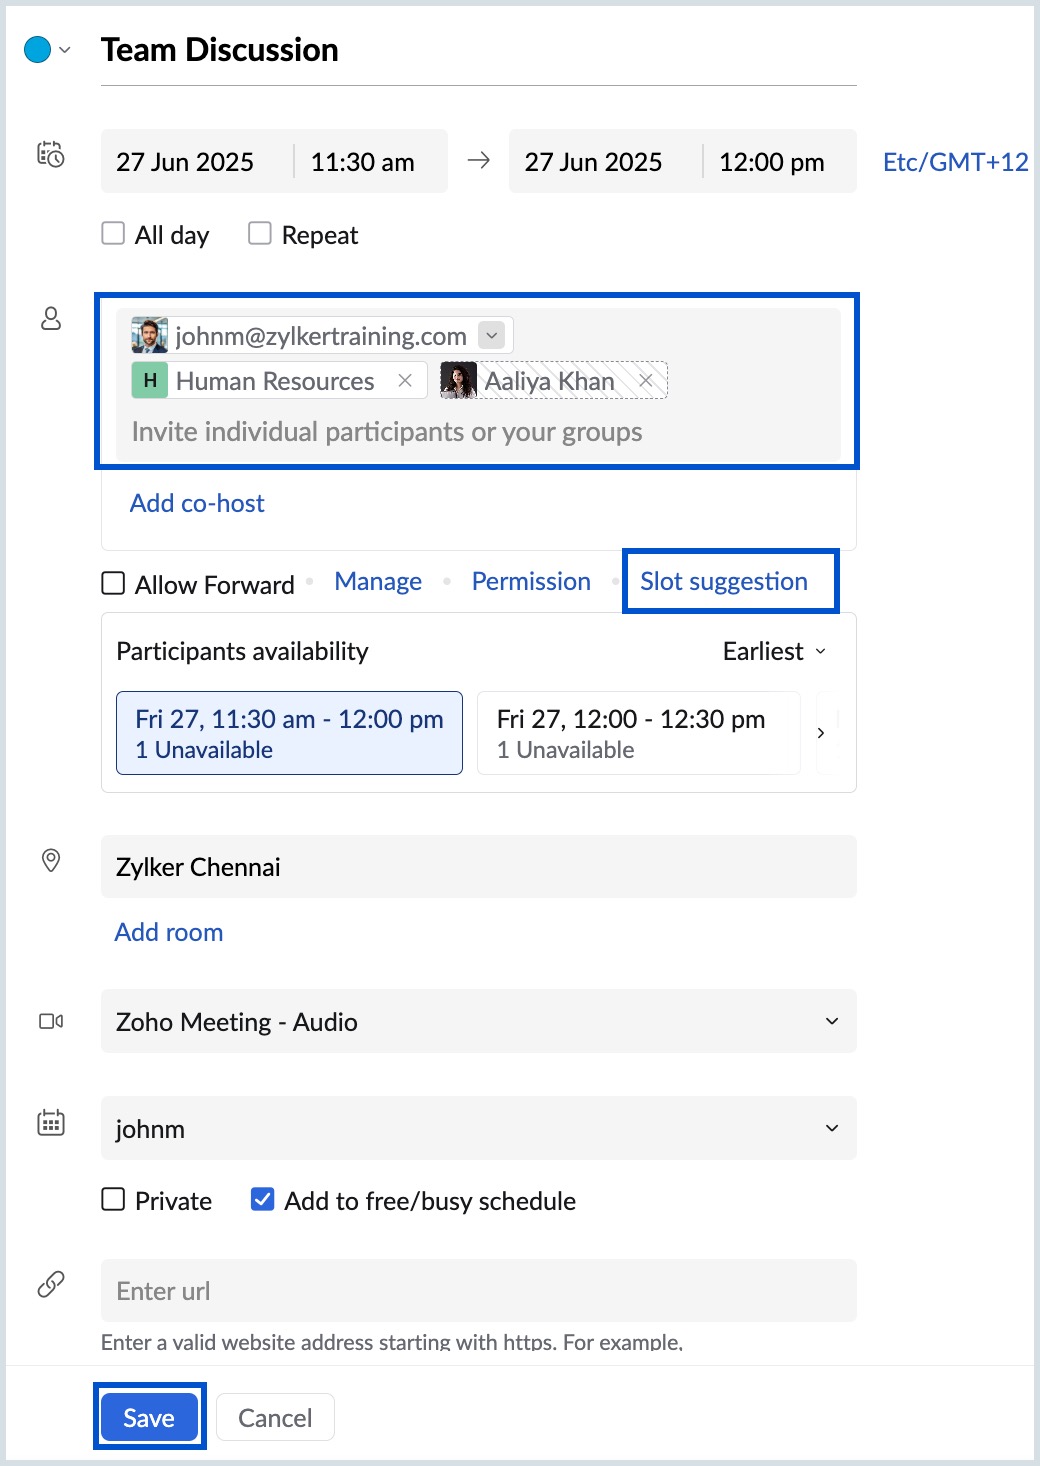
- Enter the participant's email ID or pick the participant from the Attendees field.
- You can check the Free/Busy information of the participants by clicking on Slot suggestion button.
- Click Save once the required details are filled.
Filter Locations
You can filter the branch, building, and floor across different locations of your organization. Follow the below steps to filter locations.
Steps to filter rooms
- Login to Zoho Calendar and navigate to Resources.
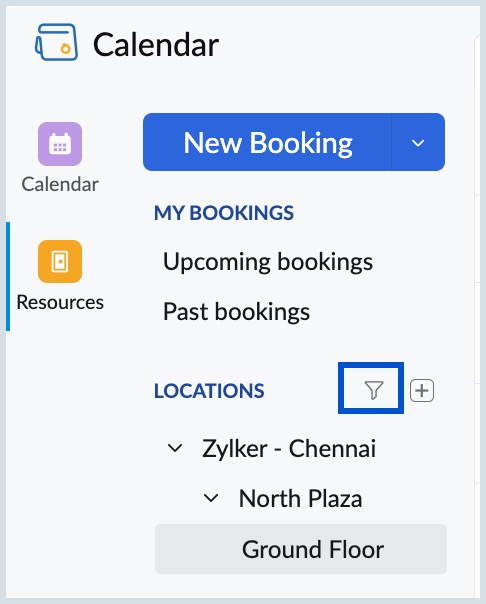
- Select the Filter icon next to the LOCATIONS category in the left pane of the grid.
- Select the desired Branch, Building, and Floor in the Filter dialog box that appears.
- Click Apply once done.
- Click the Reset to default location button to undo the changes made in the Filter dialog box.

Note:
When no filter is chosen, the user set location is selected by default. Learn more about the steps for an user to add their default location.
Filter Rooms
You can filter the rooms in your organization depending on the room type. The rooms in your organization can be categorized as conference rooms, meetings rooms and training rooms.
Steps to filter rooms
- Login to Zoho Calendar and navigate to Resources.
- Select the Filter icon next to the Sort by button in the top right section of the grid.
- Select the filter type as Meeting room or Conference room or Training room.
- The rooms in the chosen filter type for your location will be listed.
- To clear the filter, click on the filter icon and select Clear Filter.

Grid View Customization
The grid view in room booking can be customized to facilitate each user. You can choose to view the grid in days or hours, display or hide weekends and add working hours to your grid.
Steps to customize your grid view
- Login to Zoho Calendar and navigate to Resources.
- Select the More Options icon from the top right side of the grid, next to the filter icon.
- In the Grid View Customization box, select if you want to view the grid in days or hours, enable/disable weekends and working hours in the grid.

Mark room as favorite
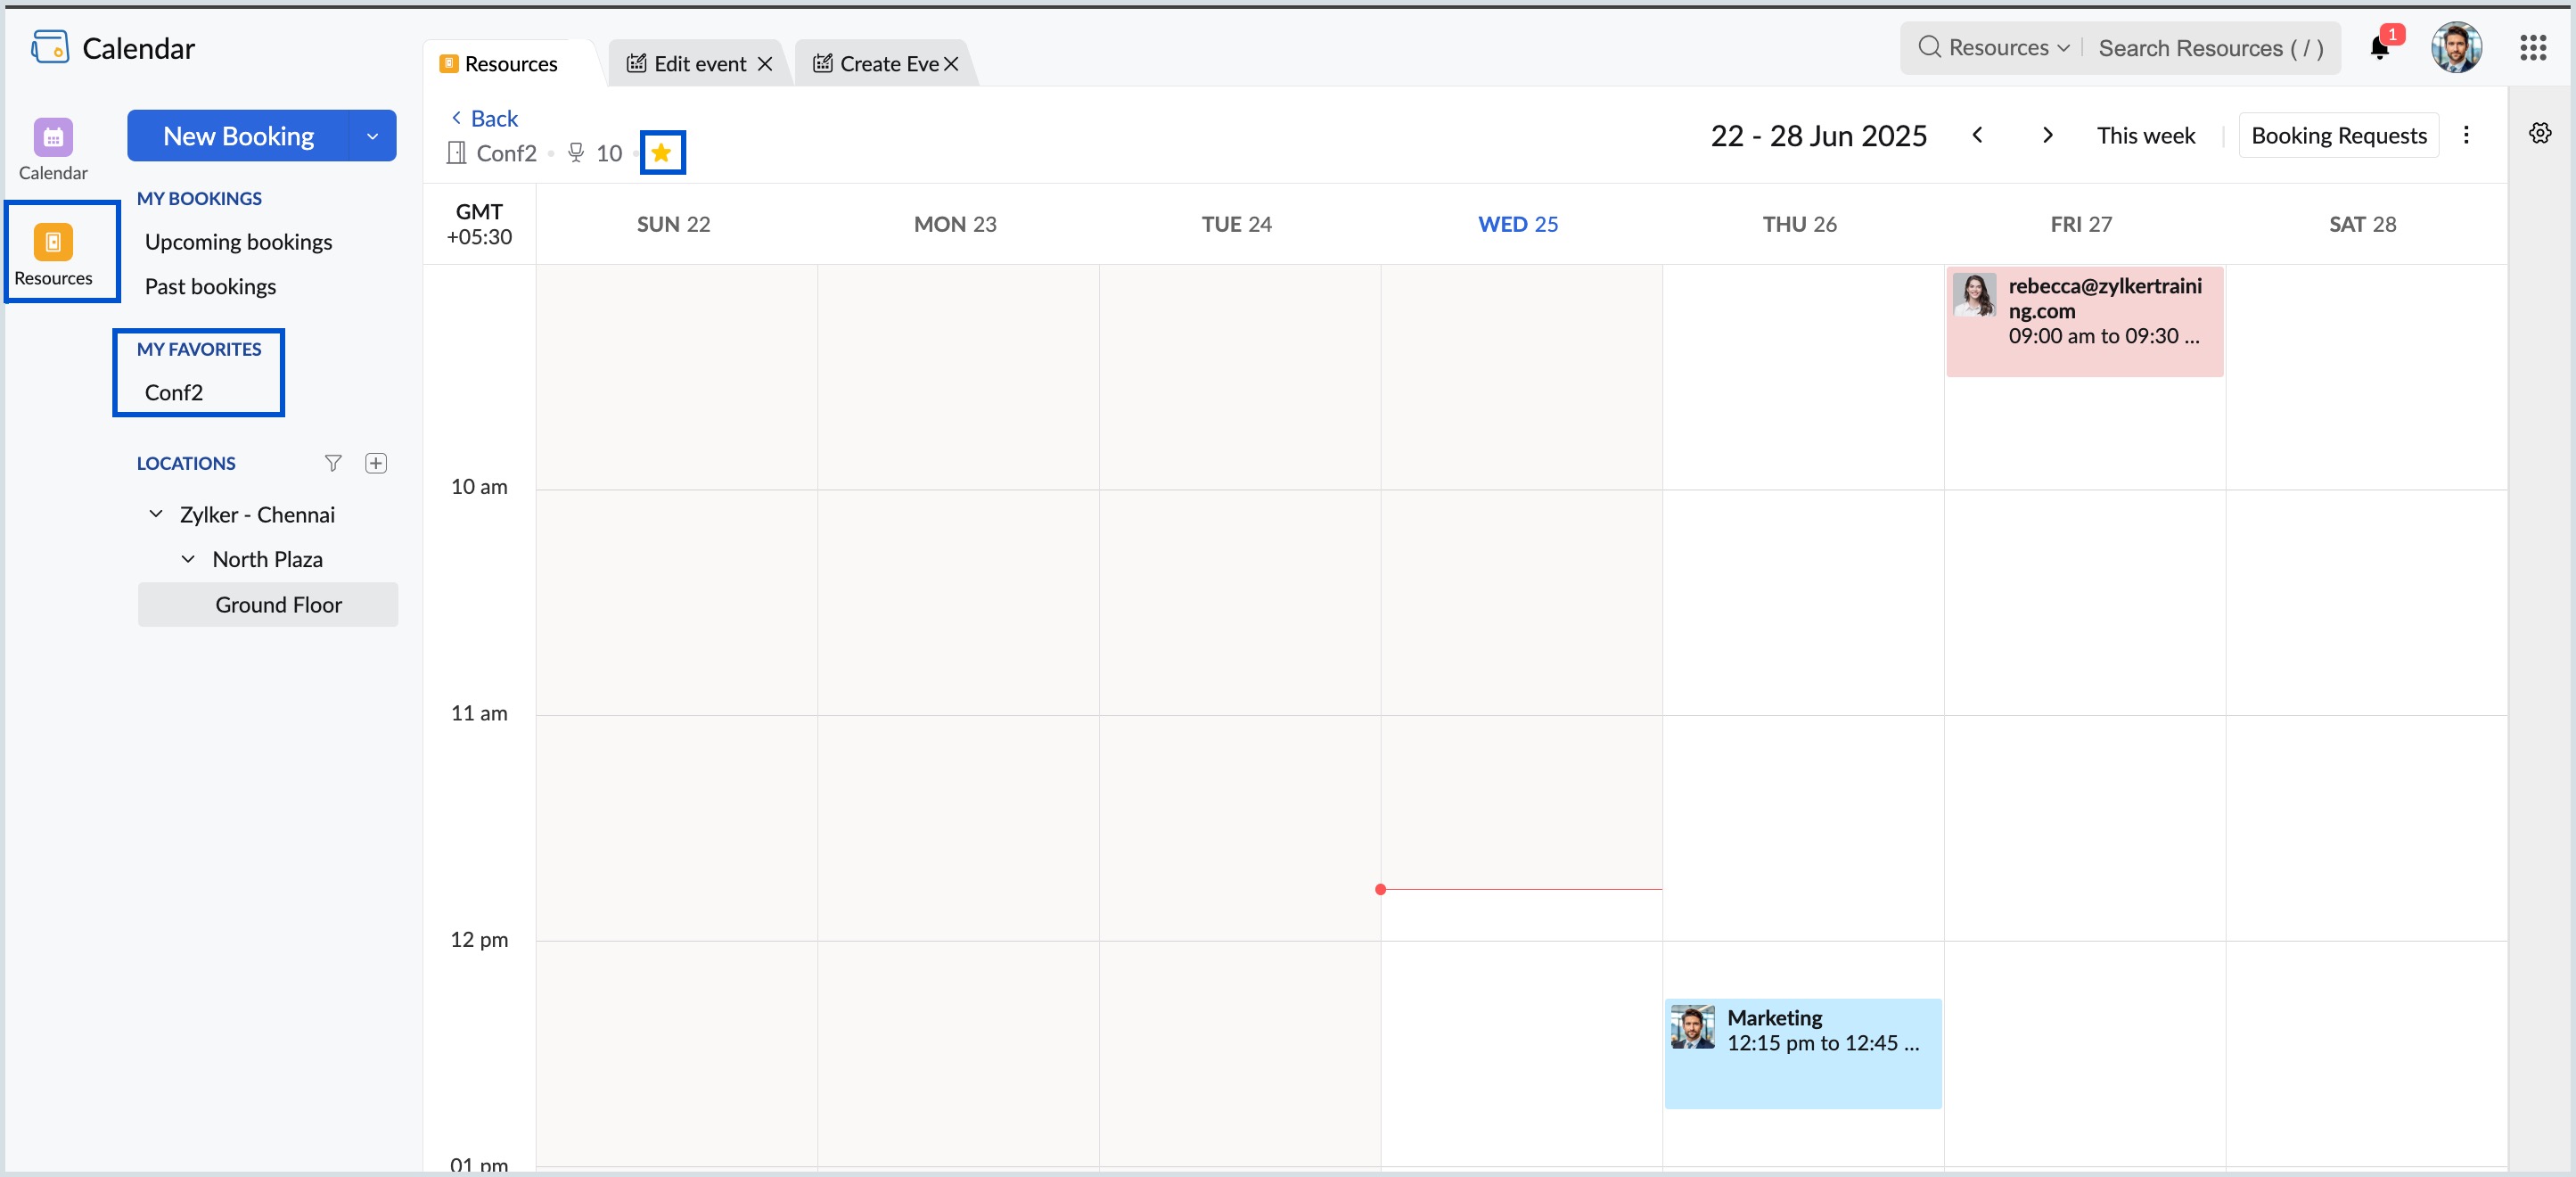
You can mark rooms as favorite and access them easily from the left pane of your Resources. When you mark a room as favorite, it will be added under My Favorites below your Location Tree.
Steps to mark a room as favorite
- Login to Zoho Calendar and navigate to Resources.
- Select the location from the left pane of Resources and click on a particular room from the rooms listed in the grid.
- Click on the Favorite button (star icon) next to room name, to mark the room as favorite.
- Your favorite room will be listed under My Favorites on the left pane of the Resources window.
Note:
The rooms that are marked as favorite are given first priority while being listed under Create Event > Add Room.
Quick Room View
You can view the details of each room right from the booking grid without going into the room view using Quick Room View.
Steps to view the details of a room using Quick Room View
- Login to Zoho Calendar and navigate to Resources.
- Hover over the room for which you want to see the details and click the More button next to the room name.
- The room details with the capacity, type, location and photo is displayed. You can also add this room as your favorite by selecting the star icon.

Note:
Resource Booking feature is available only for users with one of the Zoho Mail paid plans.


