


Developer Space - Develop Extension
The Develop Extension section in Developer Space lets you create own eWidget extensions. The extension you create can be installed from the Marketplace and used by other users.
Zoho Marketplace
Zoho Marketplace is the online platform which offers extensions and widgets that help the users enhance their workflow across multiple apps. The users can install the extensions from the Zoho Marketplace, to build upon the exiting functions of the Zoho applications.
In addition to the extensions available already, developers can now create more comprehensive extensions for Zoho Mail. These extensions can be built to integrate the functions of Zoho Mail with the features of the third-party applications. This helps the users build extensions to suit custom requirements.
Once you have built the extension, you will have to submit it for a review. After analyzing the functionality, your extension will be approved and will be published in the Zoho Marketplace, which will be available to all Zoho users to install and use.
Developing the Extension
You can start building your extension directly from Zoho Sigma platform using a pre-populated Zoho Mail plugin manifest. Alternatively, you can also use the ZET CLI to build your extension and then upload the file to Zoho Sigma for submission.
Creating extension in Zoho Sigma
To get started, create a workspace for yourself in Zoho Sigma with the following steps:
- Login to Zoho Sigma
- Enter your workspace name
- Click Create Workspace
Once you have created your workspace, click on New Extension button on the top-right corner. Enter the details like name and description and select Zoho Mail from the Service section. Then click Save as Draft and follow the detailed instructions given in this help page to begin creating your extension in Sigma.
Creating extension with ZET CLI
Command Line Interface (CLI) is used to create and package widgets. Zet command is the CLI used to package widgets for Zoho Mail.
Pre-requisites
In order to create your own widgets for Zoho Mail, you are required to download the nodejs. You can download it from here. (Version below 7 are not supported)
You can verify the node by running the following commands:
$ node -v verifies the version of the node.
$ npm -v verifies the version of the npm.
Installation
Install the ZET (Zoho Extension Kit) CLI using the below command.
$ npm install -g zoho-extension-toolkit@latest
Run the below ZET command to verify the installation. Help details about the various support commands will be displayed:
$ zet
Creating a Project
Create a project with the following command:
$ zet init
The list of Zoho services is displayed. Choose Zoho Mail and press Enter.
You will be prompted to provide a project name. Type the preferred project name and press Enter.
Including Resources
Once you enter the project name, a directory of the same name is created on your system. It contains all the required folders, files and packages.
Navigate to the project directory and open the "App" folder. Include the resources of your widget into the relevant sub-folders.
Running the server
Run the following command to start the https server that runs your extension locally:
$ zet run
This command makes use of the 5000 port of your local machine. Before starting the server, ensure that the 5000 port is not occupied.
To verify the successful running of the server, open the given URL in your browser:
https://127.0.0.1:5000/
Validate and Pack
Execute the following command to validate your extension:
$ zet validate
Your extension needs to follow the below-given specification. Running the validate command will identify any violations of the specifications if any. Any such violations need to be rectified before uploading the zip.
Run the below pack command to create a zip with all the files and folders required for the running of your extension:
$ zet pack
The zip is present in the dist folder of your project directory. You can upload this zip to the Marketplace.
Specification
The project directory of your extension includes a plugin-manifest.json file. This file contains the configuration details of your extension. The keys included in this file need to follow the following configuration:
- locale: This is the default locale for the extensions. The translation folder of your project directory should contain all the translation files. The format of the files should be "<locale-code>.json".
- service*: The Zoho product for which your extension is created.
- While creating an extension for Zoho Mail, the service key will be auto-populated in the manifest as "service": "MAIL".
- storage: The value of this key should be set as "true" if you want your extension to store application data.
- logo: File path of the image you wish to use as the logo for your extension. Ex: "apps/images/logo.png"
- modules*: Widget is the module used for Zoho Mail Extensions. It is an array of the details of your extension. The widget module is required to have the following set of properties.
- location: Location of your widget in the Zoho product.
- It has to be "zoho.mail.preview.rightpanel" for Zoho Mail, to access your extension in the widget panel.
It has to be "zoho.mail.pinnedview.rightpanel", if you want to perform quick actions using your widget. The widget will be available to be pinned to the right pane. Refer here to pin a widget to the right pane.
This API can be used to open the extension in the widget panel from the quick-action window or vice-versa.
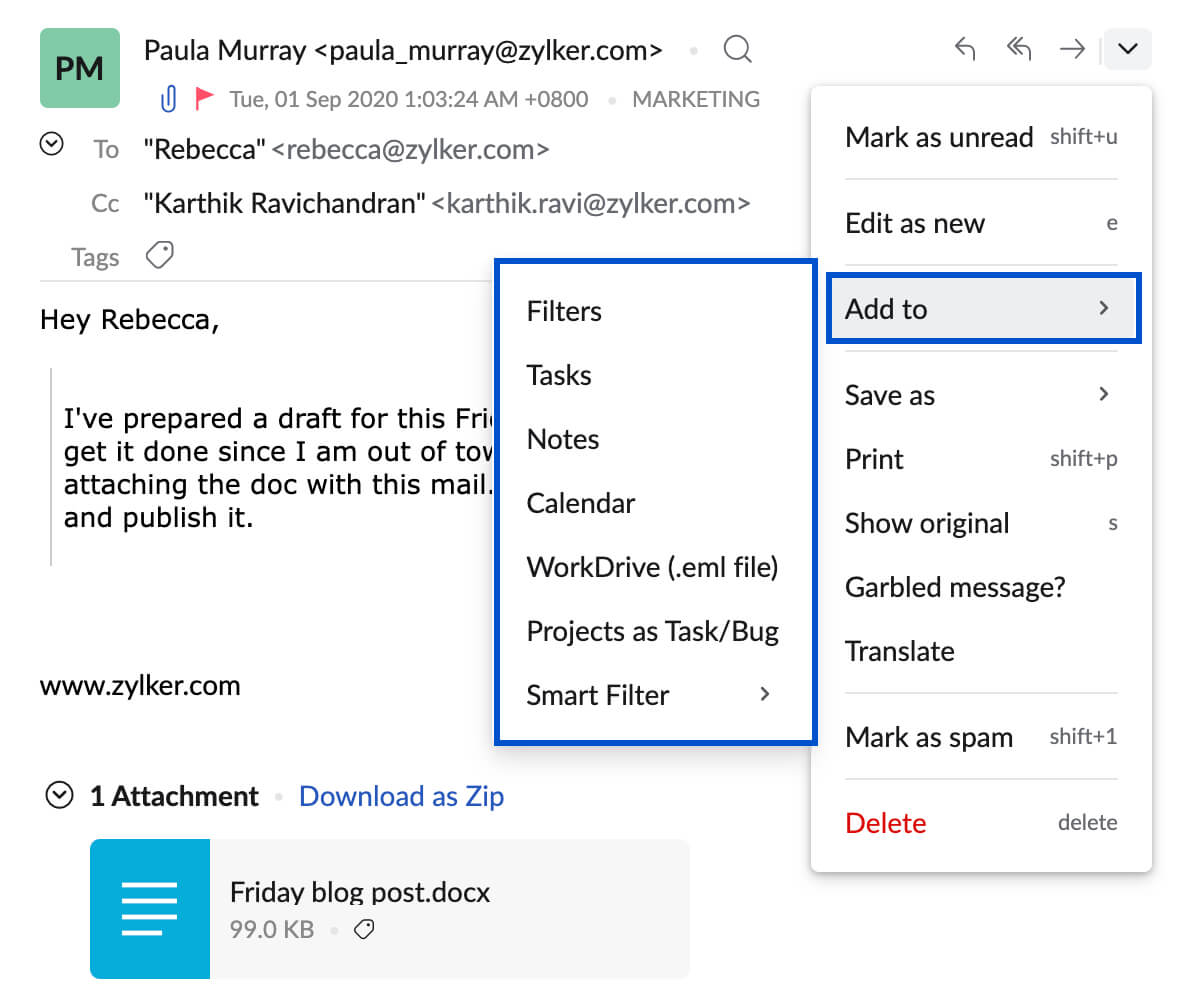
- It has to be "zoho.mail.preview.moreoption", if you want to include the application in the Add to option of the More options drop-down in mail preview pane.
- It has to be"zoho.mail.emailaddress.moreaction", to view and access your widget from the Contact Card in the Preview Pane.

- It has to be "zoho.mail.preview.rightpanel" for Zoho Mail, to access your extension in the widget panel.
- name: Name of the project directory of your widget. It is auto-populated.
url: It is the path defined for your widget.
MANIFEST SAMPLE: For accessing the widget in right panel
"modules": {
"widgets": [
{
"location": "zoho.mail.preview.rightpanel",
"name": "extension_name",
"url": "/app/widget.html"
}
]
}MANIFEST SAMPLE: To perform quick actions using the widget in pinned view
"modules": {
"widgets": [
{
"location": "zoho.mail.preview.rightpanel",
"name": "extension_name",
"url": "/app/widget.html"
}
{
"location": "zoho.mail.pinnedview.rightpanel",
"name": "extension_name",
"url": "/app/widget.html"
}
]
}MANIFEST SAMPLE: To include application to the Add to option of the More options drop-down in mail preview pane.
"modules": {
"widgets": [
{
"location": "zoho.mail.preview.rightpanel",
"name": "extension_name",
"url": "/app/widget.html"
}
{
"location": "zoho.mail.preview.moreoption",
"name": "extension_name",
"url": "/app/widget.html"
}
{
"location": "zoho.mail.pinnedview.rightpanel",
"name": "extension_name",
"url": "/app/widget.html"
}
]
}
- location: Location of your widget in the Zoho product.


connectors: Connectors allow you to integrate your extension with third-party applications. Click here to know more about connectors.
The connector key needs to have the following structure:"connectors": [
{
"serviceName": "name_of_the_service"
}
]config: This key includes the parameters that need to be configured during the installation of your extension. The structure of config key should be as follows:
"config": [
{
"name": "Param name",
"mandatory": "true/false",
"secure": "true/false",
"inputType": "text /dropdown/ checkbox"
"option": [{
"text": "option1"
"value": "1"
}]
}
]
Parameters Value name* The field that denotes the parameter name. mandatory* true - If the parameter needs to be mandatory
false - If the parameter need not be mandatorysecure* true - If the values entered should be hidden
false - If the values need not be hiddeninputType* text/ dropdown/ checkbox option This is only required if the chosen inputType is dropdown. It is used to denote the different options in the dropdown and their corresponding values. WhiteListedDomains: The White listed domains are a list of domains that are explicitly allowed to interact with your extension. Only URLs included in this whiteListedDomains can be invoked using the command Invoke URL. The whiteListedDomains key needs to have the following structure:
"whiteListedDomains": [
"https://url1.com",
"https://url2.com"
]
Testing the extension
You can test your extension locally using a few simple steps:
- Open your terminal and navigate to your project directory.
- Execute this command to run the extension: zet run
- Login to your Zoho Mail account and access https://mail.zoho.com/zm/sandbox.do URL.
- Go to Settings >> Integration >> Developer Space
- Open the eWidget pane by clicking on the integration icon to.
- Turn ON the Developer mode toggle.
Your extension that is locally run will be listed here for further testing.
Submitting the extension
Once your extension is packed, you need to submit the zip to Zoho Marketplace for review.
Uploading the Zip
- Login to your Zoho account.
- Go to the Sigma website.
- Click on the New Extension button on the top-right corner of the page.
- Enter the following details:
- Name - Name of the extensions you are submitting
- Description - Short description of your extension
- Service - Select the Zoho Mail icon from the list
- Turn ON the Upload Existing file toggle if you have a Plugin manifest ZIP file to upload.
- Select the I agree to the Terms and Conditions button and click Save as draft.
- Plugin manifest editor window will open. Save any changes you make and close the window. All extensions will be displayed as cards.
- Hover over the extension you are submitting and click on Extension Details icon.
- Then click on the Publish button on the top-right corner of the page.
- App visibility pop-up will open. Select if you want the extension to be Public or Private and click Publish.
- Private - You can choose the Private option if you want to use the extension within a small group. Private extensions can be used only by the people you share the installation link with.
- Public - If you want your extension to be published in Zoho Marketplace for customers to install, you need to choose Public option.
Depending on whether you've chosen Private or Public upload, the data you are required to provide in the first two steps will differ. They are as follows:
Public extension
Enter the following details to publish a Public extension in Zoho Marketplace:
- Primary:
- Provide the following information:
- Category - Select a tag suitable to the purpose and nature of your extension.
- Privacy policy - Enter the link for the privacy details of your extension.
- Terms of Service - Enter the URL of the Terms of Service document of your extension.
- Select the I agree to the Marketplace Vendor Agreement checkbox.
- Click Next.
- Provide the following information:
- Prerequisite:
- Select the pricing plans for which you want to support your extension from the Supported Edition drop-down.
- Click Next.
- Imagery:
- Upload the following files of your extension:
- Extensions icon - Resolution 180 x 180
- Thumbnail - Resolution 740 x 340
- Screenshots - Add the required screenshots for your extensions.
- Click Next
- Upload the following files of your extension:
- Summary:
- Enter the following details:
- Tagline
- Description
- Key features
- User education link
- Help video link
- Click Next
- Enter the following details:
- Pricing:
- Enter the following details:
- Globally available - Select if you want your extension to be available globally.
- Pricing - Choose the pricing for your extension.
- Click Submit.
- Enter the following details:
Your extension is now submitted for review to the Zoho Mail team. The functionality and usability of the app are tested and improvements are suggested if needed. Once the review process is complete, the app is published on Zoho Marketplace for users to install.
Sharing your extension
You can share the extensions you create with your organization members from the Integration settings in Zoho Mail.
- Login to Zoho Mail
- Navigate to Settings -> Integration
- Select Extensions by me from the filter menu to view all the extensions created by you.
- Click on the Share to org option of the extension you want to share with your organization.
- Click Submit
The extension will be submitted for Admin approval. Once approved by the admin of your organization, the extension will be available for other org members to install and use. Learn more.
Updating your extension
You can update the version of your extension to add features or fix bugs.
- Go to the Sigma App listing and hover over the extension you wish to update.
- Click on the Extension details button.
- Click on the Edit Extension button on the top-right corner.
- Edit Builder window will open. Make necessary changes and click Save. Close the window.
- Click Publish button in the top-right corner of the page to submit the updated extension.
Once the review process is complete, the updated version of your app will be available in Zoho Marketplace. If it is a private extension, the installation link for your updated app will be obtained.
Developer Space SDK
Developer Space APIs are commands to include various Zoho Mail functionalities into the application you create. Refer this help page for a list of all the commands.
Sample extension
The sample extension will let you explore the features offered by Zoho Mail Developer Space. The functionality of the sample extension is designed for you to try out the different actions that can be incorporated into your custom extension.
Download the sample extension here. You can also test the sample app from Zoho Sigma extension gallery.
Note:
- Developer Space is only available for Paid organization users.
- Developer Space needs to be made available to org members by the Organization Admin. Please contact your admin for access if not available. Learn more