Manage Email Retention and eDiscovery
An administrator's responsibility does not get over by just enabling eDiscovery for your organization. Managing the settings such as enabling/disabling eDiscovery for specific users, creating custom roles, etc. is equally important for admins. These settings can be monitored from the User Management section and the eDiscovery Settings section.
User Management
Admins can manage user roles, eDiscovery enabled/disabled status, create custom roles, etc. from the User Management section. Select the appropriate link to learn more about each section under User Management.
Users
The Users section lists your organization's users and their eDiscovery status (enabled / disabled). Below are the you can perform from the Users page:
- Manually enable or disable retention
- Enable retention via import and Disable retention via import
- Enable/Disable retention for domains
- Select the desired users and manage eArchive Search access.
Associate a custom filter from the drop-down option next to the Filter Name. To do this, you must first create custom filters in the Email Filters section. Refer to the create Custom Email Filter help page for details.
Note:
By default, users are associated with the default EDISCOVERY_FILTER configured at the time of enabling eDiscovery.
- View the storage used by each user consumed for eDiscovery.
Modify Retention Manually
Follow these instructions to manage eDiscovery for your organization's users:
- Log in to Zoho Mail Admin Console and select eDiscovery on the left pane.
- Navigate to User Management and select Users.
- Click the enable/disable icon under the Mail eDiscovery Status column to manually enable or disable eDiscovery for a single user.

- Alternatively, you can select multiple users and click the Modify Mail eDiscovery Status drop-down.
- Select Enable mail eDiscovery/Disable mail eDiscovery based on your preference.


The retention status gets updated for the selected users.
Enable Retention for Bulk Users
Follow these instructions to modify the enable retention status using the import method:
- Log in to Zoho Mail Admin Console and select eDiscovery on the left pane.
- Navigate to User Management and select Users.
- Click Modify Mail eDiscovery Status on the top menu.

- Select Enable mail eDiscovery via import and download the sample CSV file.

- Upload the CSV file which contains the users list and click Enable.
- Verify the user details and click Enable.


Disable Retention for Bulk Users
Follow these instructions to disable the retention status using the import method:
- Log in to Zoho Mail Admin Console and select eDiscovery on the left pane.
- Navigate to User Management and select Users.
- Click Modify Mail eDiscovery Status on the top menu.
- Select Disable mail eDiscovery via import, and download the sample file.
- Upload the CSV which contains the users list, and click Disable.
- Click Disable to update the retention status.
Modify Retention for Domains
You can easily modify the retention status for all users of a domain from the Users page. Follow these instructions to modify the retention status for domains:
- Log in to Zoho Mail Admin Console and select eDiscovery on the left pane.
- Navigate to User Management and select Users.
- Click Modify Mail eDiscovery Status on the top menu.
- Choose Enable mail eDiscovery via domain, and select the desired domain for which you want to enable retention.

- Select Disable mail eDiscovery via domain, and select the desired domain for which you want to disable retention.

The eDiscovery retention status gets updated for the domain based on your selection.
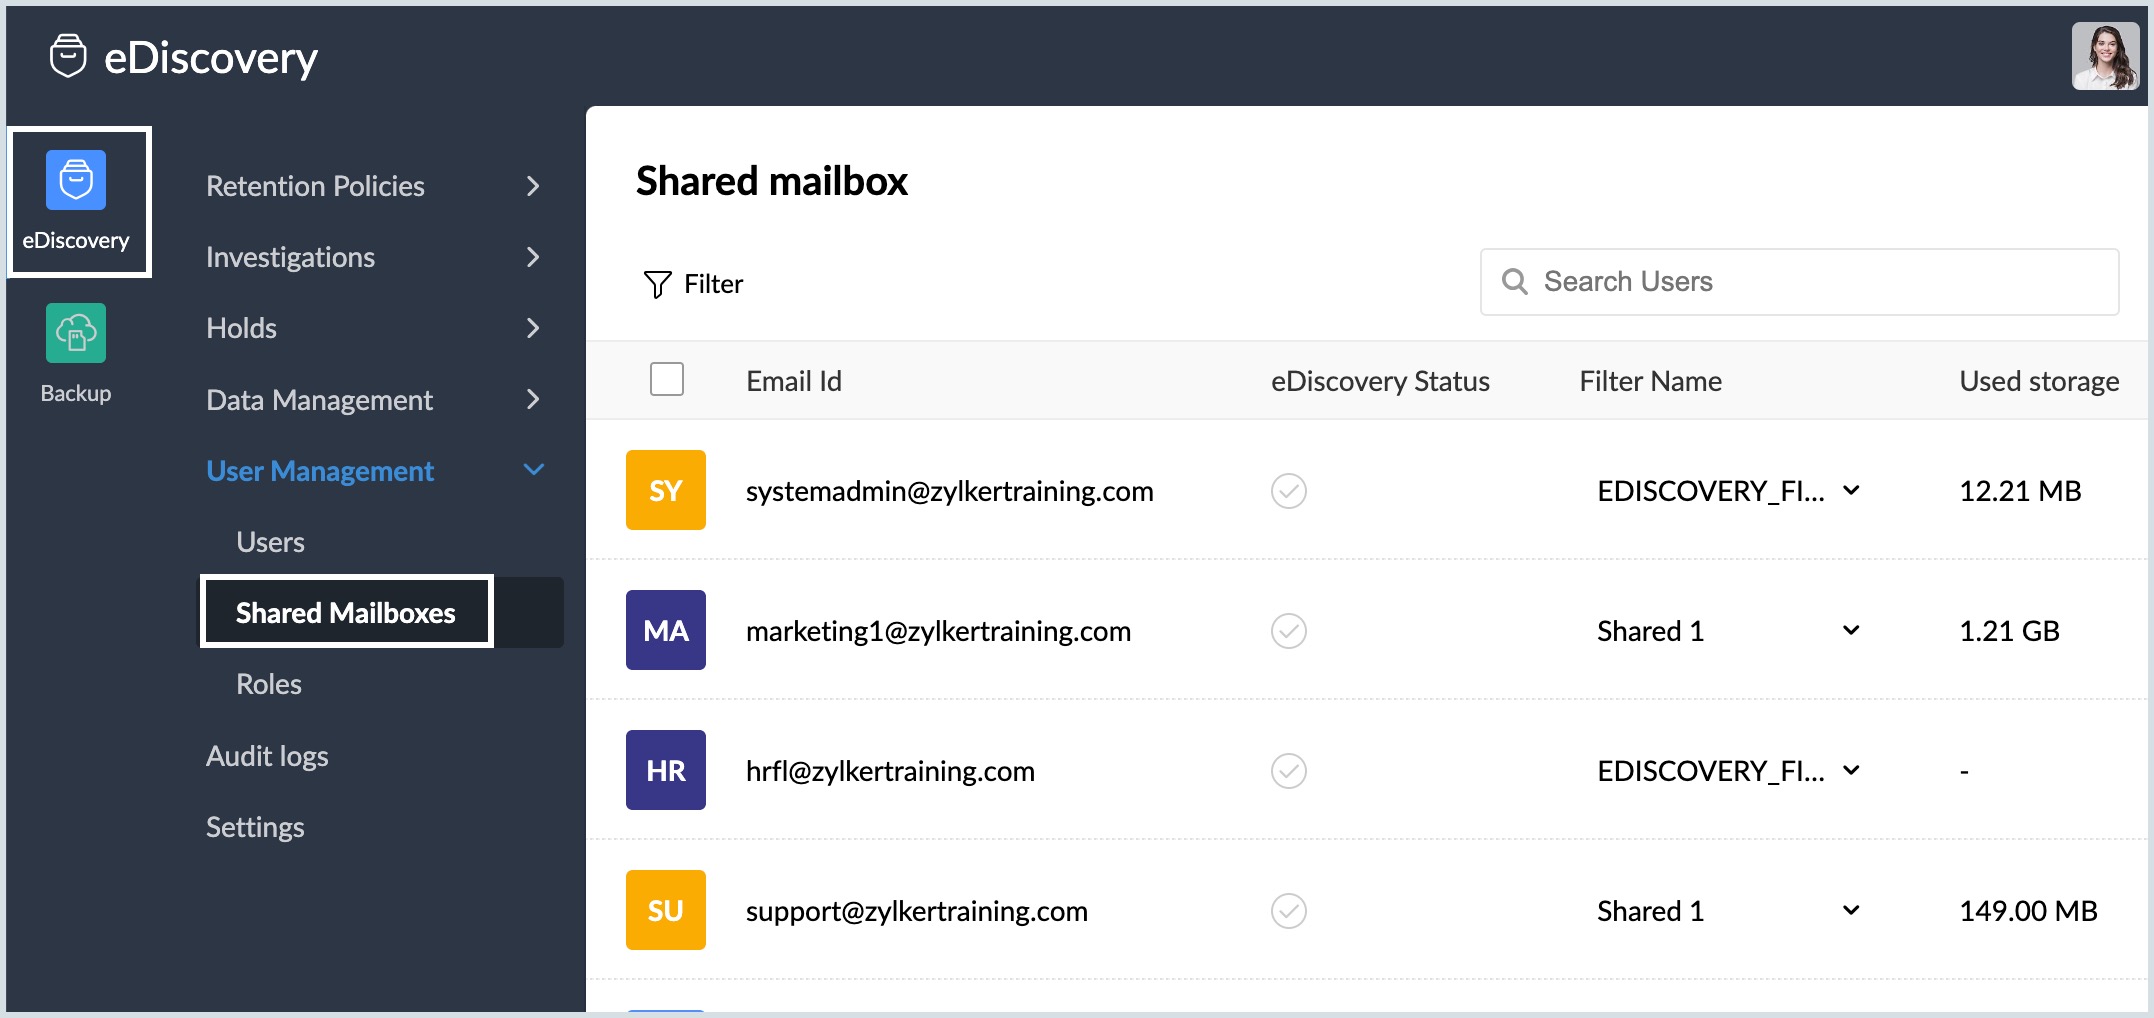
Shared Mailboxes
The Shared Mailboxes section in user management lists your organization's shared mailboxes and their eDiscovery status. From the shared mailbox section, you can:
- Enable or disable retention for the shared mailboxes.
- Apply the desired email filters for each shared mailbox.
- View the storage of the shared mailbox.
- Filter the shared mailboxes based on the eDiscovery status.
Roles
The super admin and all administrators of an organization, defined in the Zoho Mail Admin Console, have complete access to configuration and data on the eDiscovery portal.
For certain users, like legal admins, who require access only to the eDiscovery portal data, but do not require admin access to the mail settings or to the eDiscovery settings of the organization, an "Admin" access would be an overkill and may compromise the controls within the organization.
This also creates a significant amount of risk as all the users can access, control, search, export or even delete other user's data. As this data is sensitive in nature, it is advisable to limit the access to each user based on the specific requirement.
Roles allow Admins to have a more fine-grained control on who can access and what each user can do within the eDiscovery portal. There are two types of roles:
System Role
The System Role is pre-defined and users associated with this role have full-fledged access to all the actions in the eDiscovery portal. Users who need complete access to all actions in the eDiscovery portal should be assigned to this role. This being a System role, its permissions cannot be modified.
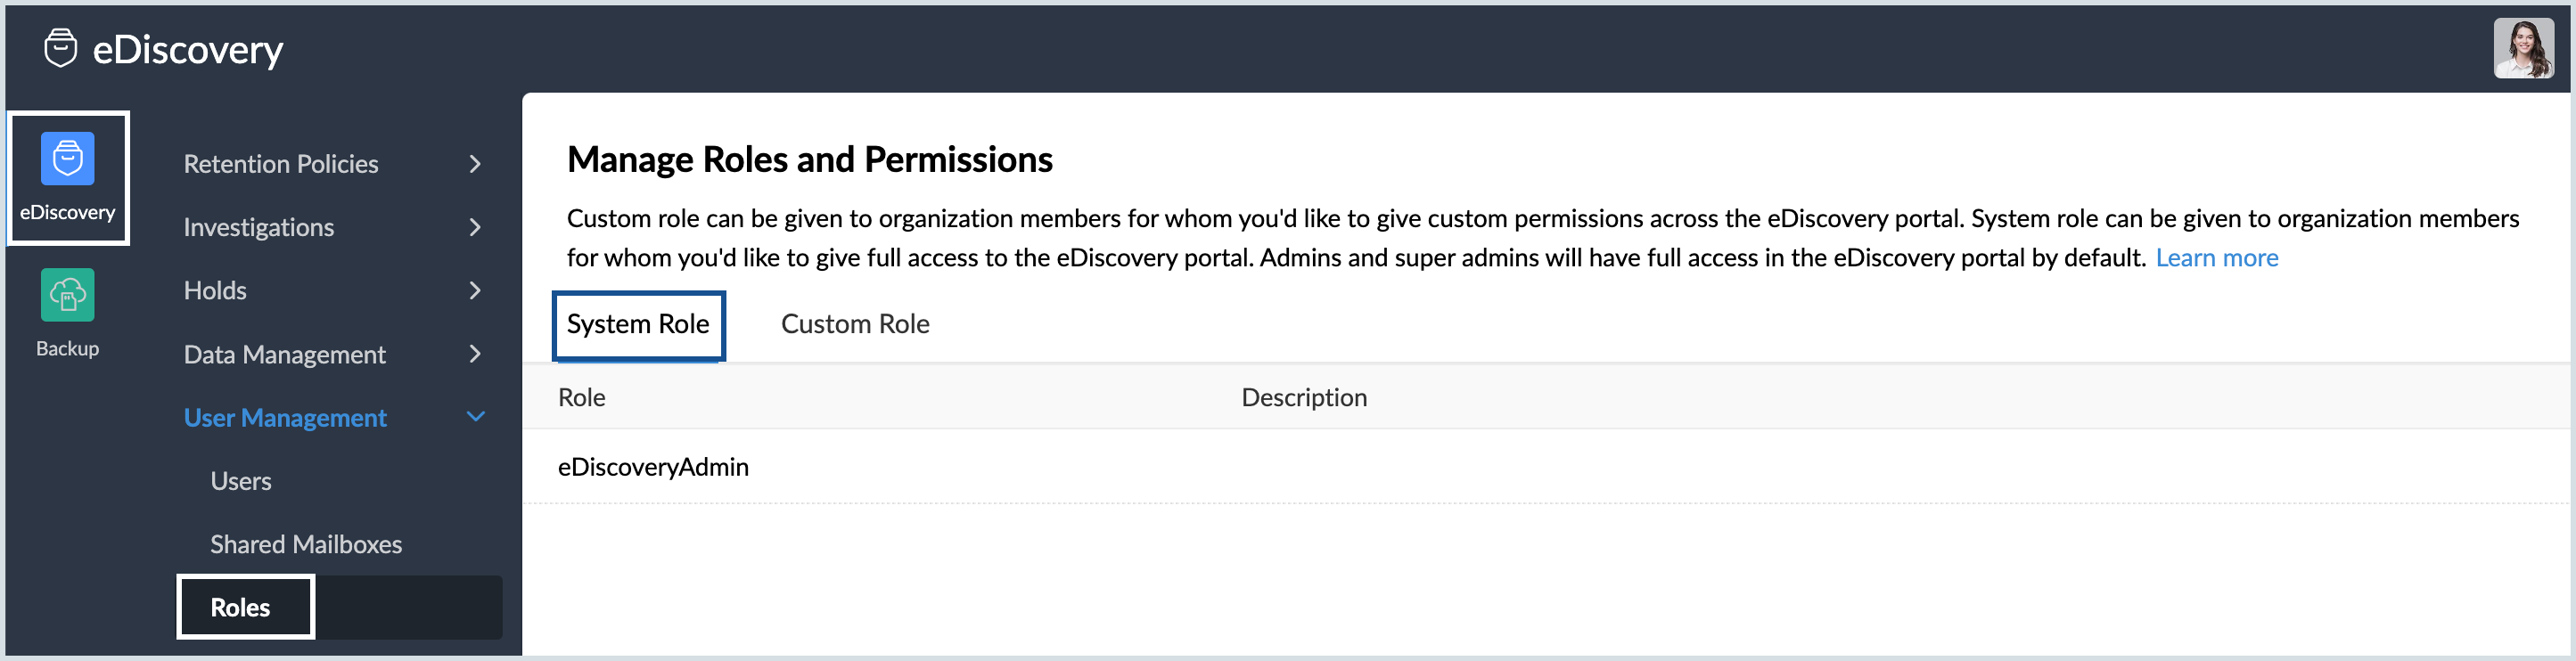
Note:
Enabling or disabling the eDiscovery service and user management permissions are not included in this Role. Users who need control on these two actions also, will need to be added as Admins in the Admin Console. Refer here on how to add an Admin.
Custom Role
For more fine-grained control, Admins can create Custom Roles. Permission for these roles can be customized by the admin as required. Admins can define as many Custom Roles as required and assign the users to more than one custom role as well.
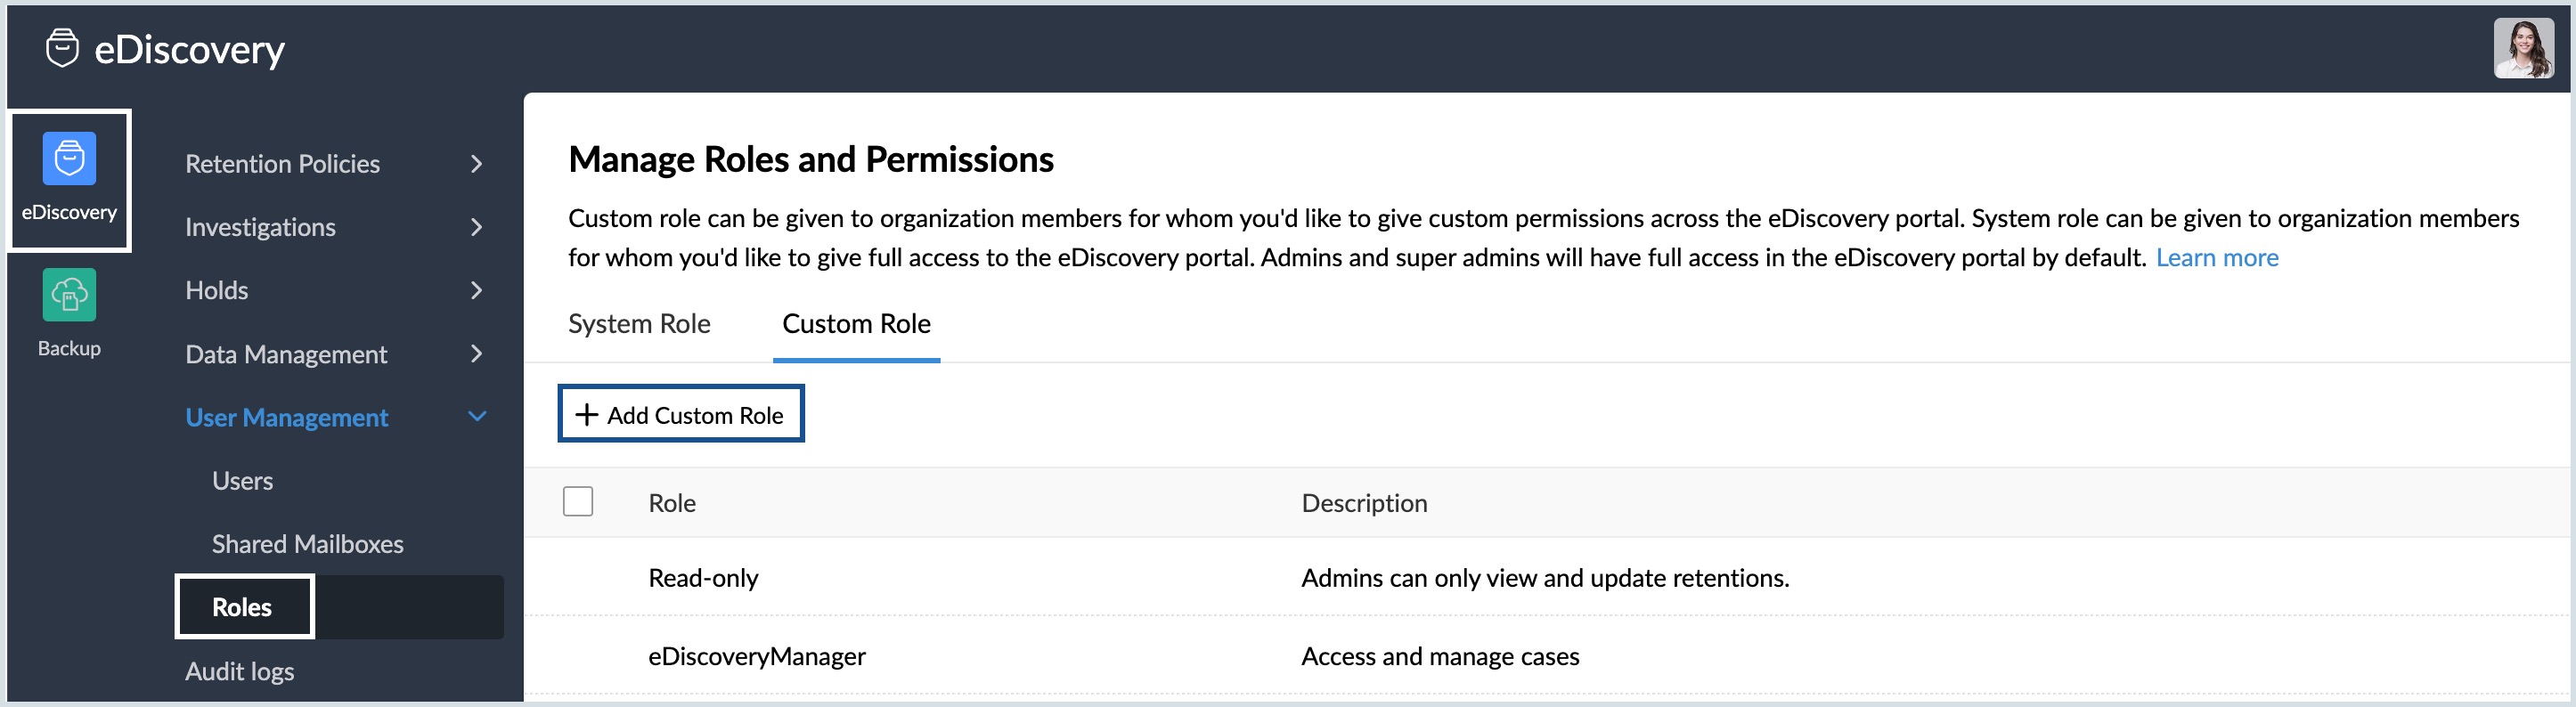
Create a Custom Role
Follow these steps to create a custom role:
- Log in to Zoho Mail Admin Console and select eDiscovery on the left pane.
- Navigate to User Management and select Roles.
- Click Add Custom Role under the Custom Role tab.
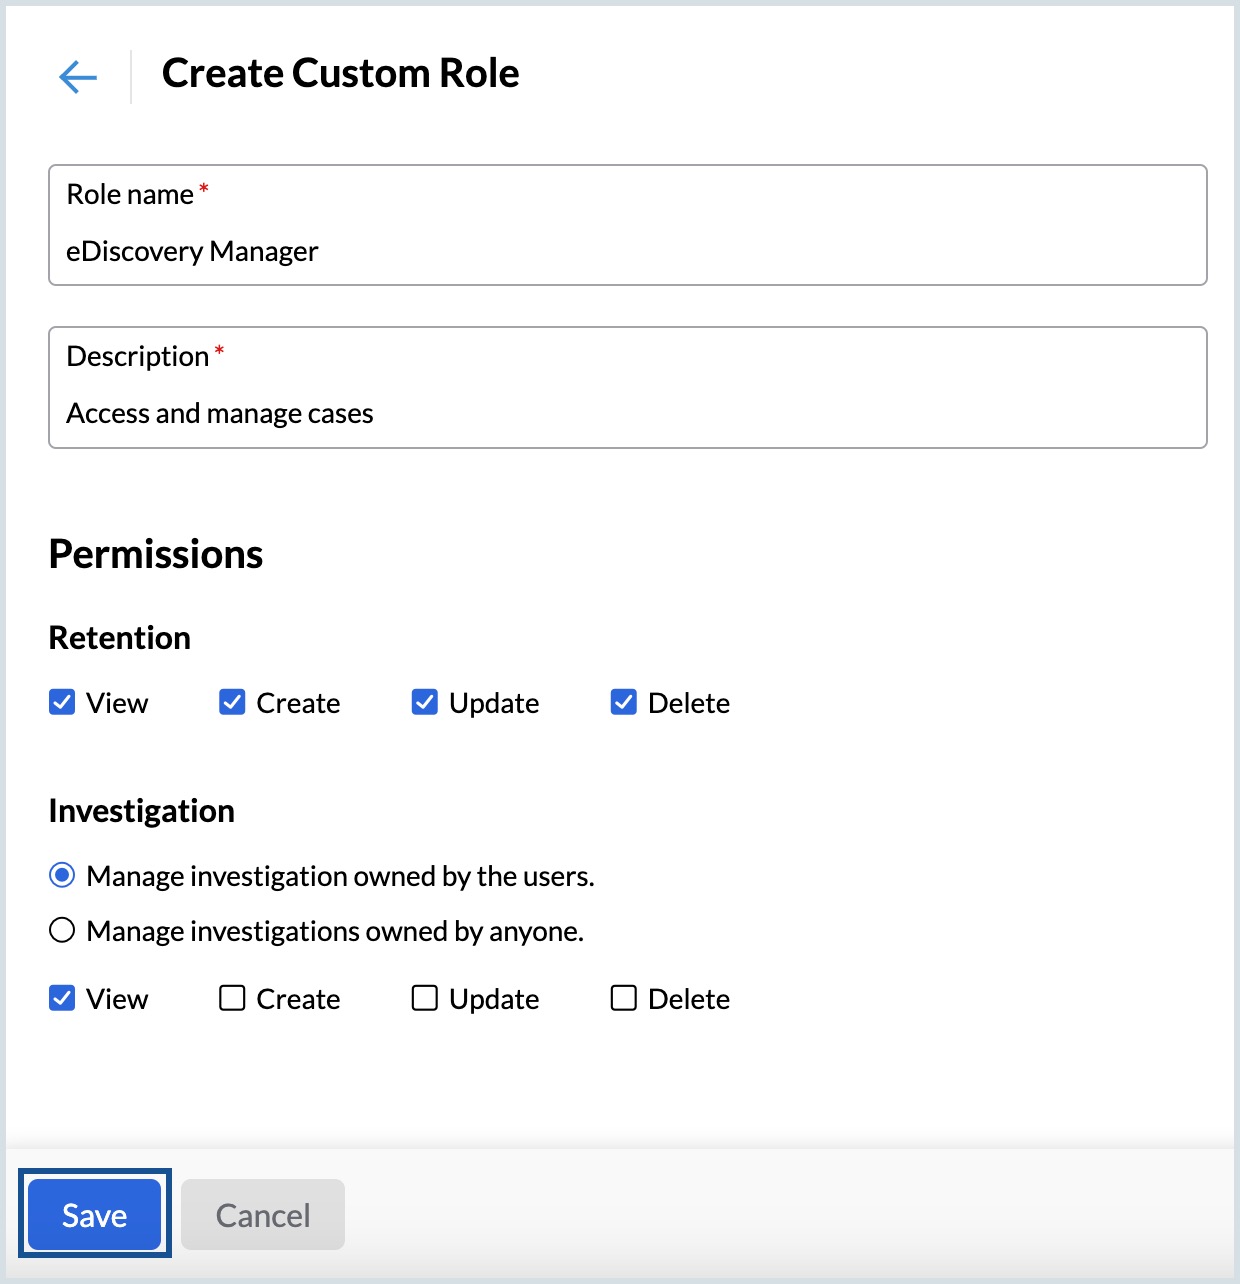
- Mention the Role name and Description.
- From the Permissions list, you can enable the required level of permission within each of the below mentioned modules:
- Retention
- Investigation (Owned by user or anyone)
- Saved Search
- Hold
- Tag
- Export
- Audit Logs (Investigation)
- Recovery
- Export and Purge
- Expunge
- Audit Logs (System actions)
- Email Filters
- You can narrow down the access based on the level of control under each module as View, Create, Update, Delete, and Download.
- Once you select the level of controls under each module, click Save to apply the changes.
- Now, go back and click on the Role name from the list to view the general description and permissions enabled for the same.
- Select Associated Users to view or add users for the said Custom Role.
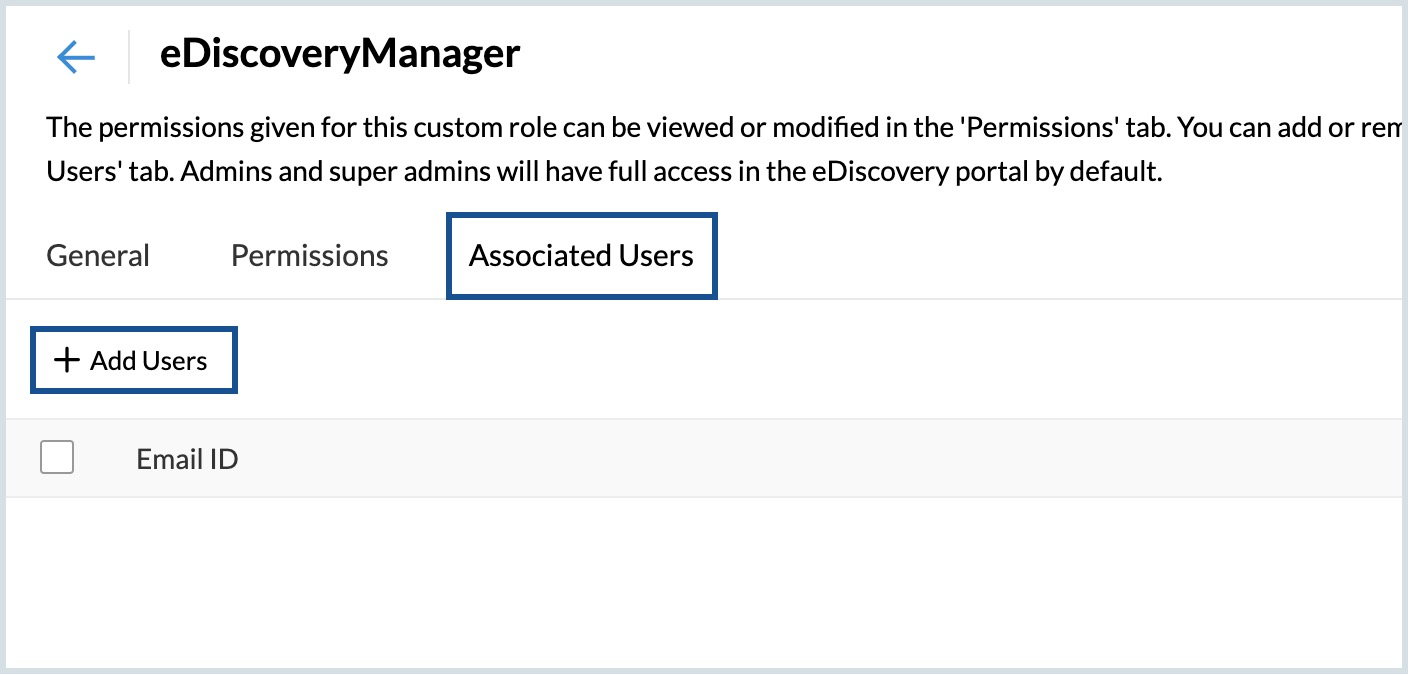
- Click Add to save the changes.


Note:
- You can assign the role to either one or several users at once.
- In case 2 or more users are assigned a same role, all these users will have the same privileges.
- If a single user is associated to 2 or more roles, the user will have combined permission of both custom roles.
Manage eDiscovery Storage
The user's mailbox, eDiscovery and Backup share the storage allocated to a user. If you no longer require certain emails in Retention, you can remove those in order to free-up the user's storage. Follow these steps to remove emails from retention:
Note:
Removing emails from retention to increase storage is a sensitive operation. The emails will be deleted forever and you won't be able to retrieve them.
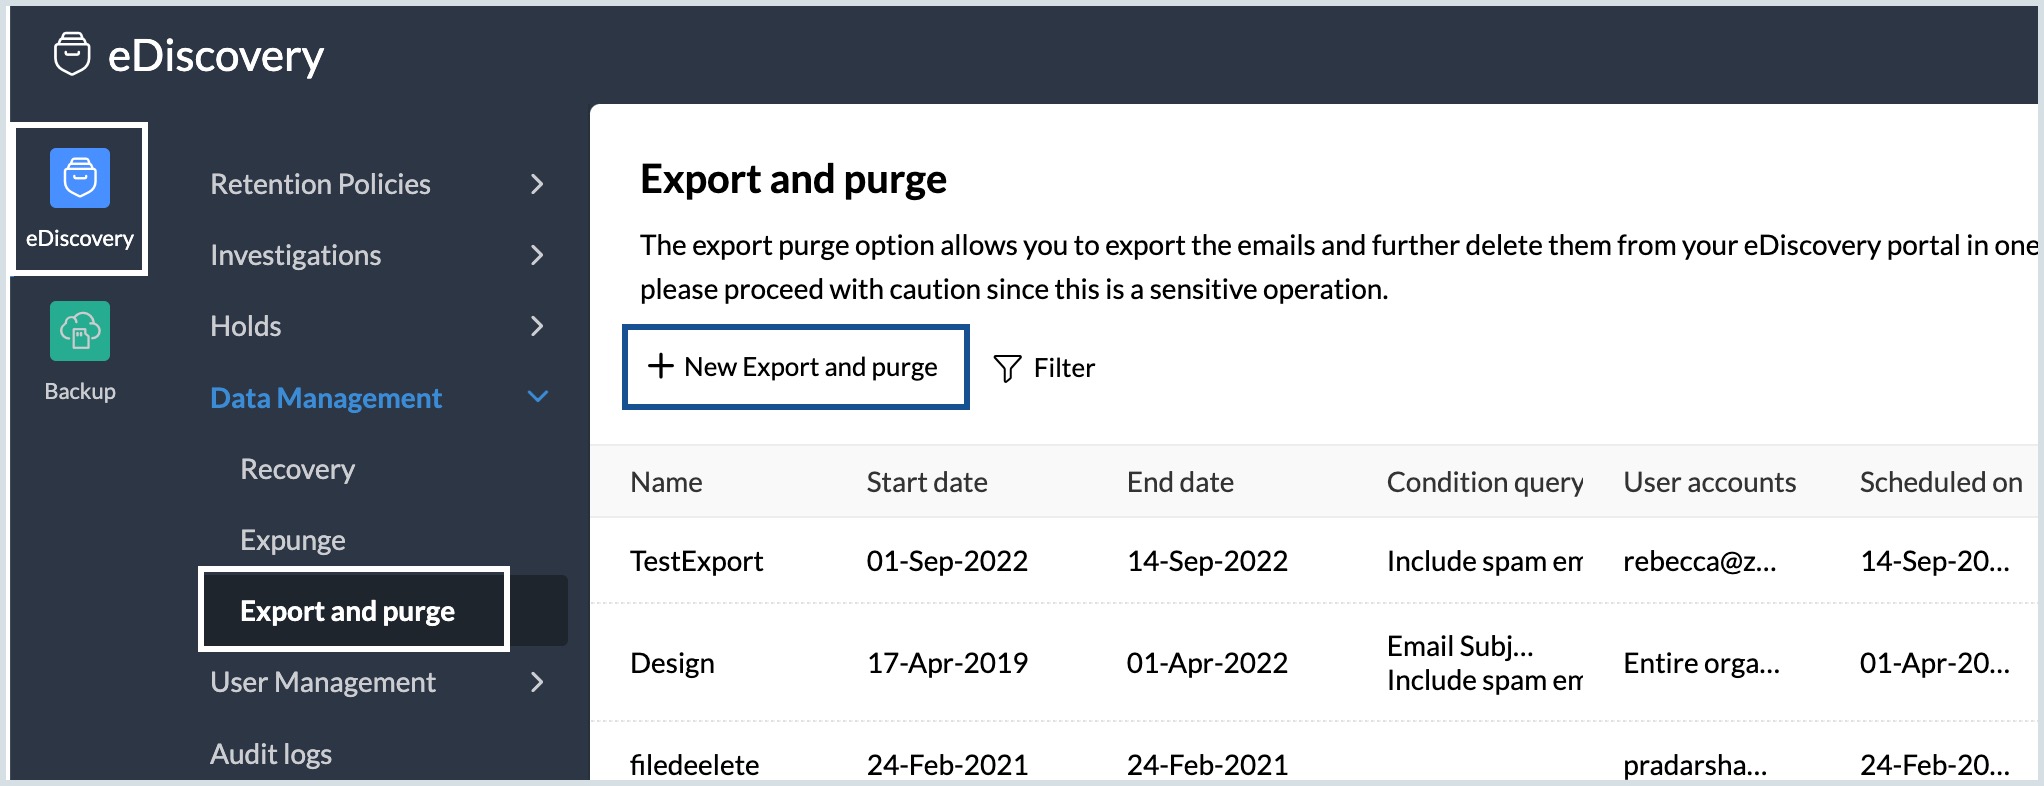
- Log in to Zoho Mail Admin Console and select eDiscovery on the left pane.
- Navigate to Data Management and select Export and purge.
- Click New Export and purge.
- Enter a name for the export and select the desired account type:
- All accounts - All user accounts and shared mailboxes will be included in the export and purge action.
- Specific user accounts - Admins can export and purge the emails of a particular user by adding the user in the User mailboxes field.
- Specific shared mailboxes - Admins can export and purge the emails in a particular shared mailbox by adding its address in the Shared mailboxes field.
- Click the duration drop-down and choose a preset range or Custom range.
- Select the start and end dates if you chose the custom range option.
- Add one or more Condition queries as per your requirement.
- If required, select the Include spam emails checkbox.
- Encrypt with password to prevent unauthorized access to your data.
- Select ZIP or PST and click Export & Purge.
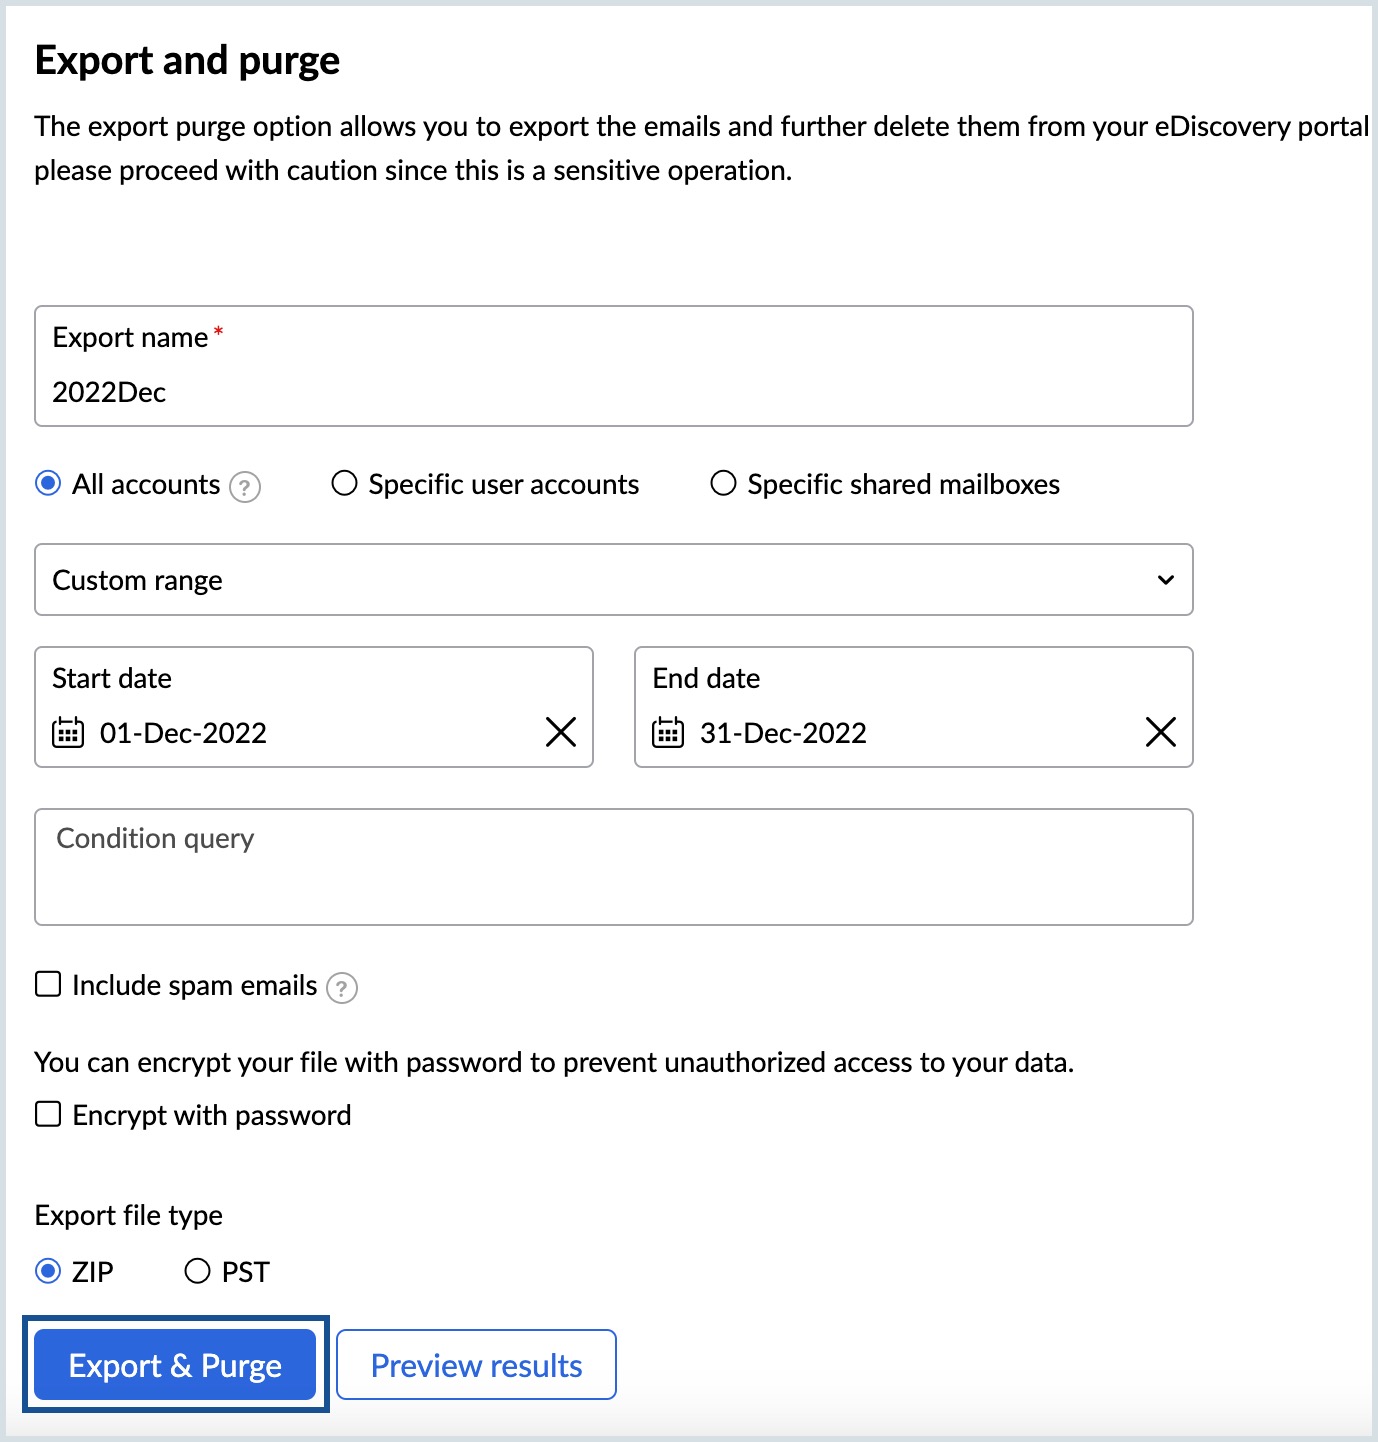
- Enter the admin password in the dialog that appears and click Ok.
- Once the export gets completed, select the export and navigate to the Files tab.
- Hover over the exported file and click Download file.
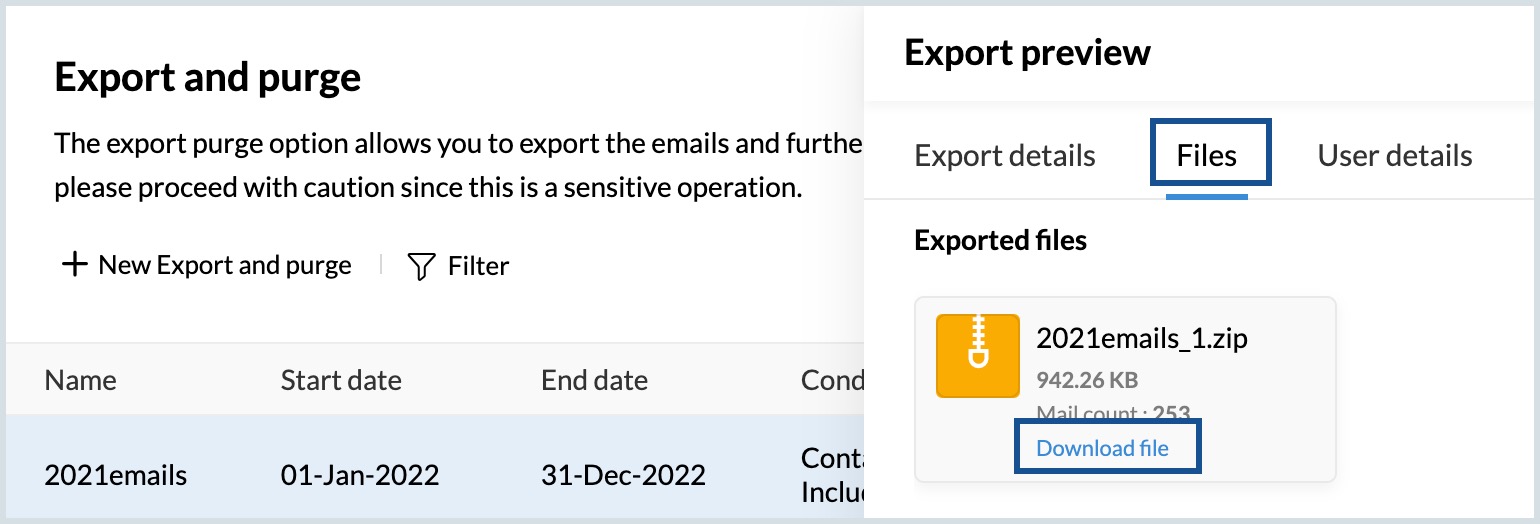


The export process may take some time depending on the file size. Based on your selection, the emails are now removed from retention, thereby increasing the user's storage. You can view the current storage space status under the Users tab.
Note:
The files under Export And purge will be available only for 90 days. Hence download the files immediately after the status shows Completed.
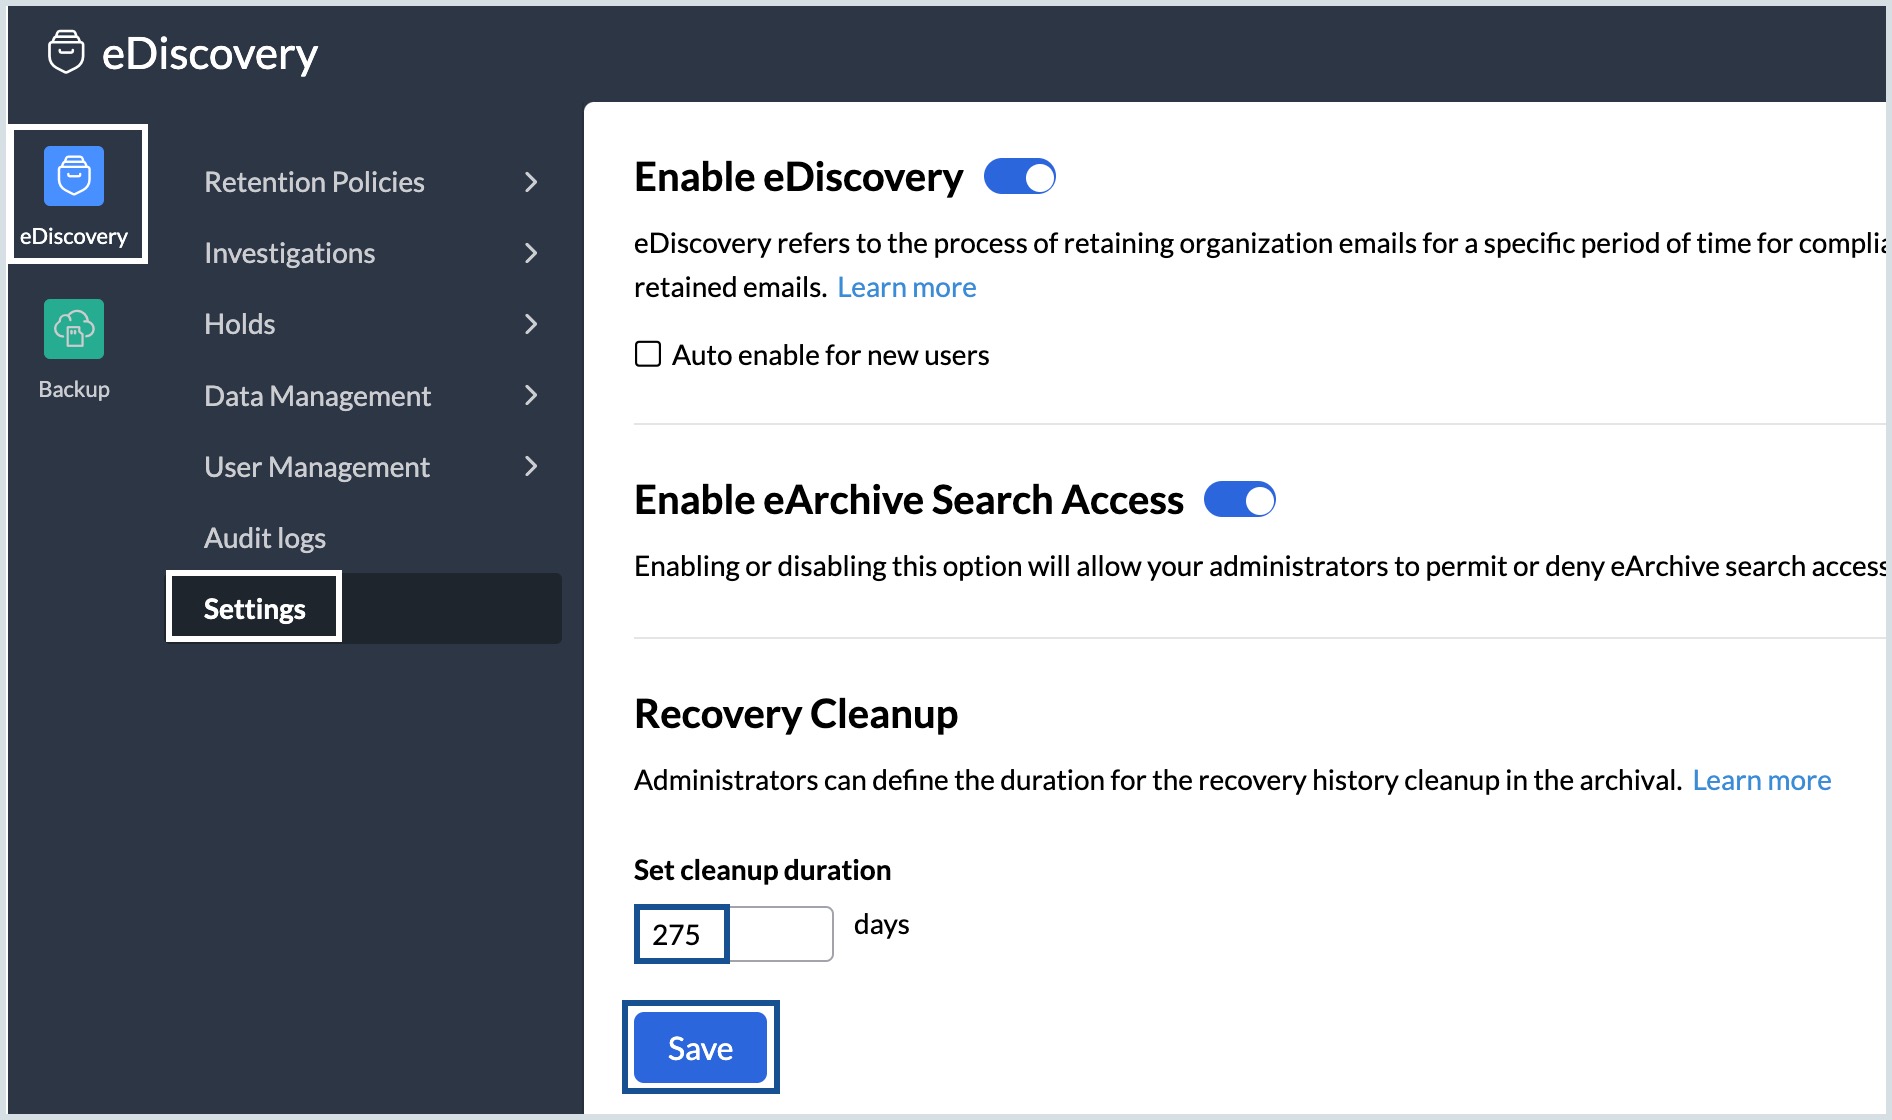
Customizing eDiscovery settings
Enable / Disable eDiscovery
As an administrator, you can customize your eDiscovery portal from the Settings section. This section allows you to enable or disable eDiscovery for your organization. In case, you have already enabled eDiscovery and later, due to some unforeseen reason, wish to disable the service, then the emails that get delivered to your organization's user account will no longer be archived, while the older emails will be retained as per the existing retention policy.
Follow these steps to manage the retention status for your organization:
- Log in to Zoho Mail Admin Console and select eDiscovery on the left pane.
- Select the Mail tab and enable/disable eDiscovery based on your preference.
- Navigate to the Cliq tab and enable/disable eDiscovery as per your organization's requirement.

- Navigate to the WorkDrive tab and enable/disable eDiscovery.
- Click Remove to provide you confirmation in the pop-up that appears.


Auto-enable for new users
If you select Auto-enable for new users, emails will be archived as per the default retention policy for every new user joining the organization. In case, auto-enable for new user is disabled, an admin will still have the option to enable eDiscovery for the new user under the Users tab, whenever required, but manually.
Enable eArchive search access for users
Administrators can decide if users can access their permanently deleted emails and recover them directly from their mailbox. To allow users to access or recover the archived emails from their mailbox, follow these steps:
- Log in to Zoho Mail Admin Console and select eDiscovery from the left pane.
- Navigate to Settings under eDiscovery and select the Enable eArchive Search Access toggle switch.
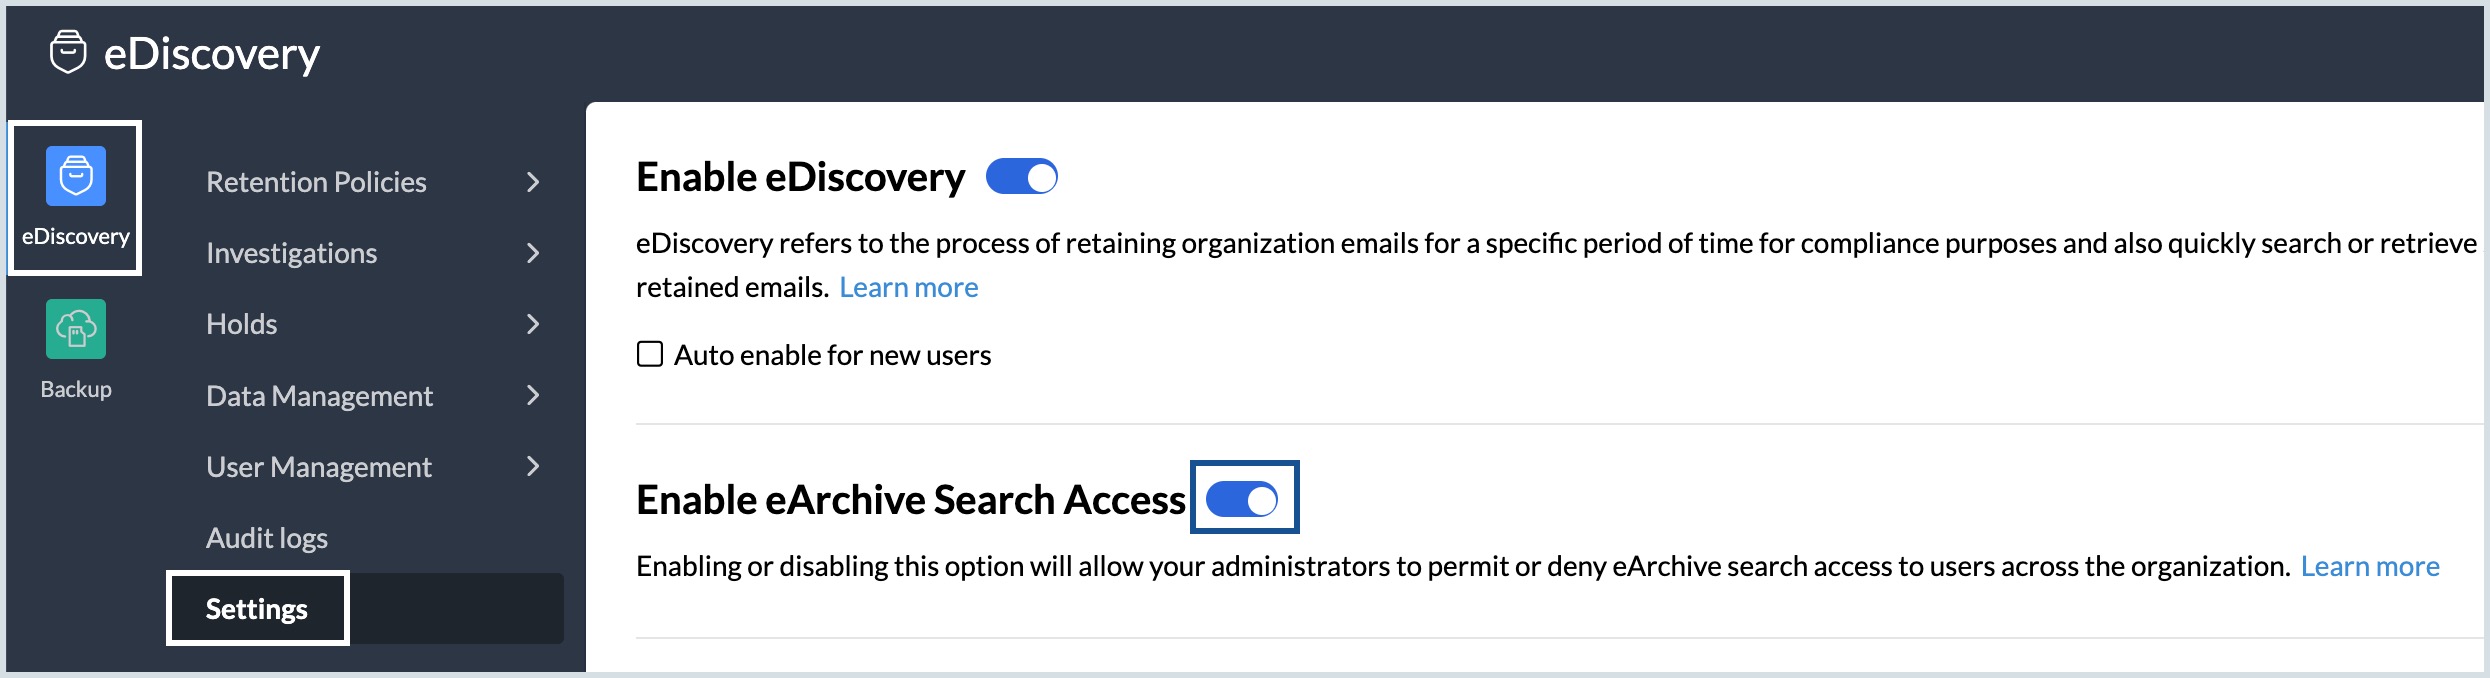
- Select Enable for All Users. You have now enabled archived mail access for all the users in your organization.

- Alternatively, select Go To UserManagement to manually configure eArchive Search access for one or more users.
- Hover over the desired user and click the admin icon under eArchive Search.
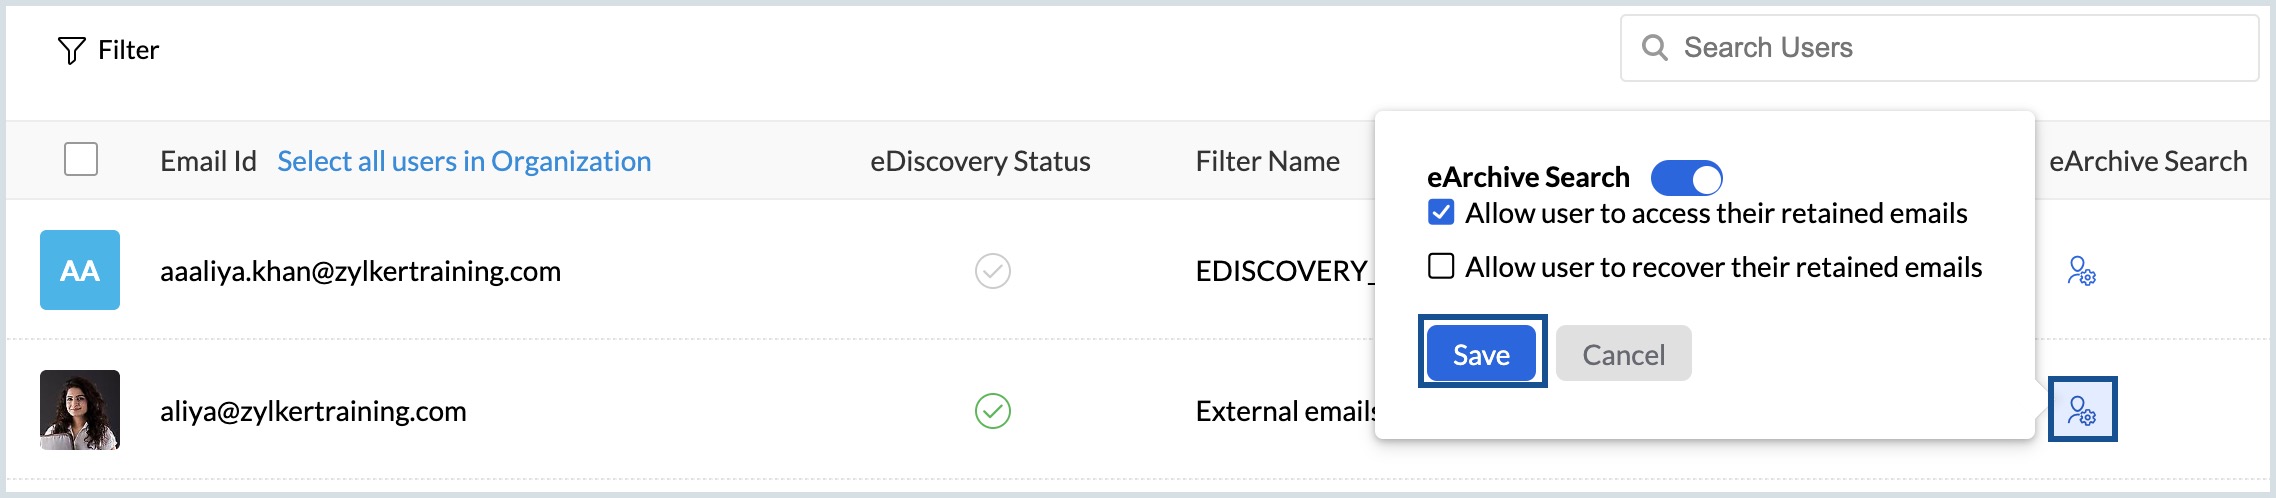
- Select the desired permissions from the available options:
- Allow user to access their retained emails - This option enables eDiscovery access in the user's mailbox. With this permission, users can view deleted emails but cannot recover them. For more details refer to Access to retained emails.
- Allow user to recover their retained emails - Allows the users to search the deleted emails and recover them back to their Inbox. For more details refer to the Steps to recover emails. You can enable this permission only if the Allow user to access their retained emails option is enabled.
- Click Save. The user can access the archived emails from his/her mailbox.
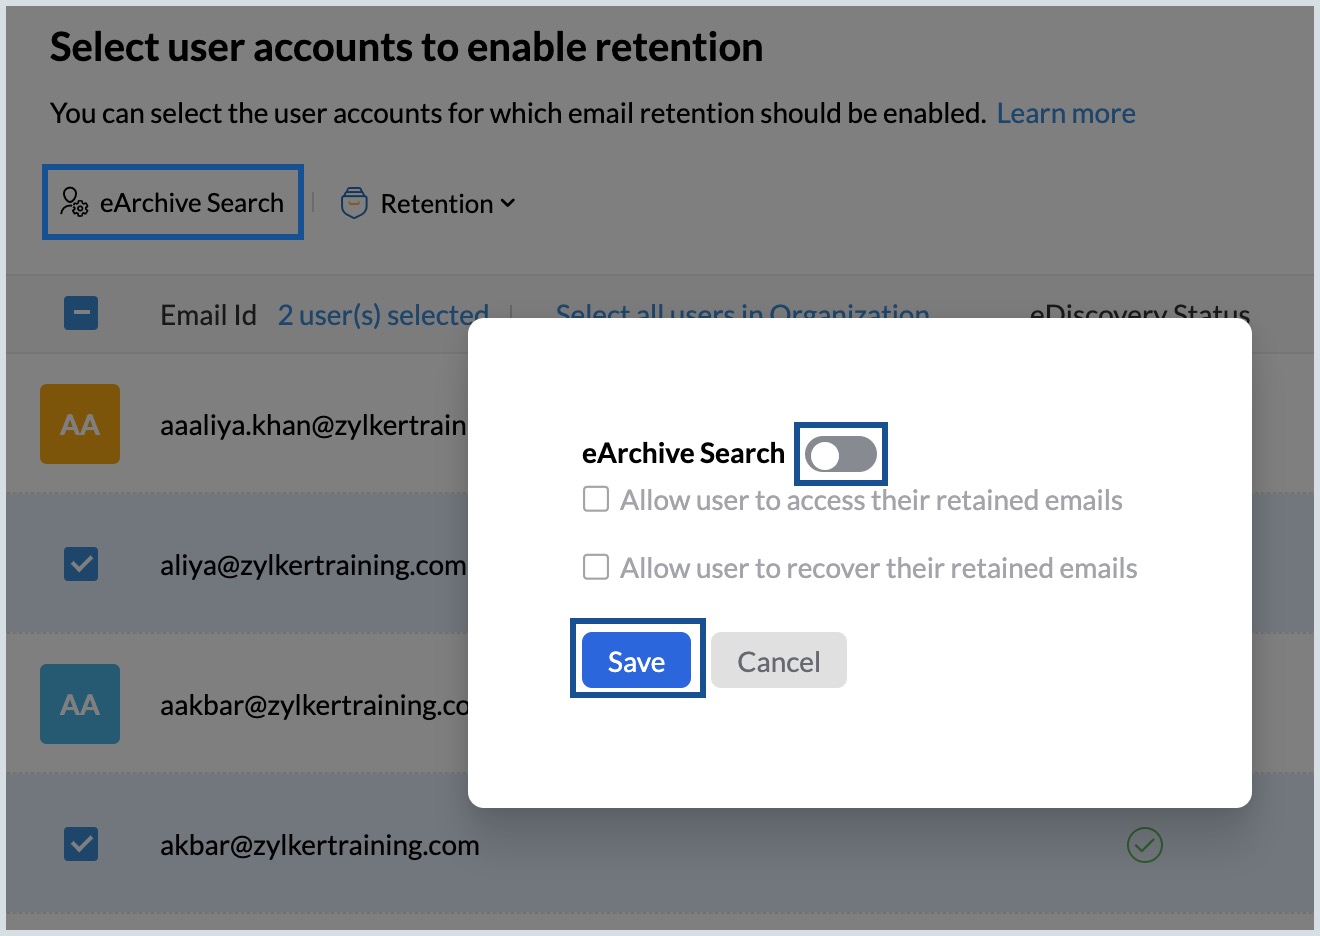
- You can also select multiple users and click eArchive Search from the top menu.
- Enable the eArchive Search toggle switch and select the desired permissions.
- Once done, click the Save button. eArchive access gets enabled for the selected users.


Recovery Cleanup
Administrators can set up a duration in order to clear the recovery stats in the eDiscovery.
eDiscovery Cleanup
The data stored in eDiscovery will be retained for the duration specified in the default retention policy or the custom retention policy. The custom retention policy which has the longest duration takes precedence over the other policies.
The emails in eDiscovery will be purged/deleted once in 10 days automatically. Admins can view the upcoming cleanup date in the eDiscovery Settings section. Emails will be cleaned up forever if it falls under any one of the below conditions:
- If the email's retention period is over and it is not part of any Holds.
- If your organization's subscription is expired for more than 30 days.