Email Routing
With Zoho Mail, you can redirect or send a copy of an email automatically by configuring Email Routing. Email Routing is helpful in many situations like if you want to automatically send a copy of one user's email to another. Or you can specify a particular user to whom all the emails that your organization receives with an unknown recipient have to be forwarded. Or you can use routing to increase security against spam.
Configure Email Routing in Zoho Mail
You can configure Email Routing, Inbound Gateway, and Outbound Gateway depending on your requirement. To configure routing to your account,
- Log in to Zoho Mail Admin Console.
- Navigate to Mail Settings in the left pane and go to Email Routing.
- In the Email Routing section, click the Configure routing button under Configuration to begin setting up email routing.

- Select the domain for which you want to enable Routing from the drop-down list.
- Provide the Destination host to which you want to route the emails. You can enter either the Domain name, Smart host, MX or the IP Address.
- Enter other relevant details and click Add. This verification process may take a while before the routing configuration gets added.


When you add configurations for email routing, it's set at the disabled condition by default. To Enable or Disable your routing configuration, follow the steps below:
- Navigate to Mail Settings in the left pane and go to Email Routing.
- Select the routing configuration you want to enable from the list.
- Under Routing Details, enable or disable it by toggling the Status.


Parameters required:
- Destination Host
The destination host is a domain name, MX record, Smart host or the IP address of a valid email server that can receive emails directly. When a domain name is provided in the destination, the routed emails will be delivered to the MX records of the domain which has been provided as the destination. In case MX records are provided directly in the destination, the emails will be directly routed to the provided servers. - Verification Email Address
Before email routing can be enabled, a verification email will be delivered to the routed server to confirm the validity of the chosen destination server details. You need to provide a valid email address to which a verification email will be sent. Only if the email has been successfully delivered, the email routing can be enabled. - Change domain to match the provided destination
By default, the domain of verification email address will be set to the domain for which you configure routing. But you can also change your verification email address' domain to the destination host's domain. For example, if you want to enable routing for the domain 'Zylker.com' to destination 'gmail.com' and your verification email is zylker@gmail.com, you can enable this option.
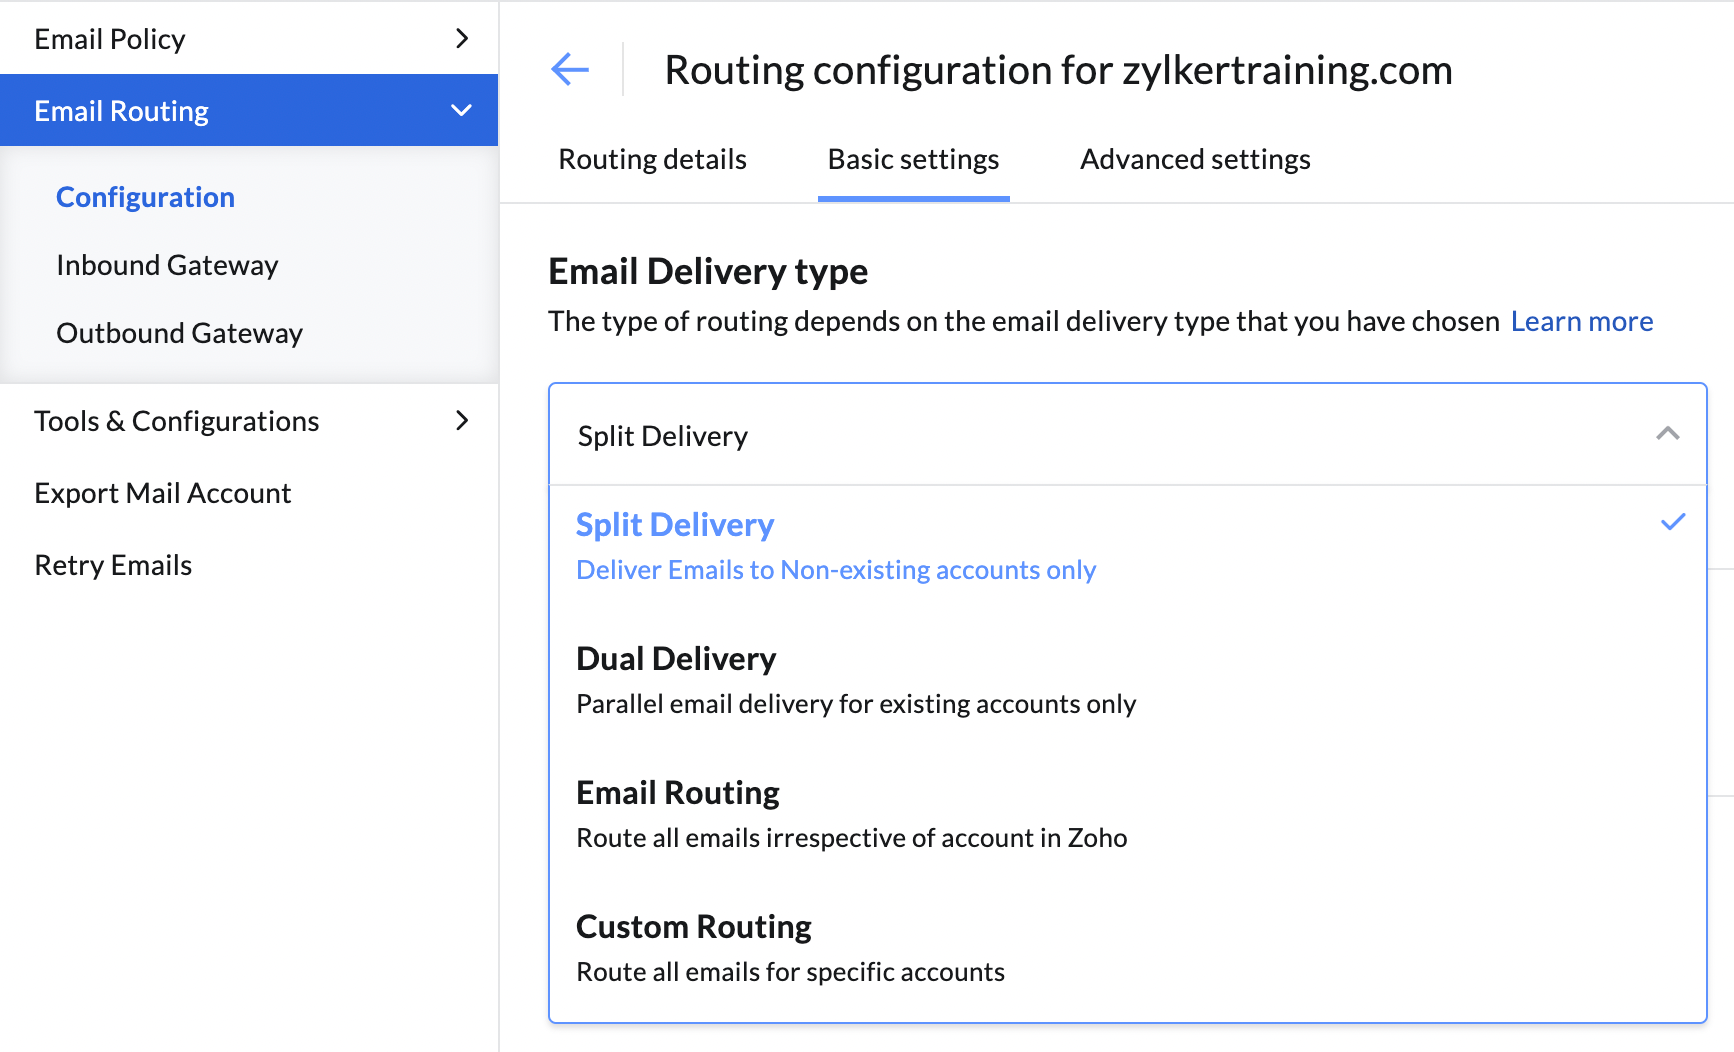
Email Delivery type
- Split Delivery: Deliver Emails to Non-existing accounts only
You can configure Split Delivery when you have a set of accounts in Zoho Mail and the remaining accounts on the other server. When you choose this option, the emails that arrive at the accounts that exist in Zoho are delivered in Zoho. When an email arrives at an account, that does not exist in Zoho, the email will be redirected to the selected destination server, instead of bouncing back the email. - Dual Delivery: Parallel email delivery for existing accounts only
You can configure Dual Delivery when you want the email delivery in both servers for all the existing accounts in Zoho. In case an email arrives at a nonexistent account, the email will be bounced back directly from Zoho servers and will not be checked in the destination servers. Essentially, Dual Delivery can be configured when you have an email backup or archival service elsewhere or want both the systems to co-exist due to various reasons. - Email Routing: Route all emails irrespective of account in Zoho
You can configure the Email Routing option in Zoho Mail when you want all the emails addressed to your account to be routed irrespective of whether the account is set up in Zoho or not. The emails will be delivered to Zoho accounts if it is set up. - Custom Routing: Route all emails for specific accounts
You can configure the Custom Routing option when you want all the emails addressed to specific accounts to be routed.
Configure Email Delivery type
You can choose different types of delivery to route your emails in a specific way. To choose an email delivery type, follow these steps:
- Log in to Zoho Mail Admin Console.
- Navigate to Mail Settings in the left pane and go to Email Routing.
- Select the routing for which you want to configure the delivery type from the list.
- On the routing configuration page of the selected routing, click Basic Settings.
- Select the routing type you want from the drop-down list.

Note:
- If you choose Custom Delivery, you can import user accounts for email routing by uploading a CSV file. If needed, you can also export the added user accounts.

- You can also choose to not retain the routed emails in Zoho Mail by checking the Do not retain Zoho Mail copy option.

Criteria based routing
With the help of Criteria based routing, you can set certain conditions following which the emails will be routed. To enable criteria based routing, follow these steps:
- Log in to Zoho Mail Admin Console.
- Navigate to Mail Settings in the left pane and go to Email Routing.
- Select the routing for which you want to configure the delivery type from the list.
- On the routing configuration page of the selected routing, click Advanced Settings.
- Enable the Criteria based routing option by toggling it on.
- Select the condition type—AND, OR, NONE.
- Select the criteria from the drop-down and enter the respective criteria value.
- To add more criteria, click the icon.


Now, only the emails that satisfy the respective criteria (condition) you have configured will be routed.
Suspended Accounts
Email routing will be suspended for accounts that have exceeded the designated Failure Threshold. Zoho Mail allows you to configure a custom Failure Threshold value ranging from 5 to 50, depending on your organization's requirements. Once this threshold exceeds, email routing to the affected accounts will be automatically suspended.
Note:
Once routing is suspended for an email address, incoming emails to that account will remain paused until you manually resume the routing for the suspended accounts.
Steps to configure failure threshold:
- Log in to Zoho Mail Admin Console.
- Navigate to the Mail Settings section in the left pane.
- Select Email Routing, then click Configuration from the drop-down menu.
- Choose the routing configuration for which the failure threshold needs to be configured.
- Go to the Suspended Accounts tab in the top pane.
- Enter the desired value in the Failure Threshold field and click the confirm icon.
- Click Proceed in the Confirm Action! pop-up to save the configuration.
The Suspended email address tab lists email addresses with suspended email routing. To restore routing for a suspended account, click the Resume button next to the corresponding address.
Other routing configurations
- Send Bounce Message
When you enable routing to the destination servers, mail to the destination may fail due to various reasons. If you enable the Send bounce option, the bounced email will be sent to the sender. You may enable or disable the bounce emails to the sender by navigating to the Basic Settings at the configuration page of the respective routing and toggling this option. - Routing for Group Members
Generally, when an email is routed to a group email address, the email is delivered to the group address alone. If the Routing for Group Members option is toggled on from the Basic Settings of the configuration page, the email will be delivered to the mailbox of each of the group members. - Recipient username change
When enabled under the Advanced Settings, you can route emails received by one user account to a different user account. This option is ideally used for spam filtering or email retention. For example, say your organization recipients rebecca@zylker.com, paula@zylker.com, and steve@zylker.com receive emails. You can automatically route any emails received by anyone in your organization to backup@zylker.com by configuring the username as "backup." - Recipient domain name change
When enabled under the Advanced Settings, you can route emails received by a user at one domain and server to the same username hosted with a different domain at a different server. For example, say your domain is zylker.com and you configure zylkertravels.com as the domain part for the routed emails. In this case, when user@zylker.com receives an email at Zoho Mail, it will be automatically routed to user@Zylkertravels.com at the other server.
Configuring Third-Party Email Archival/ Retention Systems
The Incoming and Outgoing gateways are generally used when you use third-party systems for services like Email Archival, Backup, or Retention for corporate policies. The third-party service will provide you with the MX records or IP Address, to use with their services and the IP address from which the copy will be routed to Zoho Mail.
You need to configure the IP address provided by the third-party service as 'Incoming Gateway'. Similarly, to route your outgoing emails through the third-party service, you need to configure the MX or IP address where the service accepts email for backup, as Outgoing Gateway. You can refer here for details about backup options available in Zoho Mail.
Inbound Gateway
An inbound gateway is a server that routes the emails to the Zoho Mail Servers. If the MX records of your domain are pointed to a legacy server or a backup server, you may configure email routing from your legacy server to Zoho, where the MX is not pointed to Zoho. In such cases, you need to provide the IP addresses of the servers, which relay emails to the accounts here. This will ensure that the configured IP addresses are considered legitimate and whitelisted for your organization.
To add IP addresses to your Inbound Gateway,
- Log in to Zoho Mail Admin Console.
- Navigate to Mail Settings in the left pane and go to Inbound Gateway under Email Routing.
- In the Inbound Gateway section, select either IPv4 or IPv6.
- Enter the appropriate IP address and choose its corresponding subnet IP mask from the drop-down menu.
- IPv4: Subnet IP masks range from /16 to /32
- IPv6: Subnet IP masks range from /1 to /128
- Once done, click the icon.


Below are some of the other options available in the inbound gateway section:
- Reject non-inbound gateway emails - rejects the emails that do not come from the inbound gateway IP addresses.
- Skip spam processing for all inbound gateway emails - skips spam processing for the emails that come from the IP addresses added to the inbound gateway list.
- To delete an IP address, hover over the IP and click the icon.

Outbound Gateway
An outbound email gateway is another server that is configured to relay the outgoing servers of various domains of your organization. You can configure an outbound gateway when you want to relay all the outgoing emails from your server to another SMTP server. The other server will deliver the emails to the respective accounts specified for recipients. The other server may archive emails for backup or email retention purposes.
To configure Outbound Gateway, follow these steps:
- Log in to Zoho Mail Admin Console.
- Navigate to Mail Settings in the left pane and go to Outbound Gateway under Email Routing.
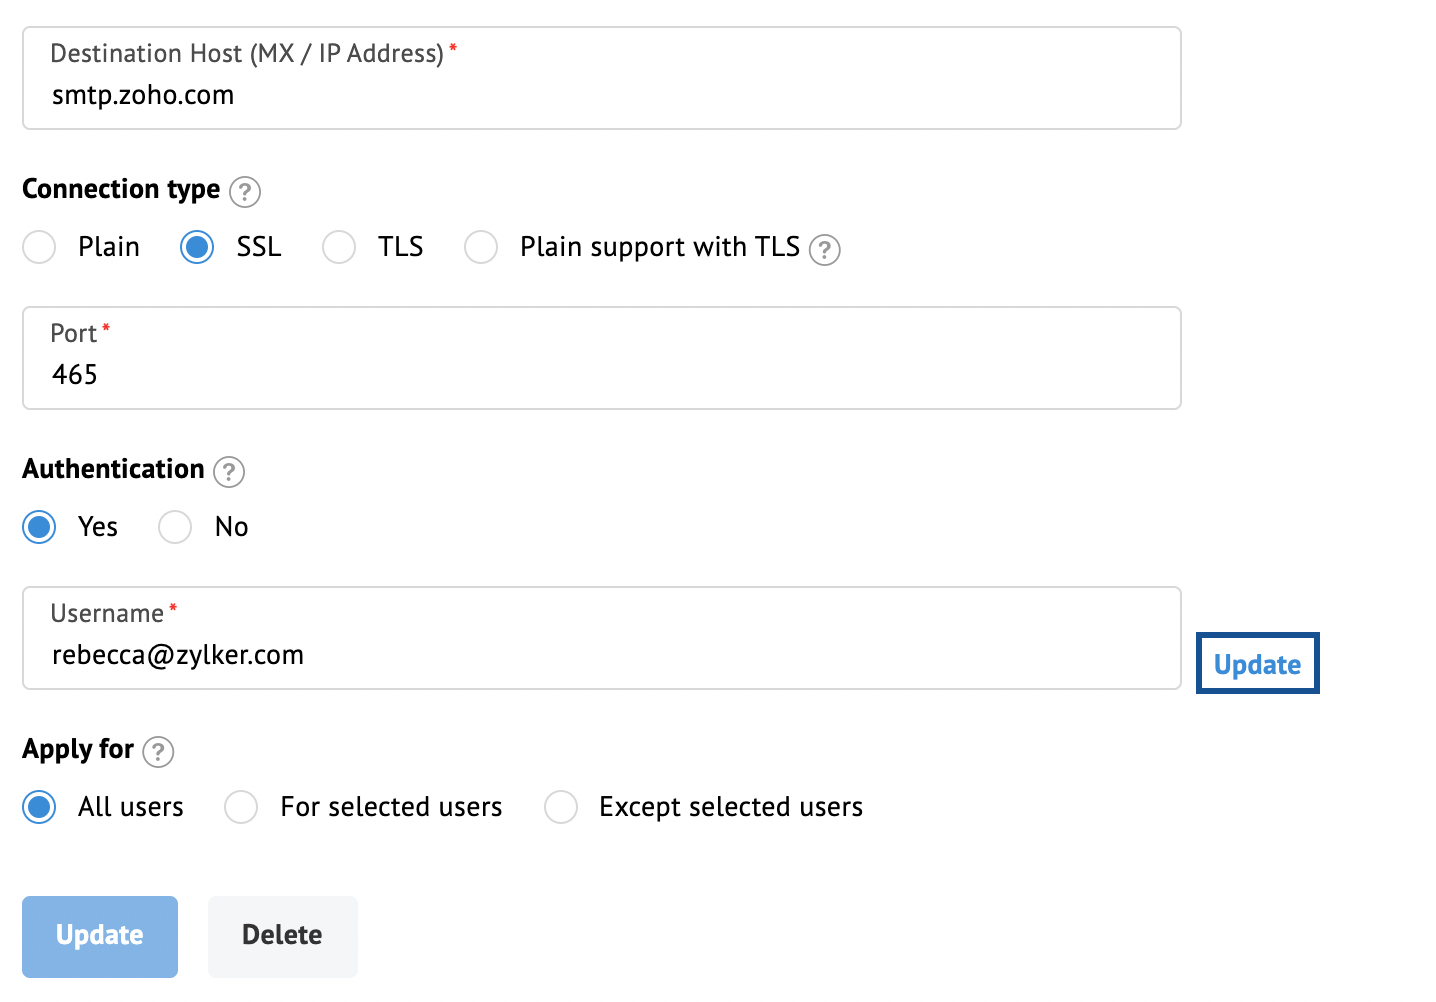
- Enter the Destination Host IP address or MX record.
- Select your Connection type and the respective Port number will be chosen automatically.
- You can choose to authenticate the destination server with its username and password.
- Select which users' emails you want to relay through the configured outbound gateway using the Apply for (All users, For selected users, and Except selected users) option.

- Once done click Add.
- Provide the Verification email address and choose the respective domain (if you have more than one) from the drop-down.
- Click on the speech bubble icon to enter your Remarks (optional)

- Once done, click Verify and Add.


Your Outbound Gateway will be configured upon successful verification. You can change the Authentication email address by clicking the Update button next to the email address used for authentication.
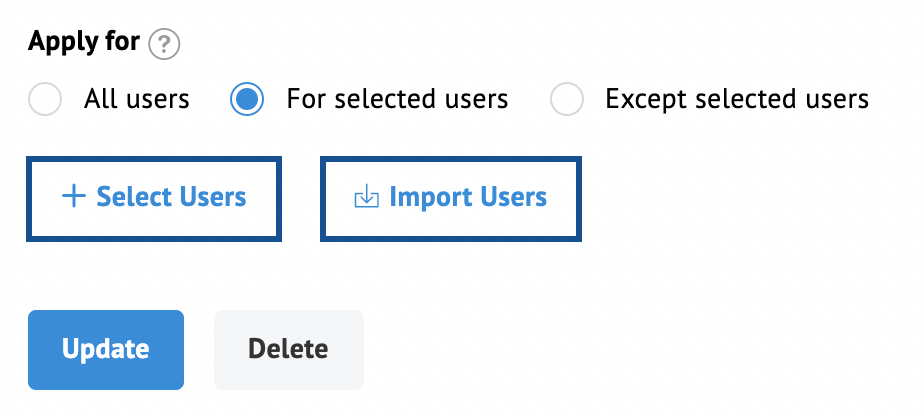
You can also change the preference of users' emails that you want to relay through the gateway. Confirm that you want to change the users configuration in the pop-up while changing the users preference.
- All users - The emails of all the users will be relayed through the gateway.
- For selected users - Only the emails of selected users will be relayed through the gateway.
- Except selected users - The emails of the selected users will not be relayed through the gateway.
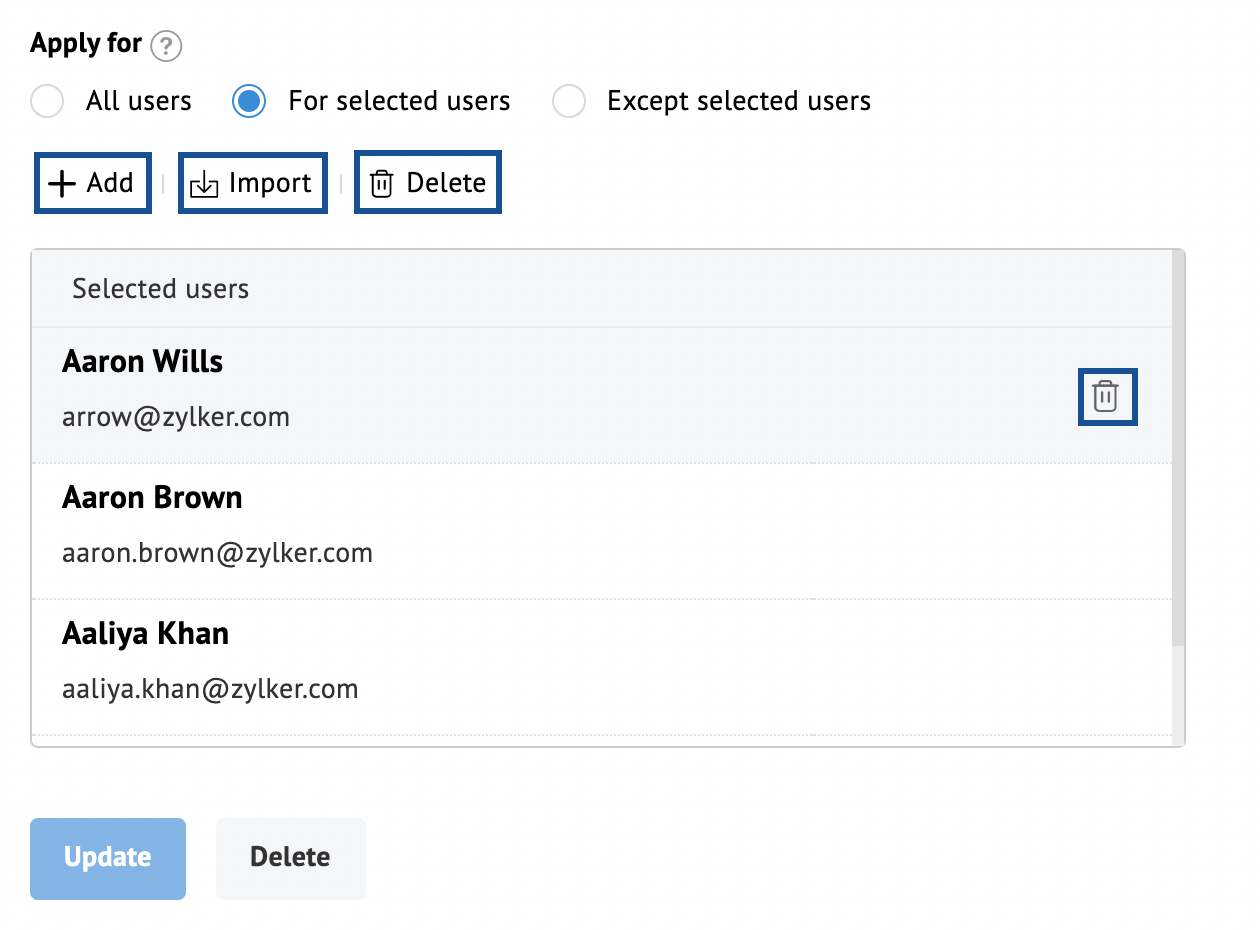
While choosing the For selected users or Except selected users choices you'll have the following options to add users:
- Select Users - From the list of users in your organization.
- Import Users - Using a CSV or TXT file.

After making the necessary changes click Update. The users selected will be listed below the Selected Users section. You can Add/ Import users to the list. You can also remove users from the list by hovering over the respective user in the table and clicking the icon or by clicking on the Delete button above the table and uploading the CSV or TXT file having the users' detail.