Investigations and Holds
Once you are done on-boarding the eDiscovery portal, you will be able to access all the features that the portal provides to manage your organization's data. Additionally, you can now also customize the portal settings apart from enabling/disabling users and creating new retention policies.
Investigation
An Investigation or a case is a legal probe against certain email communications or documents. When there is a legal case or a probe or an investigation pertaining to email communication, the organization needs to retain all the related emails until that investigation is completed/ closed. Zoho Mail groups the Investigations under three categories:
- Open - Investigations in progress
- Closed - Completed investigations
- Trashed - Investigations deleted by the admins

The eDiscovery administrator creates a new Investigation to manage the entire investigation cycle. Sometimes the Investigation can be required for the purpose of internal investigation also.
Create Investigation in Zoho Mail
Follow the below instructions to create a new email investigation:
- Log in to Zoho Mail Admin Console and select eDiscovery on the left pane.
- Navigate to the Investigations section to view or create investigations.
- Click the Create Investigation button.

- Provide the Investigation name and a detailed description.
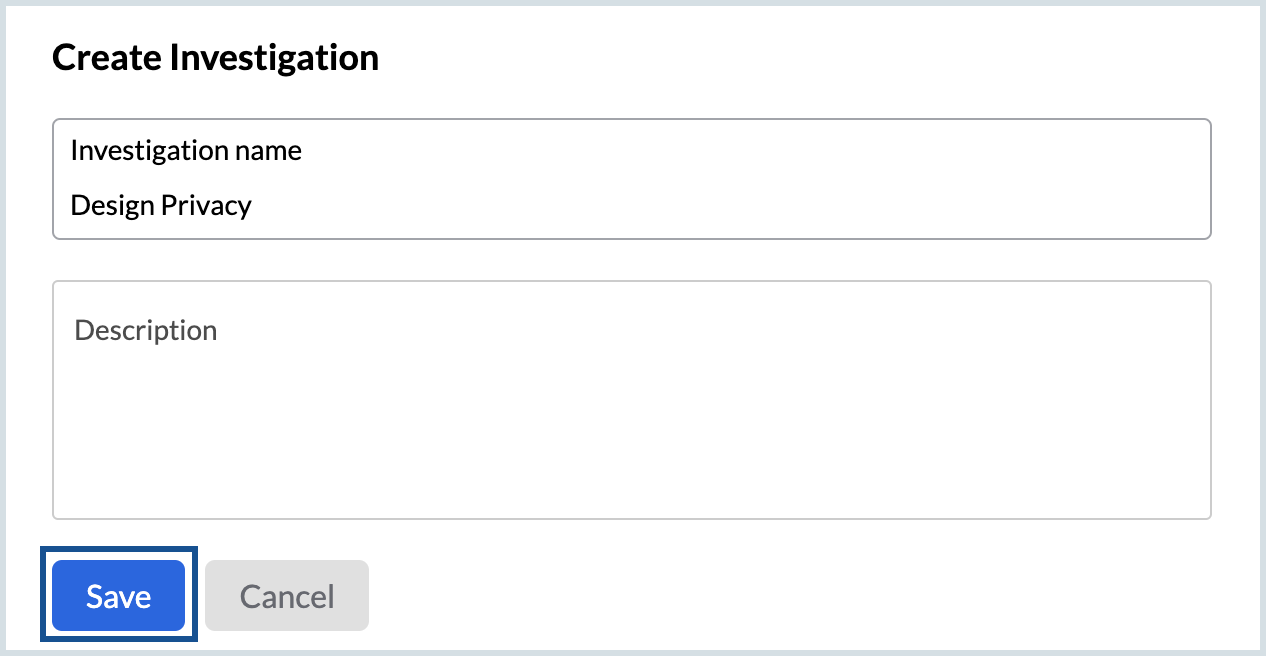
- Click Save. The investigation gets created.


You can now do the following actions in the Investigation you created:
Searches
With Zoho Mail, administrators can create multiple searches based on preferred conditions. Search helps you try various saved search conditions on your organization's data, preview results and validate these searches before creating holds. Refer to the below help pages for more details on how eDiscovery Search works.
Holds
Each Investigation will retain emails, messages and files based on one or more holds as needed for the Investigation. A Hold retains the data required for the investigation, based on a specific set of conditions. A single investigation or case may require retaining different sets of data based on various conditions. Hence there may be multiple Holds created for each Investigation. Refer to the below help pages for more details on Holds:
Exports
Admins can export the retained data whenever required. The list of export actions done by admins will be listed under the Exports tab with their current status. Refer to the below help sections for more details:
Tags
Create tags to group emails based on the requirements of the investigation. In a specific investigation, you can choose to tag emails from the search preview or the hold preview. Refer to the Create Tags help section for details.
Investigation Audit Logs
The activities performed by admins in a particular investigation can be viewed under the Audit logs tab of that investigation. Refer to the below help sections to learn more:
Recovery Emails
Email Recovery is a feature by which an administrator can restore lost or accidentally deleted emails back to the user's mailbox from the archival. As an administrator, you can choose either 'all user accounts' or 'specific user accounts' to recover and restore the archived emails back to the mailbox, when required.
Note:
- Emails can be recovered till the retention duration mentioned in the settings page of eDiscovery section.
- If your Backup duration is set higher than the retention duration, the emails can be recovered from the Backup storage.
Steps to recover an email from eDiscovery
- Log in to Zoho Mail Admin Console and select eDiscovery on the left pane.
- Select Recovery under the Data Management section.
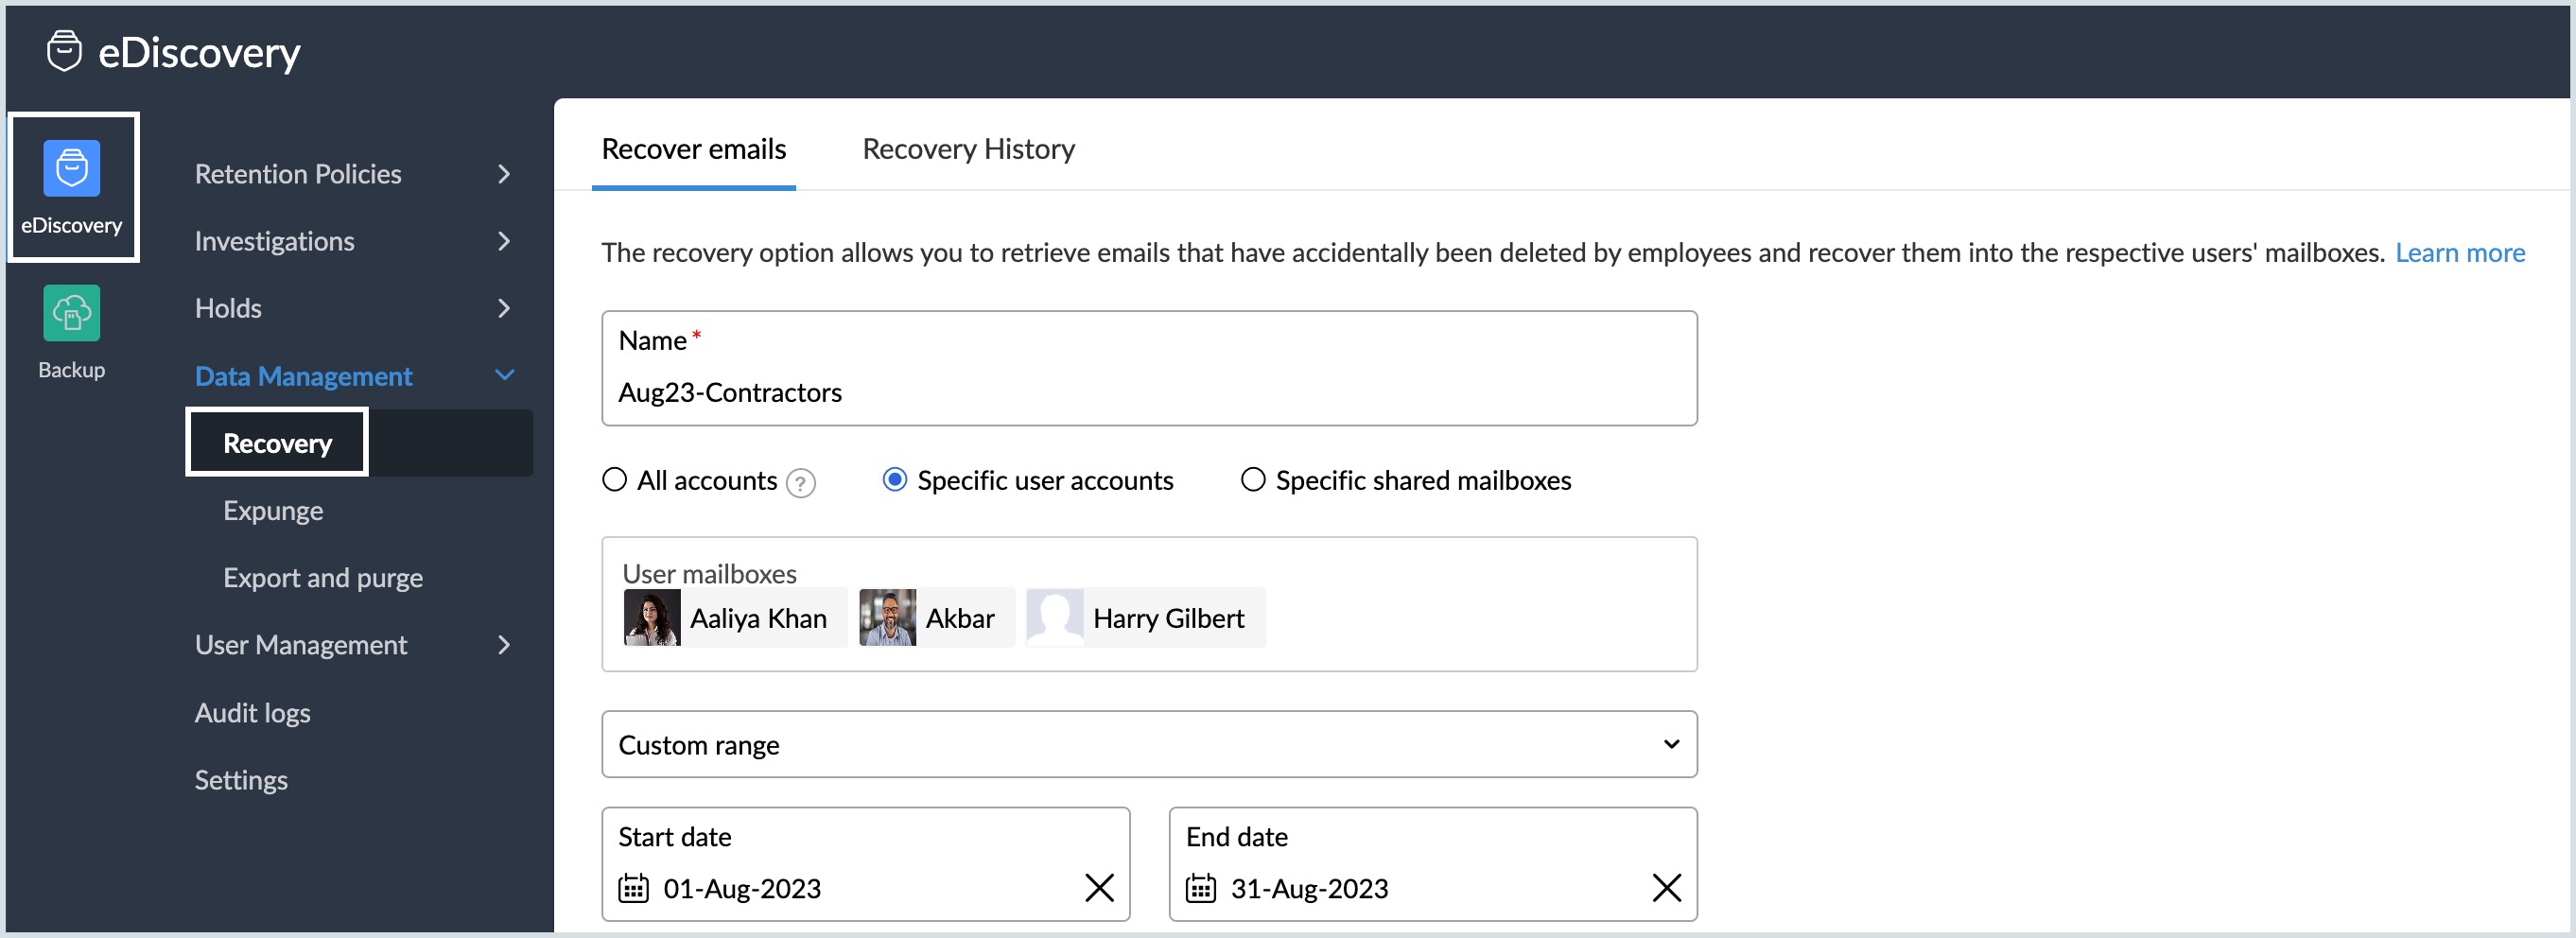
- Insert a name relevant to the case under the Recover emails tab.
- Select the desired account type:
- All accounts - Recovers the emails in all user accounts and shared mailboxes.
- Specific user accounts - Admins can recover selected user mailboxes by adding the users in the User mailboxes field.
- Specific shared mailboxes - Admins can recover a particular shared mailbox by entering its address in the Shared mailboxes field.
- Click the drop-down menu to select a preset range or a Custom range for which you want to recover the emails.
- Specify the Start and End dates for the recovery if you chose the Custom range option.
- Insert the search criteria under the Condition query.
In the Recover emails to section, select either of the below options:
- New folder - Choose this option to recover emails to a new folder under the parent folder eArchiveRestored.
- Folder based on filter run through operation - Emails that satisfy the specified conditions are processed through the Filters setup by the users in their mailbox settings.
Note:
- The new folder will be created under the parent folder eArchiveRestored.
- If an email doesn't match any existing filter conditions under Folder based on filter run through operation, a new folder will be created under the parent folder eArchiveRestored.
- If a folder already exists with the entered folder name, emails will be restored to that folder.
- Sent emails will be recovered to the 'Sent' folder.
- Enter a folder name to which you wish to recover the emails.
- Select the checkboxes as per your requirement:
- Include spam emails - Choose this option if you want to recover the spam emails for the entered condition query.
- Only deleted email - Recovers only the deleted emails that match the condition query.
- Choose Preview results, if you wish to ensure the search conditions are matched.
- Click Recover to restore the emails back to the user mailbox.


Note:
On recovering an email from eDiscovery, the mail will be restored back to the user mailbox while retaining a copy of the same in the archives. However, the copy of the mail will be deleted from backup.
Recovery History
All the recovery actions performed along with the details are logged chronologically under the Recovery History tab. By default, the Retention history will be cleaned post 90 days. However, the cleanup duration can be set by the admin under the Settings tab.
Expunge Emails
Expunge is a feature which allows an administrator to delete a particular email from the user's mailbox. As an administrator, you can either delete a mail with or without any user request (in case of any virus or phishing emails).
Steps to expunge an email from eDiscovery
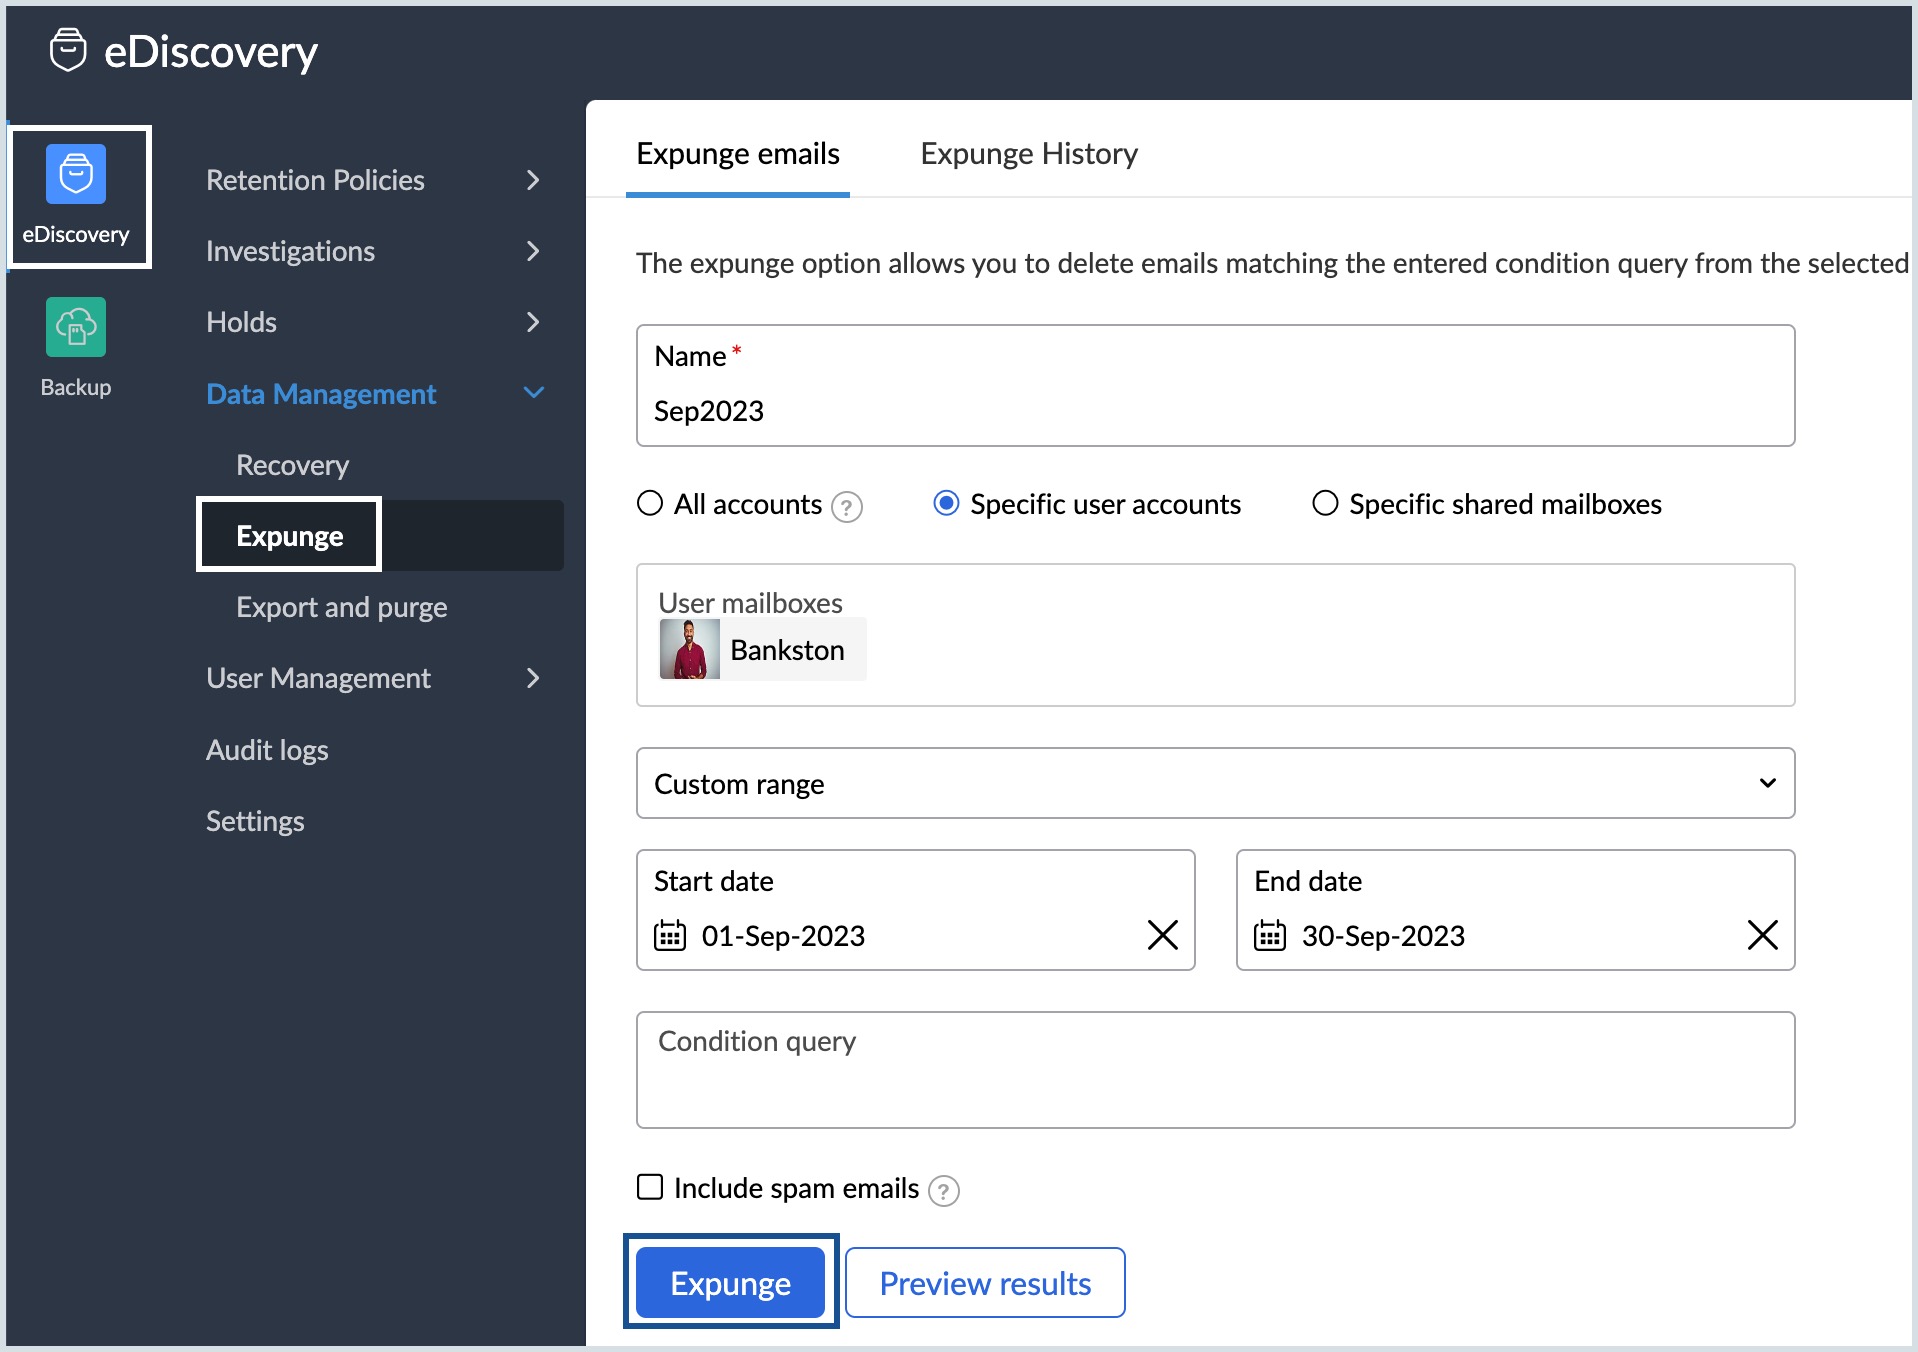
Follow these steps to expunge emails:
- Log in to Zoho Mail Admin Console and select eDiscovery on the left pane.
- Select Expunge under the Data Management section.
- Provide a name relevant to the expunge case under the Expunge emails tab.
- Select the desired account type:
- All accounts - All user accounts and shared mailboxes will be included in the expunge.
- Specific user accounts - Admins can delete a particular user mailbox by adding the user in the User mailboxes field.
- Specific shared mailboxes - Admins can delete emails in shared mailboxes by entering its address in the Shared mailboxes field.
- Include spam emails, if applicable. This will include spam emails as well in the search.
- Specify the start and the end dates for the search and mention the search criteria.
- Perform conditional search to filter out an email from the user’s archive.
- Click on the Preview Results to view the filtered emails.
- If the results match, click on Expunge to delete the mail from the user's mailbox.

Note:
On Expunge, the mail will be deleted from the user's mailbox. However, a copy of the mail will be retained in the Archive.
Expunge History
All the expunge actions performed along with the details are logged chronologically under Expunge History tab.
Export And Purge
The Export and purge section under Data Management lists all the export & purge operations performed by the administrator along with the current status of the action. Admins can create a new export and purge from here. It may take some time to complete this action depending on the file size. Once the exported file is ready for download, the status will be shown as completed. Click on the file to view the details and the download link. The exported file will be cleaned up after 90 days and so, it is recommended to download the file within the said period.
As the Export & Purge action will permanently and irrevocably remove the data from eDiscovery portal and leaves no copy behind, it is highly recommended to promptly download the file on time. It will also delete emails which are on hold or whose retention period is not yet expired, hence this option needs to be used with caution.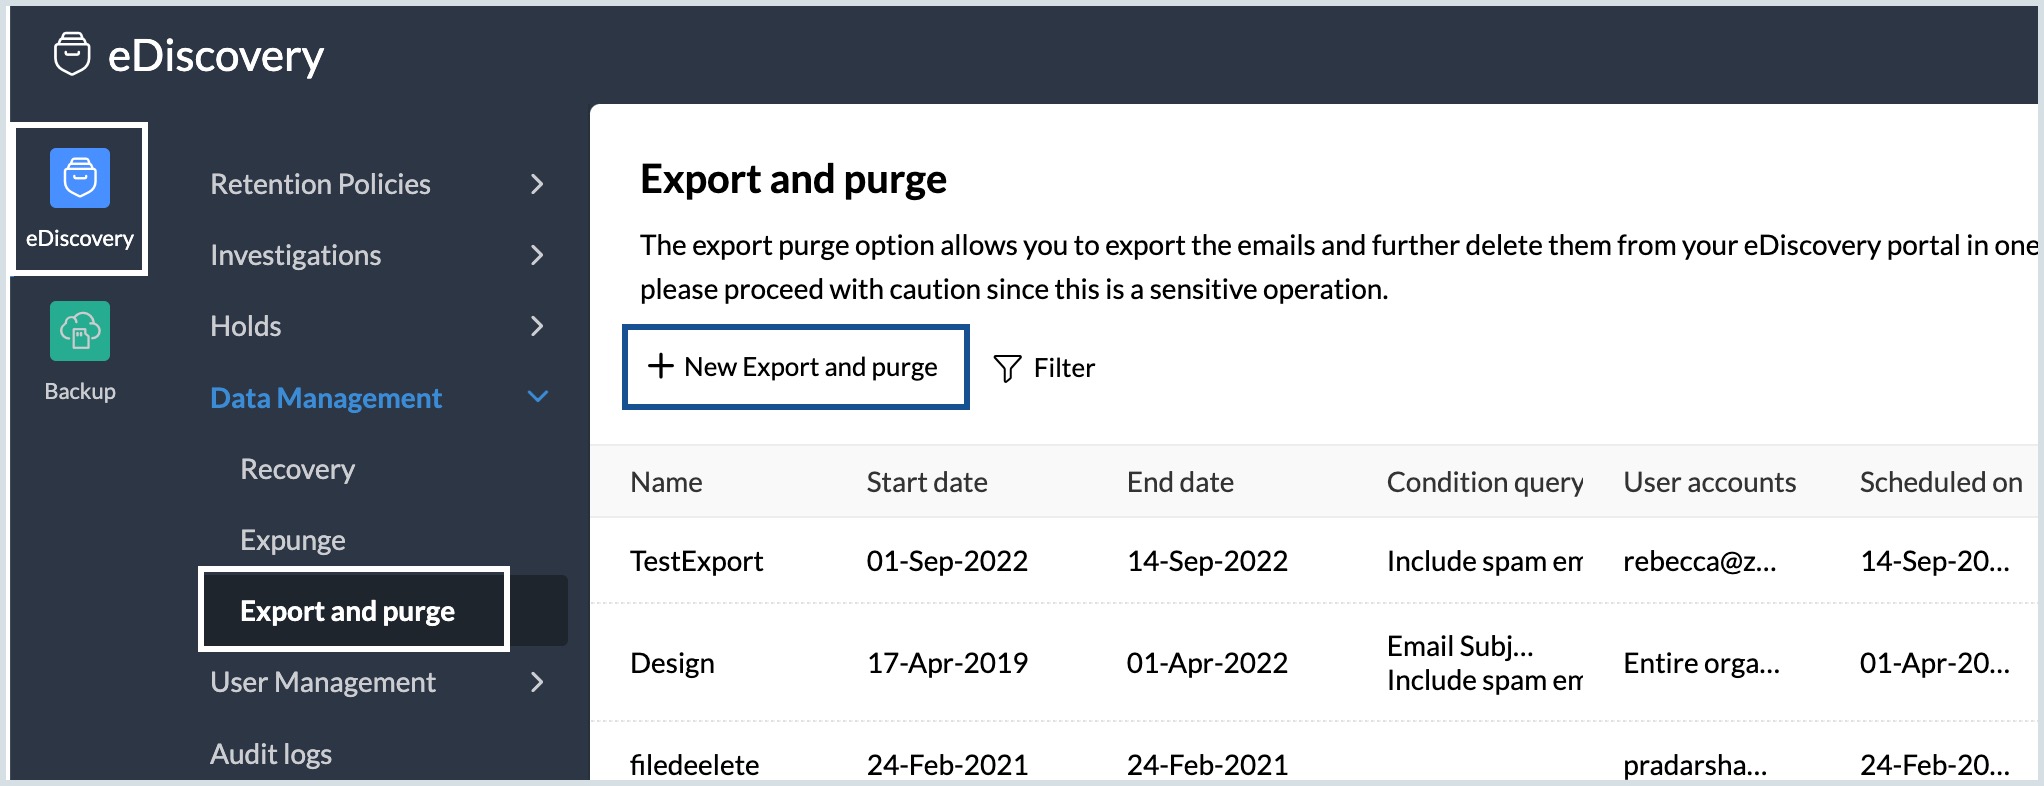
Note:
The export and purge action can be used to manage the eDiscovery storage of users. If a user's storage nears the maximum limit, you can either purchase additional storage or export and purge old emails to free-up storage space. Navigate to the Manage eDiscovery Storage section to create a new export and purge.
eDiscovery Audit logs
All the actions of the administrators in this portal will be recorded in the Audit logs section. Instead of viewing the activity specific to an investigation, you can view all the activity in the eDiscovery portal here. Navigate to the corresponding help sections to learn more:
Note: You can choose All under the Service name section to view the audit logs for all the WorkPlace services.
Mail Audit Logs
Follow these steps to view the admin actions performed for Mail in the eDiscovery portal:
- Log in to Zoho Mail Admin Console and select eDiscovery on the left pane.
- Select Audit Logs and choose Mail under service name.

- Select the Start date and End date.
- If required select the desired user accounts to view the logs for specific users.
- Choose one or more actions for which you want to view the logs. The available options are:
- Select all actions
- Retentions
- Investigations
- Saved search
- Holds
- Exports
- Export and purge
- Search
- Tags
- Recovery
- Expunge
- Audits
- Filter
- eDiscovery settings
- Roles
- eArchive search
- Click Preview audit to view the logs.

- Click Download audit to save the logs to your computer.

- If required, encrypt the file with a password to prevent unauthorized access to your data and click Download audit.


You have successfully downloaded the eDiscovery Mail logs in CSV format.
Cliq Audit Logs
Follow these steps to view the admin actions performed for Cliq in the eDiscovery portal:
- Log in to Zoho Mail Admin Console and select eDiscovery on the left pane.
- Select Audit Logs and choose Cliq under service name.
- Select the Start date and End date.
- If required select the desired user accounts to view the logs for specific users.
- Choose one or more actions for which you want to view the logs. The available options are:
- Select all actions
- Retentions
- eDiscovery settings
- Saved search
- Search
- Holds
- Exports
- Audits
- Click Preview audit to view the logs.

- Click Download audit to save the logs to your computer.
- If required, encrypt the file with a password to prevent unauthorized access to your data and click Download audit.


You have successfully downloaded the eDiscovery Cliq logs in CSV format.
WorkDrive Audit Logs
Follow these steps to view the admin actions performed for WorkDrive in the eDiscovery portal:
- Log in to Zoho Mail Admin Console and select eDiscovery on the left pane.
- Select Audit Logs and choose WorkDrive under service name.
- Select the Start date and End date.
- If required select the desired user accounts to view the logs for specific users.
- Choose one or more actions for which you want to view the logs. The available options are:
- Select all actions
- Retentions
- eDiscovery settings
- Saved search
- Search
- Holds
- Exports
- Audits
- Click Preview audit to view the logs.
- Click Download audit to save the logs to your computer.
- If required, encrypt the downloaded file with a password to prevent unauthorized access to your data and click Download audit.
You have successfully downloaded the eDiscovery Cliq logs in CSV format.