User Account Reports
The Users reports section will provide you with consolidated information on every user of your organization. User account reports will give you extensive information on each user such as their last login time, email protocols enabled or disabled status, email groups a user is part of, storage used, and more.
Accessing Users Reports
- Log in to Zoho Mail Admin Console and select Reports on the left pane. The Admin Reports page opens in a new tab.
- Select Users on the left pane. The User summary report page appears by default.
- Navigate to the appropriate report page from the available options.
Account reports
The list of all reports available under User Account reports is as follows:
User summary
The user summary report provides detailed information about all the users in your organization.
- Log in to Zoho Mail Admin Console and select Reports on the left pane. The Admin Reports page opens in a new tab.
- Select Users on the left pane. The User summary report page appears by default.
- Below are the details that you can see in the User summary report:
- Name/ Email - Mentions the user name and the mailbox address of the user.
- Last login time - Mentions the last login date and time of the user and also shows the new users who have never logged in.
- TFA status - Mentions if Two Factor Authentication of the user is enabled or disabled.
- User status - Mentions if the user's status is active or inactive.
- Group memberships - Lists the addresses of groups the user is part of.
- Select Manage Columns from the upper right corner to choose which columns to display in the report. After selecting the desired columns, click Apply to update the view. If needed, click Reset to restore the default column settings.
- Click on the Filter option on the top pane to filter the report data on the basis of Role, User without mail account, User status or Plans.
- Use the search bar available in the top pane to narrow down your data by name or email.

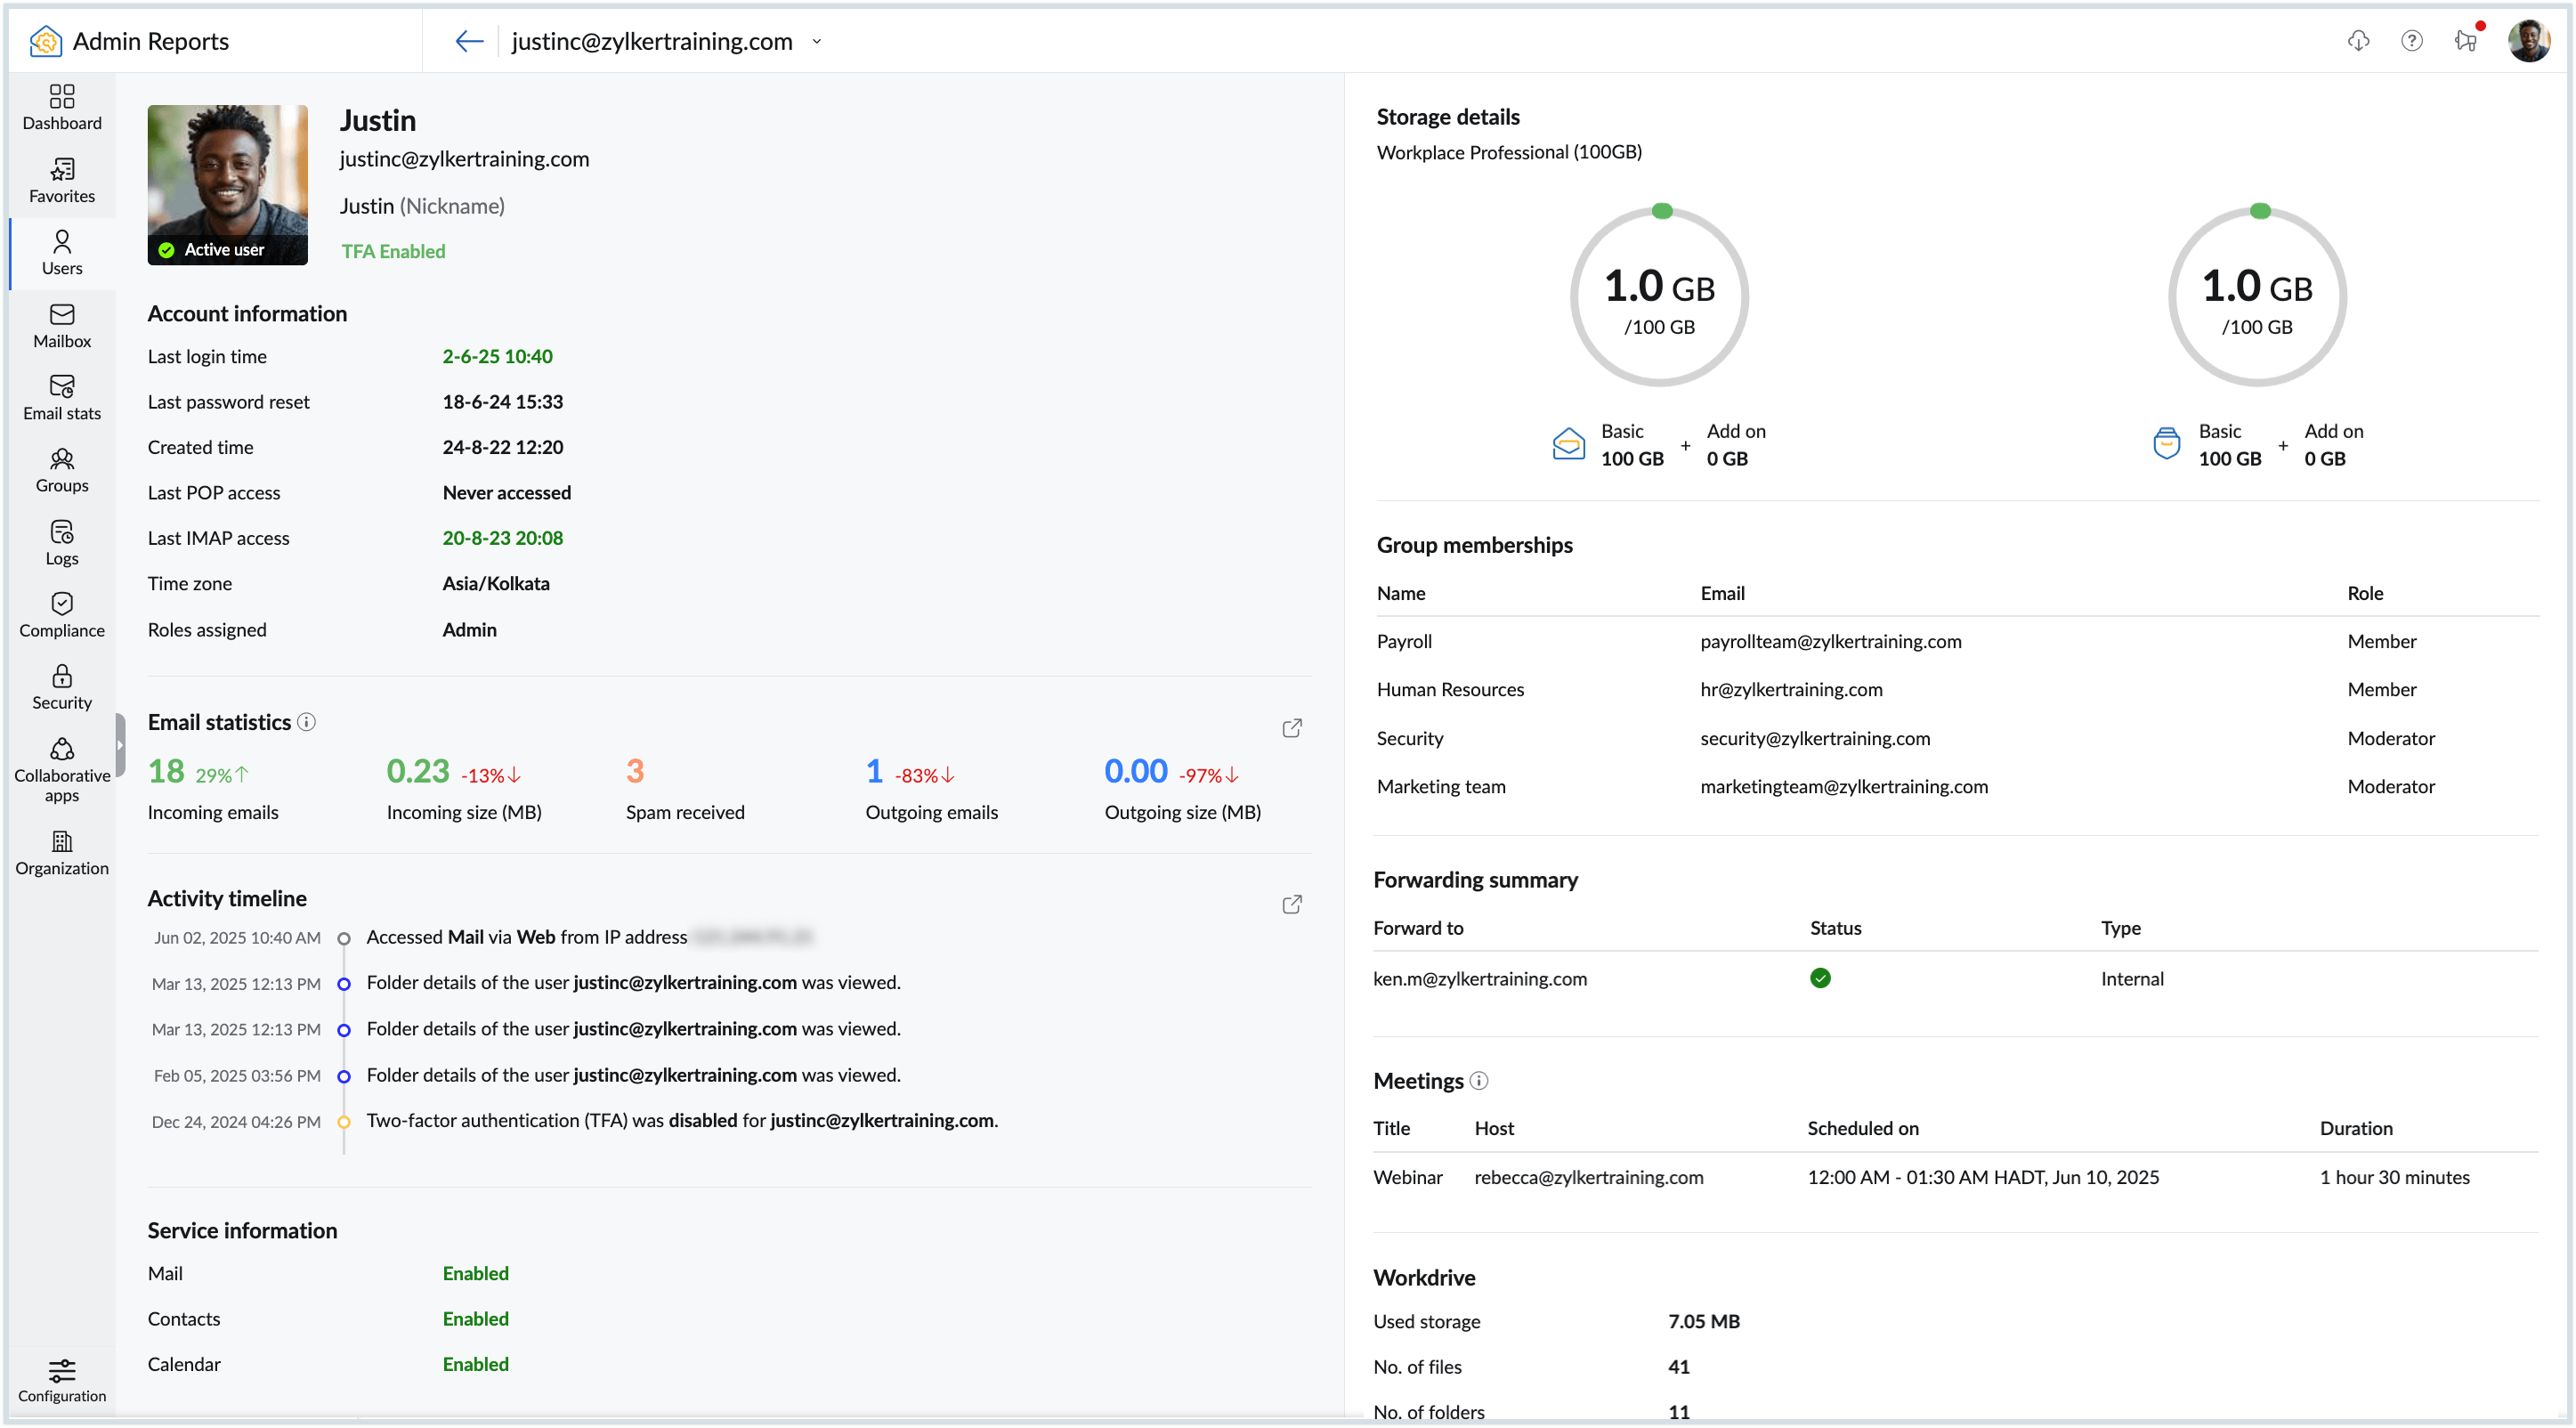
Click on any user to see more detailed information such as:
- Personal Details : Displays the user's personal information, including full name, nickname, email address, gender, and whether TFA (Two-Factor Authentication) is enabled.
- Account Information : Provides details such as account creation time, last login time, last password change, timezone, and the user’s assigned role.
- Email Statistics : Shows the number of incoming and outgoing emails, spam emails received, and the size of incoming and outgoing emails in MB for the last 7 days.
- Activity Timeline : Displays both administrative actions performed on the user’s account within the admin console and the user's login activities over the past 7 days.
- Service Information : Indicates whether the Mail, Calendar, and Contacts services are enabled for the user.
- Storage Details : Here, you can view the user's plan details and the storage allocated to them. The graphical chart displays the overall storage available for the user in GB, showing the split between the Basic and Addon plans (if applicable) for both Mail and eDiscovery separately.
- Group membership(s) : Lists the groups the user is part of, including the group names, email addresses, and the user’s role within each group.
- Forwarding Summary : Lists the email addresses to which the user’s emails are forwarded and the status of the configured email forwarding.
- Meetings : Displays all meetings scheduled by the user, including details such as the meeting title, host, scheduled date and time, and meeting duration.
- WorkDrive : Displays the total storage used by the user, along with the total number of files and folders in their WorkDrive account.
- Click the Pop-out icon beside any widget to access its corresponding section in the Admin Console for a more in-depth view of the displayed details.

Note:
The Meetings section in the user preview page is displayed only for users who have subscribed to the Workplace Professional plan.
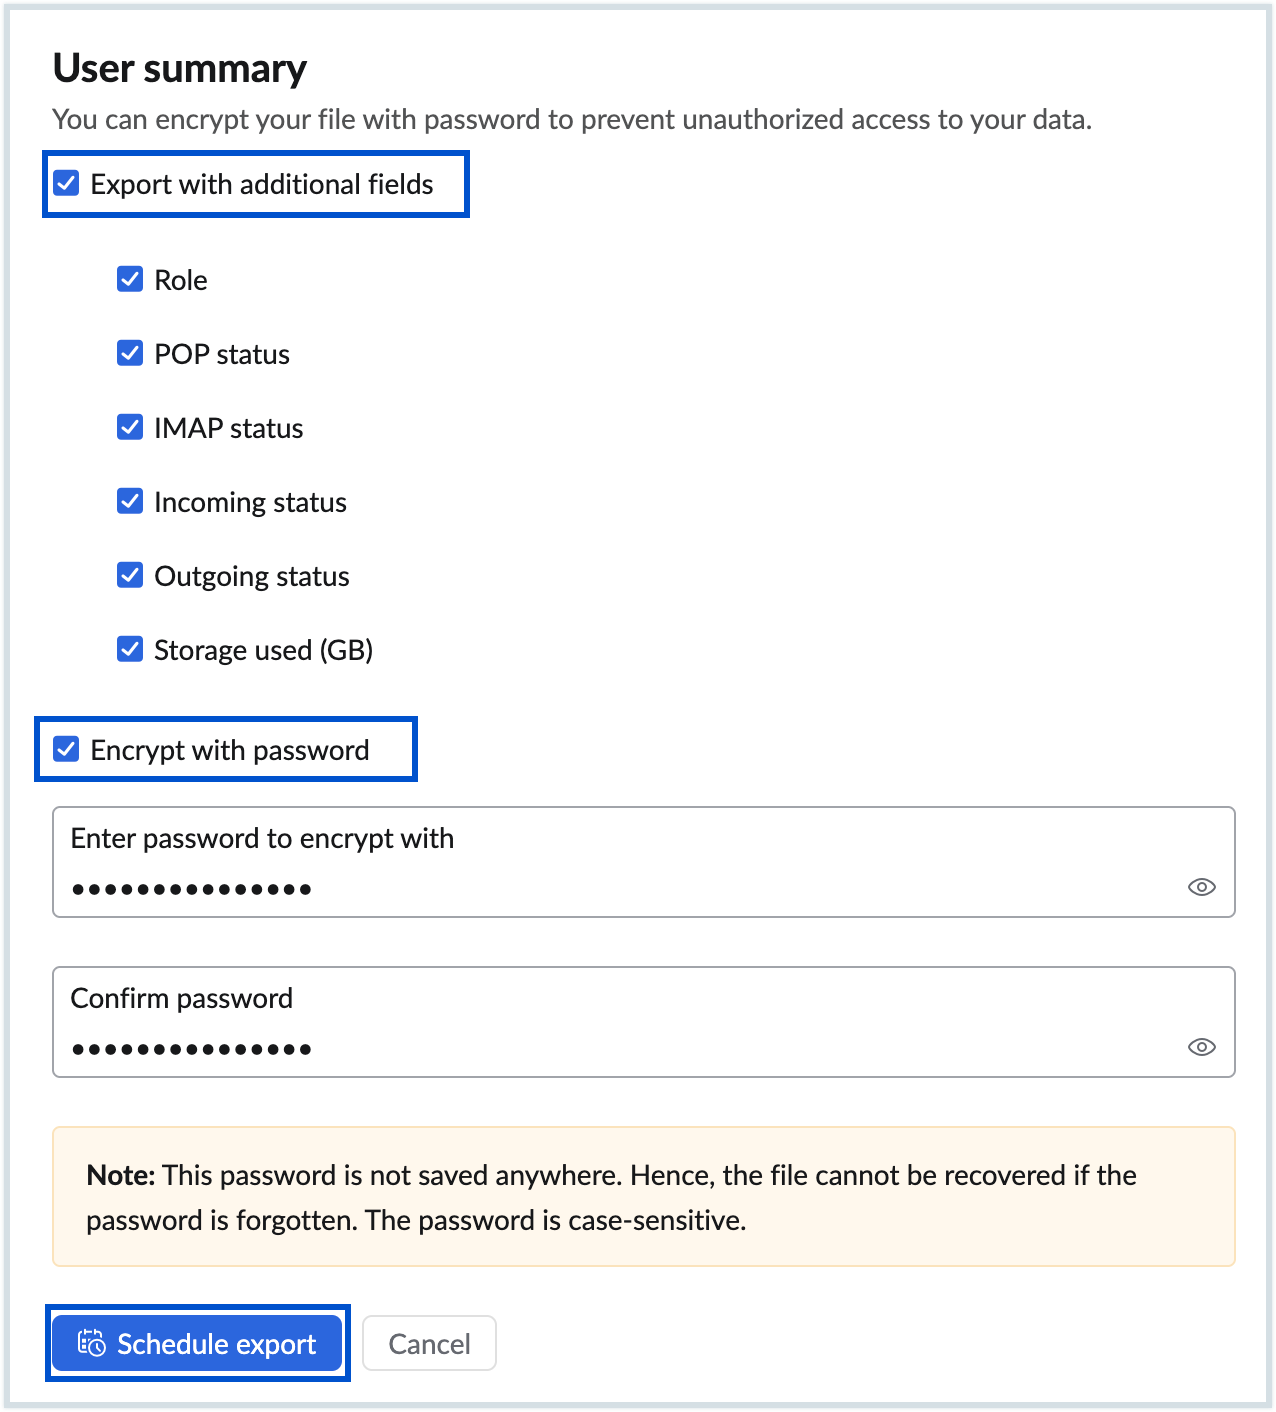
- To download the report as a CSV file to your local device for analysis or share it via email or Zoho Cliq, click the Share option in the top pane. You can also encrypt your file by selecting the Encrypt with password option or choose the Encrypt with additional fields option to export the report with columns other than the default ones. Click here to learn more about sharing reports.

Role summary
The Role summary report shows the list of all the custom admins along with the roles assigned to them. The number of users under each custom admin category can be seen on the top of the report page. Below are the details that you can view in the Role summary report:
- Name/Email - Mentions the user name and email address of the user.
- Roles assigned - Displays the list of custom admin roles assigned to the user.
- Last login time - Mentions the last login date and time of the user and also shows the new users who have never logged in.
- User status - Mention if the user is an active or inactive user
You can use the dedicated Filter option to view either the User management admin, Policy admin, Spam control admin list or the Helpdesk admin list. Once you select a filter, the Active Filter appears next to the search bar in the top pane. The Search bar allows you to narrow down the results based on the user's name or email.
Note:
This option is available only for organizations that use one of our paid plans.
Blocked user
The blocked user summary report displays the following information:
- Name/ Email - Mentions the user name and the mailbox address of the user.
- Blocked on - The time frame along with the date and time at which the users were blocked is shown.
- Type - The Incoming/ Outgoing emails, POP/ IMAP access to the users, and Web access to mail that are blocked for users will be listed.
- Details - The description of the reason why the accounts are blocked will be shown
You can use the search bar available in the top pane to narrow down your data by name or email. Click on any user to see more detailed information about the user like account information, mailbox actions, contact information and more.
Note:
This option is available only for organizations that use one of our paid plans.
External From Addresses
The External from addresses report includes the number of external addresses the user configures, their verification status, and the server name. This report displays the following information, click on each user in the report to see more detailed information.
- Name, Email address, and the number of external addresses configured by the users.
- From address - The external From address of the users.
- Verified status - The verification status of the external From address will be shown.
- Server name and Server port - The server name and server port through which the external From address has been configured will be listed.
- Connection type - The connection type of the server name and port of the external From address will be shown.
- Reply to - The reply to an email address if there's any will be listed here.
You can use the Search bar in the top pane to narrow down your data by Name /Email. To download the report as a CSV file to your local device for analysis or share it via Zoho Cliq or Zoho WorkDrive, click the Share option in the top pane. You can also encrypt the file with a password to prevent unauthorized access to your data. Click here to learn more about sharing reports.
Note:
This option is available only for organizations that use one of our paid plans.
Forwarding summary
The forwarding summary report only lists the users who have configured a forwarding list. The report consists of the following information:
- Name/Email - Mentions the user who has configured a forwarding list.
- Internal forwards - Mentions the internal email address (part of your organization) configured by the user for email forwarding.
- External forwards - Mentions the external email address (not part of your organization) configured by the user for email forwarding.
Follow these steps to manage the Forwarding summary report:
- Use the Search bar available in the top pane to narrow down your data by Name /Email.
- Click on the Filter option on the top pane to filter the report data. You can also find the Active filters in the top pane next to the search bar
- Check if the forwarding emails are Active or Inactive with the Enabled or Disabled tag. You can also know if an email address is unverified with the Not Verified tag. The tooltip shows the number of emails configured, hover over the tooltip to see all the forwarding emails
- To download the report as a CSV file to your local device for analysis or share it via Zoho Cliq or Zoho WorkDrive, click the Share option in the top pane. You can also encrypt the file with a password to prevent unauthorized access to your data. Click here to learn more about sharing reports.

- When you click on any user, you'll be redirected to the email forwarding settings section of that user in the Admin Console where you can modify the settings.
Out of office
The Out of office report includes the list of users who have configured an out-of-office response together with information like the time frame for which the response was configured and the subject of the response. The Out of office report displays the following information:
- Name/ Email- Mentions the user who has configured an out of office response.
- Duration - Mentions the duration for which the user was out of office response was configured
- Subject - Mentions the subject of the out of office response.
- Sent to - Mentions the list of users for whom the response was sent.
- Status - Indicates whether the out of office response is Active or Inactive
Follow these steps to manage the Out of office report:
- Click the drop-down from the top pane and select the duration for which you wish to view the out of office report. You can select from a list of available durations or set a Custom range based on your requirement.
- Click Filter and choose either Currently running or Inactive, to view the report based on the status of the out of office response. You can find the Active filters in the top pane next to the search bar.
- Use the Search bar available in the top pane to narrow down your data by Name /Email.
- If the user has configured one or more accounts, the primary email address will be displayed with a star notation.
- To download the report as a CSV file to your local device for analysis or share it via Zoho Cliq or Zoho WorkDrive, click the Share option in the top pane. You can also encrypt the file with a password to prevent unauthorized access to your data. Click here to learn more about sharing reports.

- When you click on any user, you'll be redirected to the Out-of-Office section of that user in the Admin Console where you can modify the configuration.
Account Status Report
The Account status reports provide valuable information regarding user account creation, deletion and based on the account status. Select the Account status report under the Users section.
Note:
The reports available under the Account status report are available only for organizations that use one of our paid plans.
The list of all reports available under Account status report is as follows:
Recently created
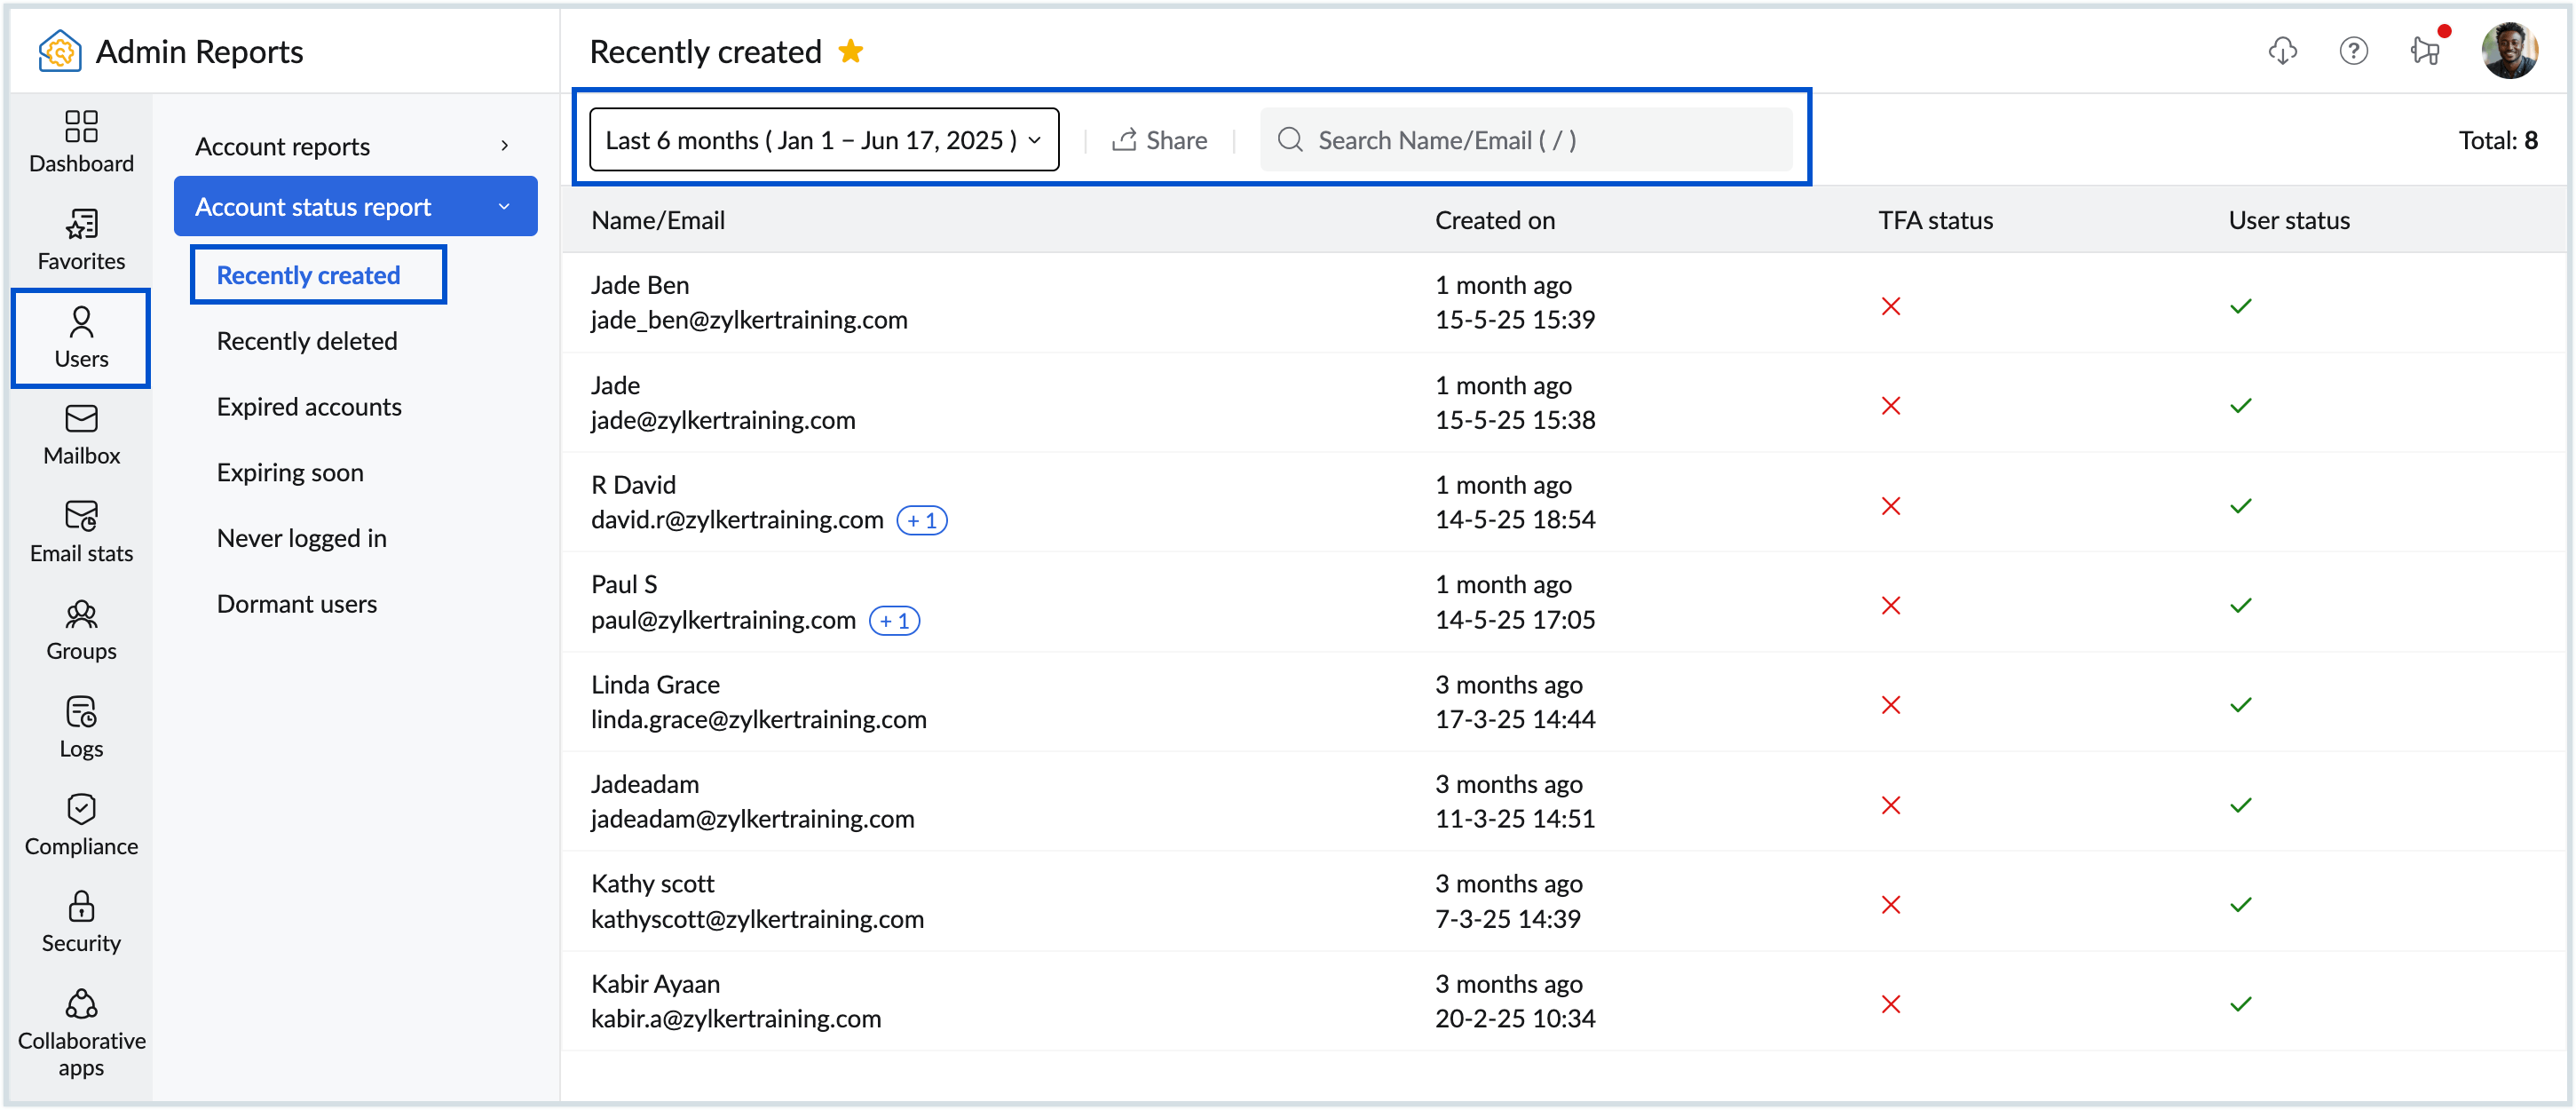
The recently created report contains details of the recently created users. The Recently created reports page displays the following information:
- Name/Email - Mentions the recently added user's name and mailbox address.
- Created on - Mentions the date and time the user account was created.
- TFA status - Mentions if Two Factor Authentication of the user is enabled or disabled.
- User status - Mention if the user is an active or inactive user.
Follow these steps to manage the Recently created report:
- Click on the Date filter to select the time period for which you want to see the report.
- Use the Search bar available in the top pane to narrow down your data by Name /Email.
- To download the report as a CSV file to your local device for analysis or share it, click the Share option in the top pane. You can also encrypt the file with a password to prevent unauthorized access to your data. Click here to learn more about sharing reports.

- Click on each user to see more information about the user like personal information,account information, services enabled, mailbox actions, and contact information.
- A list of actions can be seen at the top right corner of the detailed user info page, using which you can:
- Refresh - Refresh the user profile page to view the latest user profile data.
- Export - Export the Expired accounts report as a CSV file. You can choose to encrypt the file with a password to prevent unauthorized access to your data.
- Edit profile - Redirect to the specific user's profile page on the Admin Console, allowing you to edit the user's profile details.
Recently deleted
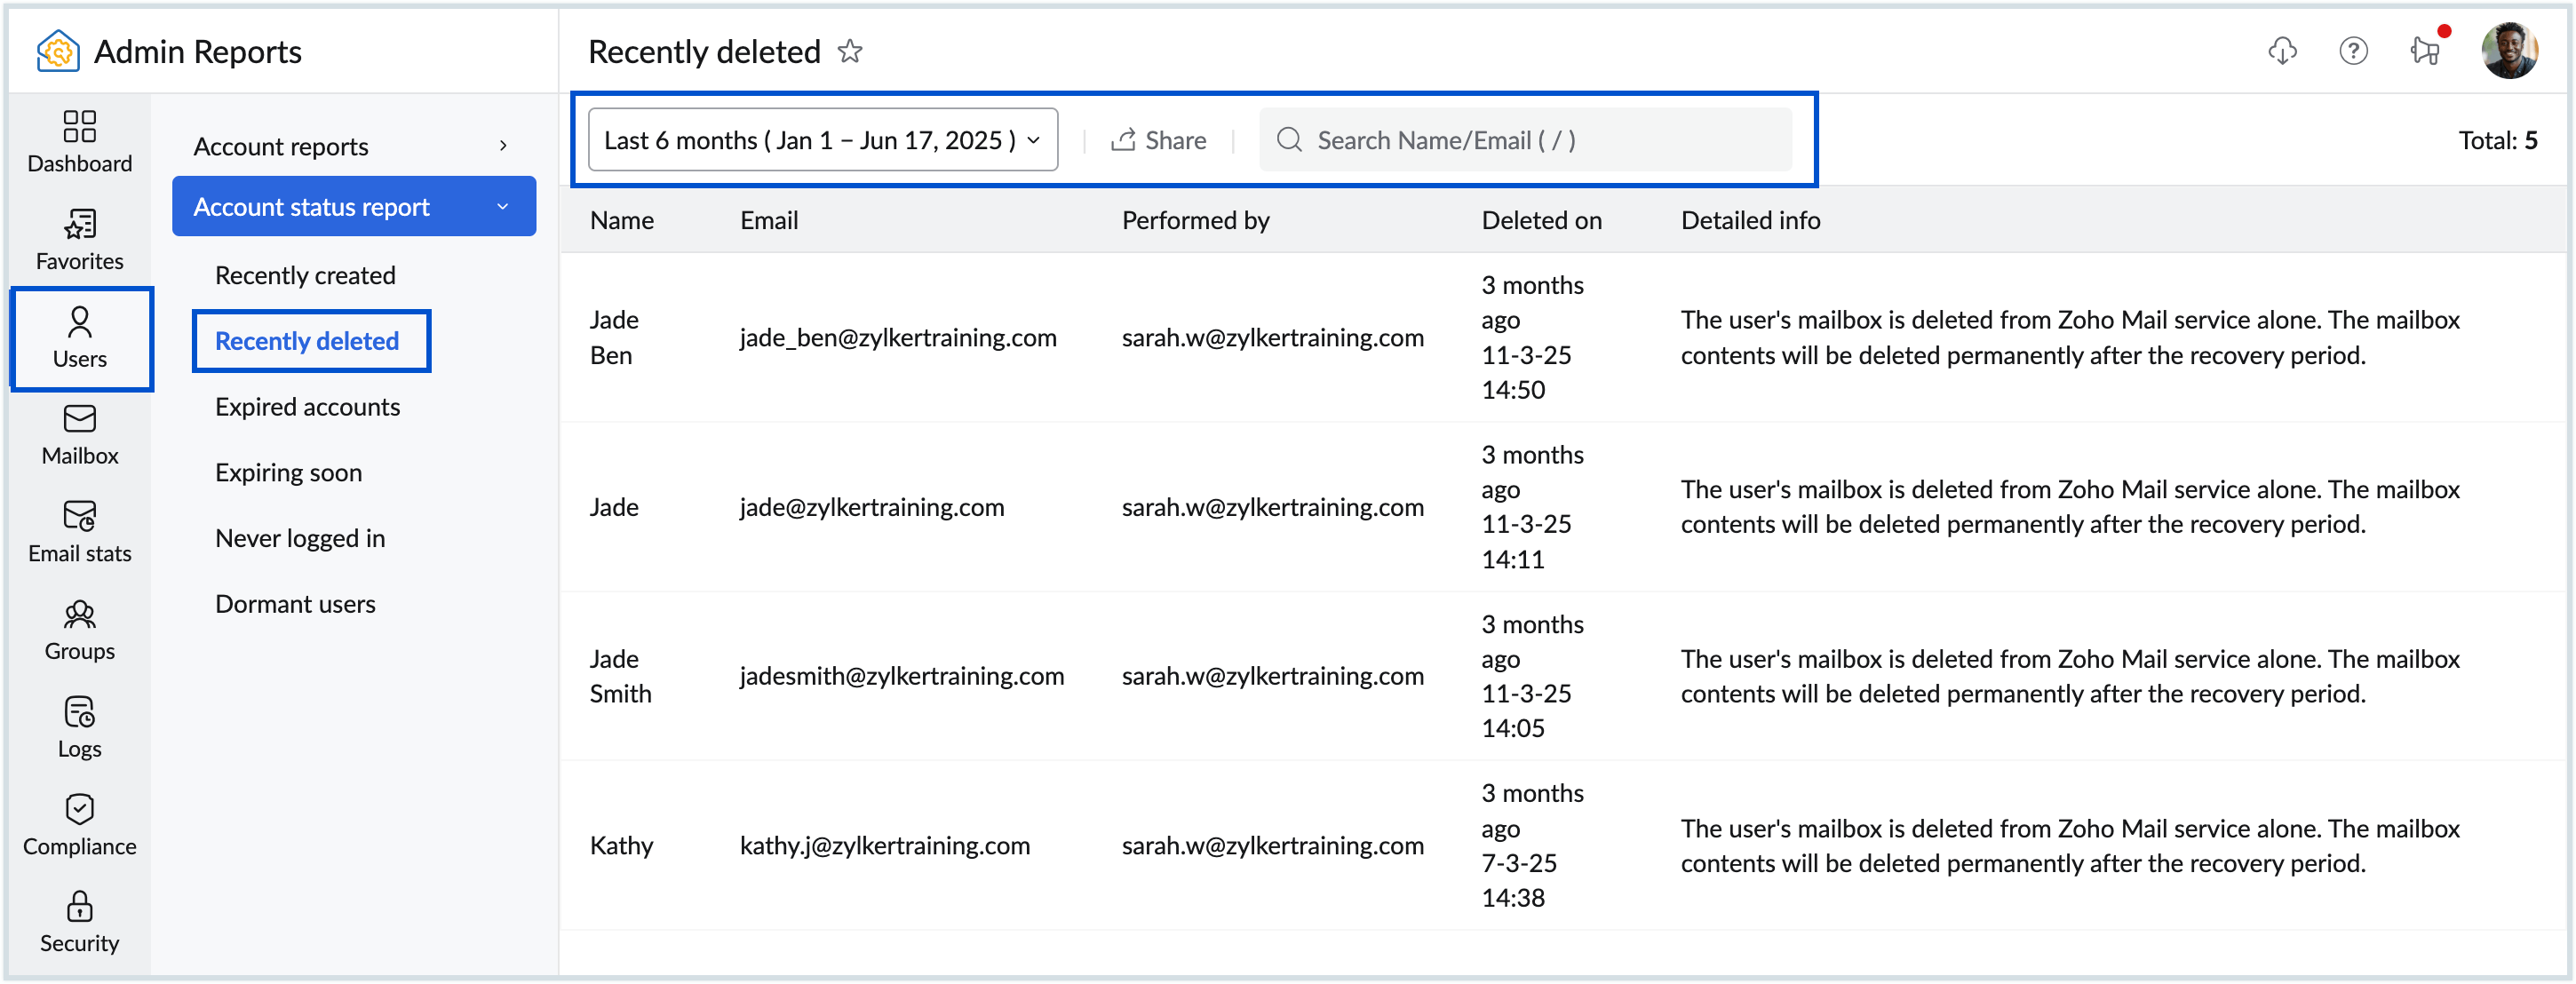
The recently deleted report contains details on the recently deleted users. The Recently deleted report displays the following information:
- Name and Email - The name and email addresses of the users whose accounts have been deleted are displayed.
- Performed by - The name of the person who deleted the user accounts will be shown.
- Deleted on - The date on which the accounts have been deleted will be listed.
- Deleted info - Displays whether the user account was deleted only from Zoho Mail or Zoho Workplace services, or from all Zoho services.
Follow these steps to manage the Recently deleted report:
- Click on the Date filter to select the time period for which you want to see the report.
- To download the report as a CSV file to your local device for analysis or share it, click the Share option in the top pane. You can also encrypt the file with a password to prevent unauthorized access to your data. Click here to learn more about sharing reports.
- Use the Search bar available in the top pane to narrow down your data by Name /Email.

Expired accounts
The Expired accounts report displays a detailed list of user accounts that have reached their expiration date. The expiration date refers to the specific date on which the account is scheduled to auto-disable, and once disabled, the account may no longer be accessible to the user. By regularly reviewing the reports on expired accounts, organizations can mitigate the potential risks and fortify their overall security posture. Follow the below steps to manage the Expired accounts report:
- You can use the Search bar to narrow down the results based on the user's name or email.
- The Expired account report appears for the specified email address or name. Below are the details available in the report:
- Name/Email - Mentions the user's name and email address.
- Expired on - Mentions the date and time the user account was expired.
- Created on - Mentions the date and time the user account was created.
- Last login - Mentions the last login date and time of the user, and also shows the new users who have never logged in.
- Role - Mentions whether the user is a Zoho Mail Member/ Custom Admin/ Administrator/ Super Administrator.
- Select Manage Columns icon from the upper right corner and select the preferred columns to be displayed:
- TFA status - Mentions if Two Factor Authentication of the user is enabled or disabled.
- Storage used - The overall storage used by a user in terms of GB.
- Storage allotted - The overall storage allotted for a user in terms of GB and the split between the Basic and Addon plan (if any) in terms of GB.
- Drag and drop the columns in Manage Columns to view the report in the preferred column order. Select Reset column list to view the default columns.
- To download the report as a CSV file to your local device for analysis or share it, click the Share option in the top pane. You can also encrypt the file with a password to prevent unauthorized access to your data. Click here to learn more about sharing reports.

- Click any record from the list to view detailed information about the user account.
- A list of actions can be seen at the top right corner of the detailed user info page, using which you can:
- Refresh - Refresh the user profile page to view the latest user profile data.
- Export - Export the Expired accounts report as a CSV file. You can choose to encrypt the file with a password to prevent unauthorized access to your data.
- Edit profile - Redirect to the specific user's profile page on the Admin Console, allowing you to edit the user's profile details.
Expiring soon
The Expiring Accounts report lists user accounts that are about to expire, providing details on when each account will be disabled. Administrators can also view accounts approaching expiration within specific time ranges using the filter option. Follow these steps to manage the Expiring accounts report:
- Click the drop-down from the top menu and select either a predefined duration or a Custom range.
- Select the start and end dates, if you've chosen Custom range.
- Enter the user's name or email address in the Search bar to further narrow down the results.
- The Expiring account report appears for the search query. Below are the details available in the report:
- Name/Email - Mentions the user's name and email address.
- Expires on - Mentions the date and time the user account will expire.
- Expires in - Mentions the duration or time period before the account expires.
- Created on - Mentions the date and time the user account was created.
- Last login - Mentions the last login date and time of the user, and also shows the new users who have never logged in.
- Select Manage Columns icon from the upper right corner and select the preferred columns to be displayed:
- Role - Mentions whether the user is a Zoho Mail Member/ Custom Admin/ Administrator/ Super Administrator.
- TFA status - Mentions if Two Factor Authentication of the user is enabled or disabled.
- Storage used - The overall storage used by a user in terms of GB.
- Storage allotted - The overall storage allotted for a user in terms of GB and the split between the Basic and Addon plan (if any) in terms of GB.
- Drag and drop the columns to view the report in the preferred column order. Select Reset column list to view the default columns.
- To download the report as a CSV file to your local device for analysis or share it, click the Share option in the top pane. You can also encrypt the file with a password to prevent unauthorized access to your data. Click here to learn more about sharing reports.

- Click any user from the list to view detailed information about the user account.
- A list of actions can be seen at the top right corner of the detailed user profile page, using which you can:
- Refresh - Refresh the user profile page and view the latest user profile data.
- Export - Export the Expired accounts report as a CSV file. You can also choose to encrypt the file with password to prevent unauthorized access to your data.
- Edit profile - Redirect to a specific user's profile page on the Admin Console, from which you can edit the user's profile details.
Never logged in
The Never logged in report displays the list of users who have never logged into their mailbox from the date of account creation. Below details appears on the Never logged in report page:
- Name - Displays the user name.
- Email - Mentions the mailbox address of the user.
- Inactive days - Displays the number of days that the user has been inactive.
- Created on - Mentions the account creation date and time.
To narrow down the results, enter the user Name/Email in the Search bar and hit enter. To download the report as a CSV file to your local device for analysis or share it, click the Share option in the top pane. You can also encrypt the file with a password to prevent unauthorized access to your data. Click here to learn more about sharing reports.
Click any user from the list to view detailed information about the user account. A list of actions can be seen at the top right corner of the detailed user profile page, using which you can:
- Refresh - Refresh the user profile page and view the latest user profile data.
- Export - Export the Expired accounts report as a CSV file. You can also choose to encrypt the file with password to prevent unauthorized access to your data.
- Edit profile - Redirect to a specific user's profile page on the Admin Console, from which you can edit the user's profile details.
Dormant users
The Dormant users report page includes the list of all mailboxes that are inactive for a specified time period. It also provides the last activity time and the number of days that the mailbox has been dormant. Below details appear on the Dormant users report page:
- Name - Displays the user name.
- Email - Mentions the mailbox address of the user.
- Inactive days - Displays the number of days that the user has been inactive.
- Last activity time - Mentions the last date and time that the user was active.
Follow these steps to manage the Dormant users report:
- Select the desired time period in the drop-down from the top menu.
- You can select one of the below options in the Filters drop-down:
- By last login time
- By last mail send
- By POP accessed
- By IMAP accessed
- To further narrow down the results, enter the user Name/Email in the Search bar and hit enter.
- To download the report as a CSV file to your local device for analysis or share it, click the Share option in the top pane. You can also encrypt the file with a password to prevent unauthorized access when downloading it. Click here to learn more about sharing reports.


