Spam Control Lists and Internationalized Spam
In the Spam Control section of the Zoho Mail Admin Console, you will have the option to allow or block email addresses, domains, IP addresses, etc. Additionally, you can also add trusted lists for certain domains and email addresses to skip any spam processing when you receive emails from these addresses.
Further, you can define specific countries and languages from which you can allow or reject emails.
Allowed List
As an administrator, if you do not want certain emails to be marked as spam, you can add the domain, specific email addresses or IP addresses to the Allowed List. However, in case there is an SPF failure, and there is no action set for SPF failure, the emails from allowed list domains or addresses will not be marked as 'Not Spam'. In the case of SPF failure, the email may be a possible spoofed email, and hence the email address/ IP address/ domain added to the allowed list will not be effective in that case.
Follow the below instructions to navigate to the Allowed List section:
- Login to the Zoho Mail Admin Console.
- Go to the Security & Compliance menu.
- Select Spam Control, and select Allowed List. Select the preferred tab to configure allowed lists:
Allowed Email Addresses
To skip the spam control checks for specific email addresses, follow these steps in the Emails tab:
- Navigate to the Emails tab and click on Add to enter the email addresses.
- You can add multiple email addresses by separating them with commas.
- Finally, click Add.
- Alternatively, you can also import email addresses by clicking on Import.
- Click Browse Files, and select the file containing the email addresses.
- The email addresses in the CSV file will get added to the allowed list.
Allowed Domains
To skip the spam control checks for specific emails originating from specific domains, follow these steps:
- Navigate to the Domains tab and click on Add.
- You can add multiple domains by separating them with commas.
- Finally, click Add.
- Alternatively, you can also import domains by clicking on Import.
- Click Browse Files, and select the file containing the domain names.
- The domain names in the CSV file will get added to the allowed list.
Allowed IP Addresses
To allow emails from a certain IP address range, select the IP Addresses tab and follow these steps:
- Click on Add to enter the IP addresses.
- Enter the IP addresses and select the IP mask, depending on the IP range that you'd like to add. Click here to know more about IP masks.
- Finally, click Add.
- Alternatively, you can also import IP addresses by clicking on Import.
- Click Browse Files, and select the file containing the IP addresses.
- The IP addresses in the CSV file will get added to the allowed list.
Blocked List
A blocked list can also be defined commonly for the entire organization. The administrators can add entire domains, TLDs, specific email addresses, IP addresses, or recipient email addresses to the blocked list. In these cases, even if the domain passes the SPF test, the email from that domain will be marked as spam.
Additionally, while defining the blocked list, the admin can also choose the action to be taken on the blocked emails. They can either:
- Mark it as spam - The email will be moved to the respective user's spam folder.
- Move it to quarantine - The email will be quarantined from where the admin will have to process the email further.
- Reject the email - The email will be permanently rejected.
Follow the below instructions to access the Blocked List for your organization:
- Log in to the Zoho Mail Admin Console and select Security & Compliance on the left menu.
- Navigate to Spam Control, and select Blocked List. Select the preferred tab to configure the blocked list:
Blocked Email Addresses
To add specific email addresses to the blocked list, follow these steps:
- Click Add in the Emails tab and add one or more email addresses by separating them with commas.
- Select the action to be taken on these emails, then click Add.
- Alternatively, you can also import email addresses by clicking on Import. Select the action to be taken on these emails.
- Click Browse Files, and select the file containing the email addresses. The email addresses in the CSV file will get added to the blocked list.
Blocked Domains
To add one or more domains to the blocked list, select the Domains tab and follow these steps:
- Click Add to enter the domain names. You can add multiple domains by separating them with commas.
- Select the action to be taken on these emails, then click Add.
- Alternatively, you can also import domains by clicking on Import. Select the action to be taken on these emails.
- Click Browse Files, and select the file containing the domain names. The domain names in the CSV file will get added to the blocked list.
Blocked IP Addresses
To block emails from a certain IP address range, select the IP Addresses tab and follow the below instructions:
- Click on Add to enter the IP addresses.
- Enter the IP addresses and select the IP mask, depending on the IP range that you'd like to add. Click here to know more about IP masks.
- Select the action to be taken on these emails, then click Add.
- Alternatively, you can also import IP addresses by clicking on Import. Select the action to be taken on these emails.
- Click Browse Files, and select the file containing the IP addresses.
- The IP addresses in the CSV file will get added to the blocked list.
Blocked TLD List
A Top-level Domain (TLD) is the last segment of a domain name. For example, in the domain name zylker.com, .com is the TLD. To block a TLD, select the TLDs tab and follow these steps:
- Click on Add to enter the TLD. You can add multiple TLDs by separating them with commas.
- Select the action to be taken on these emails, then click Add.
- Alternatively, you can also import TLDs by clicking on Import. Select the action to be taken on these emails.
- Click Browse Files, and select the file containing the TLDs. The TLDs in the CSV file will get added to the blocked list.
Blocked Recipient List
If you want to block emails addressed to certain members of your organization, select the Recipient Emails tab and follow these steps:
- Click on Add to enter the email address.
- You can add multiple emails by separating them with commas.
- Select the action to be taken on these emails, then click Add.
- Alternatively, you can also import recipient email addresses by clicking on Import. Select the action to be taken on these emails.
- Click Browse Files, and select the file containing the email addresses. The email addresses in the CSV file will get added to the blocked list.
If you are entering the entire IP address that denotes a specific machine, you will have to select the subnet as 32 from the dropdown list. If you mention just the network to denote all the computers that come under that network, enter the network part of the IP address and select the subnet depending on the number of bits that you have used in the IP address.
For example, if you are entering 172.20.0.0 and select 30 from the dropdown list, it will refer to IP addresses in the range 172.20.0.0 - 172.20.0.3. This will denote a total of 4 IP addresses. This can be derived by calculating 2(32-n). In this case, the value of n will be 30, and by performing the calculation we derive at 22, which will be 4. Hence the 4 IP addresses will be added to the respective List. Similarly, you can add a consecutive range of IP addresses by selecting the relevant value from the dropdown list.
Note:
- You will not be allowed to include your domain's TLD in your organization's Blocked List.
- The IP Address options for the allowed list and the blocked list will not be available for organizations in the free plan.
- When you add a domain to the blocked list, any emails from its associated sub-domains will be blocked too.
Blocked List Patterns
Blocked List Patterns in the Admin console will allow the administrator to add the usual patterns in which the spam emails get delivered to the users in the organization. The patterns that can be added are:
Sender Pattern
You can add texts or regular expression patterns to this list to make sure that the emails containing these patterns in the sender email address are marked as spam. You can set the Email delivery action to Move to spam or Move to quarantine.
To configure a pattern click on Add and select either Plain text or Regular expression. You can set an expiry date for the pertaining pattern. Now, click Add to save the pattern.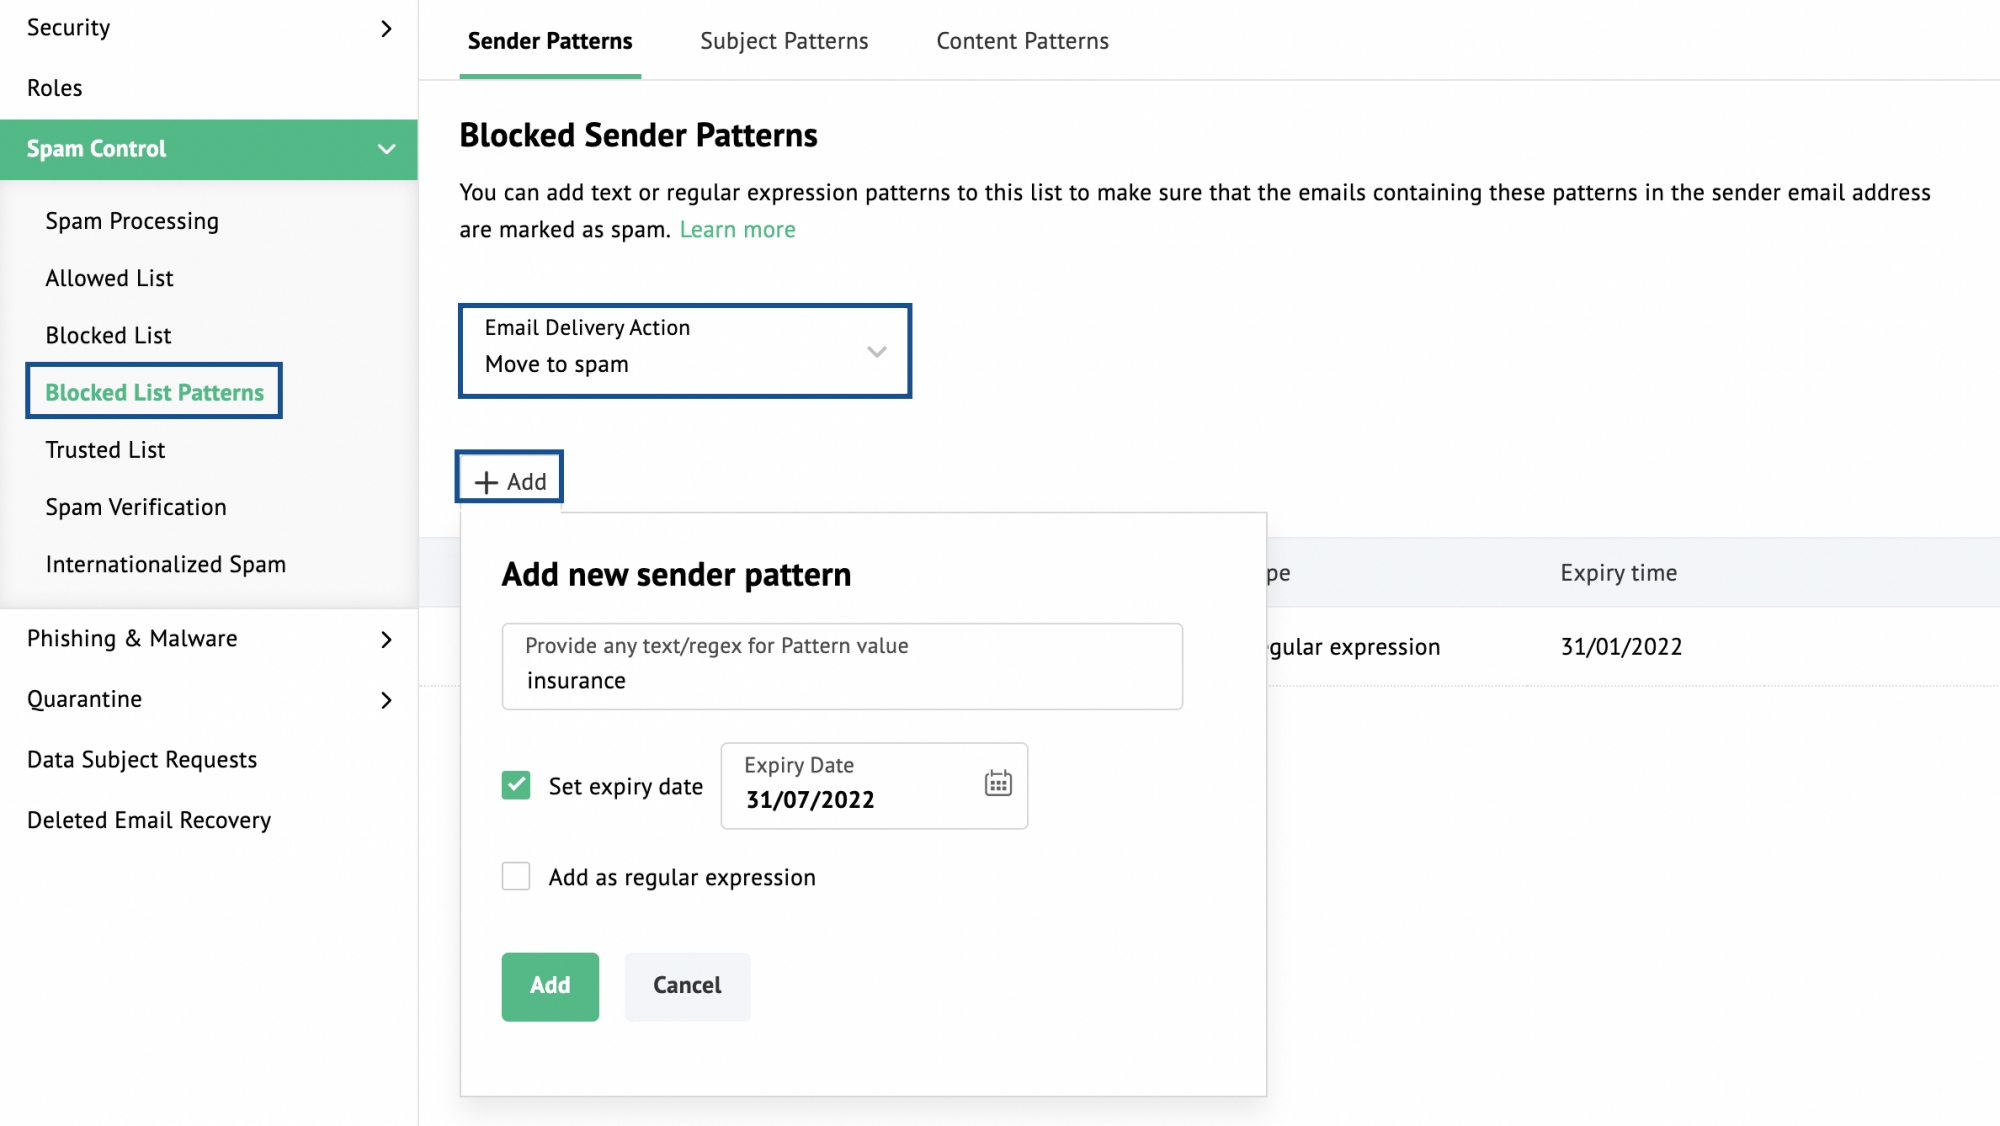
You can also Edit/ Delete a pattern using the icons provided over the saved patterns.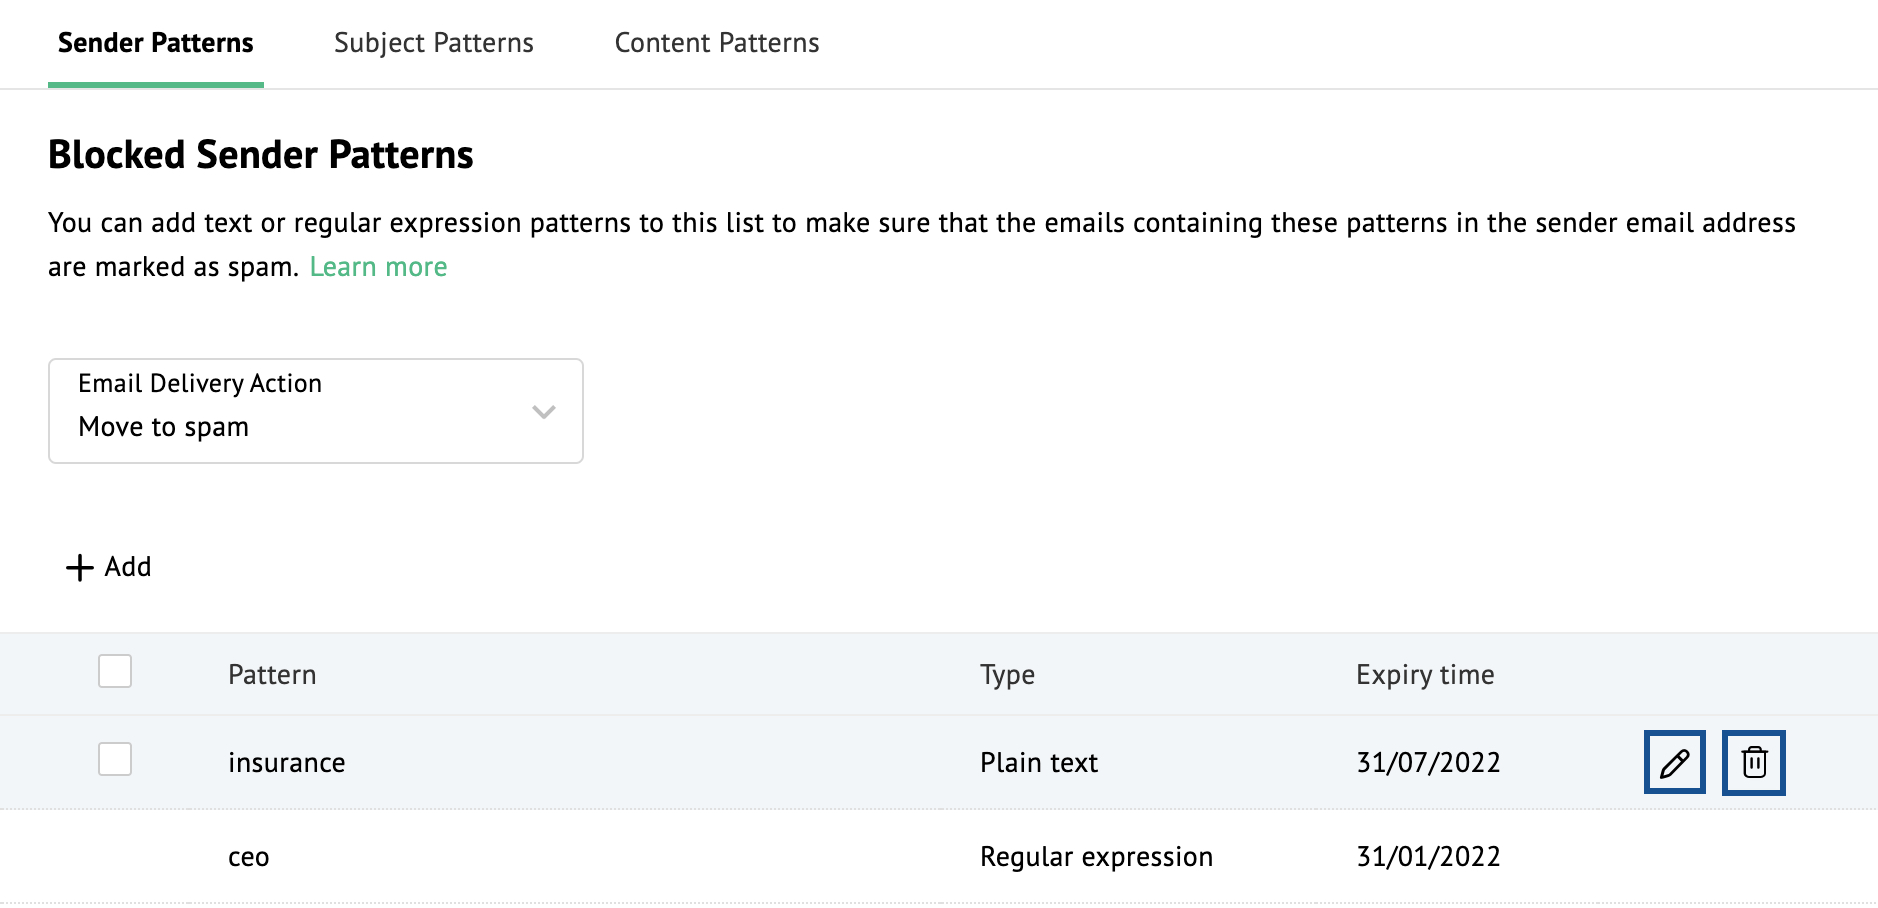
Subject Pattern
You can add text or regular expression patterns to this list to make sure that the emails containing these patterns in the subject of the email are marked as spam. You can set the Email delivery action to None, Move to spam or Move to quarantine.
To configure a pattern click on Add and select either Plain text or Regular expression. You can set an expiry date for the pertaining pattern. Now, click Add to save the pattern.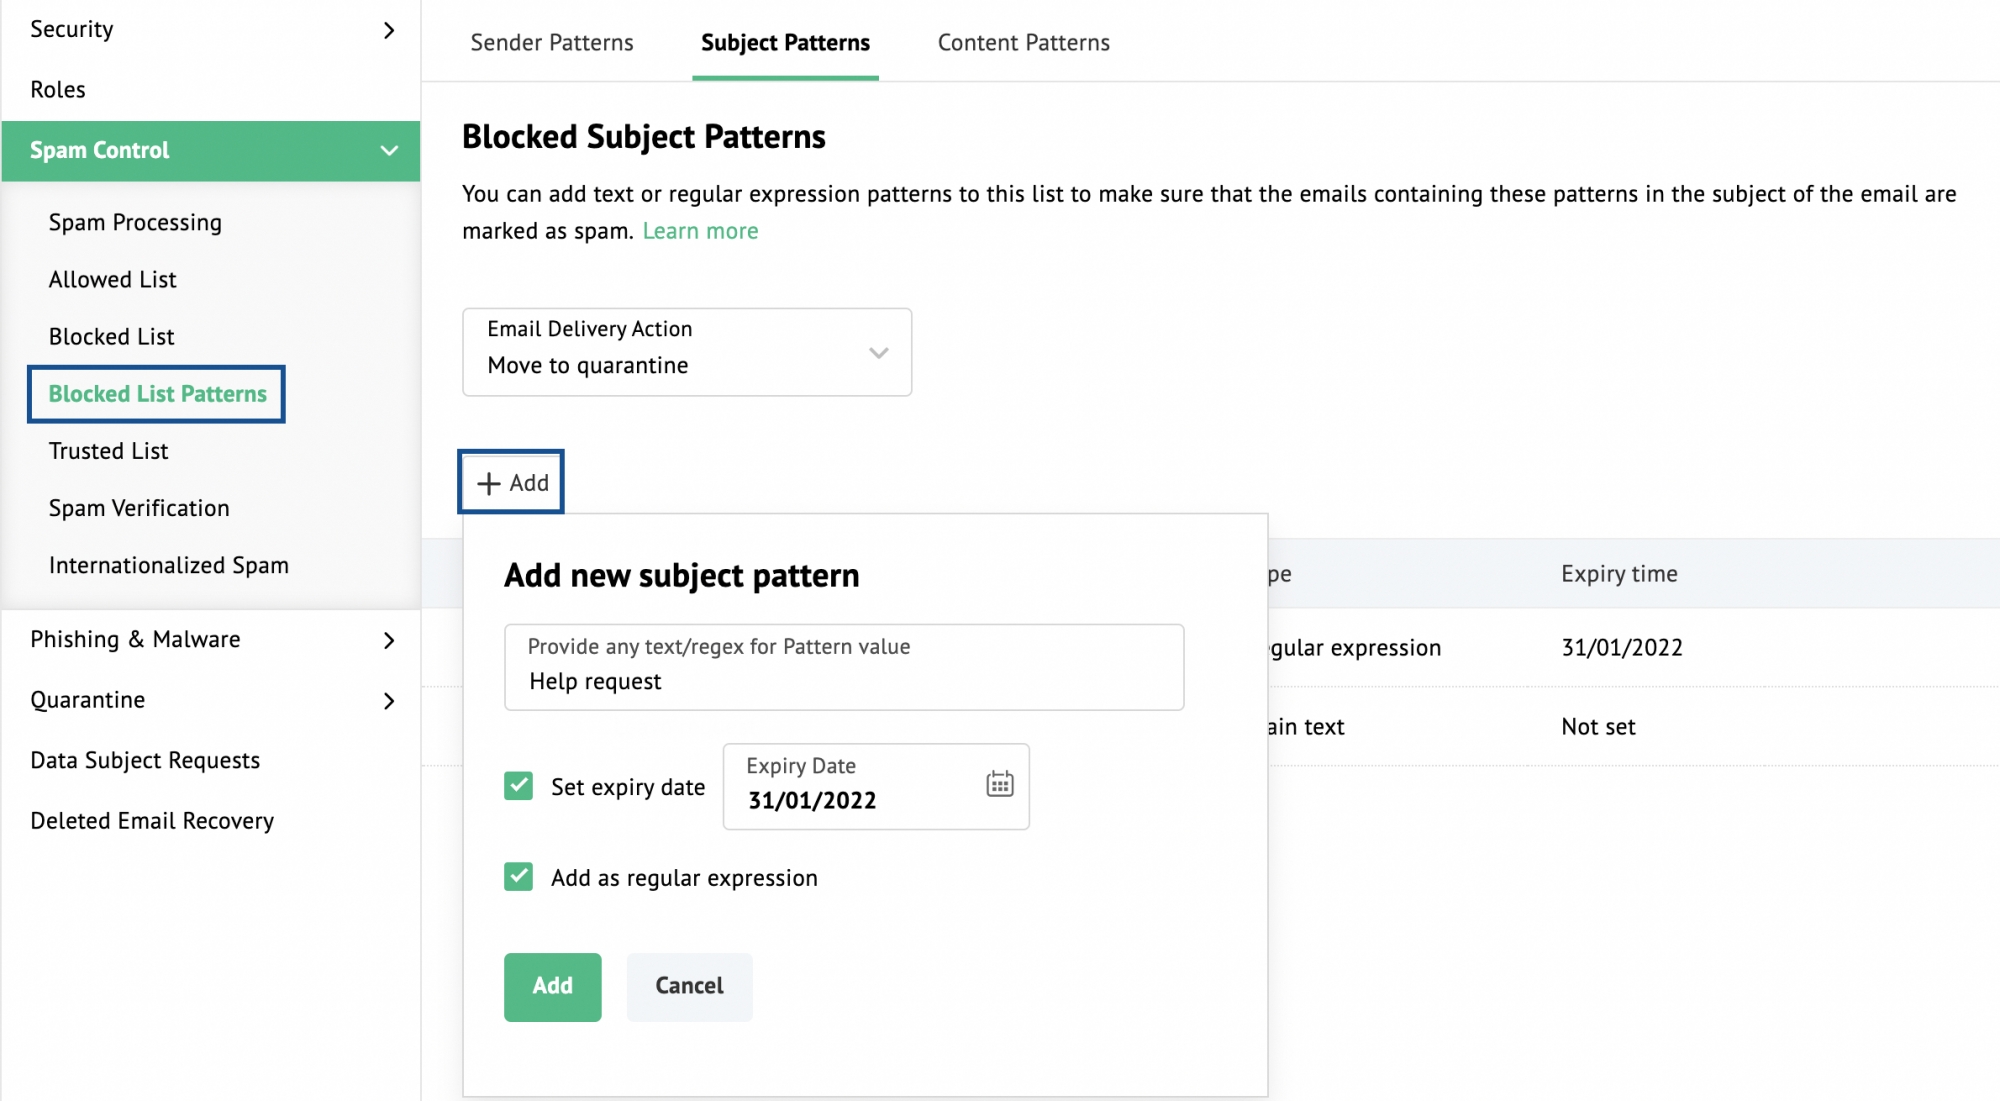
You can also Edit/ Delete a pattern using the icons provided over the saved patterns.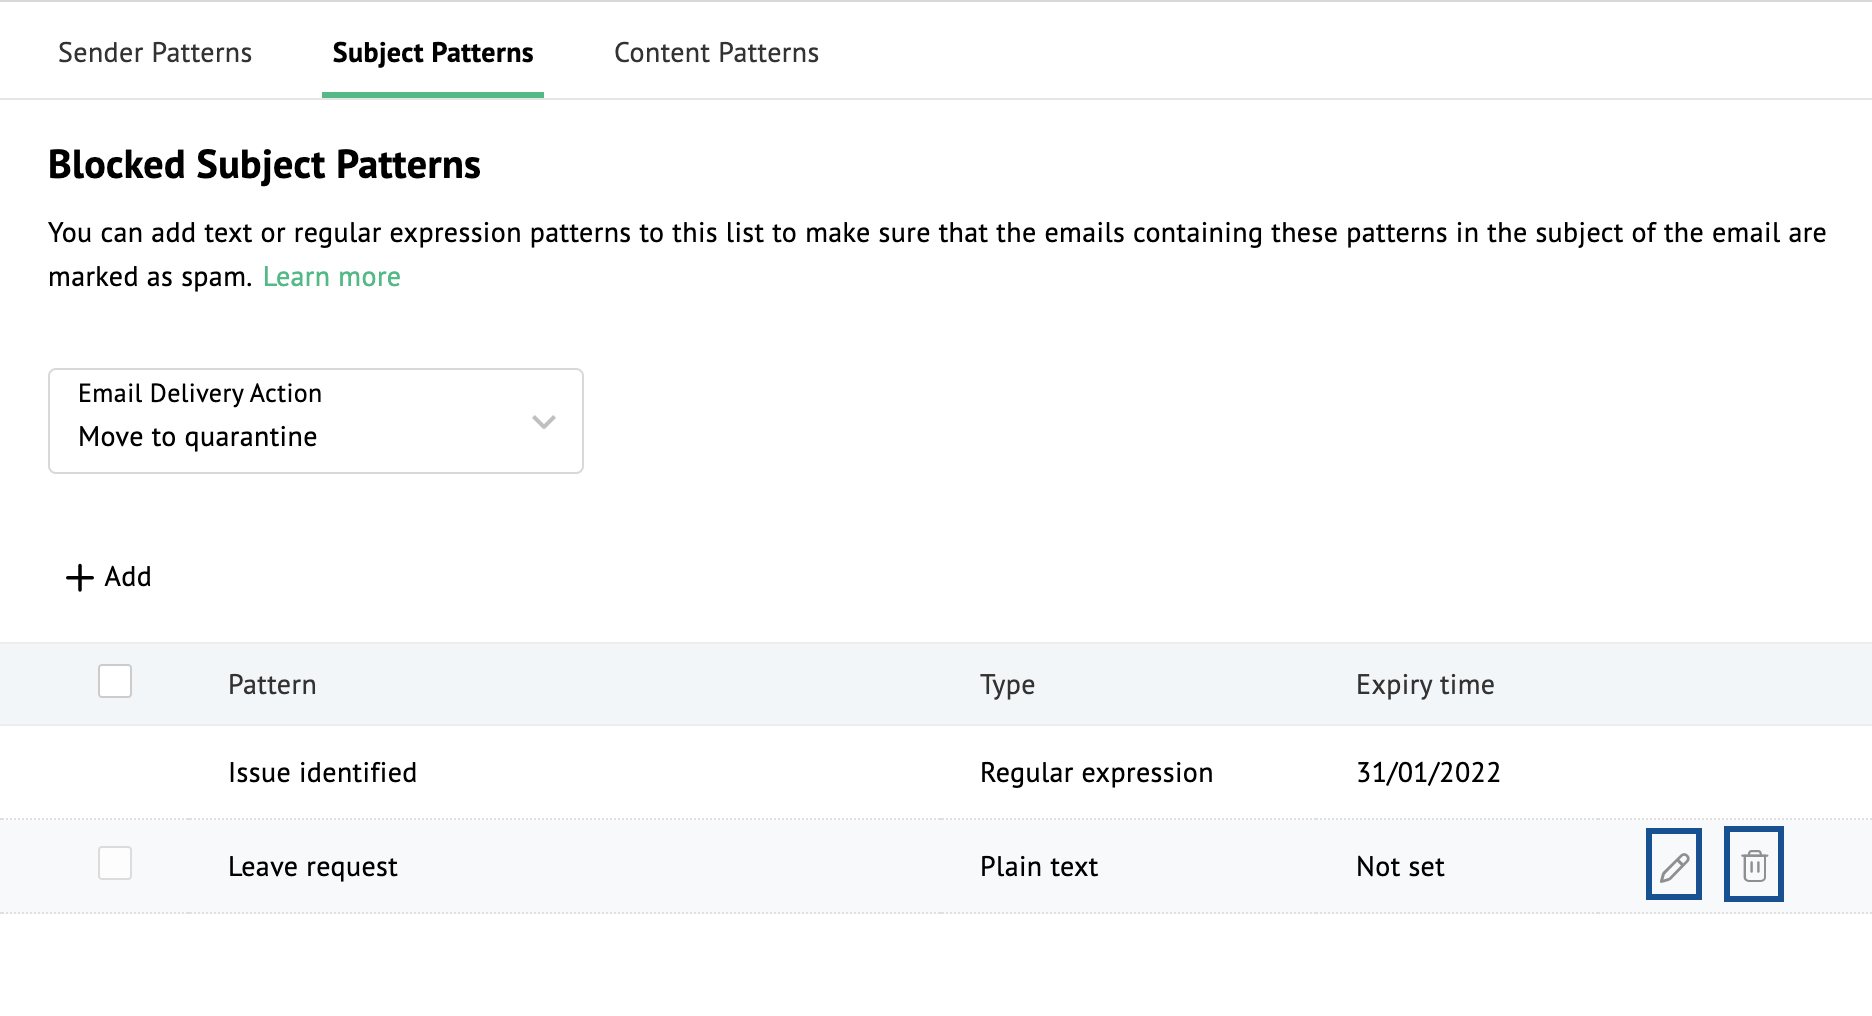
Content Pattern
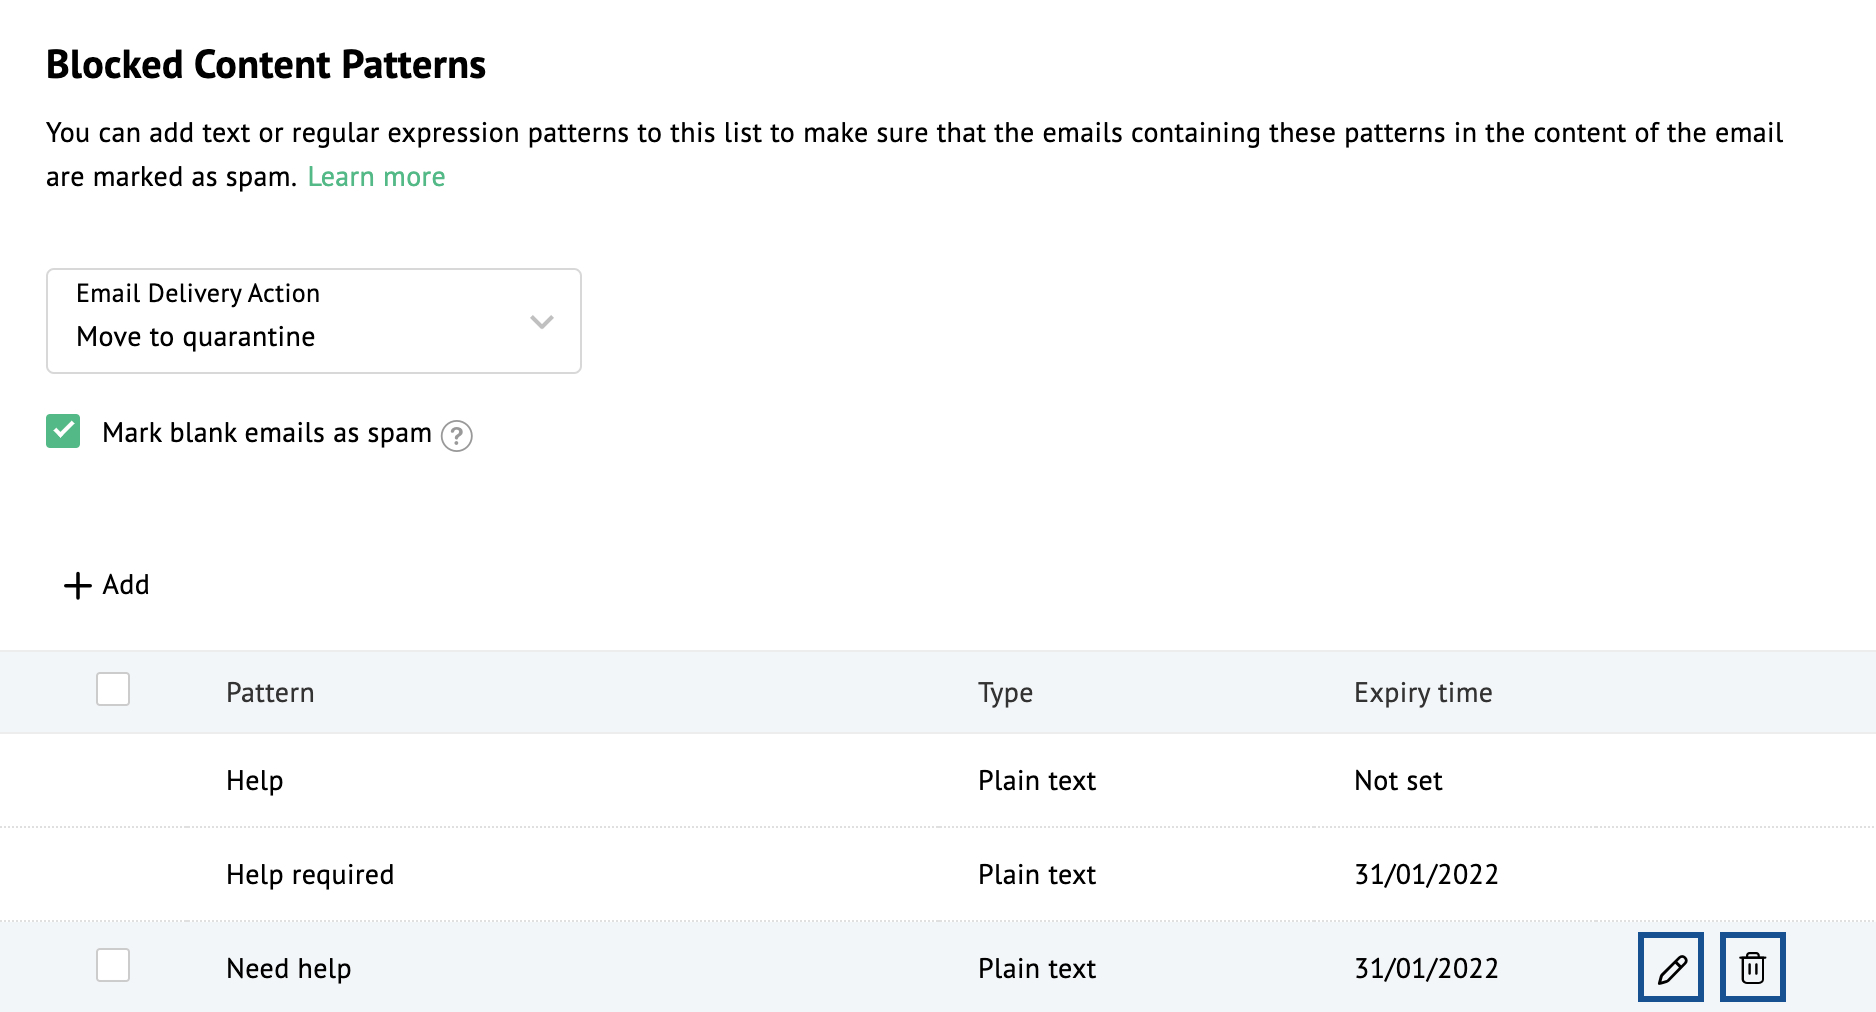
You can add text or regular expression patterns to this list to make sure that the emails containing these patterns in the content of the email are marked as spam. You can set the Email delivery action to None, Move to spam or Move to quarantine. You also have the option to Mark blank emails as spam.
To configure a pattern click on Add and select either Plain text or Regular expression. You can set an expiry date for the pertaining pattern. Now, Click Add to save the pattern.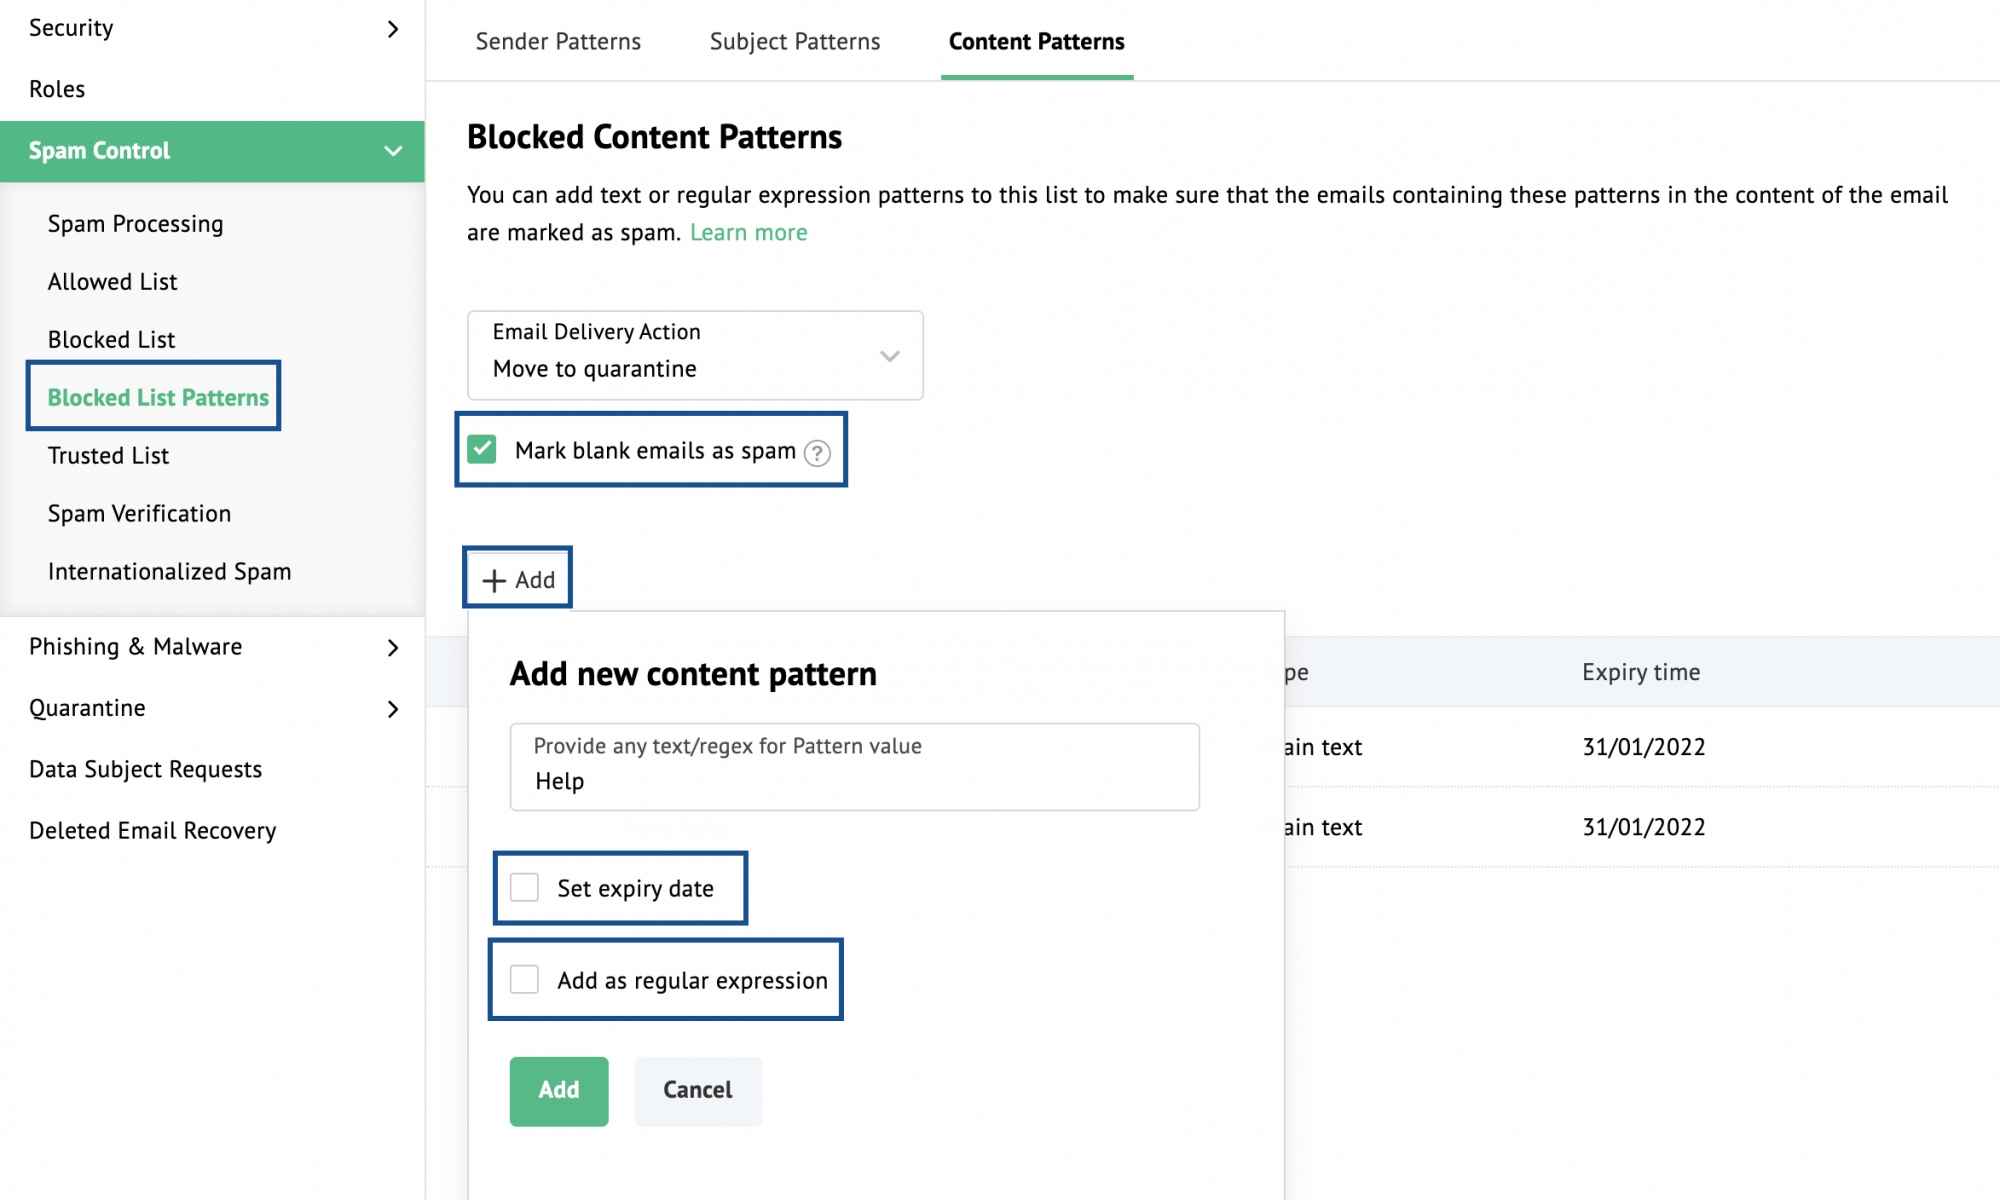
You can also Edit/ Delete a pattern using the icons provided over the saved patterns.
Trusted List
The trusted list is where you can add any email addresses, domains, or IP addresses that you want to exclude from any spam processing. None of the usual spam checks will be conducted on emails that are received from the entities added in the trusted list and they will not be validated for SPF, DKIM, or block list checks. While adding values to the trusted list, be doubly cautious since the organization could be exposed to spam or phishing attacks, as there is no spam check.
Follow the below instructions to define the trusted list for your organization:
- Login to the Zoho Mail Admin Console
- Go to the Security & Compliance menu.
- Select Spam Control, and select Trusted List. You will land in the Emails tab.
- To add specific email addresses to the trusted list, do these steps:
- Click on Add to enter the email addresses.
- You can add multiple email addresses by separating them with commas.
- Finally, click Add.
- Alternatively, you can also import email addresses by clicking on Import.
- Click Browse Files, and select the file containing the email addresses.
- The email addresses in the CSV file will get added to the trusted list.
- To add one or more domains to the trusted list, click on the Domains tab and do these steps:
- Click on Add to enter the domain names.
- You can add multiple domains by separating them with commas and click Add.
- Alternatively, you can also import domains by clicking on Import.
- Click Browse Files, and select the file containing the domain names. Now, click Import to proceed.
- The domain names in the CSV file will get added to the trusted list.
Note:
It is generally not recommended to add your own domain to the trusted domain list, as this may result in spoofed emails being delivered to your users' mailboxes. However, if you choose to proceed, a warning pop-up will appear for you to confirm your action. Review the warning message carefully, and click Proceed Anyway to confirm.
Internationalized Spam (Language/Location-based Spam):
Language-based spam:
You can allow or reject mails based on the language of the email. You can set the languages according to your preference in the Zoho Mail Control Panel.
Follow the below steps to add languages:
- Login to the Zoho Mail Admin Console
- Go to the Security & Compliance menu.
- Select Spam Control, go to Internationalized Spam. You will land in the Language tab.
- Select the action that you'd like to take that is listed in the Spam Processing Action field. You can either Allow or Block the chosen languages.
- Click Add and select the languages.
- Once done, click Add.
Based on the preferences set, emails in the languages that you've entered will either be blocked or allowed.
Country-based spam:
Based on the location of the origin of emails, you can either reject the email, mark it as spam or move it to the quarantine list.
Follow the below steps to add locations:
- Login to the Zoho Mail Admin Console
- Go to the Security & Compliance menu.
- Select Spam Control, go to Internationalized Spam, and select the Country tab.
- Click Add, select the countries, and choose the desired action to apply to emails originating from them.
- You can either mark the emails as spam, move it to quarantine or reject it.
Emails from the respective countries will be processed according to the preferences that you have set.
Note:
The language and country-based spam control features will only be available for organizations that are using one of our paid plans.