Creator On-Premise - Quick Start Guide
Table of Contents
Overview
Zoho Creator On-premise is an installable low-code platform for creating enterprise-grade custom applications that can be seamlessly accessed from smartphones, tablets, and web browsers.
This guide will help you get started with building custom apps using Zoho Creator On-Premise. This guide illustrates building a Recruitment Management app using Zoho Creator to give you an overview of how you can deconstruct your business processes and build an app that fits the custom needs of your organization.
Plan your app
Before you start building your app, it is crucial that you:
- Identify the business processes that you'd like to organize and automate
- Outline the data that each process is based on, as well as the roles or profiles involved
- Outline how the roles or profiles involved, will interact with the app
Recruitment Management app
Imagine that you are an executive who has been tasked with managing the recruitment of candidates, and that you've decided to build an app that collects and manages information about the candidates who apply to the recruitment process.
This app is meant to cater to the following participants:
- The Candidates, who apply to the recruitment process
- The Manager, who conducts the interviews and decides whether a candidate is eligible to be selected or not
- The Recruitment Executive (yourself), who is in charge of monitoring this process
Flow of the app - a summary
- Candidates apply for recruitment
- Manager schedules an interview for all applicants
- After each interview, the Manager updates whether the concerned candidate is selected or rejected
Requirement-solution mapping
The following table lists the requirements of the recruitment process that this Recruitment Management app addresses:
| Requirement | Solution in Zoho Creator |
| Provide a way for candidates to easily apply to the recruitment process | Create a Form and Publish it (make it publicly accessible) |
| Automate notifying candidates that their applications were submitted successfully | Enable sending email notification whenever a candidate submits the Form |
| Provide a way for the manager to view the details of all applicants | Create a List Report and give the manager permission to view candidate records |
| Provide a way for the manager to schedule interviews with the candidates, and view the scheduled interviews | Create a Form through which the manager schedules interviews and create a Calendar Report, based on this Form, to view the scheduled interviews |
| Automate notifying the candidates as and when the manager schedules their interview | Create a Workflow that sends an email once the manager schedules an interview |
| Provide a way for the recruitment executive to quickly glance at the status of the process via a dashboard that displays the candidate information | Create a Page |
Create the Recruitment Management app
Note:
- Once you've logged in to Creator, you will be taken to your account's Home.
- Click New Application, near the top-right corner of the page. If there are no apps in your account, click Create Application near the bottom of the page.
- Select Create from scratch, displayed on the left.
- Set the app's name as 'Recruitment Management', then click Create. You will be taken to the Design page of your app:
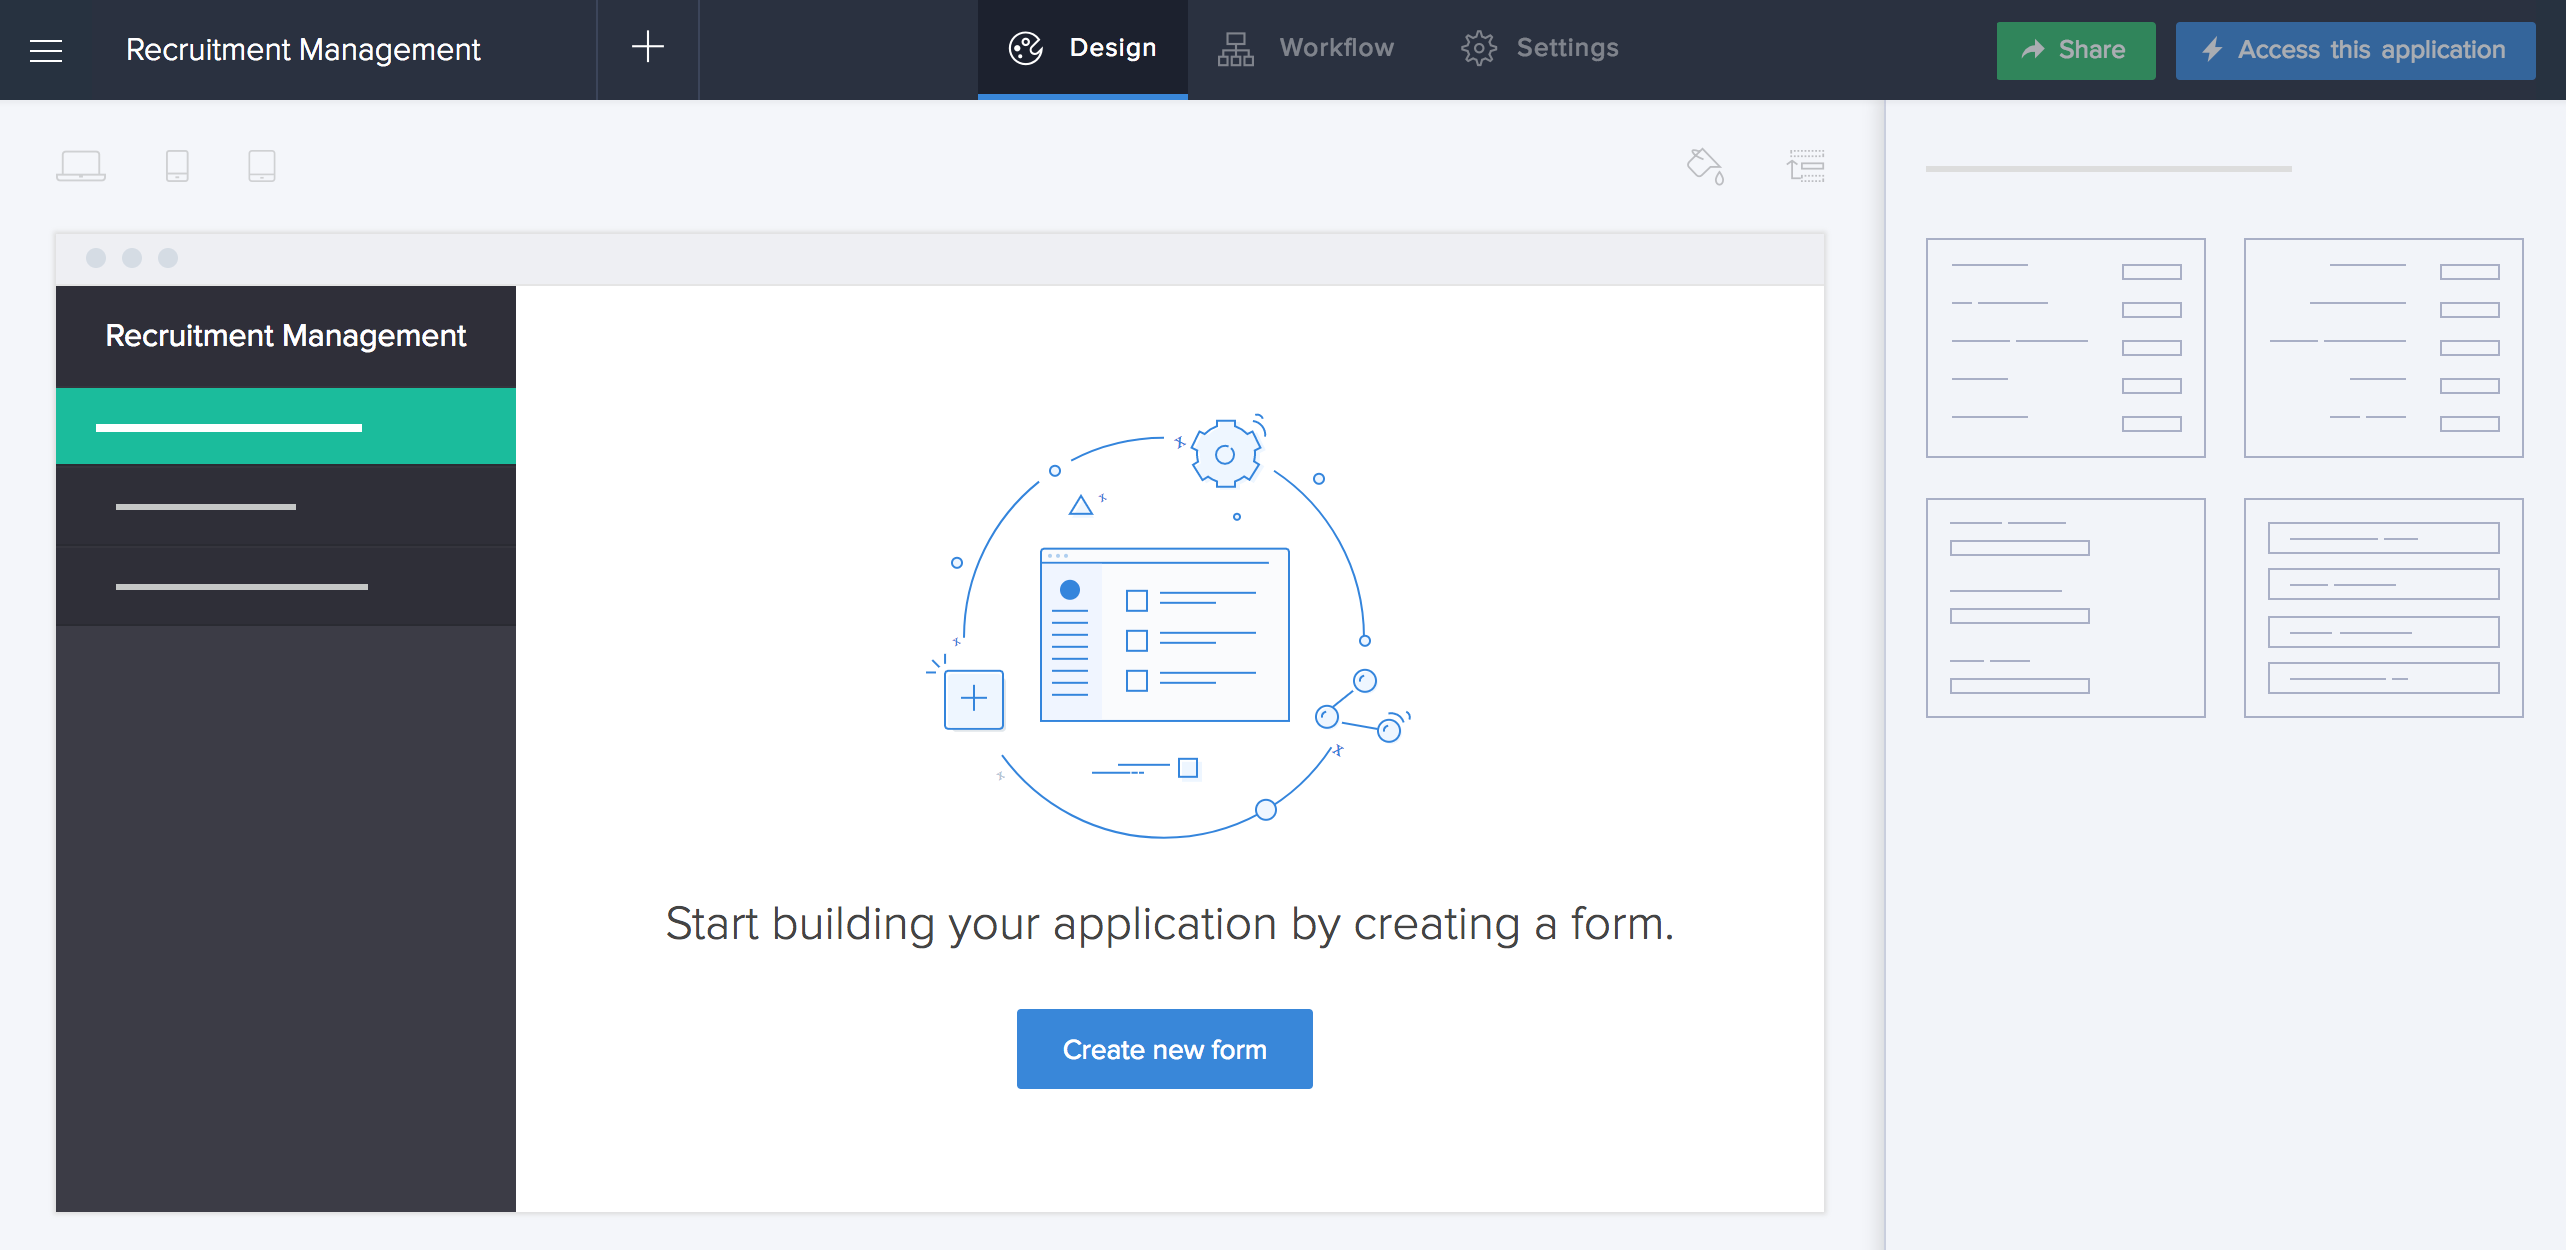

You've now created an app. However, the app does not have any components (form, report, page or workflow) in it. You will need to start by creating a form — the component of a Zoho Creator app through which users enter data in the app.
Each entry submitted through a form is called a record. Just like how a spreadsheet has columns, forms in Zoho Creator have fields.
Create form
- Click Create new form, near the bottom of the Design page.
- Select Blank.
- Set the form's name as 'Application Form', then click Create Form. You will be taken to the form builder:
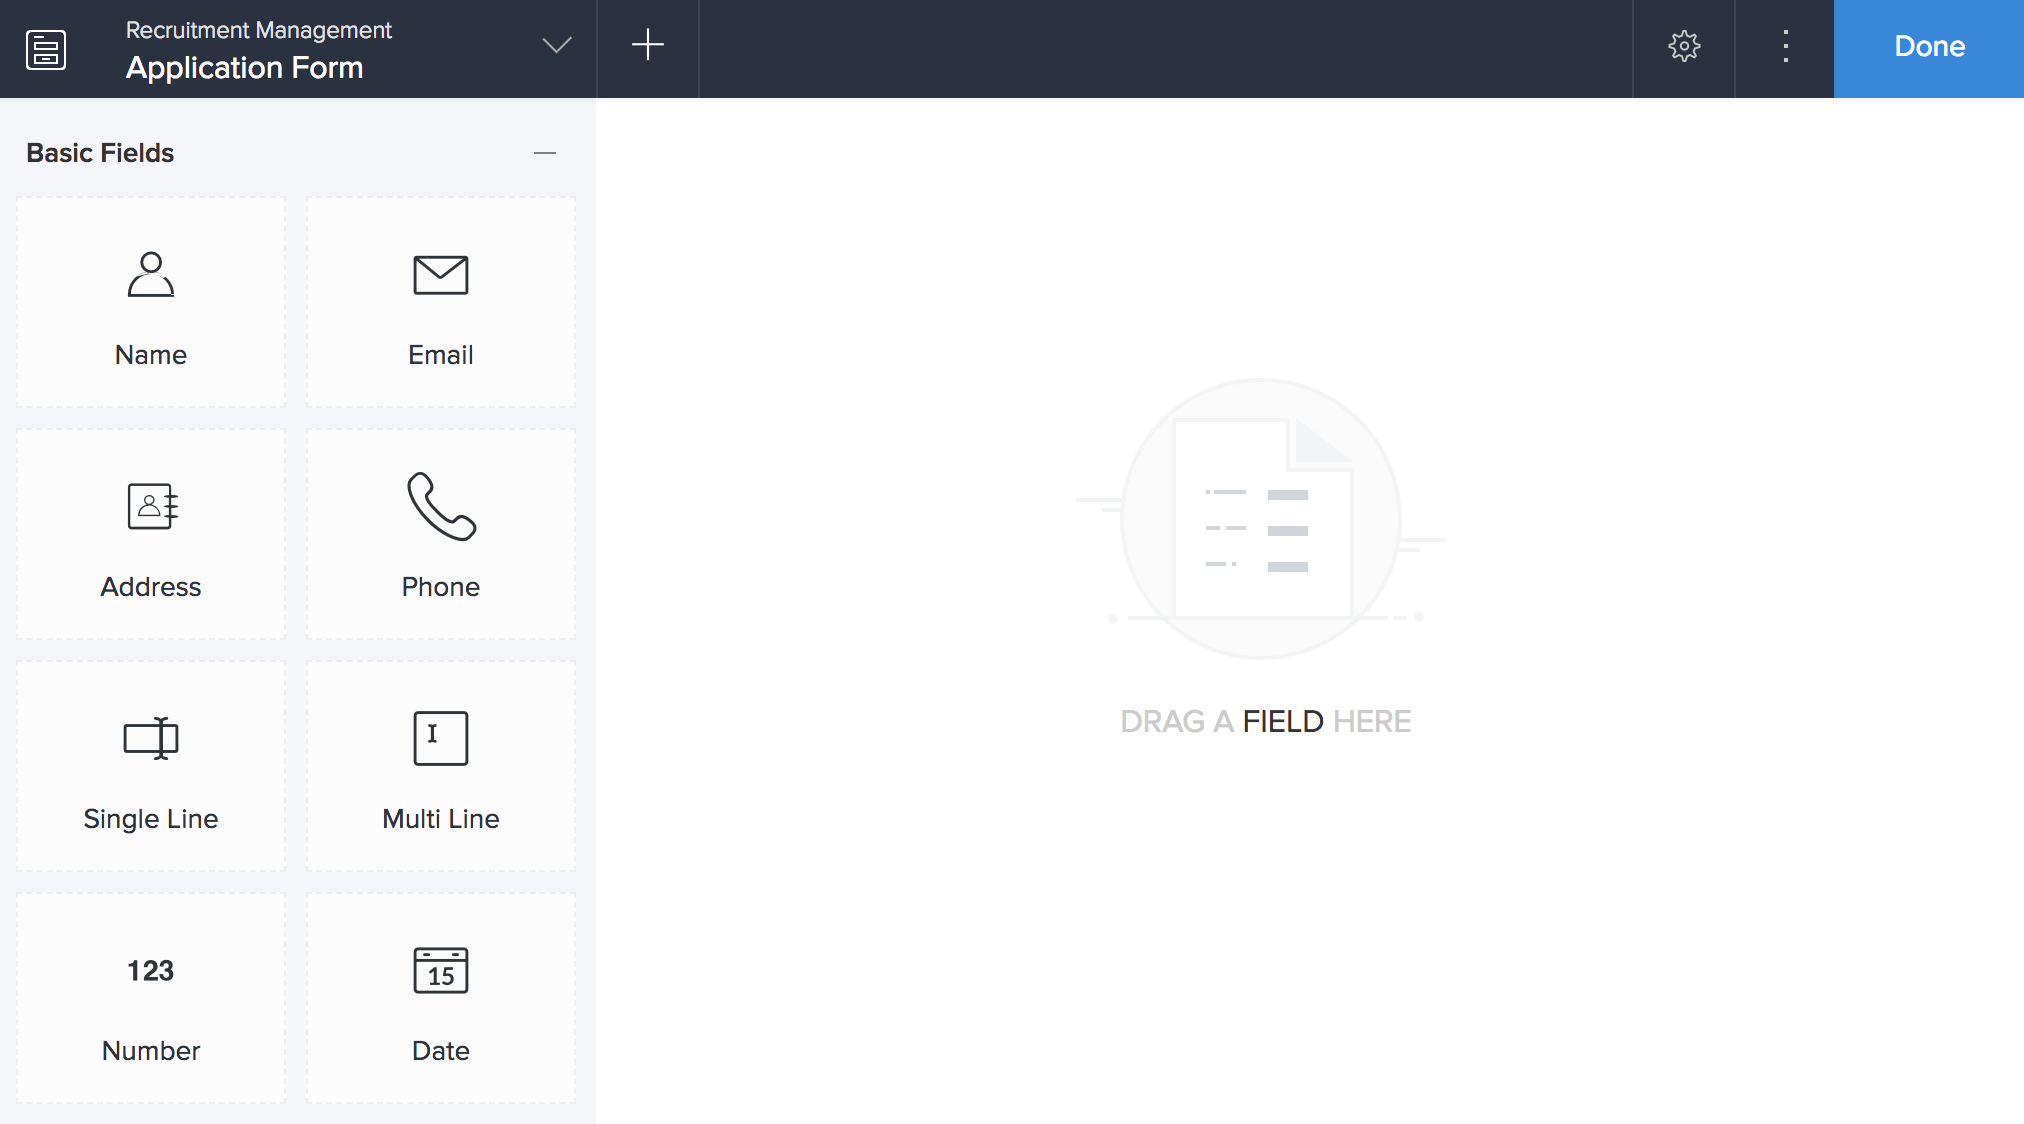
- Drag and drop the Name field from the field palette (displayed on the left), to the form. Its Field Properties will appear on the right.
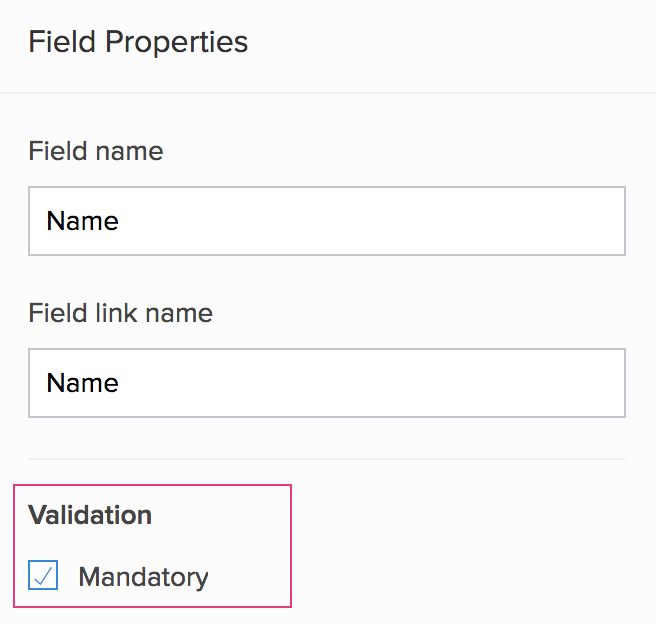
Each field comes set with:
- Field name: Its the text that is displayed next to its input area in a form. This lets the users know what information they are to enter in that field.
- Field link name: Its the name with which a field is internally referred by Zoho Creator
You can use these default names or edit them as required.
- Set the Name field as Mandatory to ensure that a candidate cannot submit an application without entering their name.
- Navigate to the Field Properties > Validation section
- Check the checkbox next to Mandatory:
- Drag and drop the Drop Down field onto the form.
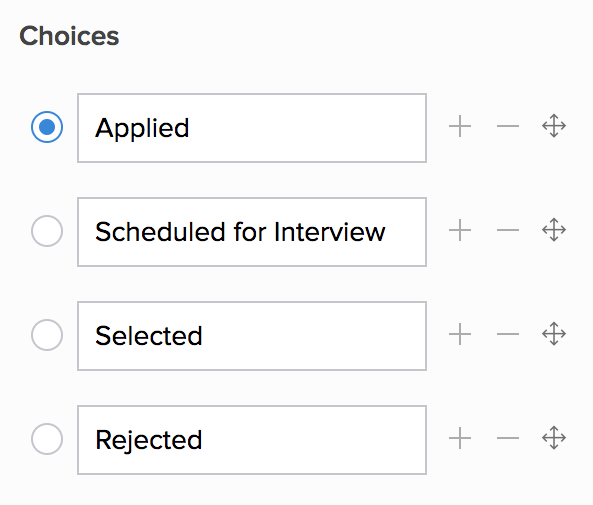
- Set its Field name as 'Application Status'
- Navigate to the Field Properties > Choices section on the right, then set the choices as shown below
- Click the radio button next to 'Applied'
- Drag and drop the following fields to your form:
Type of Field Set its Field name as Configure its Field Properties Email Email Address Set as Mandatory Phone Phone Number - File upload Resume Set as Mandatory - Click Done, displayed at the top-right corner of the form builder:


You will be taken to the Design page of your form, where you can customize and preview your form's appearance:

- This is where you will see a preview of your form's appearance.
- Select a device—Browser, Phone, or Tablet—to customize your form's appearance on that device. The selected device will appear in the preview.
- Select a layout: Layout defines label placement. Device-specific layouts will be displayed here. The selected layout will be applied in the preview.
Click the Phone icon as shown below. The Design page of the Application Form, with the preview of how it will look when accessed on a smartphone, will appear:

Send email notification on form submission
Now that you have created the form through which the candidates will submit their applications, let's address the requirement that the app is to automate notifying the candidates that their applications were submitted successfully.
As the candidates will be sharing their email address while submitting the Application Form, we can notify them by sending an email when they submit this form. You can achieve this by using one of the built-in features of forms in Zoho Creator.
To enable sending an email on form submission:
- In the Design page, hover the mouse over the form's preview, then click Open Form Builder.
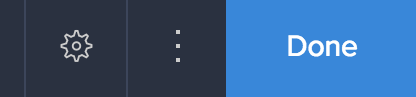
- Click the Properties icon near the top-right corner of the form builder, as shown below. The Form Properties pane will appear on the right.
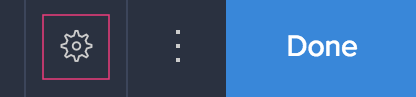
- Check the checkbox next to Send email notification, as shown below. The Customize link will appear:
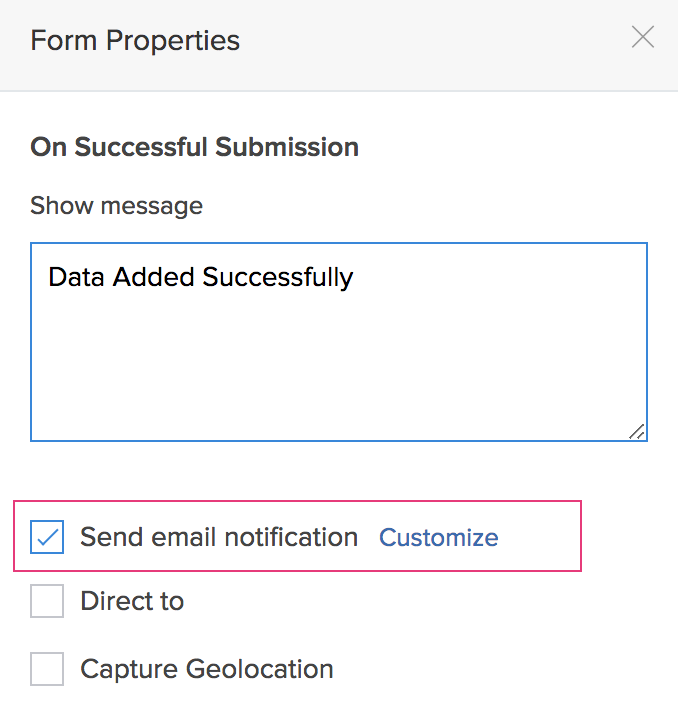
- Click Customize. In the Set email notification pop-up window:
- Set To: Select the Email Address field
- Set Subject as 'Confirming your application'
- Set Message as shown below
- Click Done

- Close the Form Properties, then click Done at the top-right corner of the form builder.


Create workflow to hide fields on form
The Application Status field in the Application Form is meant to track the candidates' progress in the recruitment process. It's a field that must not be exposed to the candidates when they submit the form, but must be visible to the recruitment executive and the manager.
This concerns the event of a candidate submitting, or creating, a record. Thus the workflow needs to be triggered during record creation. To do this:
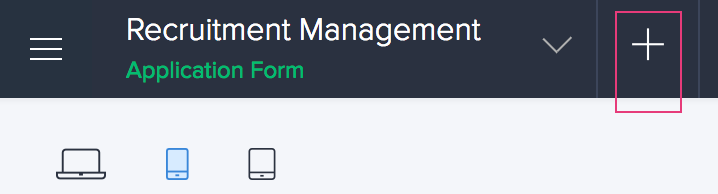
Click the Add New icon at the top of the Design page:
- Select Workflow.
- Select While using the form.
- Select Application Form from the dropdown next to Choose form.
- Select the choice Created for Run when a record is.
- Select Field rules from the dropdown next to When to trigger workflow.
- Set the workflow's name as 'Hide Application Status field'.
- Click Create Workflow.
You will be taken to the workflow builder: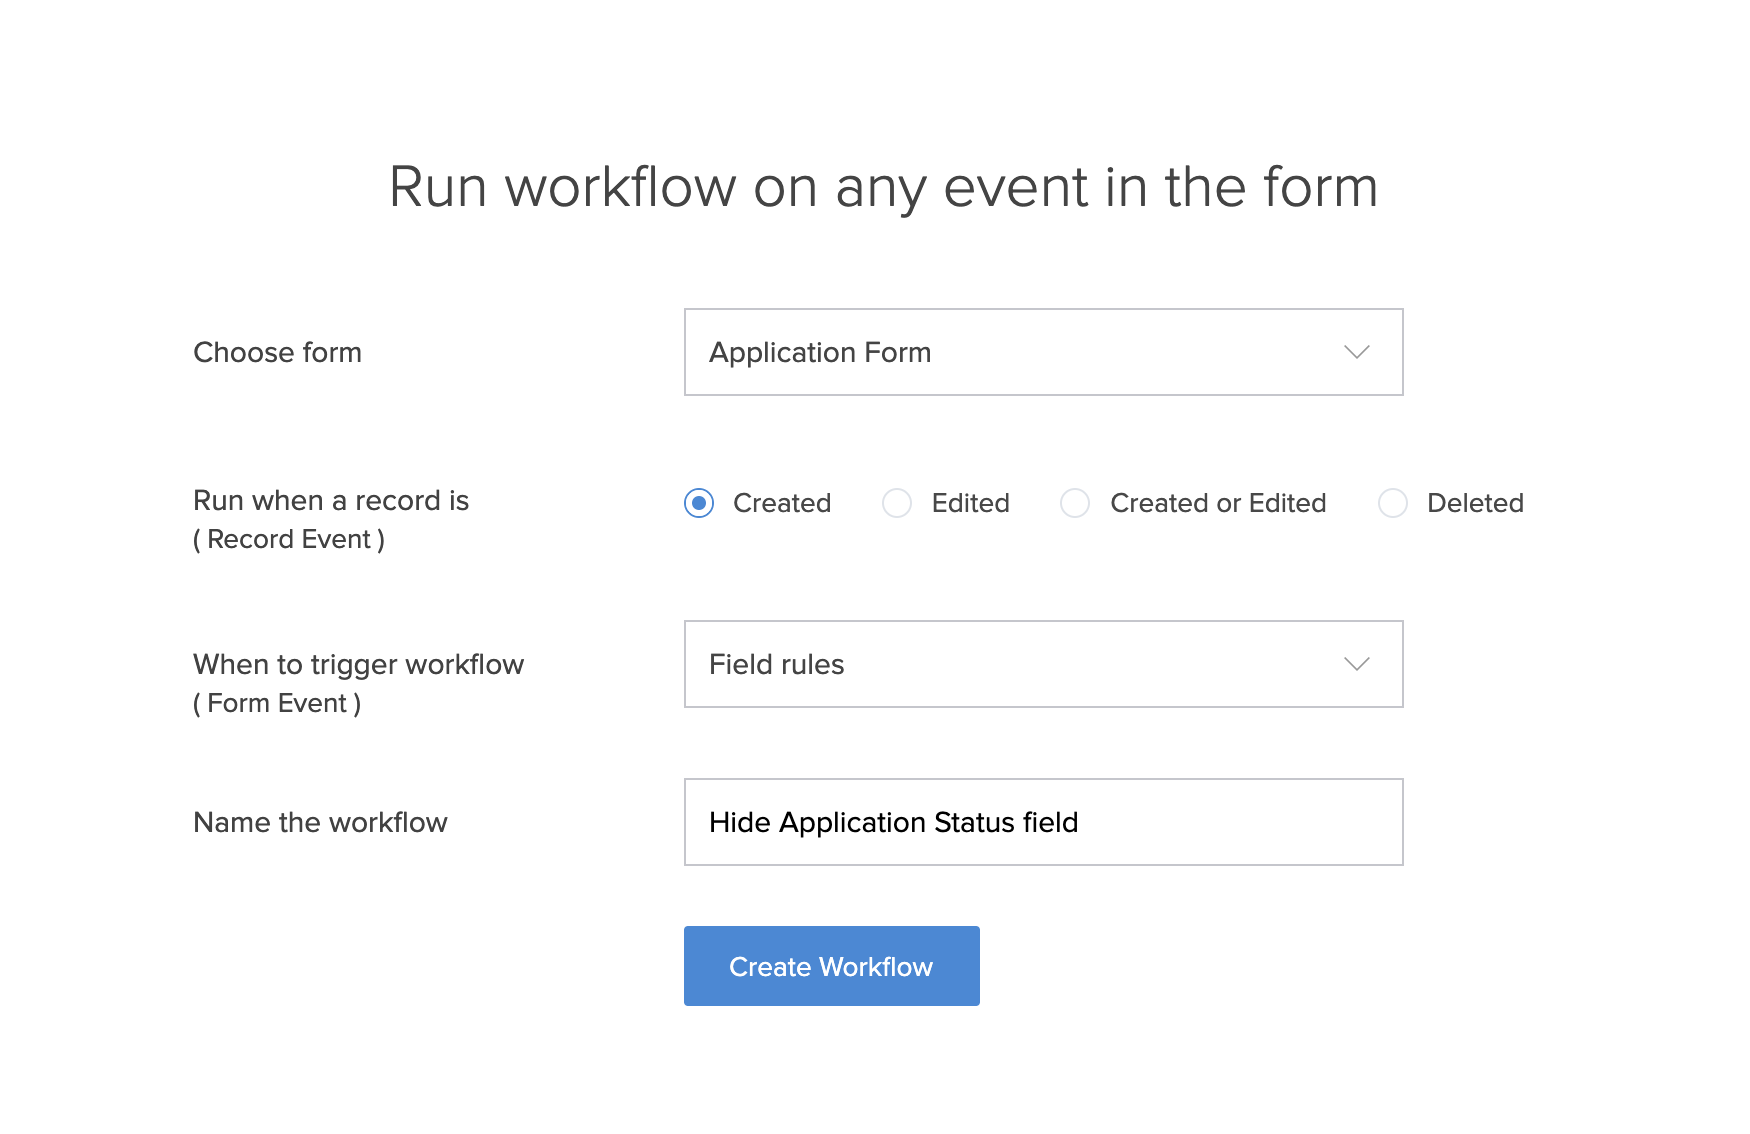
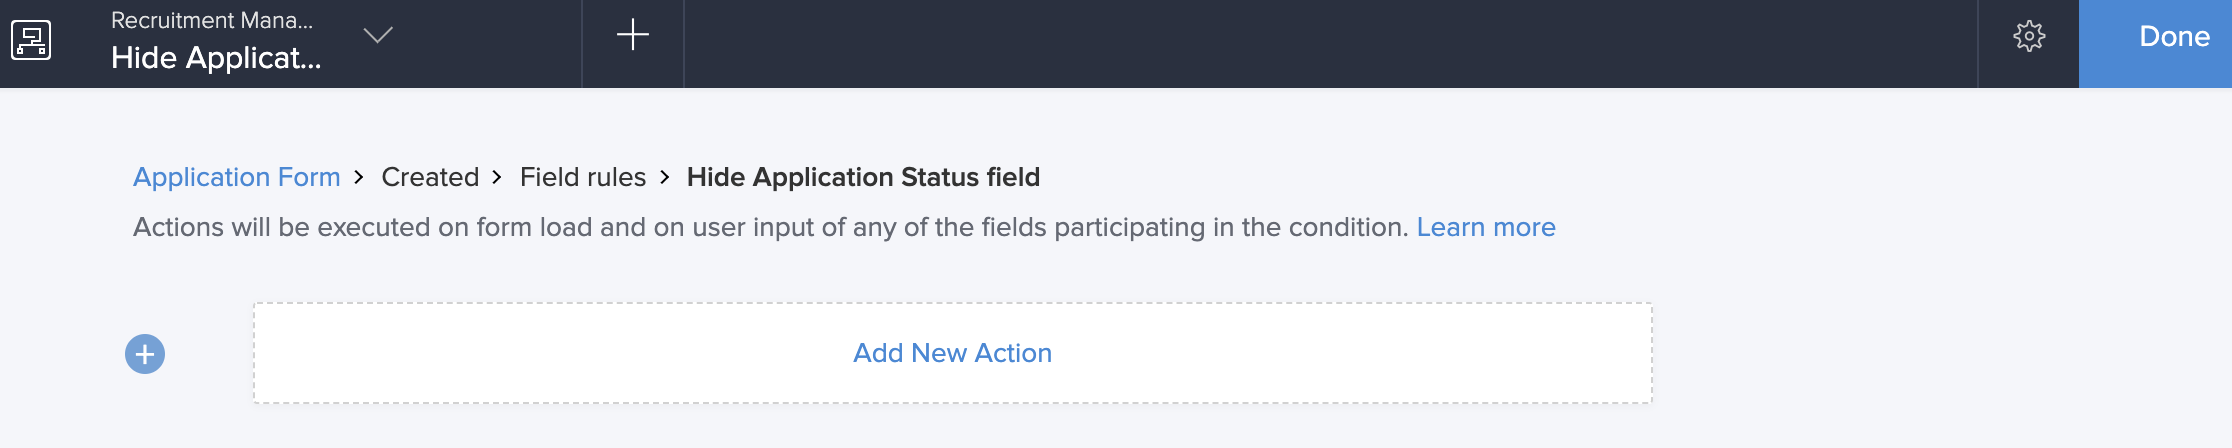
- Click Add New Action.
- Set Run this action with the choice Always.
- Select Hide fields under Select an action.
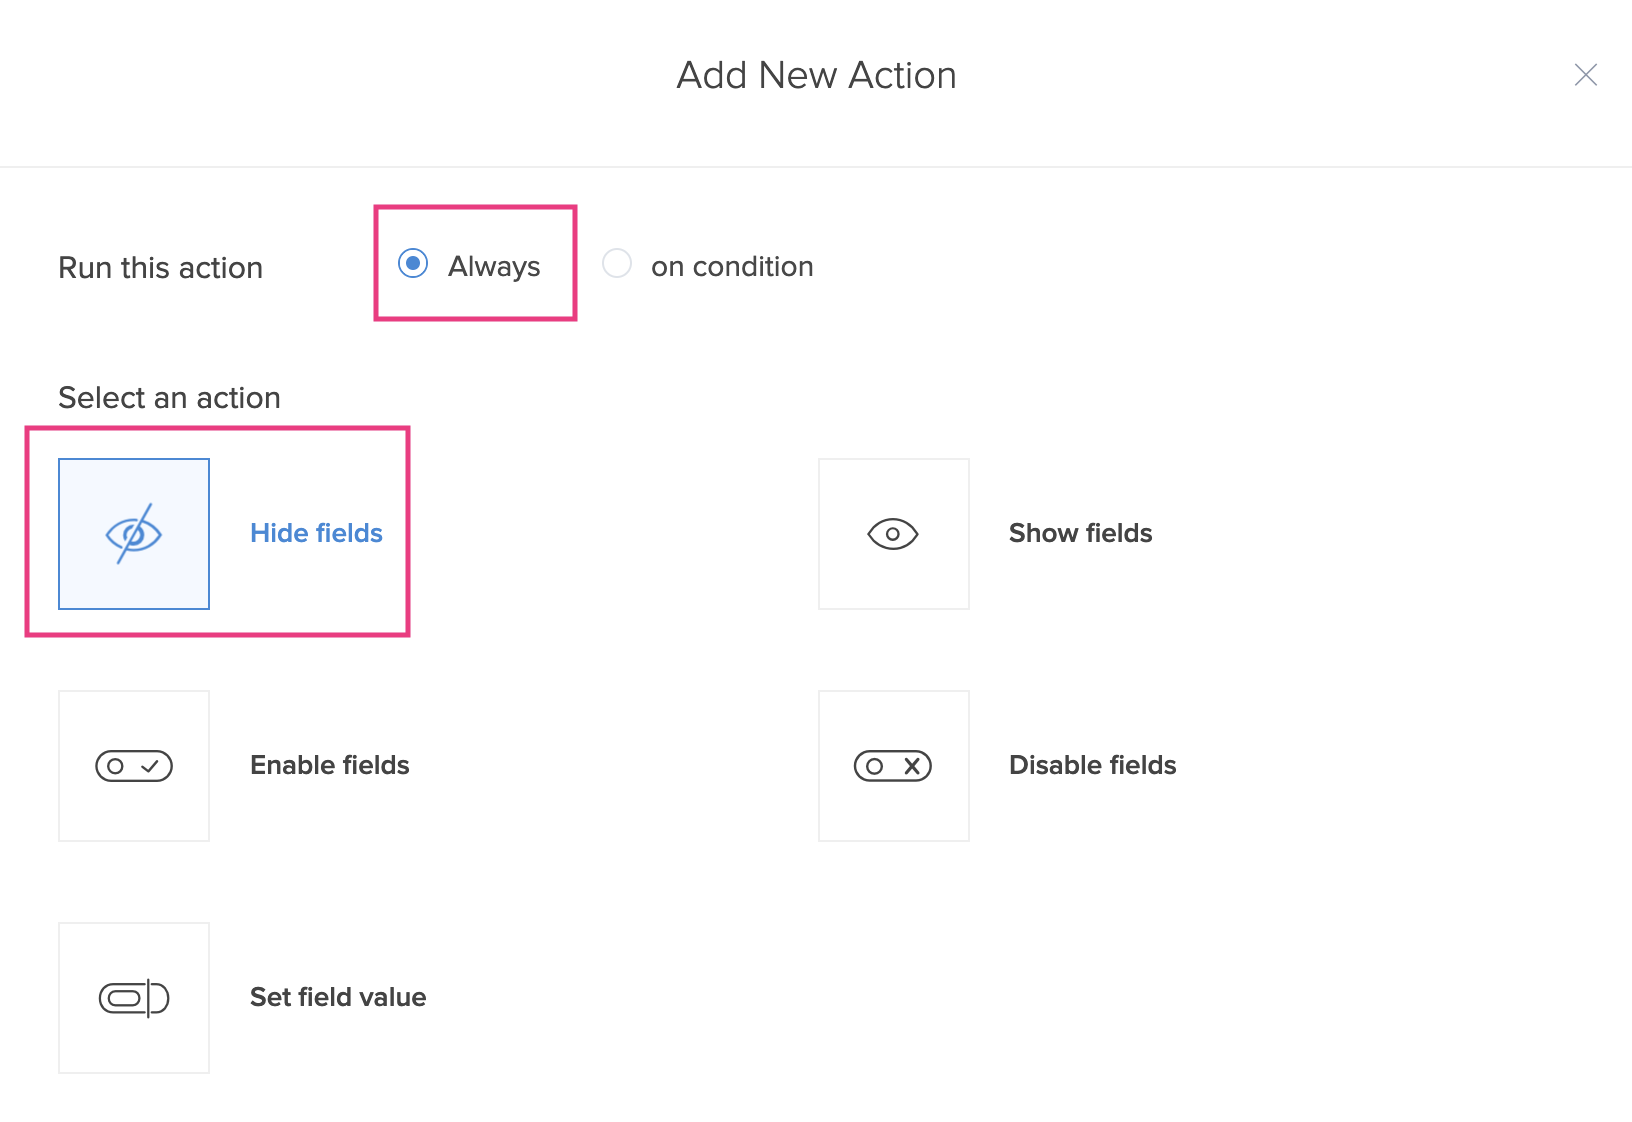
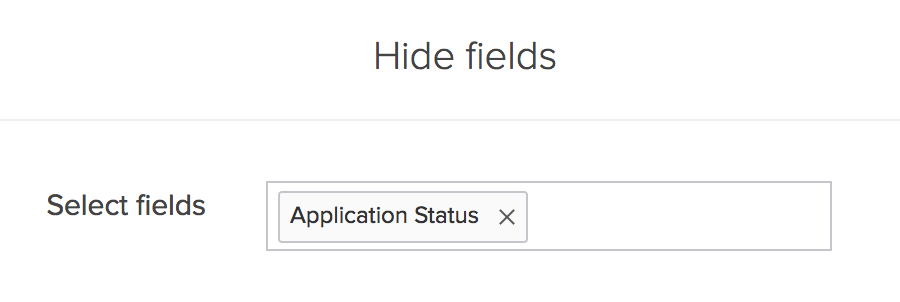
- Select Application Status in the dropdown next to Select Fields:
- Click Save at the bottom-right corner.
- Click Done at the top-right corner of the workflow builder.


You will be taken to the Workflow page of your app. When you access the Application Form hereafter, the Application Status field will not appear.
Access the app
- Click Access this application in the top-right corner of the Design page:
You will get to access the Application Form:
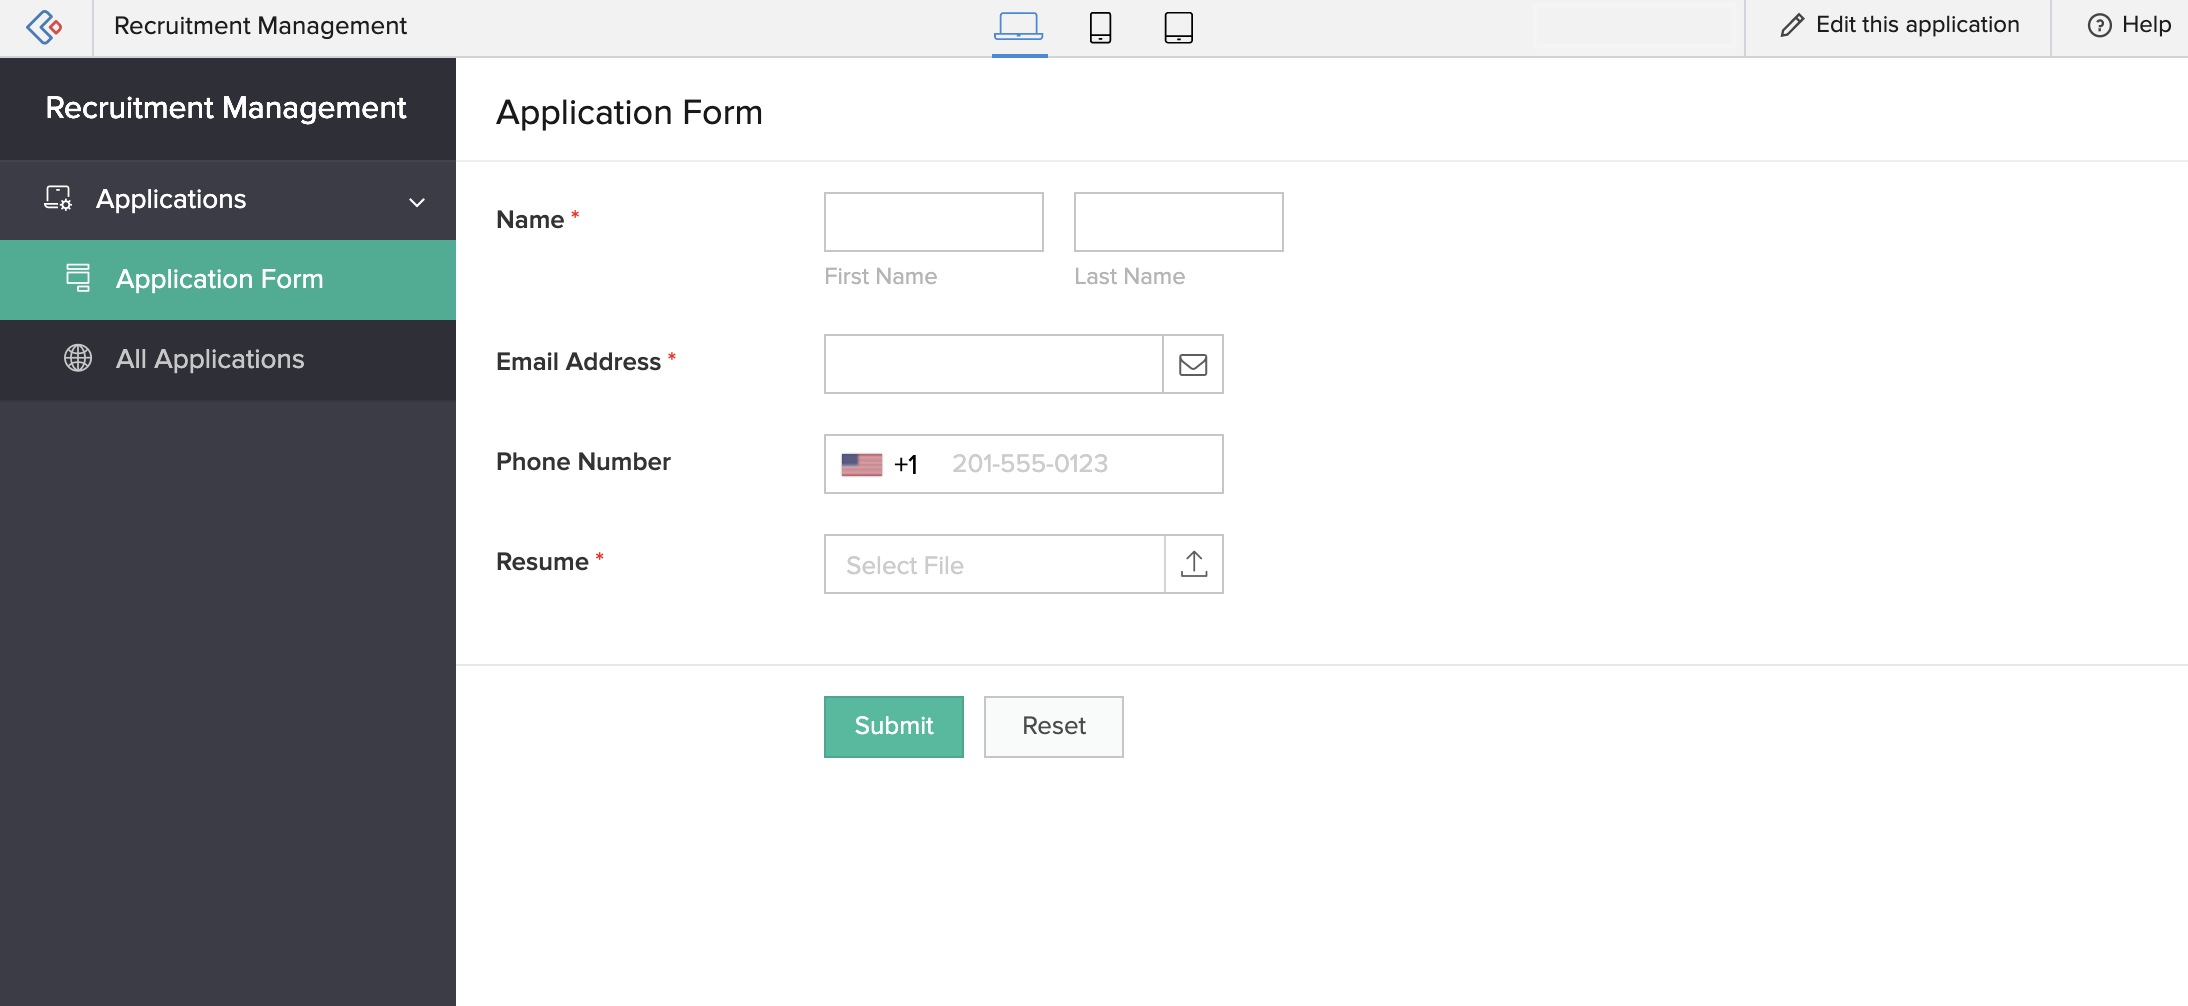
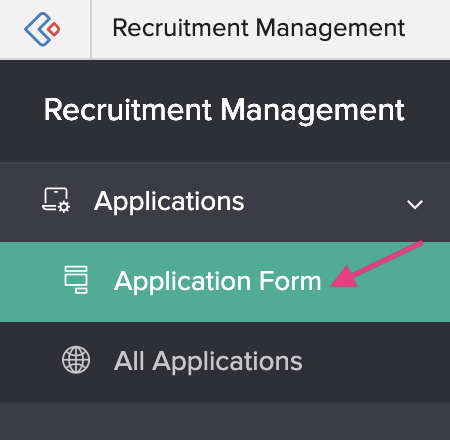
Try submitting some dummy candidate records through your form. Doing this will help you to visualize your app as you continue to add components (forms, reports, workflows, and pages) to it. - Click All Applications on the left, as shown below. A List Report will appear. It will display all the entries submitted through the Application Form.


If you go through all the steps you've covered so far, you'll notice that nowhere did you create this report. When you create a form, Zoho Creator automatically creates a list report for it. A report is the component of a Zoho Creator app which enables your users to view the data submitted through a form. All Applications is the default list report of the Application Form.
The view that you see on accessing the All Applications report, is its Quick View. The Quick View of a report enables your users to view multiple records in one glance.

When you click on a record, the Detail View will slide in from the right. The Detail View of a report enables your users to view a single record in detail.

Edit the app
Click Edit this application at the top-right corner of the app:

Since you clicked Edit this application from the All Applications report, you'll be taken to its Design page:

Here, you can perform device-specific customizations for the Layouts and Actions of this report's Quick View and Detail View, displayed on the right. As you customize, the Design page will let you preview them.
Create relationship between forms
A relationship in Zoho Creator defines how records in one form are related to the records in another form. The related forms can be in the same app or in different apps in the same account.
There are two ways in which you create a relationship in Zoho Creator – by adding a Lookup field or a SubForm field to a form. This guide illustrates using a lookup field to create a relationship between forms.
At this stage, your app only has the Application Form in it. To establish a relationship, you need another form. This second form is going to be the one through which the manager schedules interviews for the applicants. To create this form:
- Click the Add New icon displayed at the top of the Design page.
- Select Form, then select Blank.
- Name the form as 'Schedule Interview', then click Create Form.
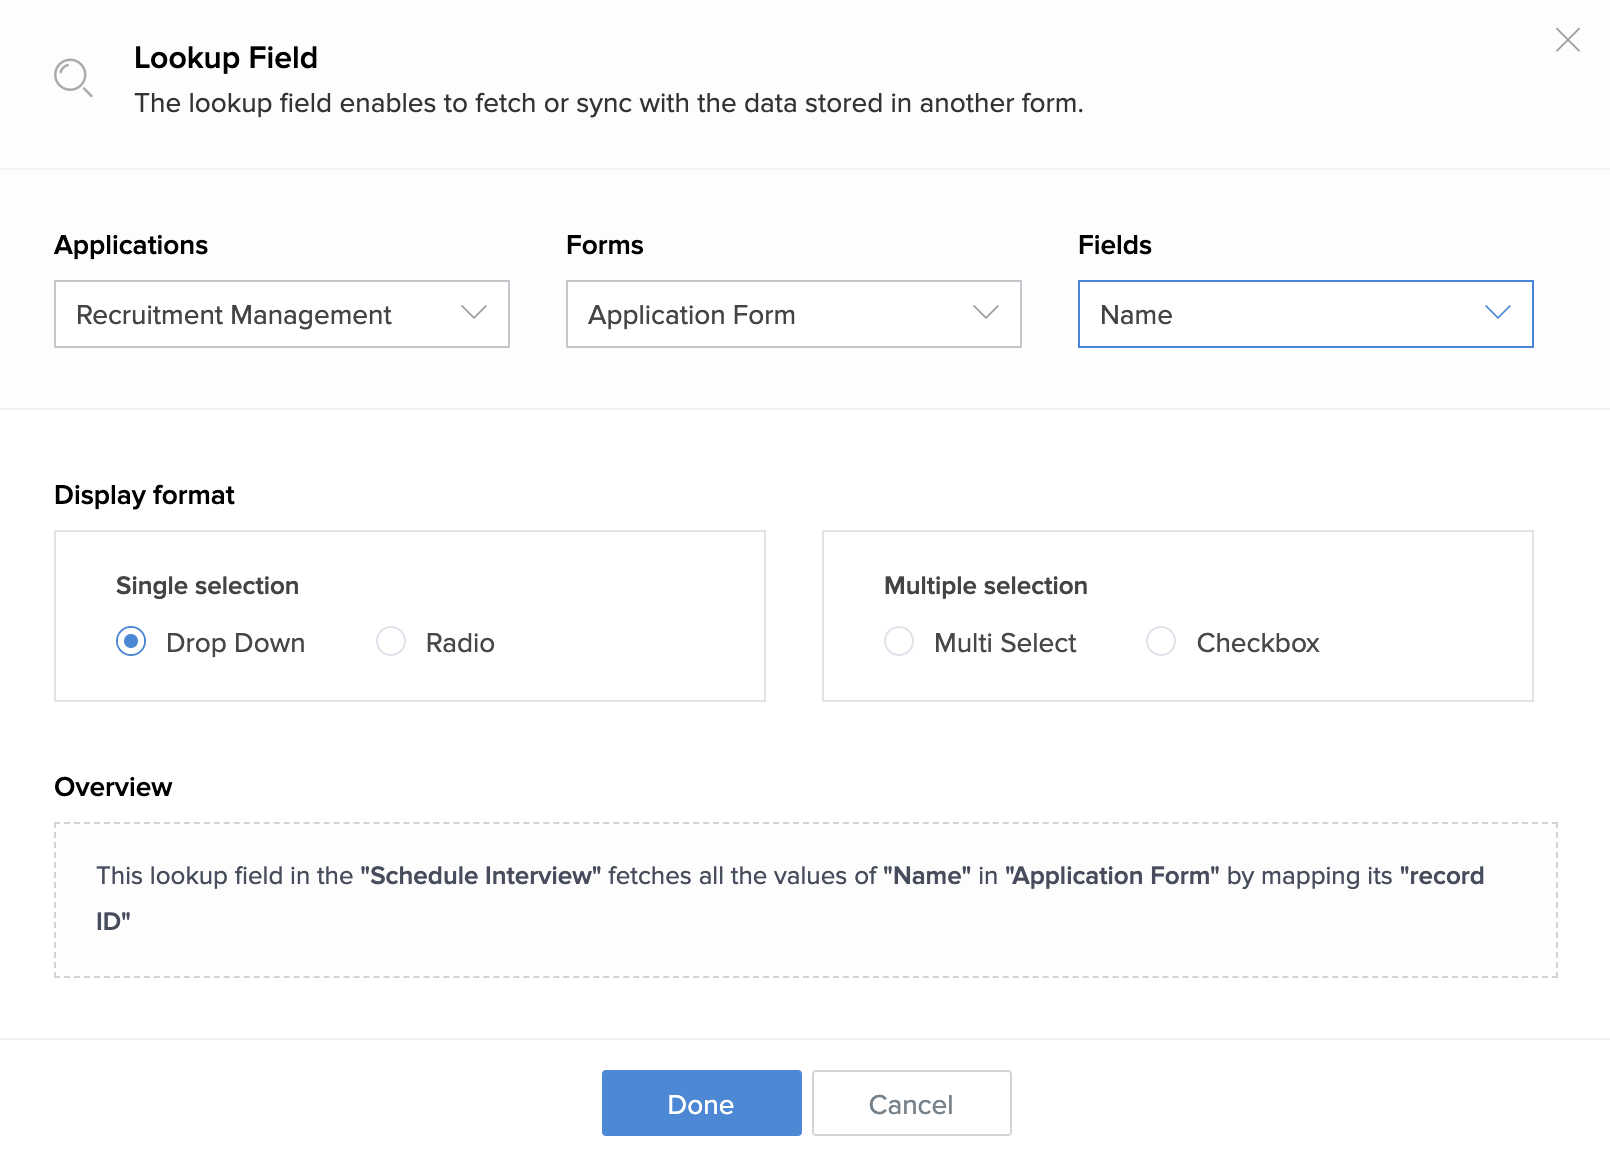
- Drag and drop a Lookup field onto the form.
- Select the Recruitment Management app, then the Application Form, and then the Name field
- Select Display format as Dropdown
- Click Done
- Configure the Lookup field:
- Set its Field Name as 'Candidate'
- Navigate to the Display Fields section and click the - icon displayed next to the Prefix and Suffix fields. (This will remove them from the display)Note: You can select maximum of 3 display fields for a lookup field.
- Navigate to the Validation section and check the checkbox next to Mandatory
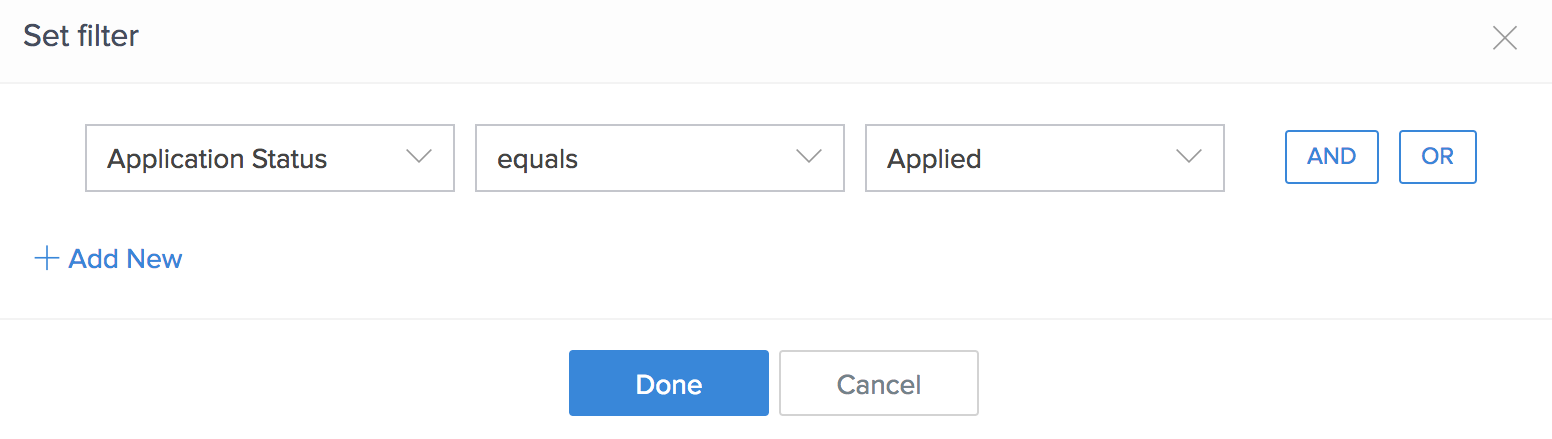
- Navigate to the Choices section and check the checkbox next to Set Filter
- Select the Application Status field, then the equals operator, then the choice Applied, and then click Done
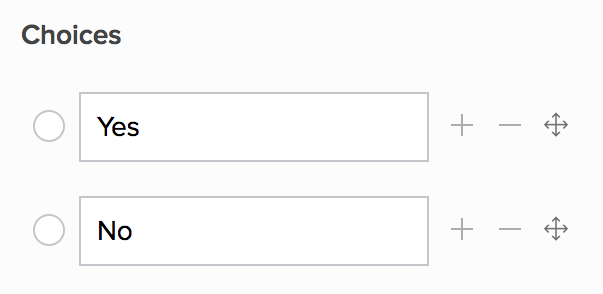
- Drag and drop the Radio field onto the form:
- Set its Field Name as 'Selected?'
- Navigate to the Field Properties > Choices section on the right, and set the choices:
- Drag and drop the following fields onto the form:
Type of Field Set its Field Name as Configure its Field Properties Date-Time Interview Date & Time Set as Mandatory Multi Line Comments -
- Click Done at the top-right corner of the form builder. You will be taken to this form's Design page.


You've now created a relationship: the Schedule Interview form, through the Candidates lookup field, is related to the Application Form.
Create workflows to hide fields, send email & update record
When the manager schedules an interview for a candidate:
- They should receive an email stating the date and time of their interview
- Their Application Status must be updated from 'Applied' to 'Scheduled for Interview'. (This is to ensure that the manager does not schedule another interview for the same candidate. This supplements the filter we added to the Candidate lookup field in the Schedule Interview form.)
Also, you need to hide the Selected? and Comments fields when a manager schedules an interview. (It just doesn't make sense to let the manager see these fields when scheduling an interview. They're needed only when the manager is done interviewing a candidate.
You can add these actions in separate workflows depending upon their trigger instance (when the manager adds a record in the Schedule Interview form).
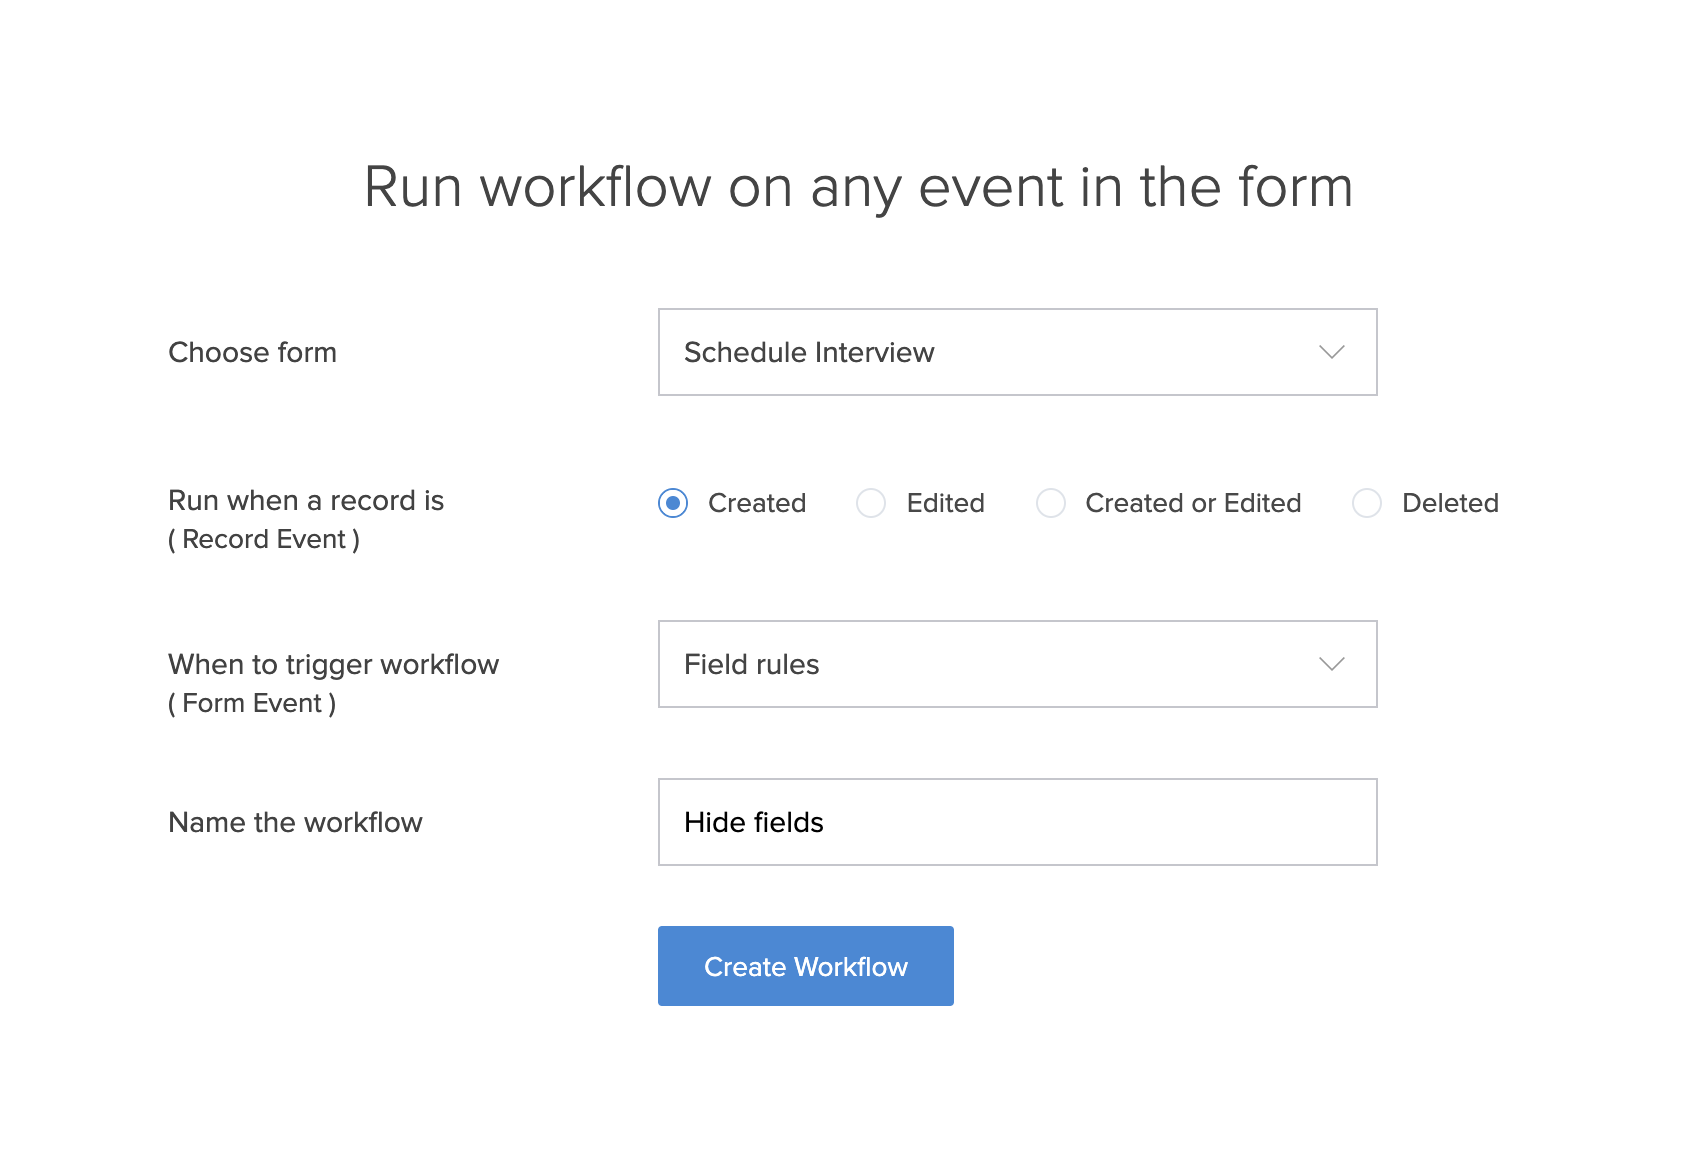
To create a workflow to hide the two fields:
- Click the Add New icon displayed at the top of the Workflow or Design page of your app.
- Select Workflow.
- Select While using the form.
- Select Schedule Interview from the dropdown next to Choose form.
- Select the choice Created for Run when a record is.
- Select Field rules from the dropdown beside When to trigger workflow.
- Set the workflow's name as 'Hide fields', then click Create Workflow.
- Click Add New Action in the workflow builder.
- To hide fields:
- Set Run this action with the choice Always.
- Select Hide fields under Select an action.
- Select the fields Selected? and Comments from the dropdown next to Select Fields.
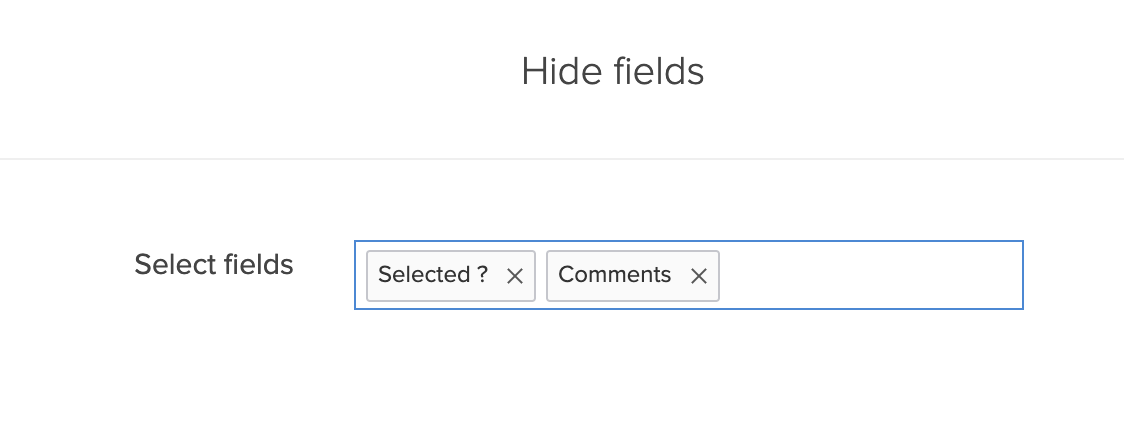
- Click Save at the bottom-right corner
- To create a workflow to send interview details to candidates and update candidate records:Note: Before creating a workflow to send email, you need to configure the mail server. Learn how
- Repeat the above steps from 1 to 5.
- Select Successful form submission from the dropdown beside When to trigger workflow.
- Set the workflow's name as 'Send interview details', then click Create Workflow.
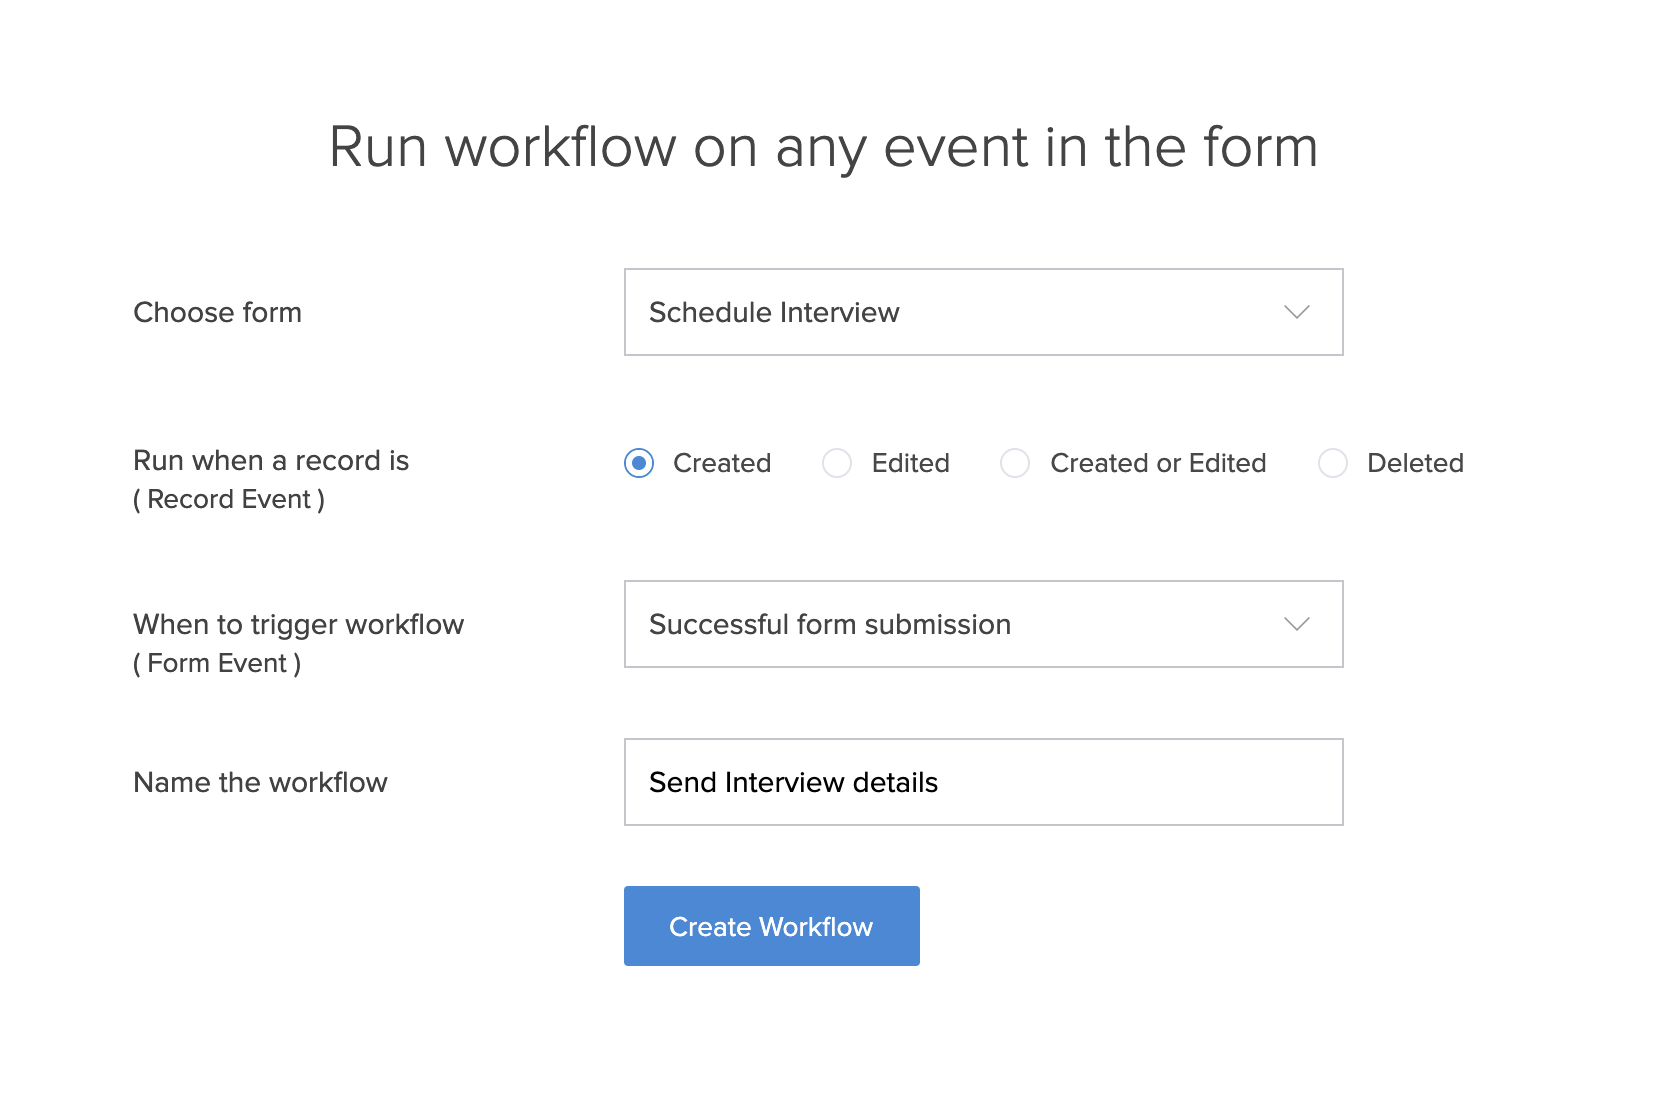
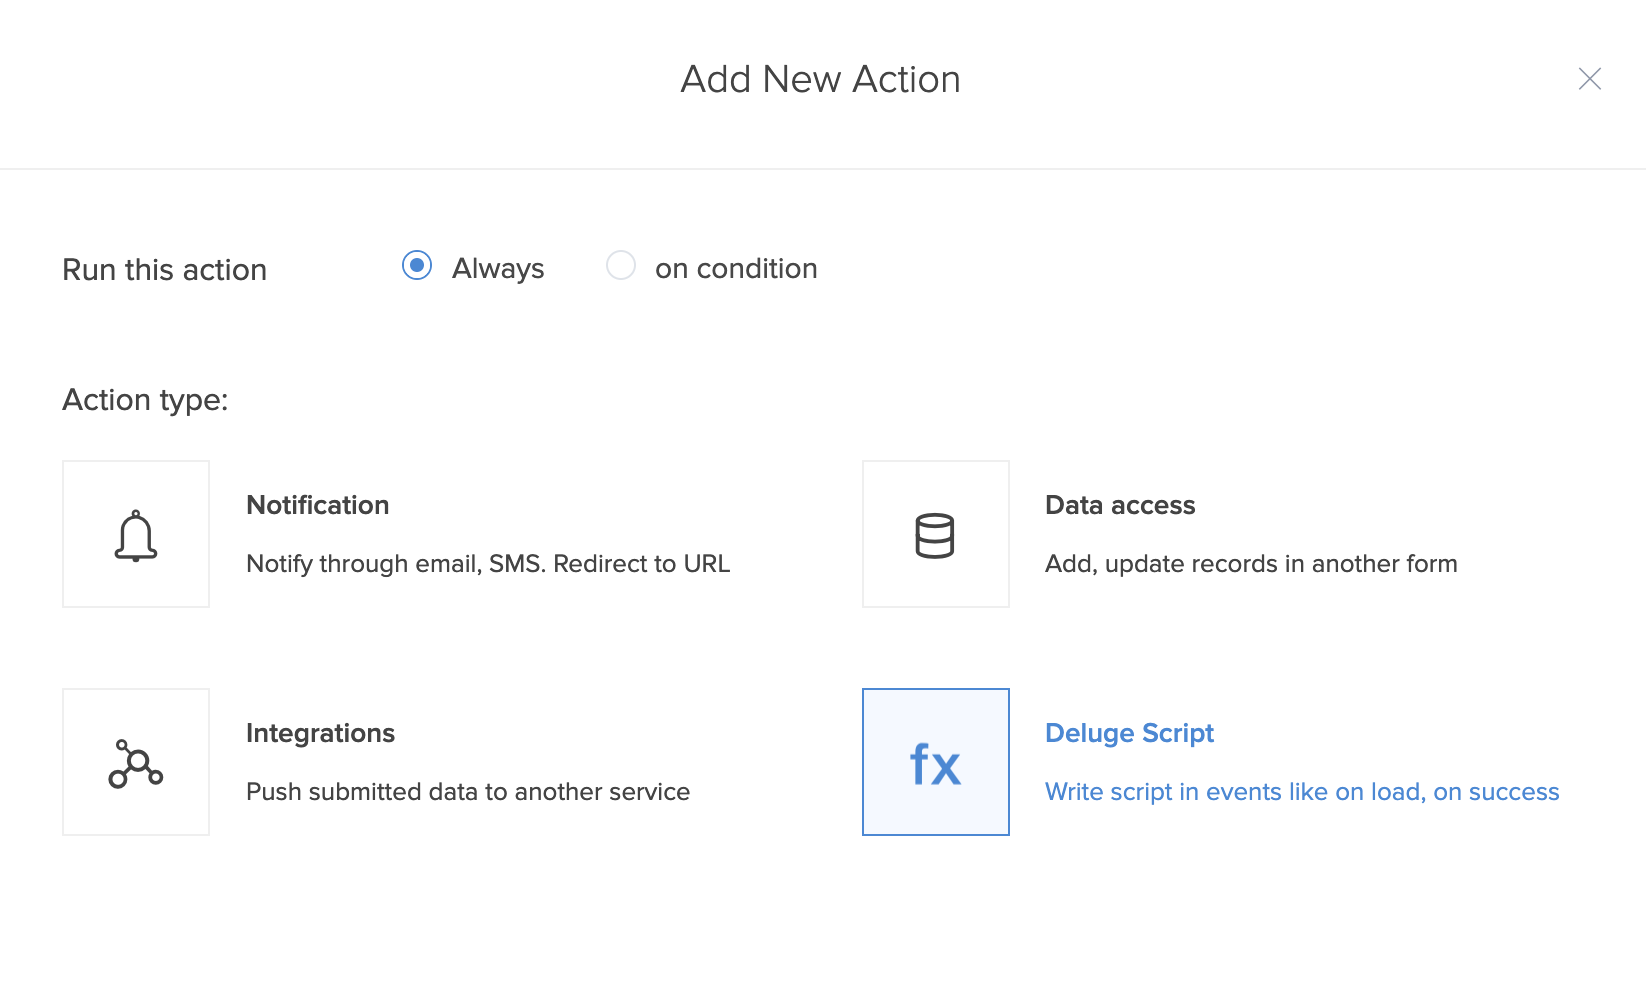
- Click Add New Action in the workflow builder.
- To send interview mail,
- Select Deluge Script
- Paste the following code snippet in the script editor:
candidate_record = Application_Form [ID = input.Candidate];
sendmail
[
from: zoho.adminuserid
to: candidate_record.Email_Address
subject: "Interview Scheduled"
message: ("Hello, " + candidate_record.Name) + "<br><br>Your interview has been scheduled on " + input.Interview_Date_Time
]
candidate_record.Application_Status = "Scheduled for Interview";
- Select Deluge Script
- Click Save at the bottom-right corner
- Click Done at the top-right corner of the workflow builder. You will taken to your app's Workflow page.


Create and customize calendar report
In addition to the list report, the following types of reports are available in Zoho Creator On-Premise: Spreadsheet, Kanban, Calendar, and Timeline. Each report enables a specific user experience. For example, a spreadsheet report enables you to view and edit records as if working on a spreadsheet. Each report type require the records it will display to contain a certain type of information.
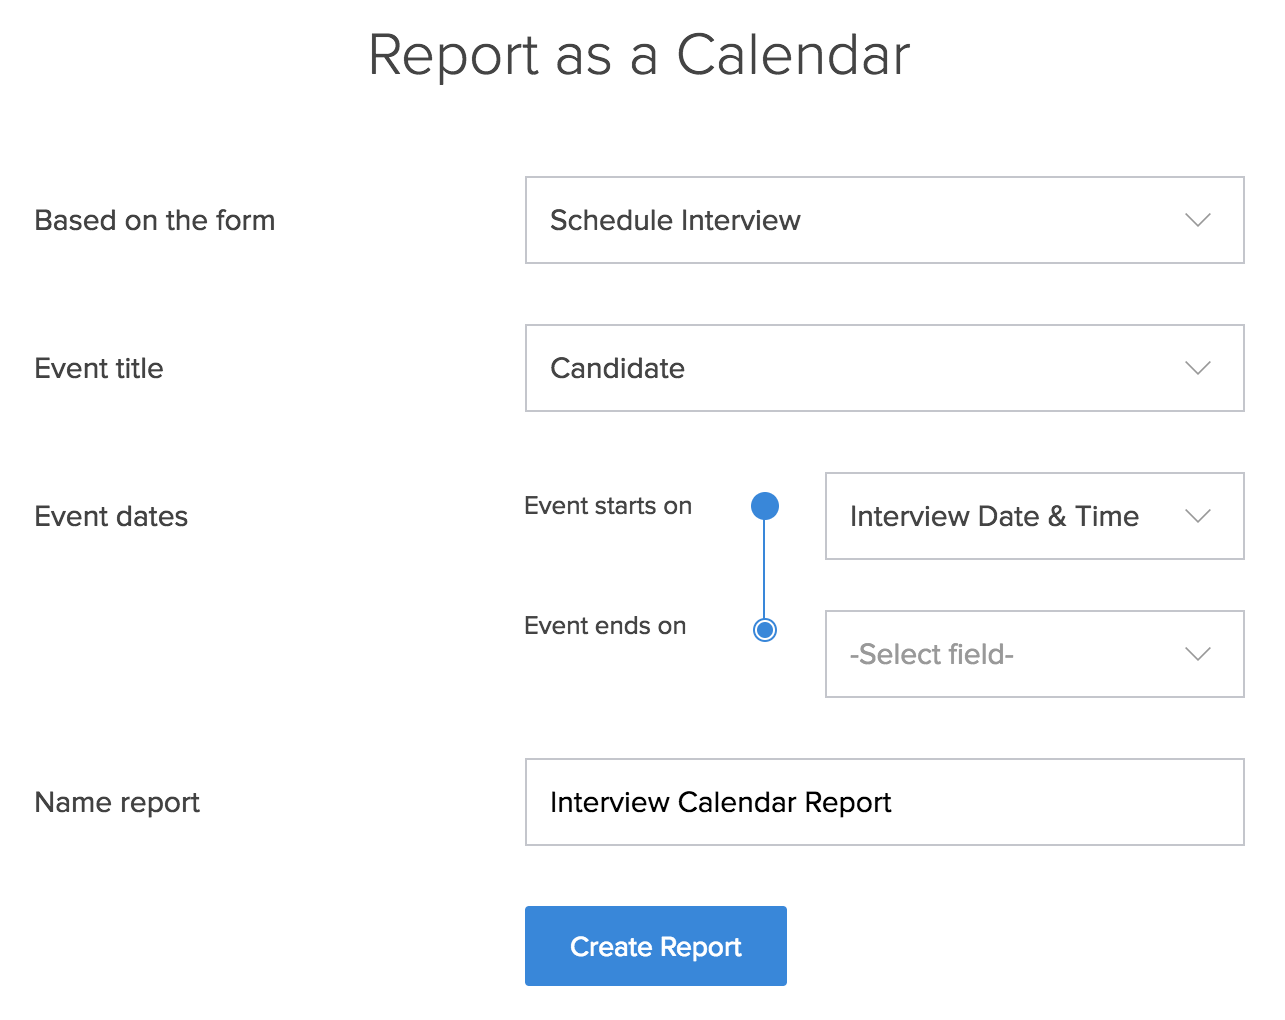
For creating a calendar report, you'll need a date or date-time field. The Interview Date & Time field in the Schedule Interview form is a date-time field. To create a calendar report this form:
- Click the Add New icon at the top of the Design page.
- Select Report, then select Calendar.
- Select Schedule Interview from the dropdown next to Based on the form.
- Select the Candidate field from the dropdown next to Event title.
- Select the Interview Date & Time field from the dropdown next to Event starts on.
- Set the report's name as 'Interview Calendar Report', then click Create Report.

You will be taken to its Design page. Customize it as follows:
- Click Detail View on the right.
- Click Layout.
- Click on the first layout, as shown below. The Configure Fields pane will slide in from the right.

- Select the Candidate field.
- Select All Applications from the Link to view dropdown:
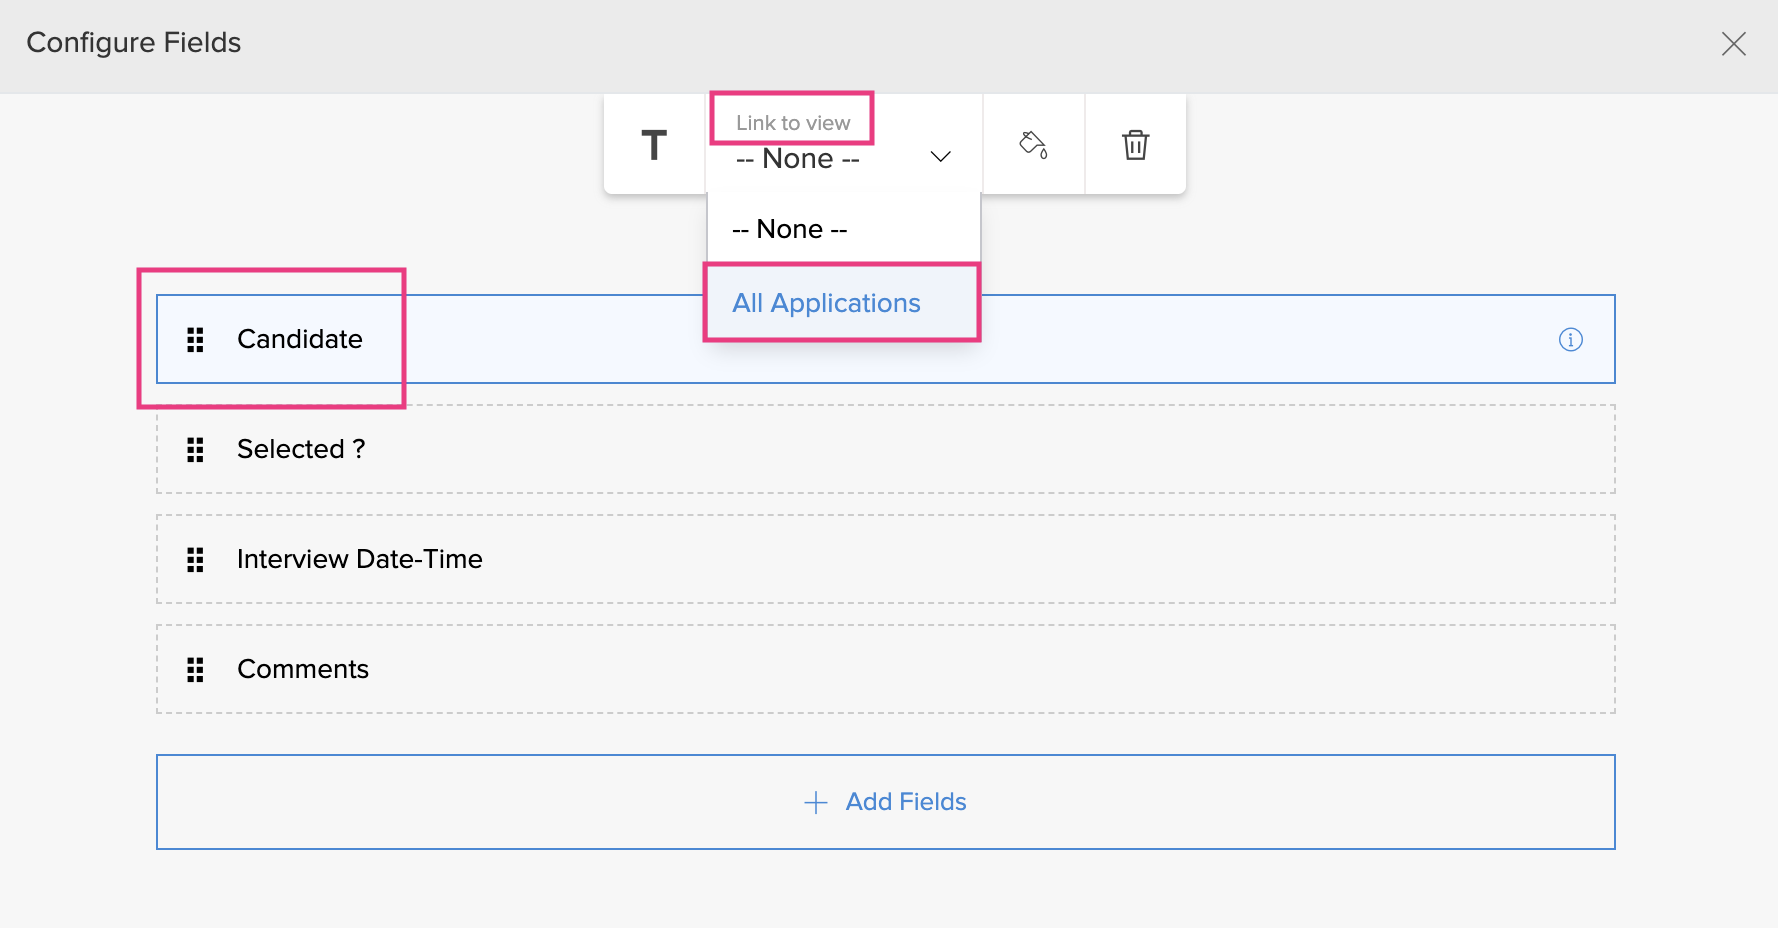
- Click the Close icon at the top-right corner of the Configure Fields pane.


Create workflow to update record
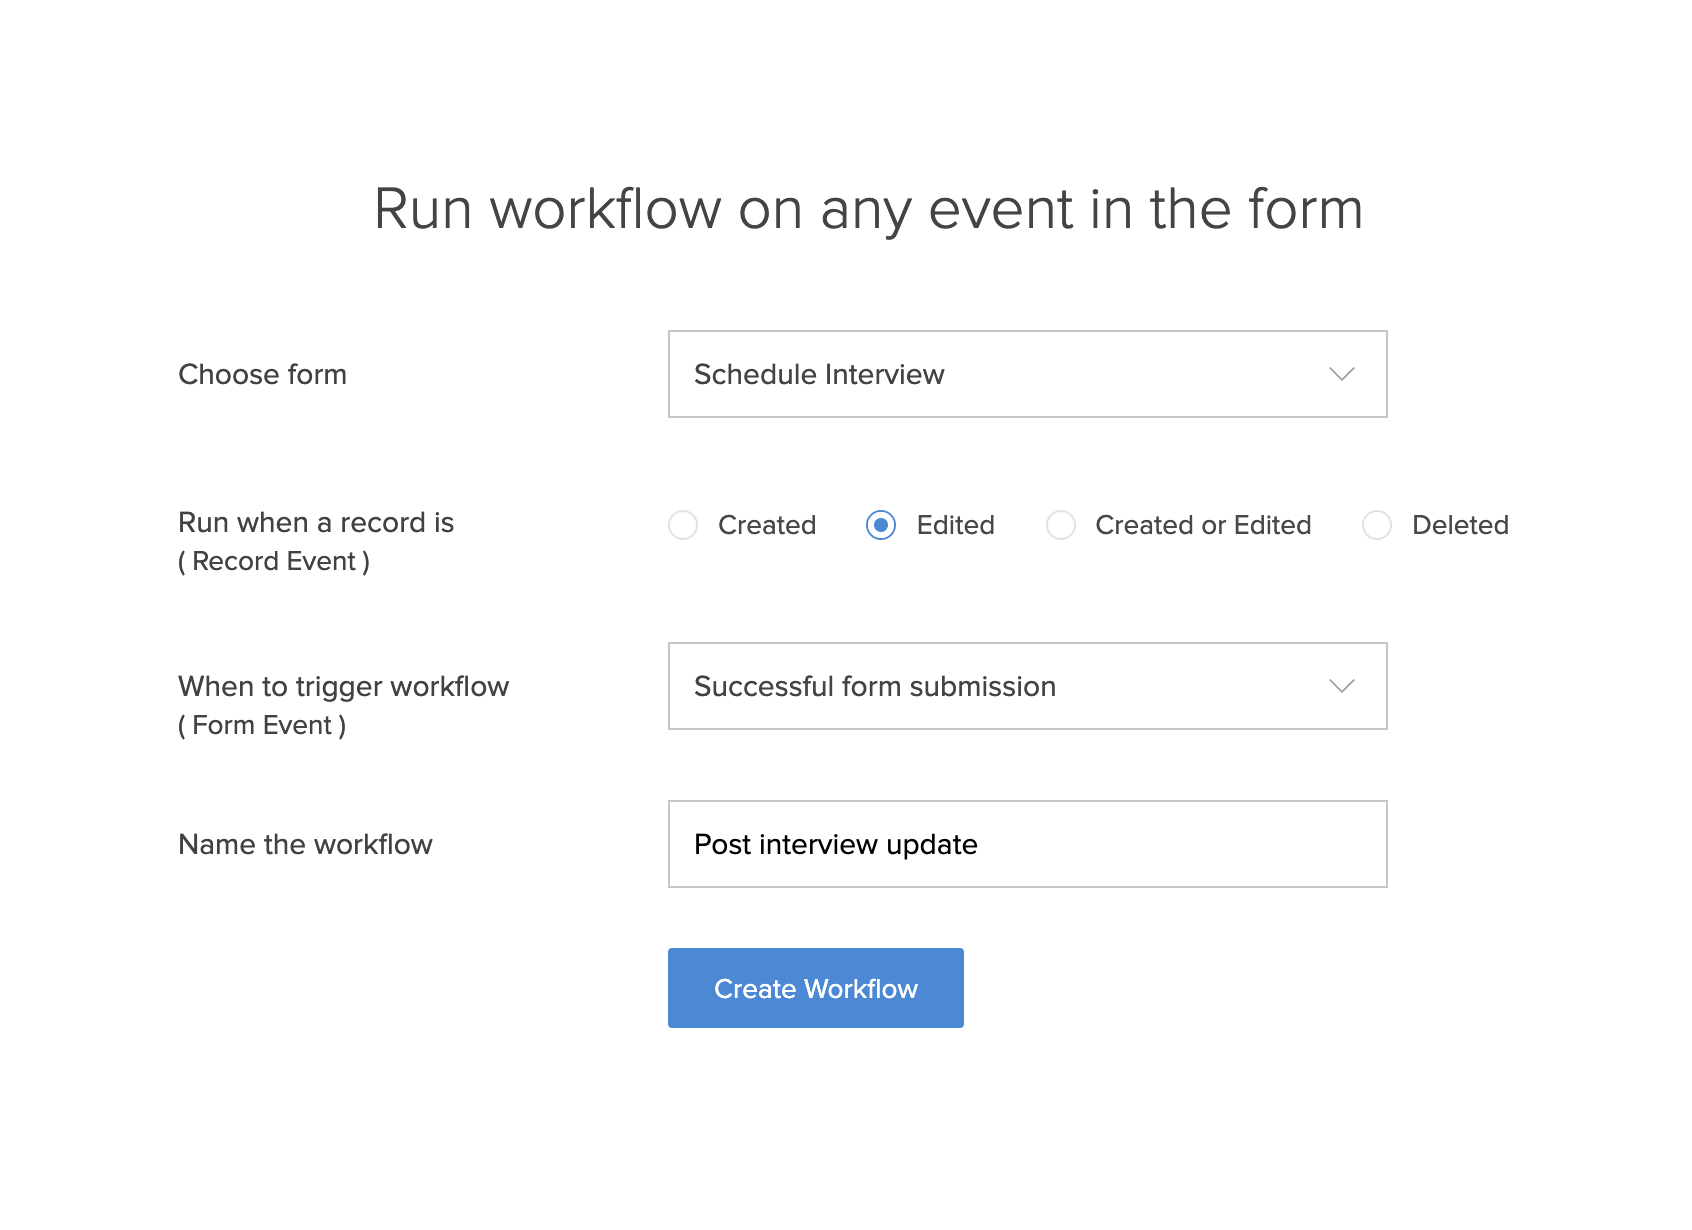
Based on the manager's decision after each interview, the Application Status of the candidate must be updated. To do this:
- Click the Add New icon at the top of the Workflow or Design page of your app.
- Select Workflow.
- Select While using the form.
- Select Schedule Interview from the dropdown next to Choose form.
- Select the choice Edited for Run when a record is.
- Select Successful form submission from the dropdown next to When to trigger workflow.
- Set the workflow's name as 'Post interview update', then click Create Workflow:
- Click Add New Action in the workflow builder.
- Select Deluge Script.
- Paste the following code snippet in the script editor:candidate_record = Application_Form [ID = input.Candidate];
if (input.Selected == "Yes")
{
candidate_record.Application_Status = "Selected";
}
if (input.Selected == "No")
{
candidate_record.Application_Status = "Rejected";
} - Click Save at the bottom-right corner
- Click Done, displayed in the top-right corner of the workflow builder.

Create page
Page is the component of a Zoho Creator app with which you can, amongst other things, enable your users to have a birds-eye view of the data managed by the app. To create the page for this Recruitment Management app:
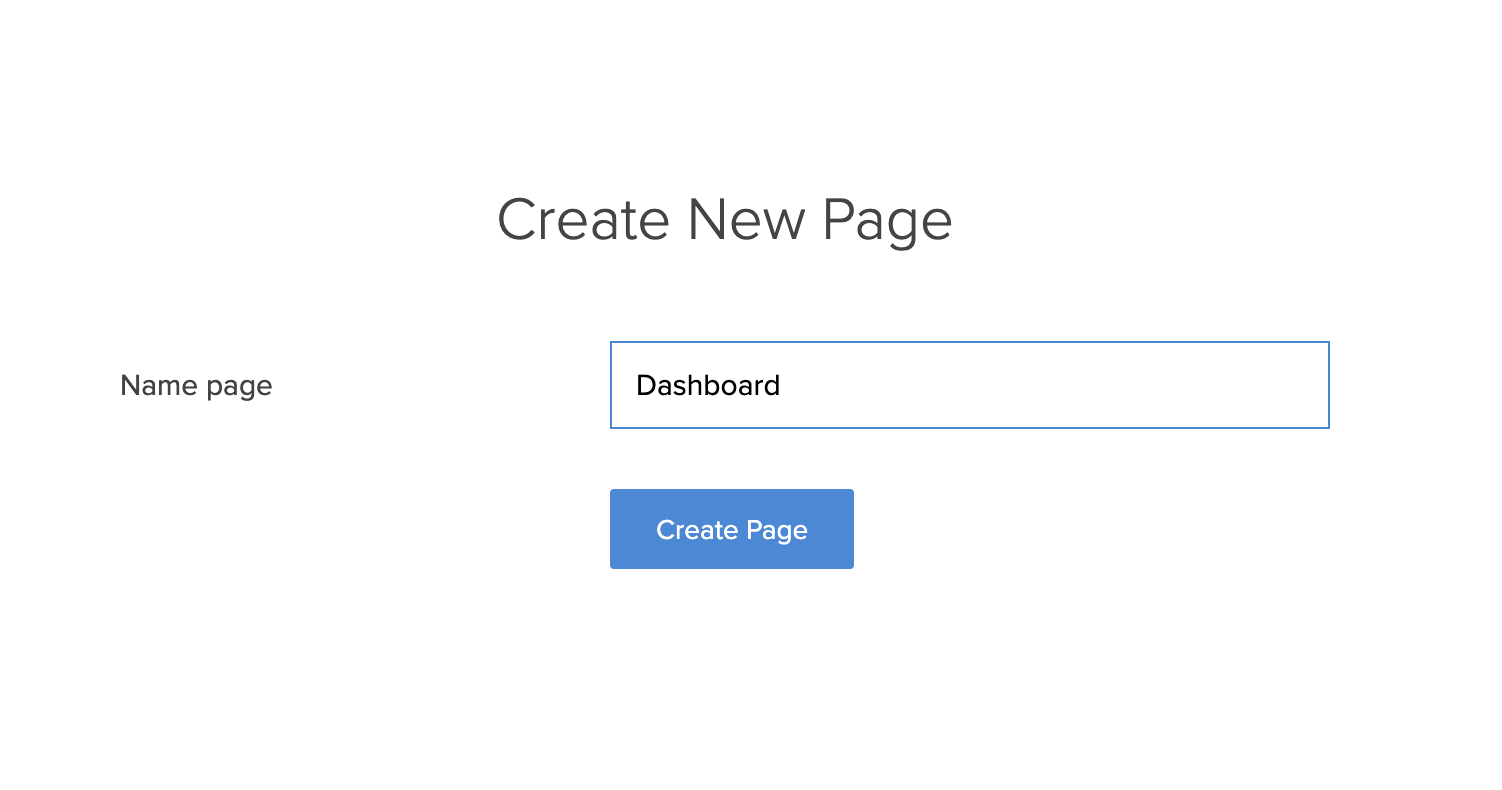
- Click the Add New icon at the top of the Design page.
- Select Page.
- Set the page's name as 'Dashboard', then click Create Page.
- You will be taken to the page builder:
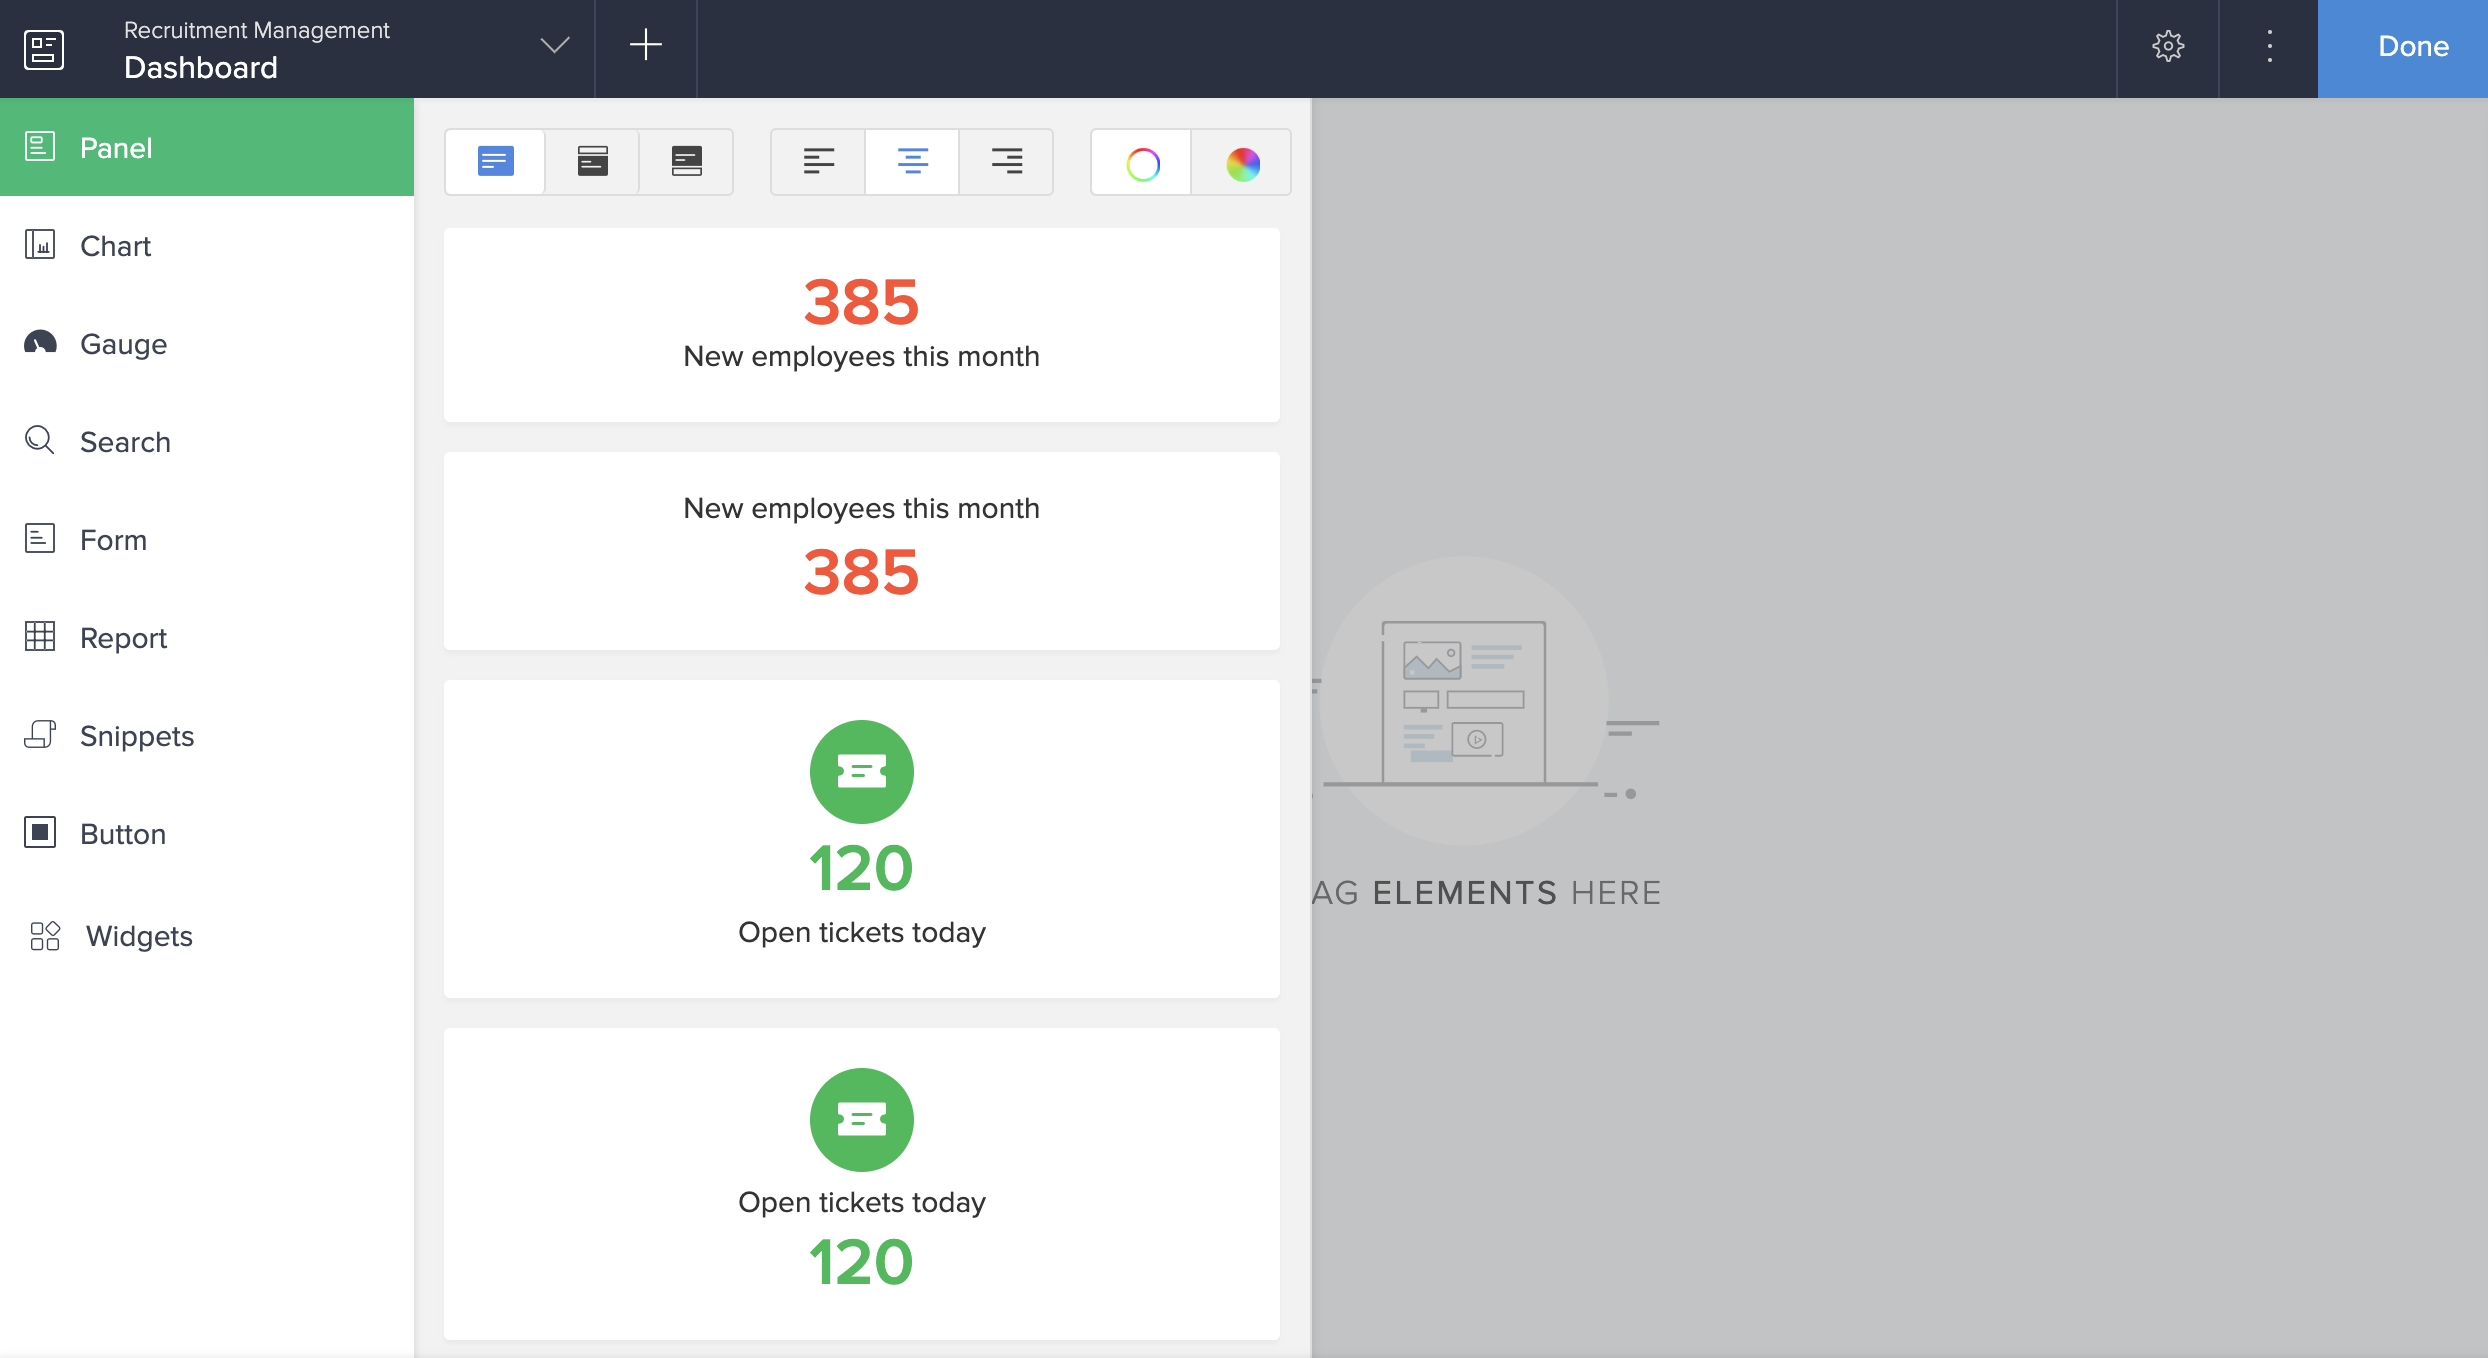
- Drag and drop the first Panel. The Panel Configuration pane will slide in from the right:
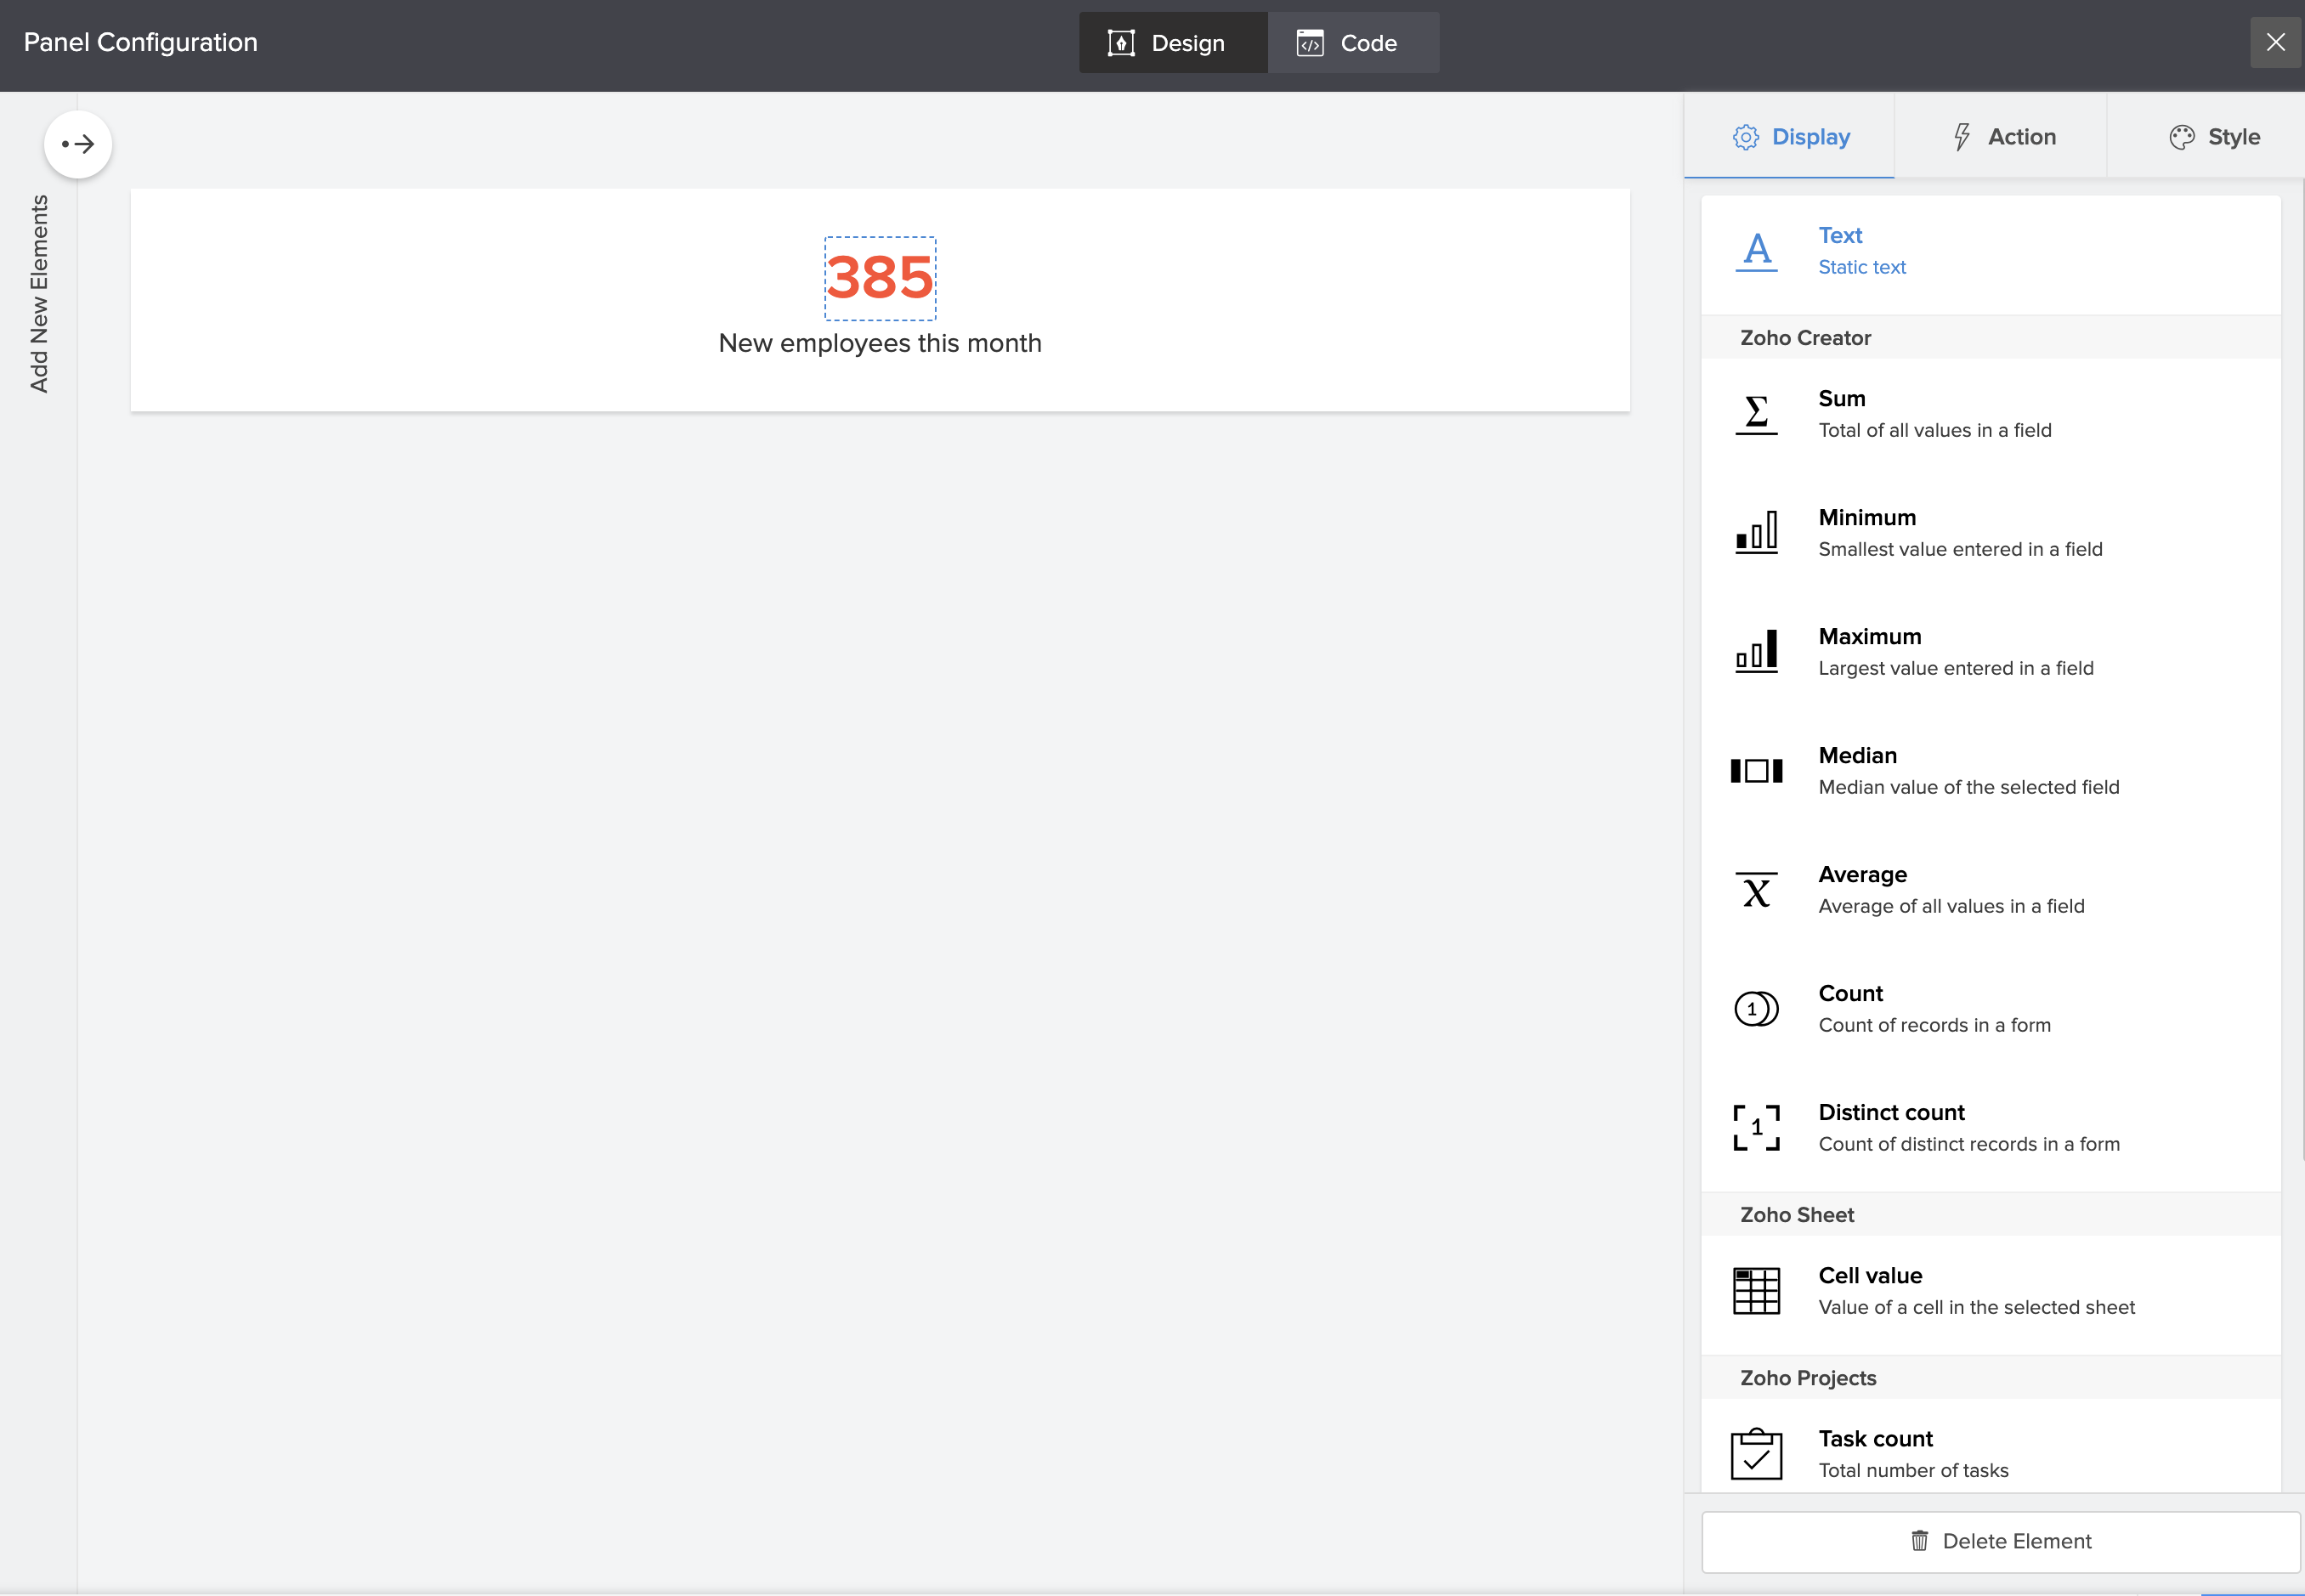
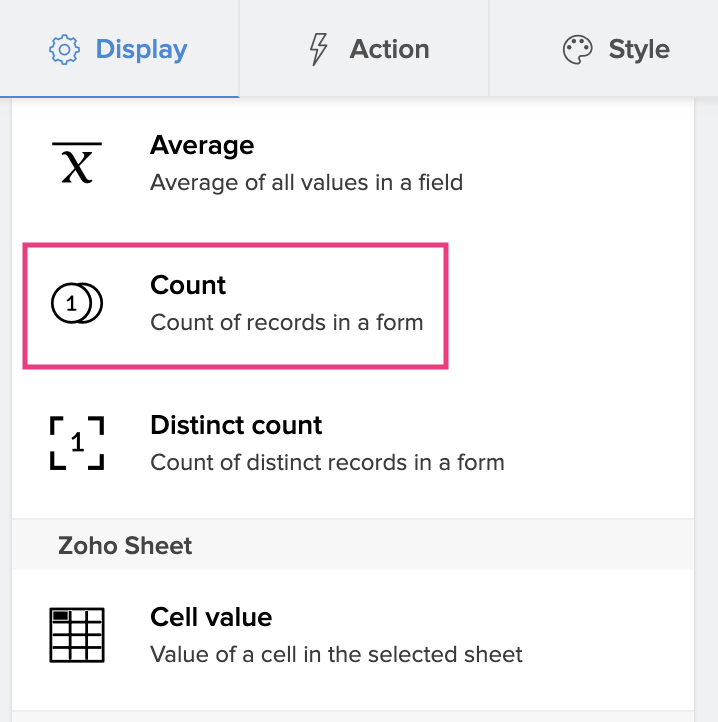
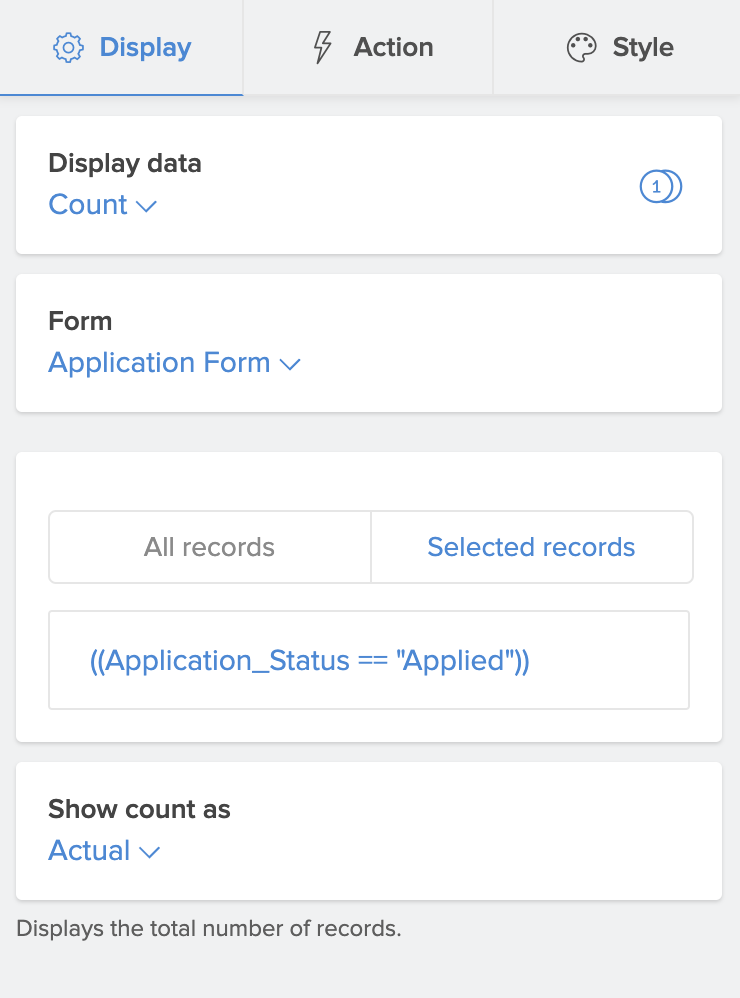
- Select Count under Display tab on the right:
- Select the Application Form.
- Select Selected Records under Evaluate for.
- Define the records to be counted using the expression, as shown below, then click Done.
You'll see the following on the right: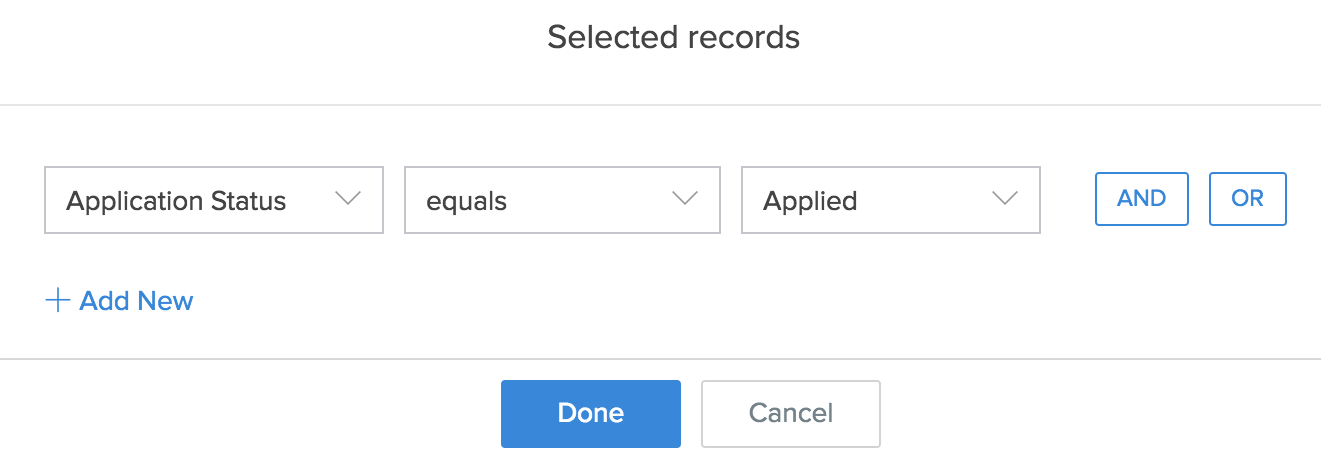
- Select the text box that is displayed below the count:
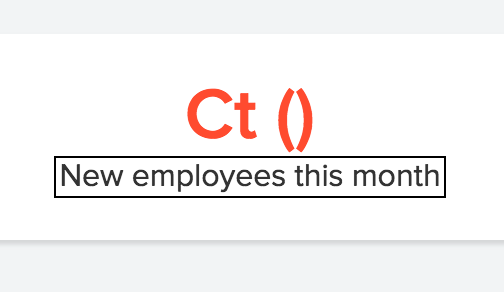
- Set its Value as 'To be interviewed' on the right:
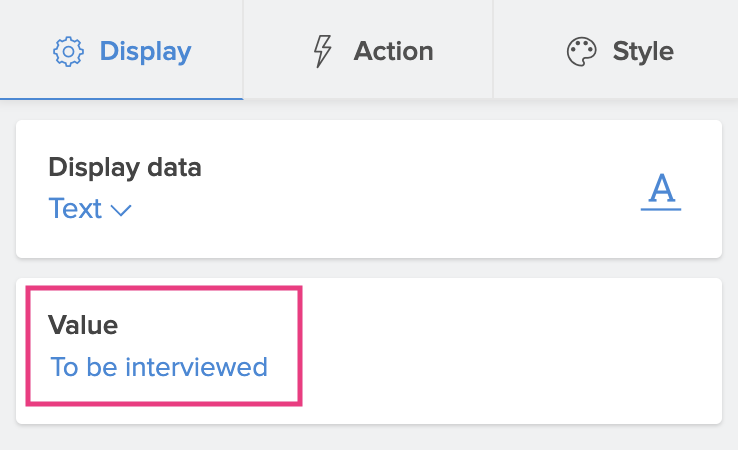
- Click the Close icon at the top-right corner of the Panel Configuration pane.
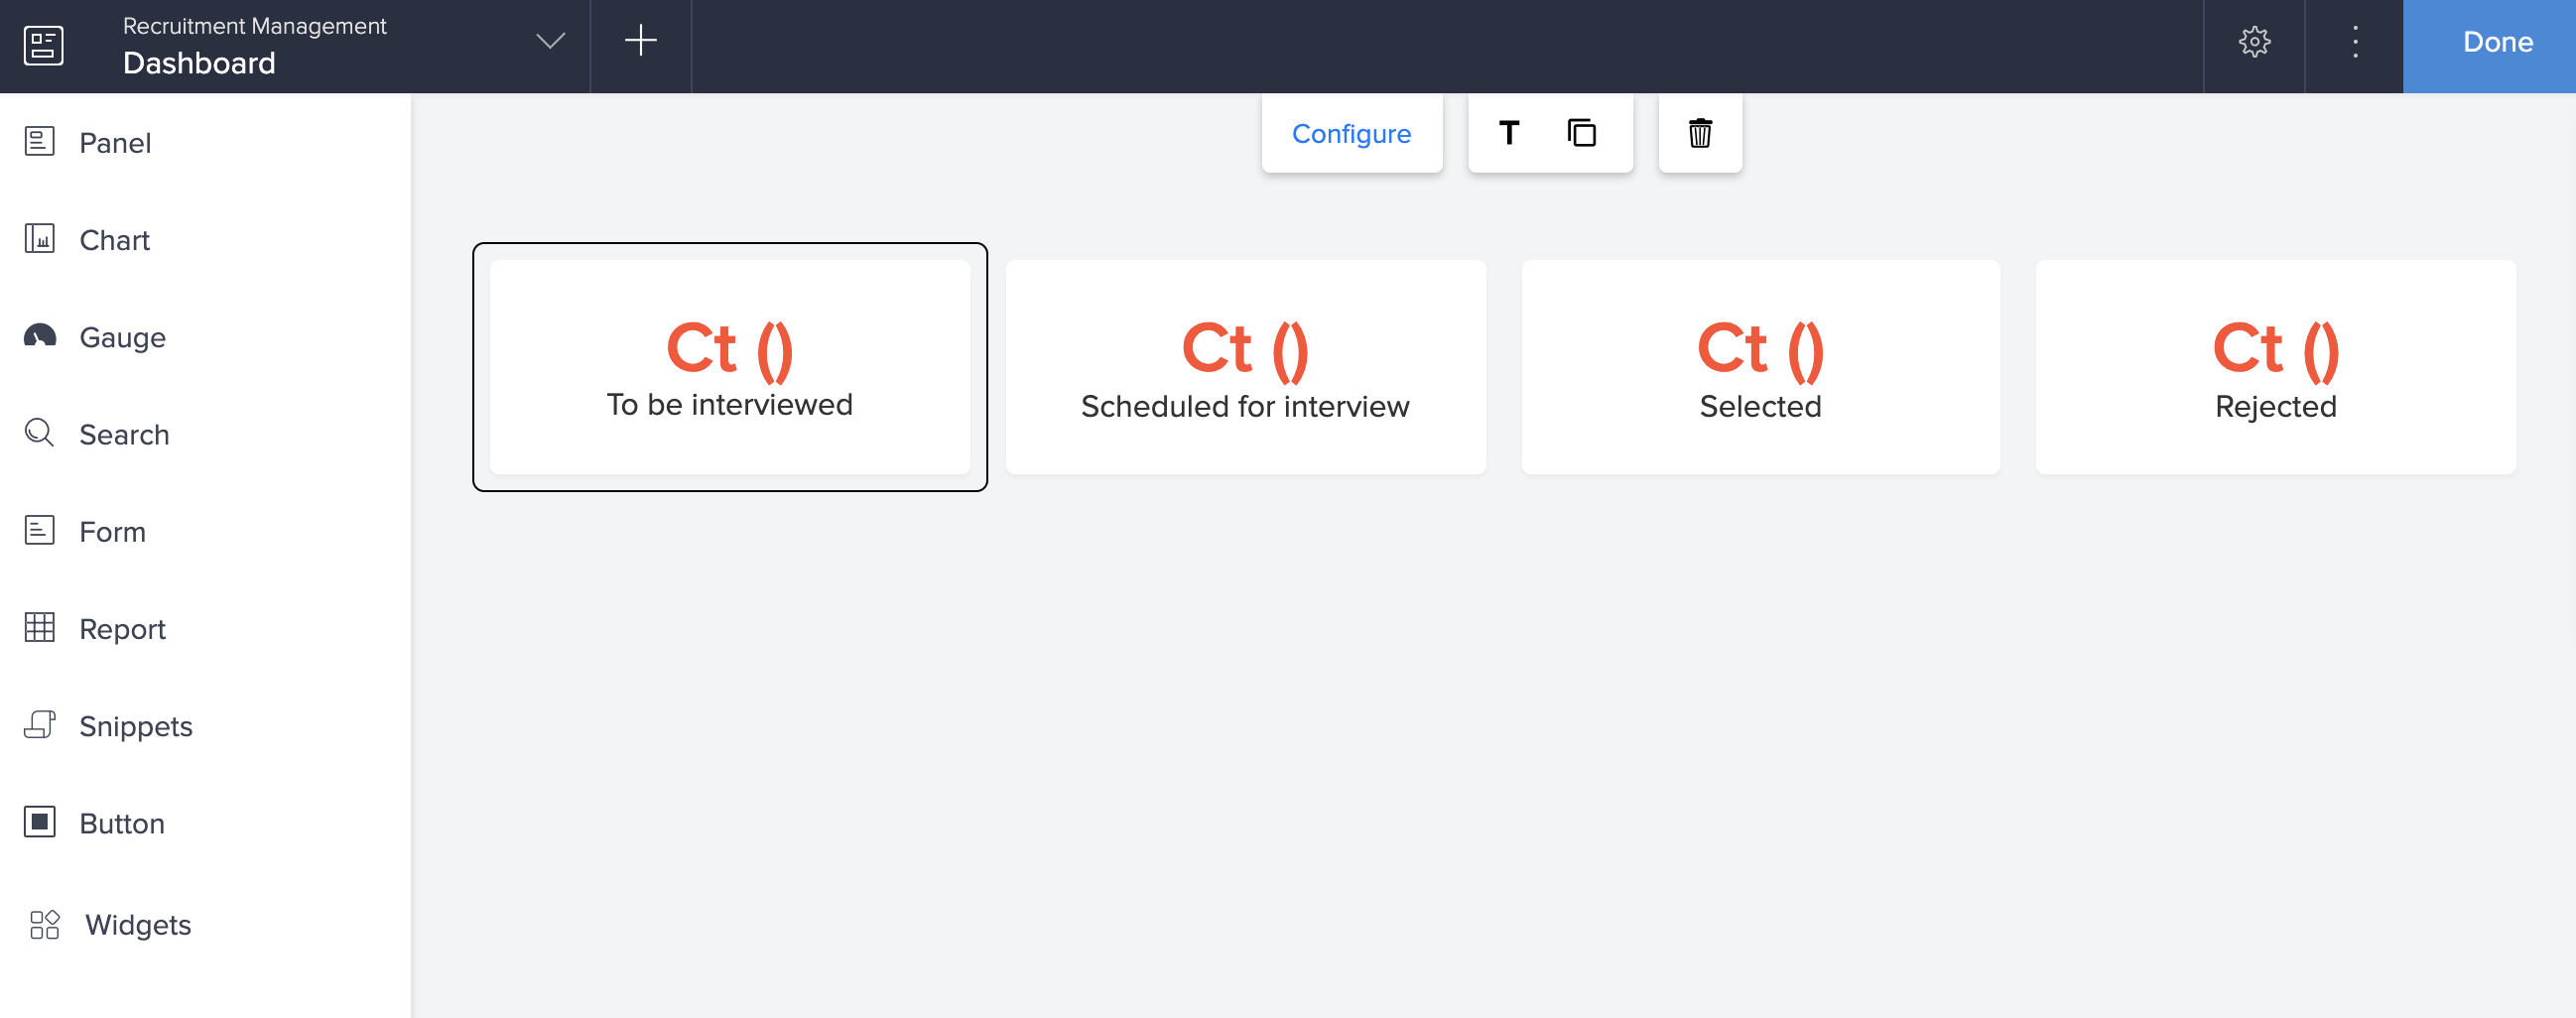
- Click Panel on the left, then repeat steps 4 to 11 such that you have a total of 4 panels in your page that show the count of records from Application Form where the Application Status is 'Applied', 'Scheduled for Interview', 'Selected', and 'Rejected'.
- Select Report, displayed on the left, then select the Recruitment Management application, and then select the Interview Calendar Report:
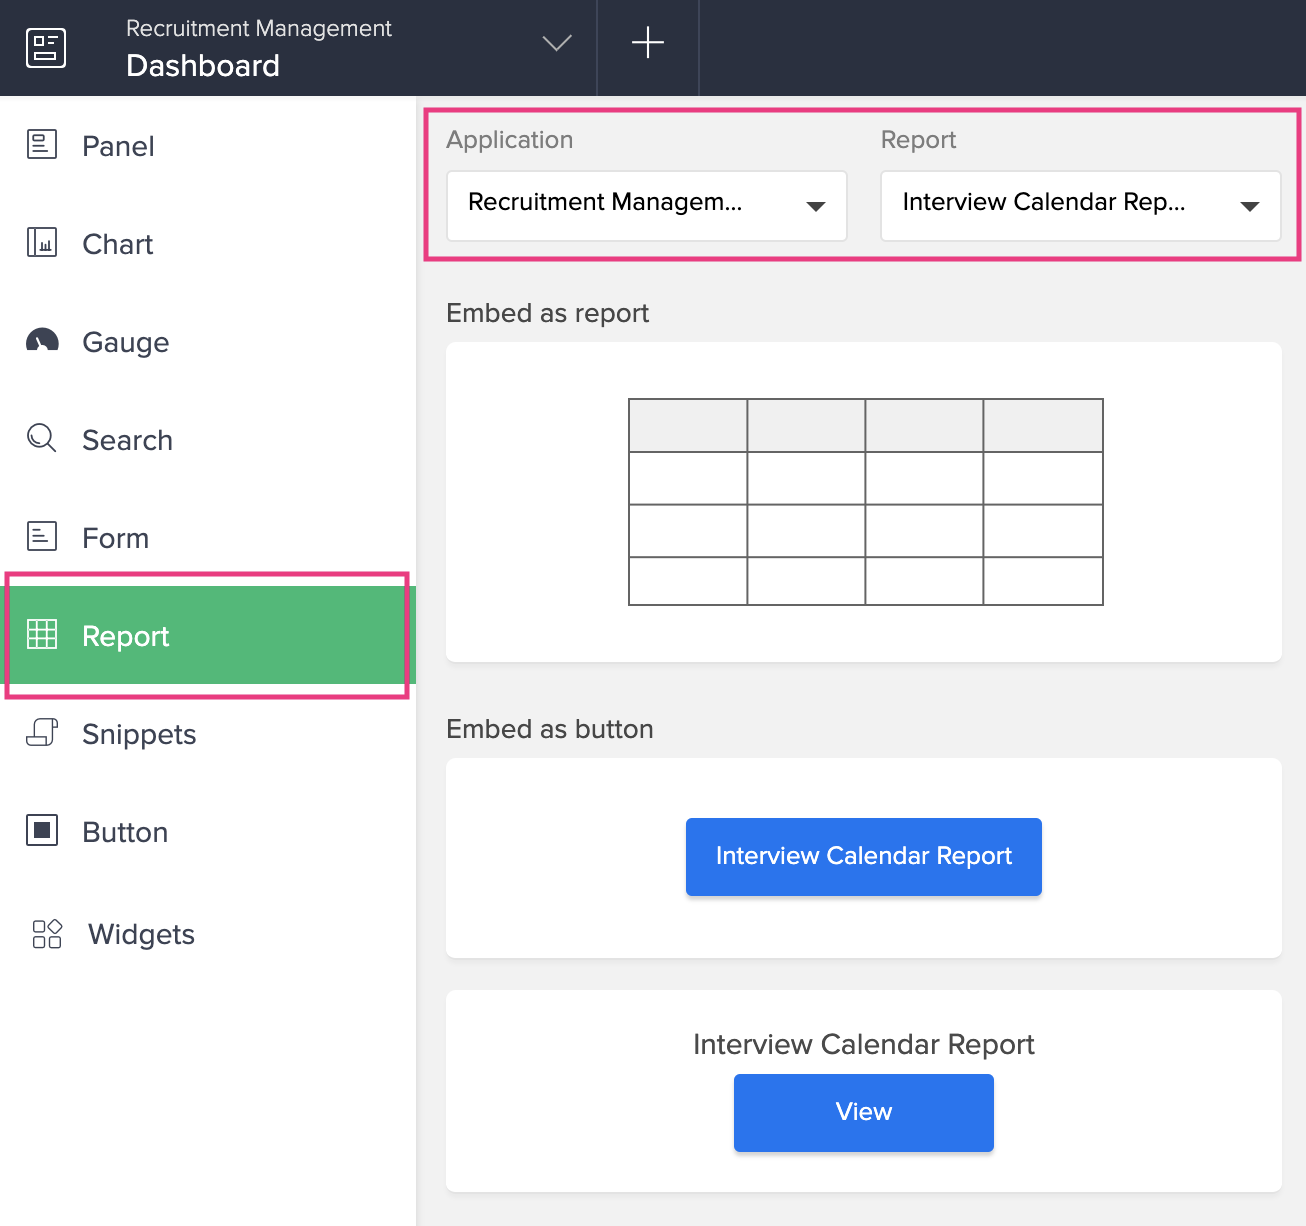
- Drag and drop Embed as Report widget onto your page.
- Click Done at the top-right corner of the page builder.


Publish form
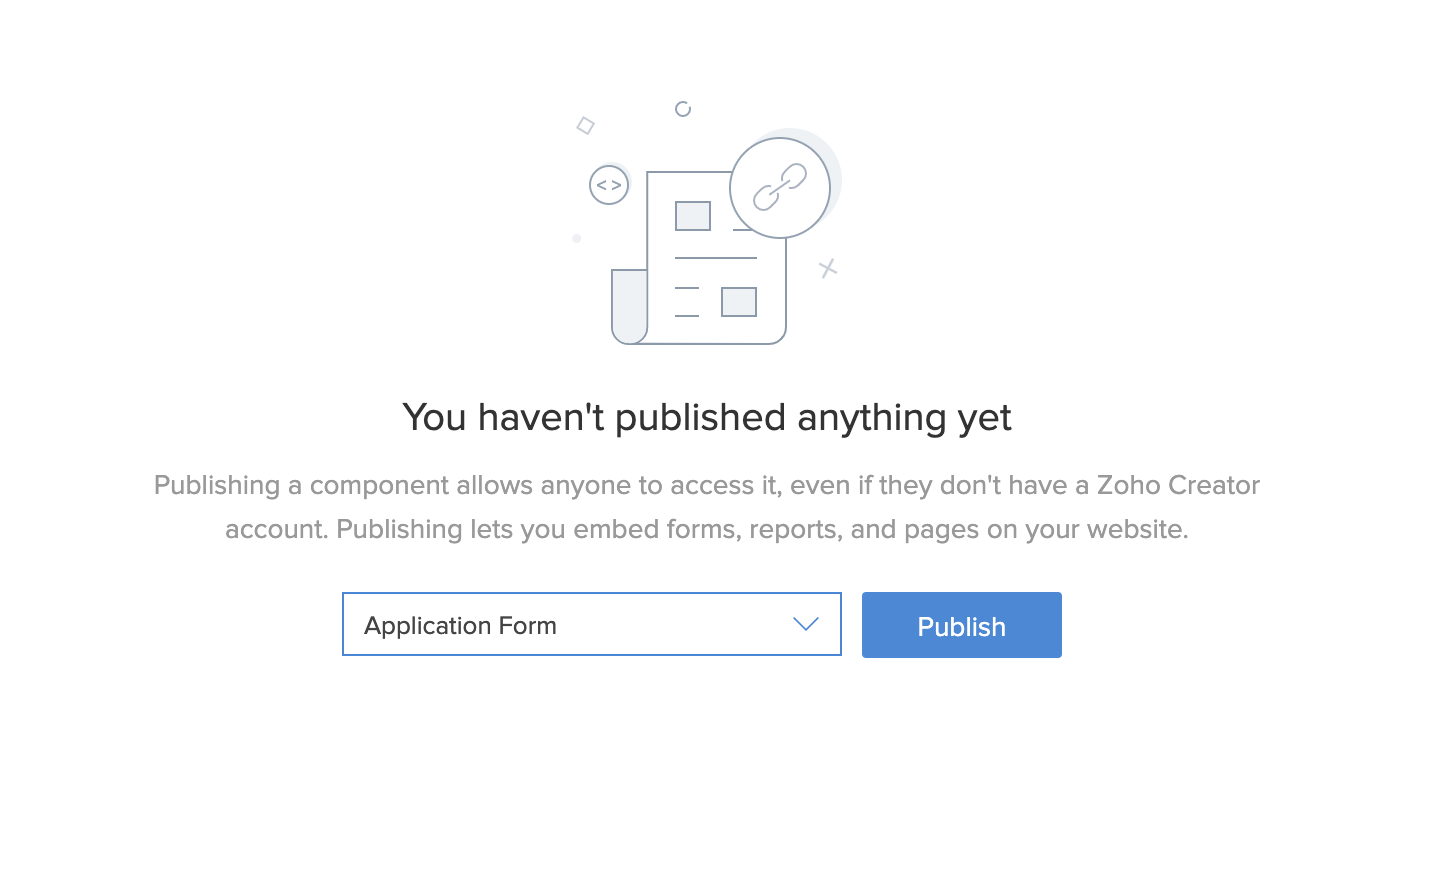
By default, your app can be accessed only by the users with whom you've shared it. However, as mentioned in the requirement-solution mapping section, the Application Form needs to be made publicly accessible. Zoho Creator enables this using the Publish feature. To publish this form:
- Click Settings, as shown below. You will be taken to your app's Settings page.

- Click Publish under Users and Control:
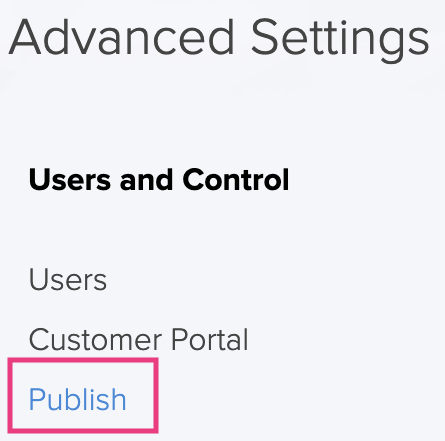
- Select Application Form from the dropdown, then click Publish.
- Copy the Perma Link that appears in the Published URL pop-up window.
If you want to embed this form in your website, use the Embed Code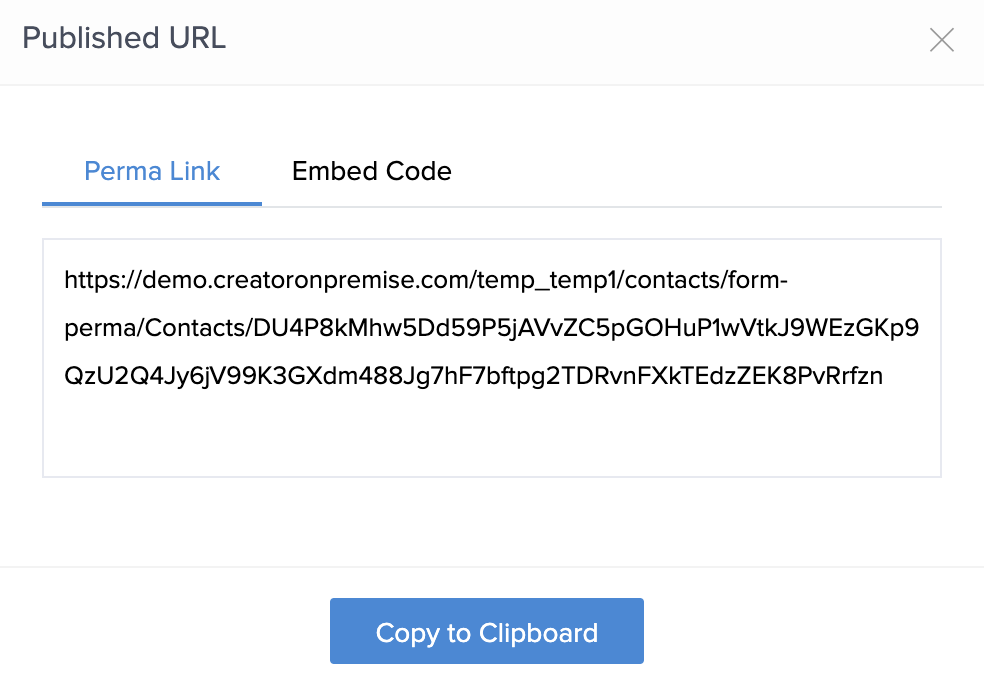


Share the app
Now that you've built an app and customized it to suit your business process, the only step remaining is to share it. Sharing an app means enabling your users to access some or all components in that app. In this Recruitment Management app, the manager needs to be given access to the app. To share the app:- Click Share at the top-right corner of the Design page:
- Select User:

- Enter the email address of the user with whom you want to share your app with, below Add Users.
- Select Add Permission Set in the dropdown below Choose a permission. The Add Permission Set pane will appear.
- Enter a name and description (optional) for the permission set.
- Select the components that you want your user to be able to access, and the actions they can perform. For this Recruitment Management app:
- Check the View checkbox against the Application Form, then select the All Applications report. (The manager should not be able to add entries in that form; they should be able to view all entries submitted; they should not be able to edit any of the entries)
- Check the Access checkbox against the Schedule Interview form, as the manager should be able to add entries through it.


Access the Recruitment Management app
- The candidates apply to the recruitment process using the published Application Form. As each application is submitted:
- The Application Status field is set as 'Applied'
- An email is sent to the email address that the candidates input in the form

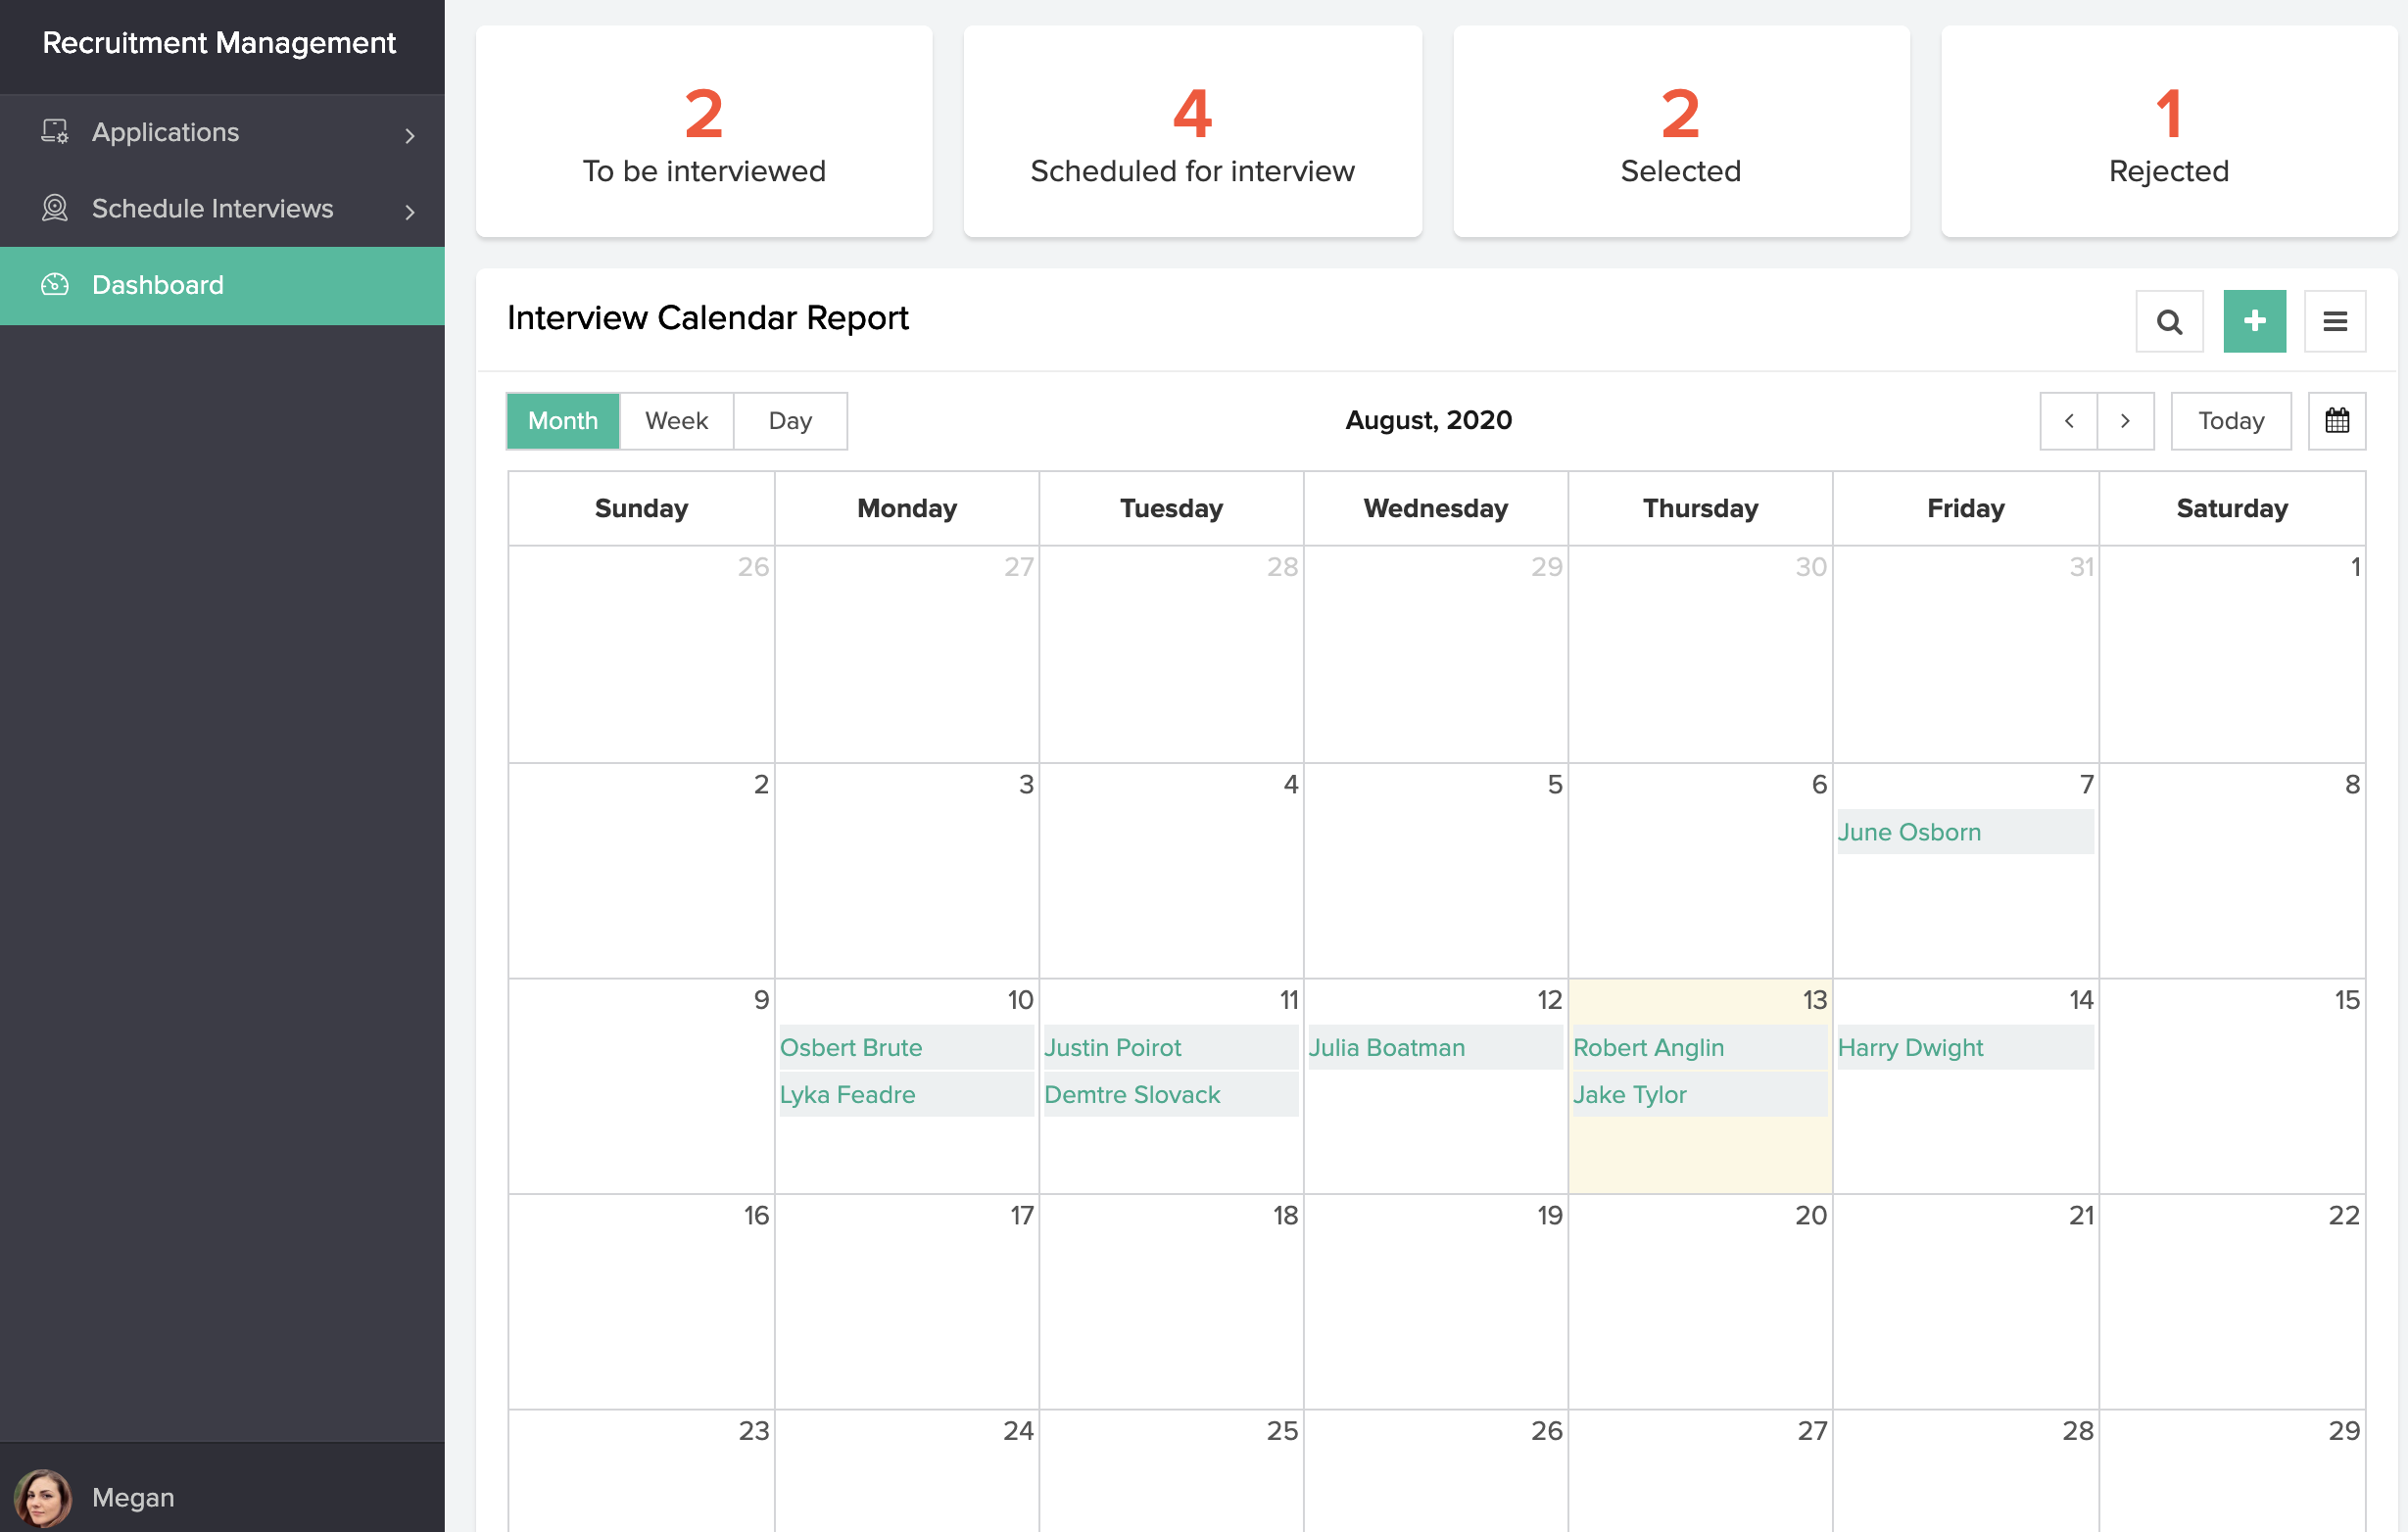
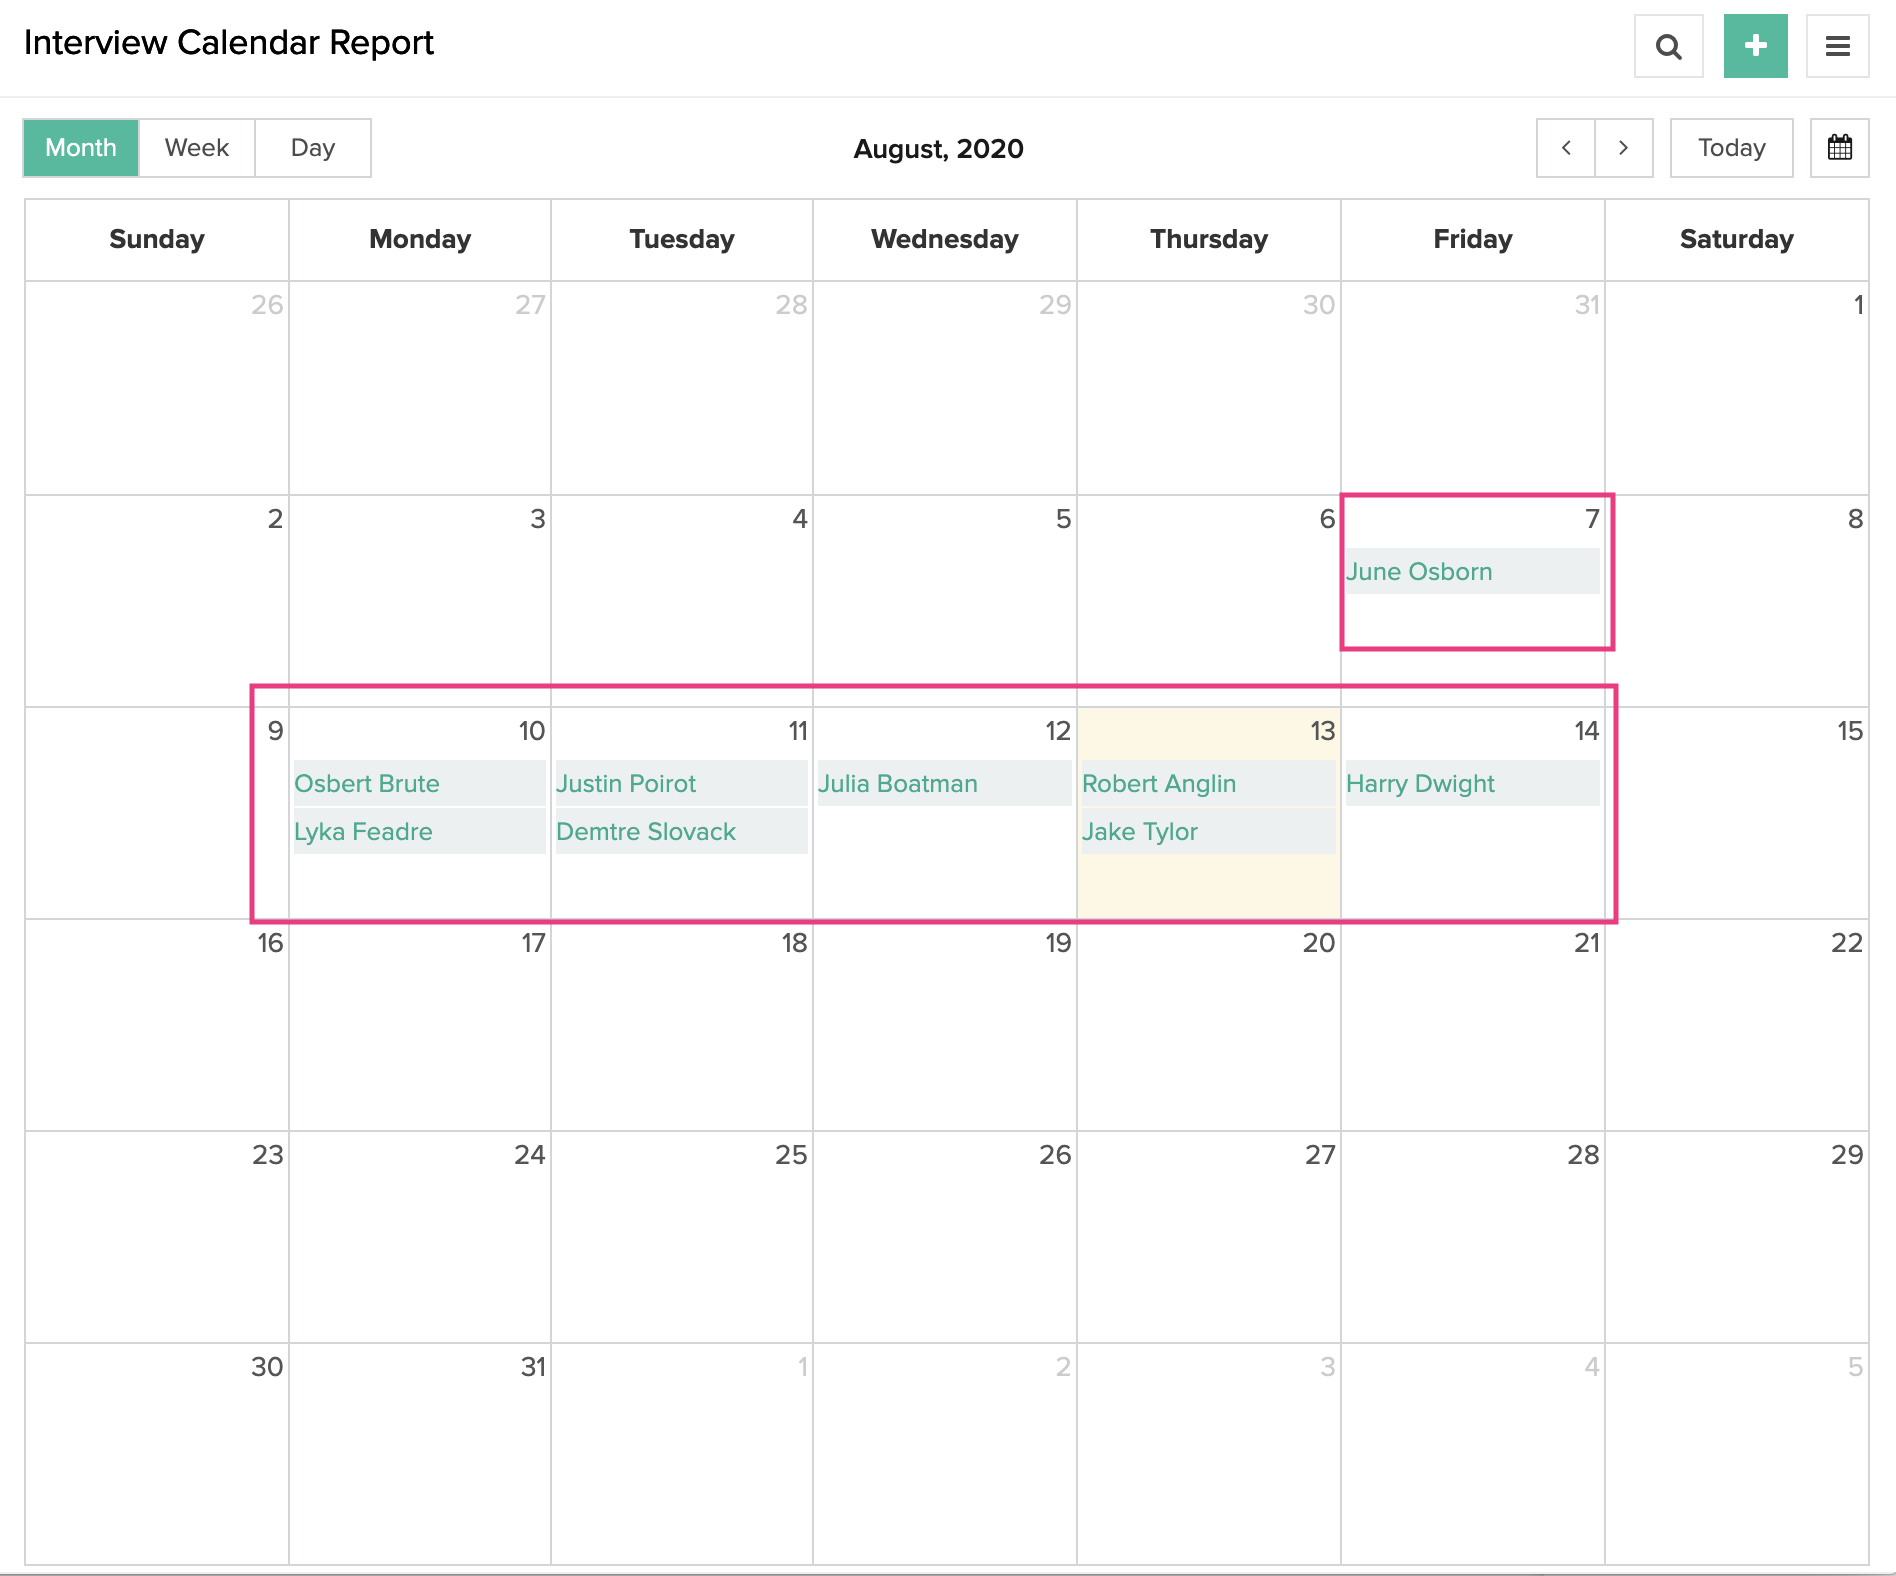
- The manager accesses the Interview Calendar Report. The manager schedules an interview by clicking on the required date in this report.
- This will open the Schedule Interview Form, as shown below
- The manager will select a candidate and set their interview's date and time, and then click Submit:

- Once the manager schedules an interview, the following happen:
- An entry appears in the Interview Calendar Report
- The Application Status of that candidate is updated from 'Applied' to 'Scheduled for Interview'
- An email is sent to the candidate, informing the date and time of their interview
- An entry appears in the Interview Calendar Report
- Once the interview is over, the manager can update if the candidate is selected or not, as follows:
- Select the required record in the Interview Calendar Report. The Detail View will appear:
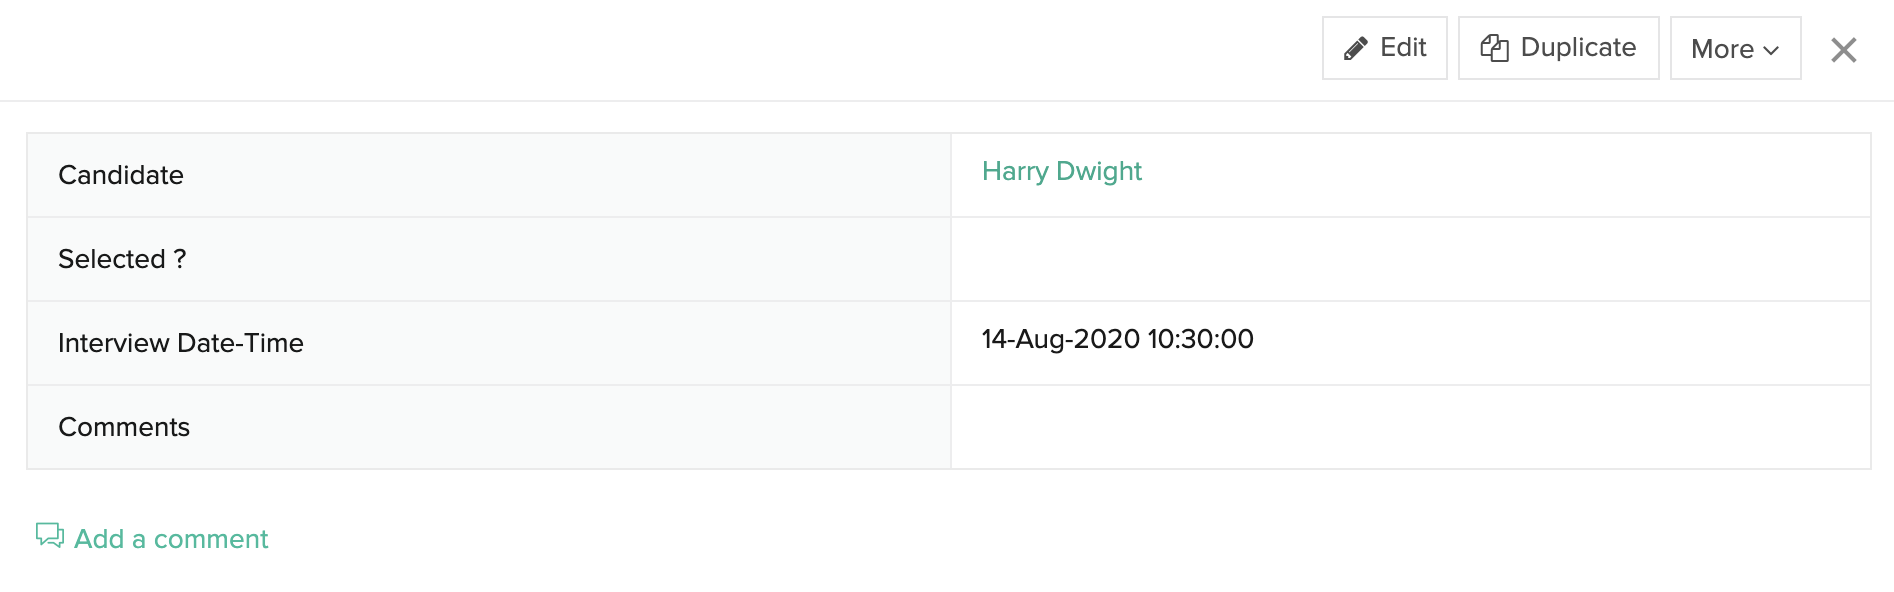
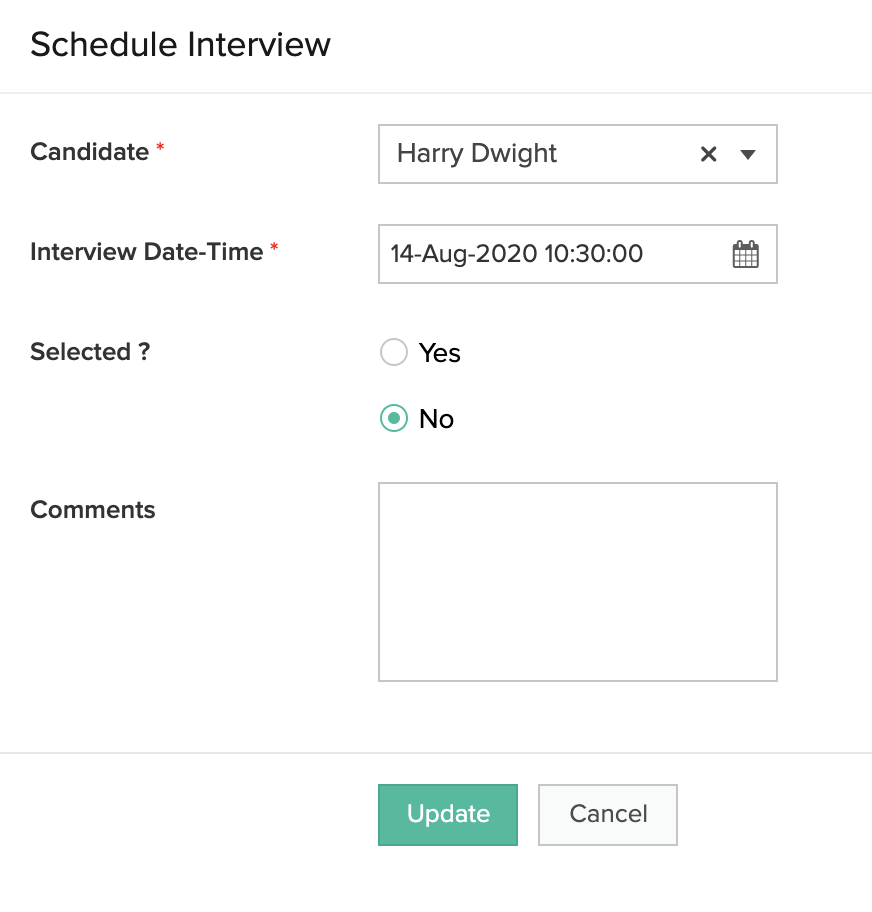
- Click the Edit button. The Schedule Interview form will open with the details of the selected record.
- Set the Selected? field as Yes to select that candidate, or No to reject the candidate, then click Update. Based on the selection, that candidate's Application Status is udpated as 'Selected' or 'Rejected'.
- Select the required record in the Interview Calendar Report. The Detail View will appear:
- The recruitment executive (yourself), as the administrator (or admin) of the app, has access to all the components in the app. You can use the Dashboard page to view all of the recruitment-related information in one place.