


Timesheet Settings and Restrictions
- General Settings
- Specific Settings
- Approval Settings
- Scheduler Settings
- Reminder Settings
- Payroll Settings
- Billing Settings
- Pay Period Settings
General Settings
- Time Log Settings
- Time Log Field Customization
- Timesheet Settings
- Payroll Calculation Settings
- Attendance Integration Settings
- Export Settings
Time Log Settings
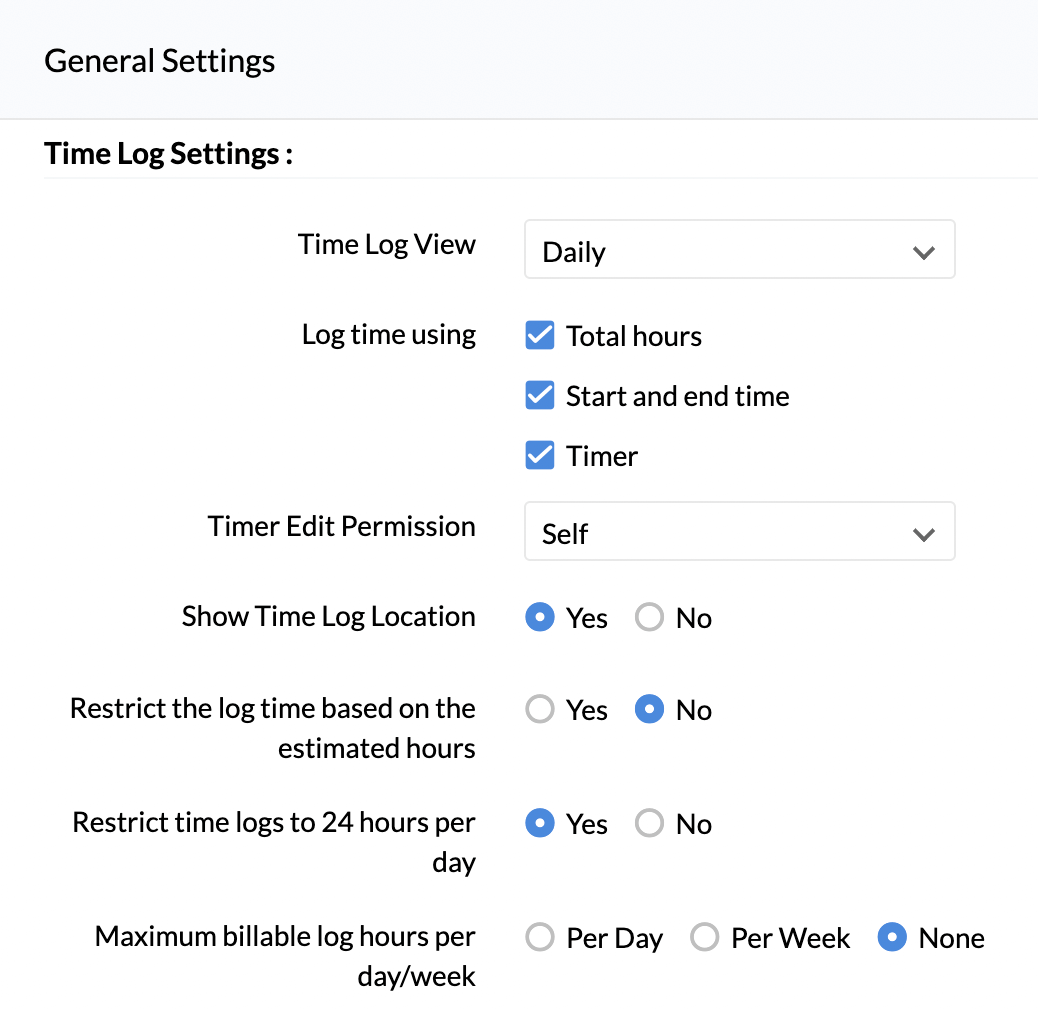
Time Log View:
You can set a time log view from daily, weekly and monthly options for the employees of your organization.
Now the selected time log view will be reflected for your employees under Timesheets > Time Logs >List View. This will be their default view once they land in List View.
Log time using:
This setting lets you define how you want your employees to log their time. You can choose from the following options – Total hours, Start and end time, Timer. More than one option can be selected.
Note:If the timer or start and end time option is disabled under 'Log time using' setting then the corresponding option under Attendance integration settings will also be disabled.
Timer Edit Permission:
You can configure settings for your employees to edit their own timer entry or allow the timer entries to be edited only by the Reporting Manager or the Admin. To allow the employee to edit their own time logs, select 'Self' from the drop-down.
Show Time Log Location:
In this setting, by choosing 'Yes' the location from where the time was logged by the user will be shown.
Some important points to note while location sharing is enabled:
- When the accuracy returned by the browser is below 1000 meters, the location shown is based on available latitude and longitude.
- When the accuracy returned by the browser is between 1000 and 3000 meters, the location shown is based on available latitude and longitude, along with the current accuracy level.
- When the accuracy returned by the browser is above 3000 meters, the location shown is based on IP address, along with the current accuracy level.
- When the location couldn't be captured, the location shown is based on IP address.
Restrict the log time based on the estimated hours:
This would restrict the user's time logged for any job, based on the estimated hours set, while adding the job. Enabling this will prevent the User from logging more time for a job, than what is given as the estimated hours.
Restrict time logs to 24 hours per day:
Users will be restricted to submit time logs not exceeding the 24-hours per day limit.
Maximum billable log hours per day/week:
This setting lets you define a maximum count for the billable time that can be logged in a day or week. If you want your employees to log time only for 8 hours a day, you can define this restriction here.
Similarly, you can also fix the maximum working hours for a week. This setting will restrict employees from logging in more time than what is fixed by the organization for a week.
Note: If Restrict time logs to 24 hours per day is enabled, The maximum hours allowed for a day is 24 hours and for a week is 168 hours i.e. 24*7.
Also, you can allow overtime worked by your employees to be calculated as part of the maximum billable hours.
When overtime is enabled, the maximum billable hours allowed to be logged for a day or week will be inclusive of the overtime hours.
- Click on 'Allow Over Time'. This option will be visible only if you set maximum billable log hours
- Enter the maximum OT(Overtime) Hours that you would like to allow
- Enter the Extended OT (Overtime)Hours that you would like to allow
![]() Tip: You can set various rates for Overtime and Extended Overtime worked by your employees. Know more.
Tip: You can set various rates for Overtime and Extended Overtime worked by your employees. Know more.
Similarly, you can include and exclude weekends and holidays from being considered as overtime.
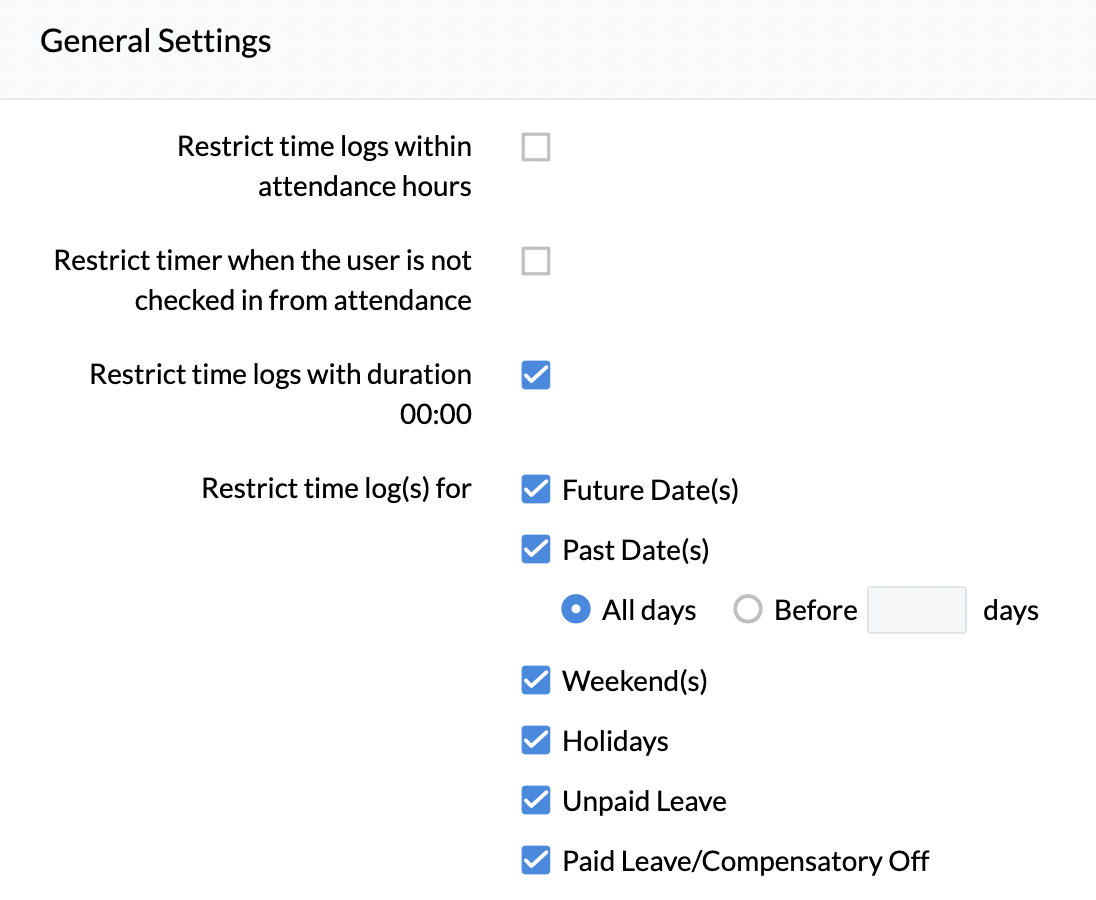
Restrict time logs within attendance hours:
When enabled, the user will be able to create time logs only within their attendance hours for any given day. For example, if an employee has been present from 9 AM to 11 AM ( 2 hours), then the time logs for that day should also be for 2 hours or lesser.
Note:If Push time log entries to attendance is already enabled, then this setting cannot be enabled since it is the time logged hours that will be considered as the attendance hours.
The Restrict time logs with duration 00:00 option disallows any negligible time log entries that are less than a minute long.
Restrict time logs for
The Restrict time log(s) for option lets you restrict your employees to log time based on the preferences selected.
The options include:
- Future date(s): Employees are restricted from submitting time logs for any future dates.
- Past Date(s): Restrict employees from submitting time logs either for all past days or specifically allow for a specific number of days before the present day.
- Weekend(s): Employees are restricted from submitting time logs for weekend days.
- Holidays: Employees are restricted from submitting time logs for all holidays.
- Unpaid leave: Employees are restricted from submitting time logs during unpaid leave,
- Paid Leave/Compensatory off: Employees are restricted from submitting time logs during paid leave or compensatory off.
Note: Past and future date restrictions do not apply to administrators.
Restrict time Logs within job's period:
Based on your organization's requirements time log restrictions can be further fine-tuned to prevent employees from adding time logs outside a job's assigned time frame. The following options can be used:
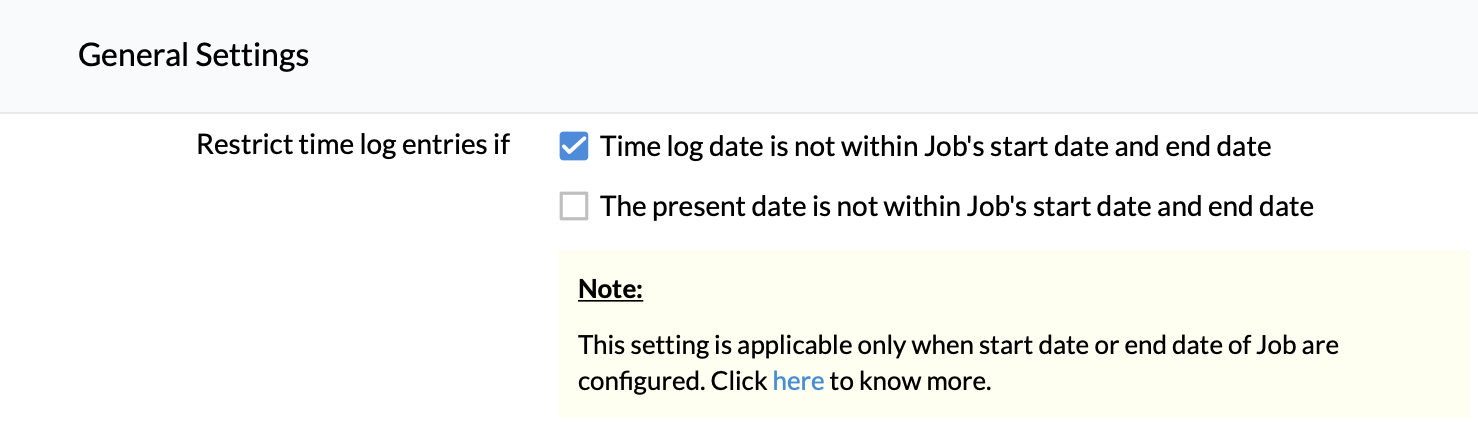
Time log date is not within the job's start and end date.
When this restriction is enabled, employees cannot log time if the date selected for logging time is not within the job's start and end date.
The present date is not within the job's start and end date
When this restriction is enabled, employees cannot log time if the present date is not within the job's start and end date.
Furthermore, it is important to note that when either the job's start or end dates are not defined the behavior of this feature will vary as described below:
- When jobs have only start date defined:
- If the 1st option is checked, then the employees can only log time if the time log date is on or after the start date of the job.
- If the 2nd option is checked, then the employees can only log time if the present date is on or after the start date of the job.
- When jobs have only end date defined:
- If the 1st option is checked, then the employees can only log time if the time log date is on or before the end date of the job.
- If the 2nd option is checked, then the employees can only log time if the present date is on or before the end date of the job.
When jobs do not have both start and end date defined:
Both 1st and 2nd option will have no impact.
Time entry overlap:
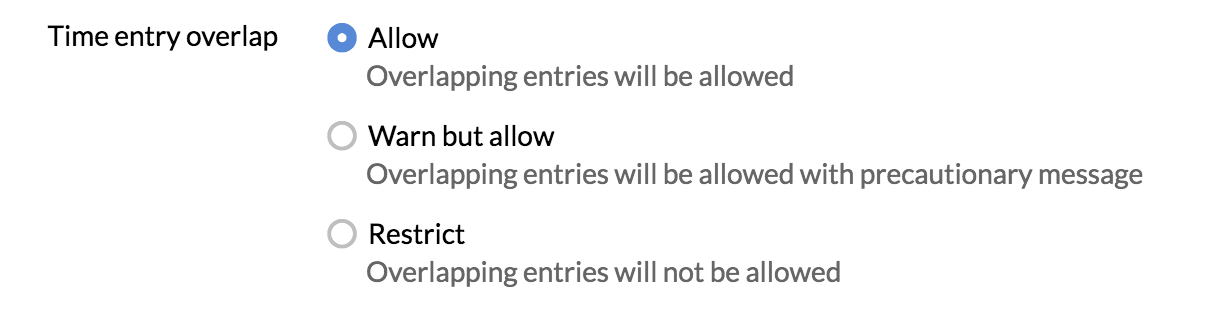
This setting can be used to restrict or warn employees when they log time that overlaps with the time entries of other time logs of the same date.
Typically, employees may work more than one job at work. In such cases, there may be an overlap of time entries.
During such a scenario, organizations can select from one of these options:
- Allow: employees will be able to log time even if time entries overlap.
- Warn but allow: employees will be warned when they log time that overlaps with time entries of other time logs on the same date. They can choose to cancel or allow the time logs to be saved.
- Restrict: employees will not be able to log time if time entry overlaps with entries of other time logs on the same date.
Note: This setting does not apply when the user logs time by entering total hours.
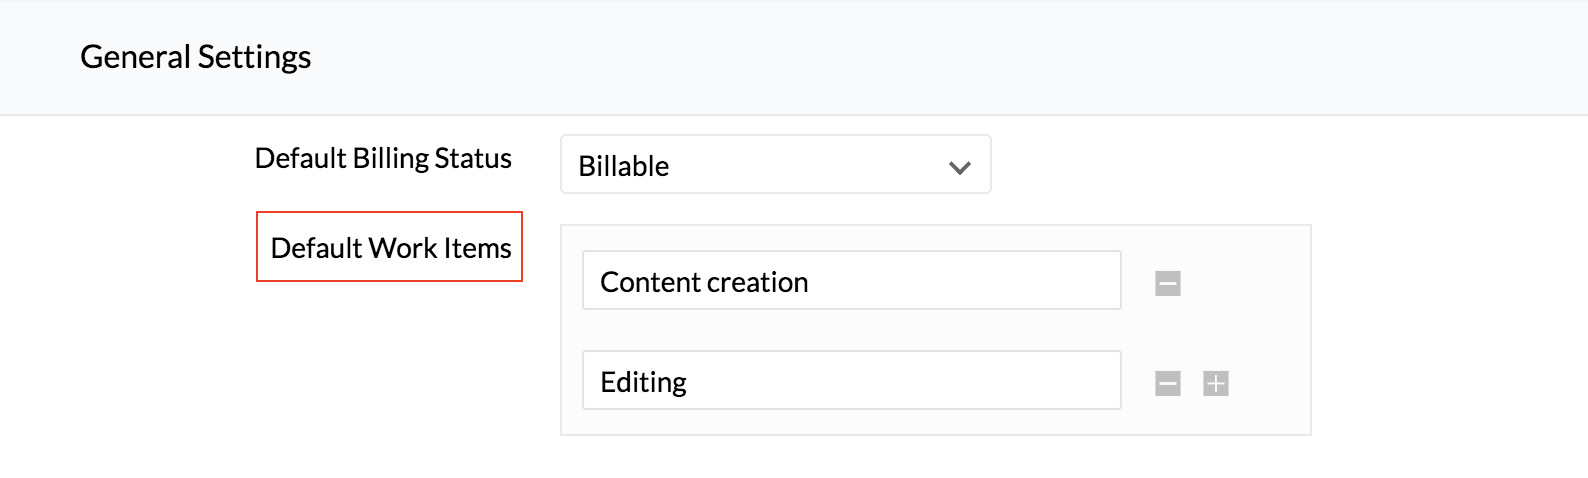
Default Billing Status:
For any Job of the User for which the user logs time, the billing status set here will be the default status.
Default Work Items:
You can configure default work items here. These will be shown as drop-down options for work items while logging time.
Time Log Field Customization
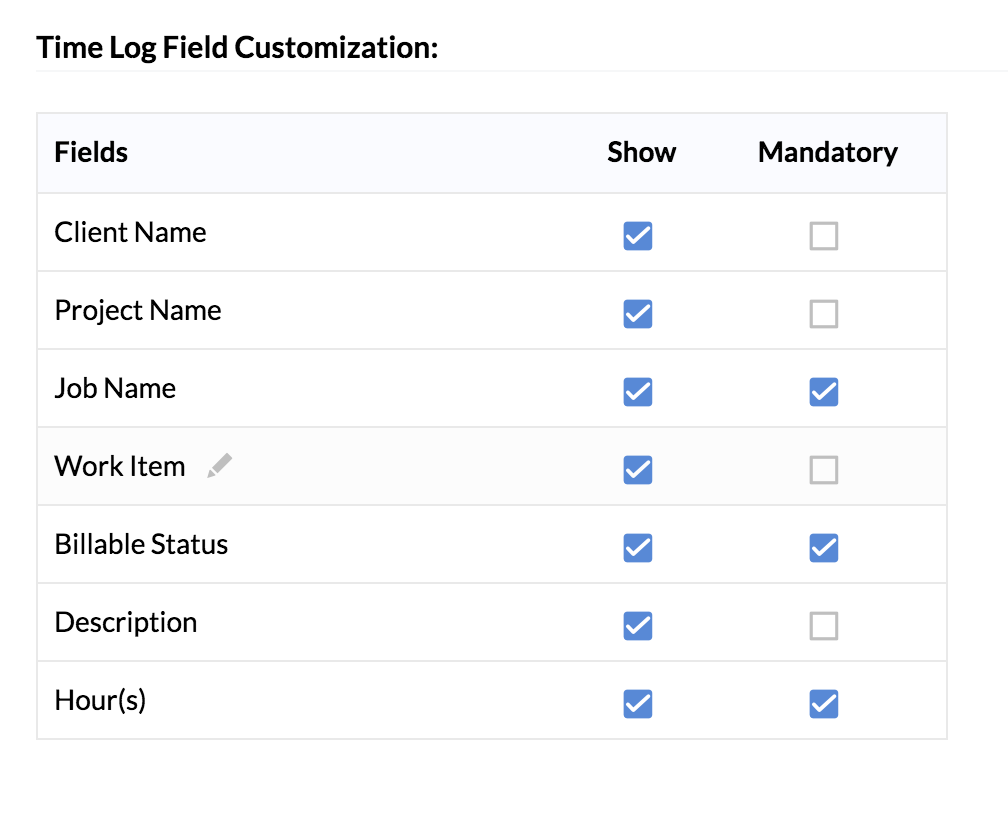
This setting allows you to perform the following actions:
- Select the fields you want to include in a time log entry. Check the box next to the field name you want to include, under Show. Uncheck fields you want to hide.
- Select the fields you want to make mandatory, in a time log. Check the box next to the field name you want to include,under Mandatory.
- Rename time log field names for Work Item and Description. Click the edit icon next to the field name to change it.
- Change the show/hide status for Billing Status
Note: Job Name and Hours are system mandatory fields and no changes can be made. Billable Status field cannot be made optional.
Timesheet Settings
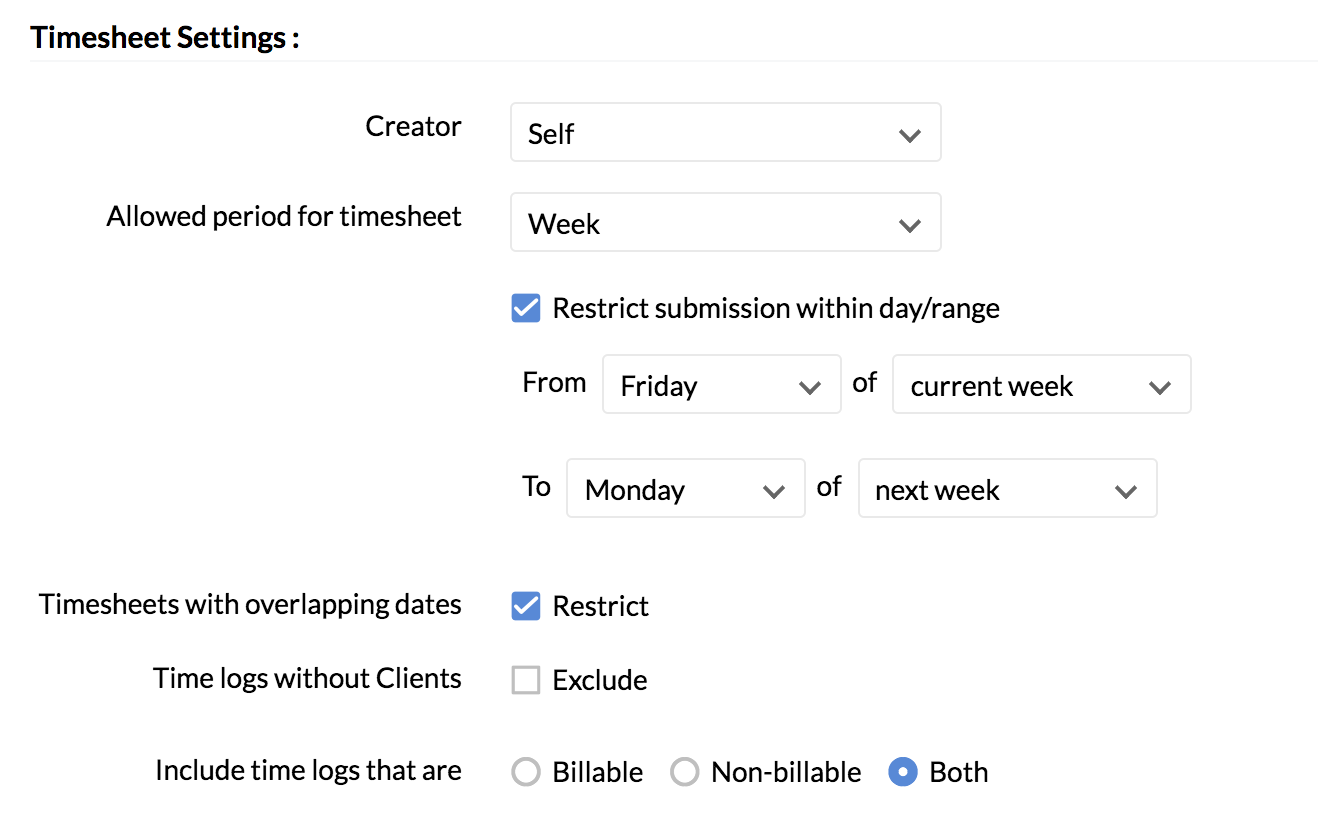
Creator
According to your organizational needs, you can define who will be the one who can create the timesheet - Self, Admin or Reporting Manager. For instance, if you want only the Reporting Manager to create Timesheets,
- From your home page, go to Timesheet > Settings > General Settings
- Under Timesheet Settings go to Creator
- Select Reporting Manager from the drop-down
- Click Submit
Once this is done, only reporting managers and admins will be able to create Timesheets.
Allowed period for timesheet
This setting lets you restrict your timesheet submissions to a specified period – day, week, or month. Any period will be the default option which allows timesheets to be submitted at any time.
If the week or month options are chosen, you can further define the interval to specific days.
To enable this setting,
- Navigate to Timesheet > Settings > General Settings.
- Go to the Timesheets section.
- Select the Allowed period for timesheet option from the drop-down. Choose Any period, Day, Week or Month.
- If you have chosen Week or Month, restrict the timesheet submission to a day or range, if required.
- Click Submit.
Use cases for restricting to a day/ range within a week
- To restrict timesheet submission to a single day
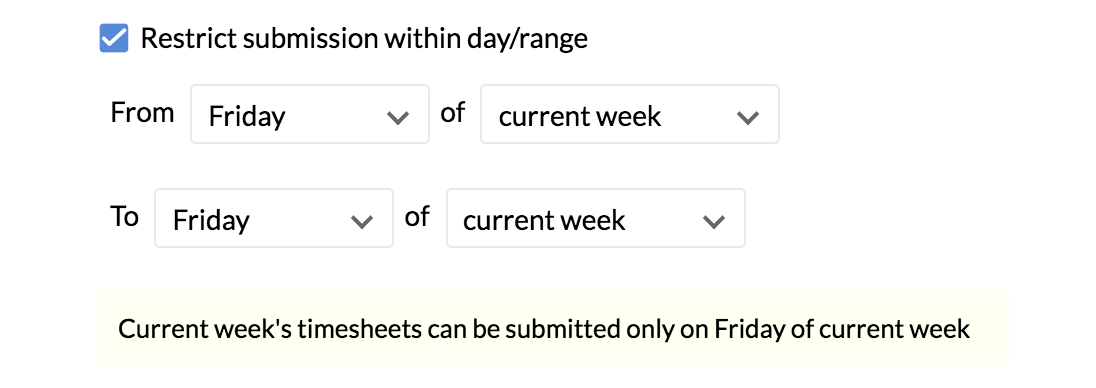
- To restrict timesheet submission to a specified time range
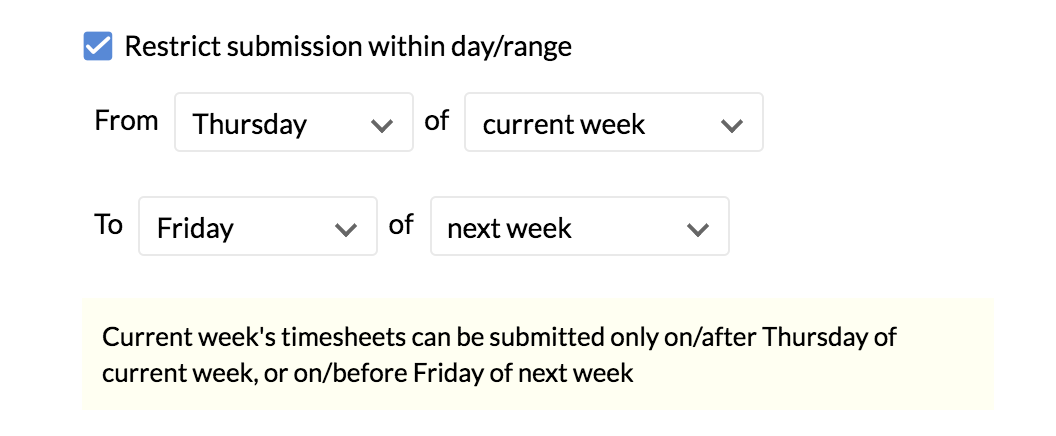
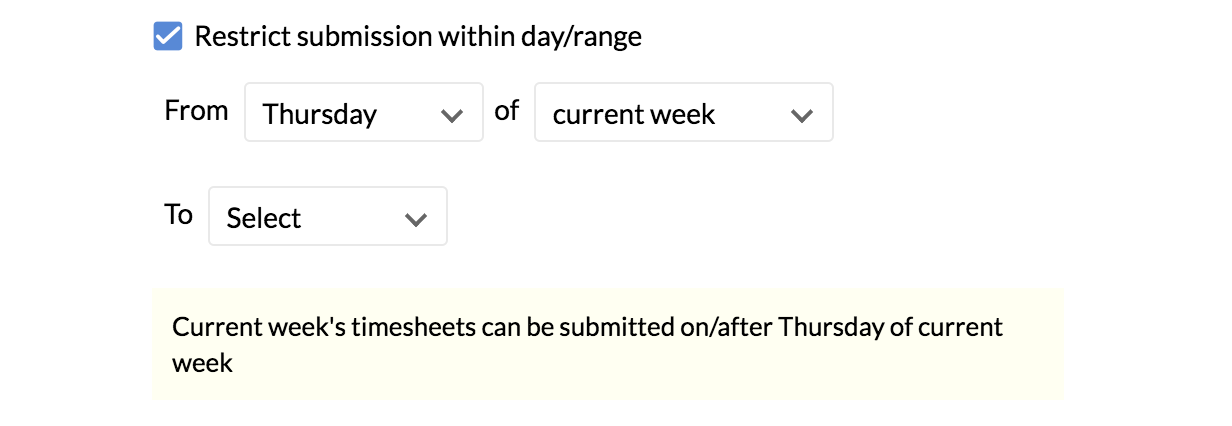
- To restrict timesheet submission with only the start date.
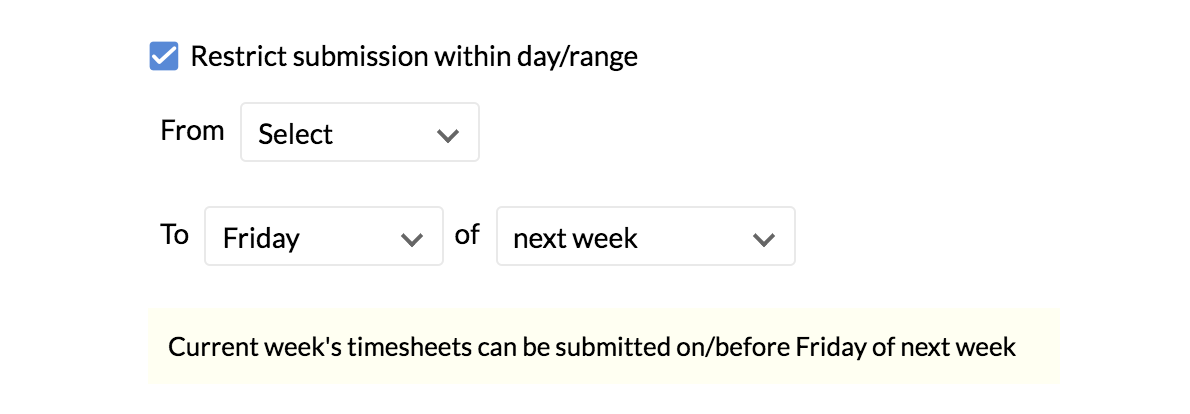
- To restrict timesheet submission with only the end date.
Note:The current week that is considered is based on the day selected when you go to Leave > Settings > Calendar Settings, and look under 'Week starts on', for the selected location.
Similar scenarios can be configured for the Monthly option as well.
For example, to restrict submission to a monthly range,
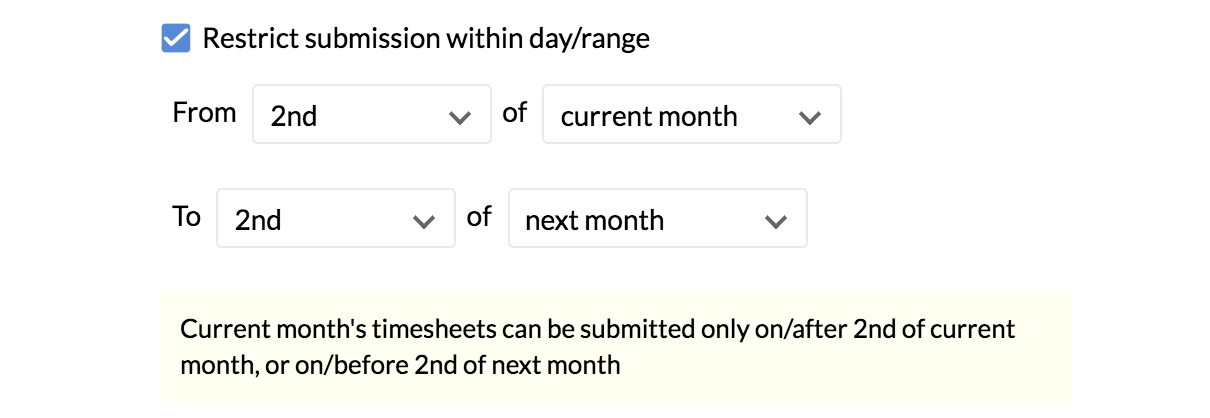
Note: Restricting submission to a day/range setting is not applicable to Admins. Admins will be able to submit timesheets anytime, irrespective of the submission range configured.
Timesheets with overlapping dates
This setting lets you restrict employees from submitting timesheets with same day or range.
To enable this setting,
- Navigate to Timesheet > Settings > General Settings.
- Go to the Timesheet Settings section.
- Check Restrict beside Timesheet with overlapping dates.
- Click Confirm.
For example, a timesheet has been submitted for the week of August 16th – 22nd.
The system will not allow the employee to submit the following additional timesheets:
- Timesheet for the 17th of August.
- Timesheet for 18th of August - 23rd of August.
- Timesheet for the month of August.
Any additional timesheets for a period or date range that includes the days that fall within the 16th–22nd of August will be restricted.
Time logs without Clients
This setting comes to use when you do not want jobs that are not associated with clients to be included in the Timesheet creation. Typically jobs and time logs can be created without being associated with a client. However, when these logs are collated to create a Timesheet, you have the option to exclude jobs that are not mapped to any Clients. Follow the steps given below.
- From your home page, go to Timesheet > Settings > General Settings.
- Under Timesheet Settings, go to Time logs without clients
- Check Exclude
- Click Submit
Include time logs that are
When time is logged, you can decide if you want only the Billable logs to be sent for approval. This will help in scenarios where you have both billable and non-billable logs but need only billable logs to be approved. Follow the steps given below.
- From your home page, go to Timesheet > Settings > General Settings
- Under Timesheet Settings, go to Include time logs that are
- Select Billable, Non-Billable or Both as required
- Click Submit.
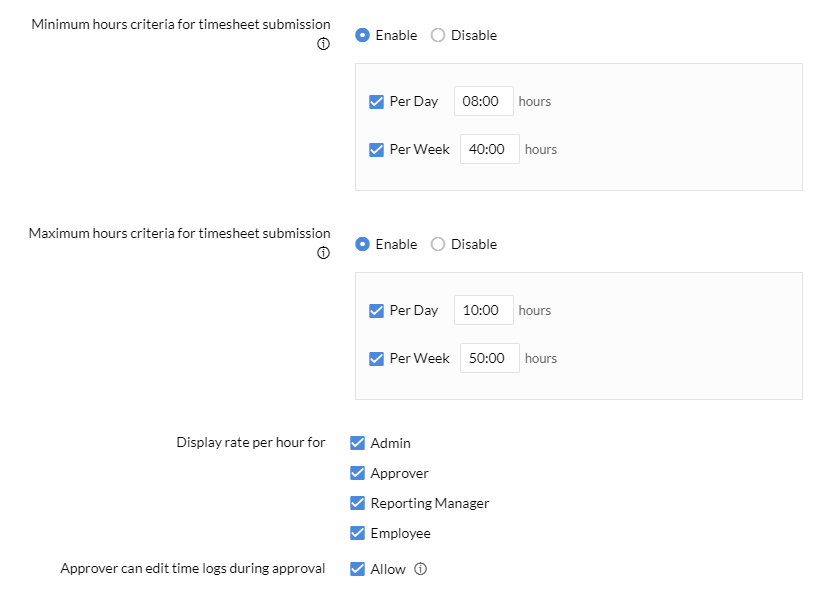
Minimum hours criteria for timesheet submission
This setting lets you include a minimum hours criteria for a user submitting a timesheet. This criteria lets you set minimum hours for time logged for a day and for a week.
To enable this setting,
- Navigate to Timesheet > Settings > Timesheet Settings.
- Go to the Timesheet Settings section.
- Select Enable for Minimum hours criteria for timesheet submission.
- Enter the minimum hours for Per Day and Per Week, as required.
- Click Submit.
This setting serves as an alert for a user when they submit a timesheet. If the setting is enabled, the user will be prompted with an alert if their total logged hours is less than the minimum hours set. They will, however, be able to submit their timesheet whether or not their total logged hours meets the set criteria.
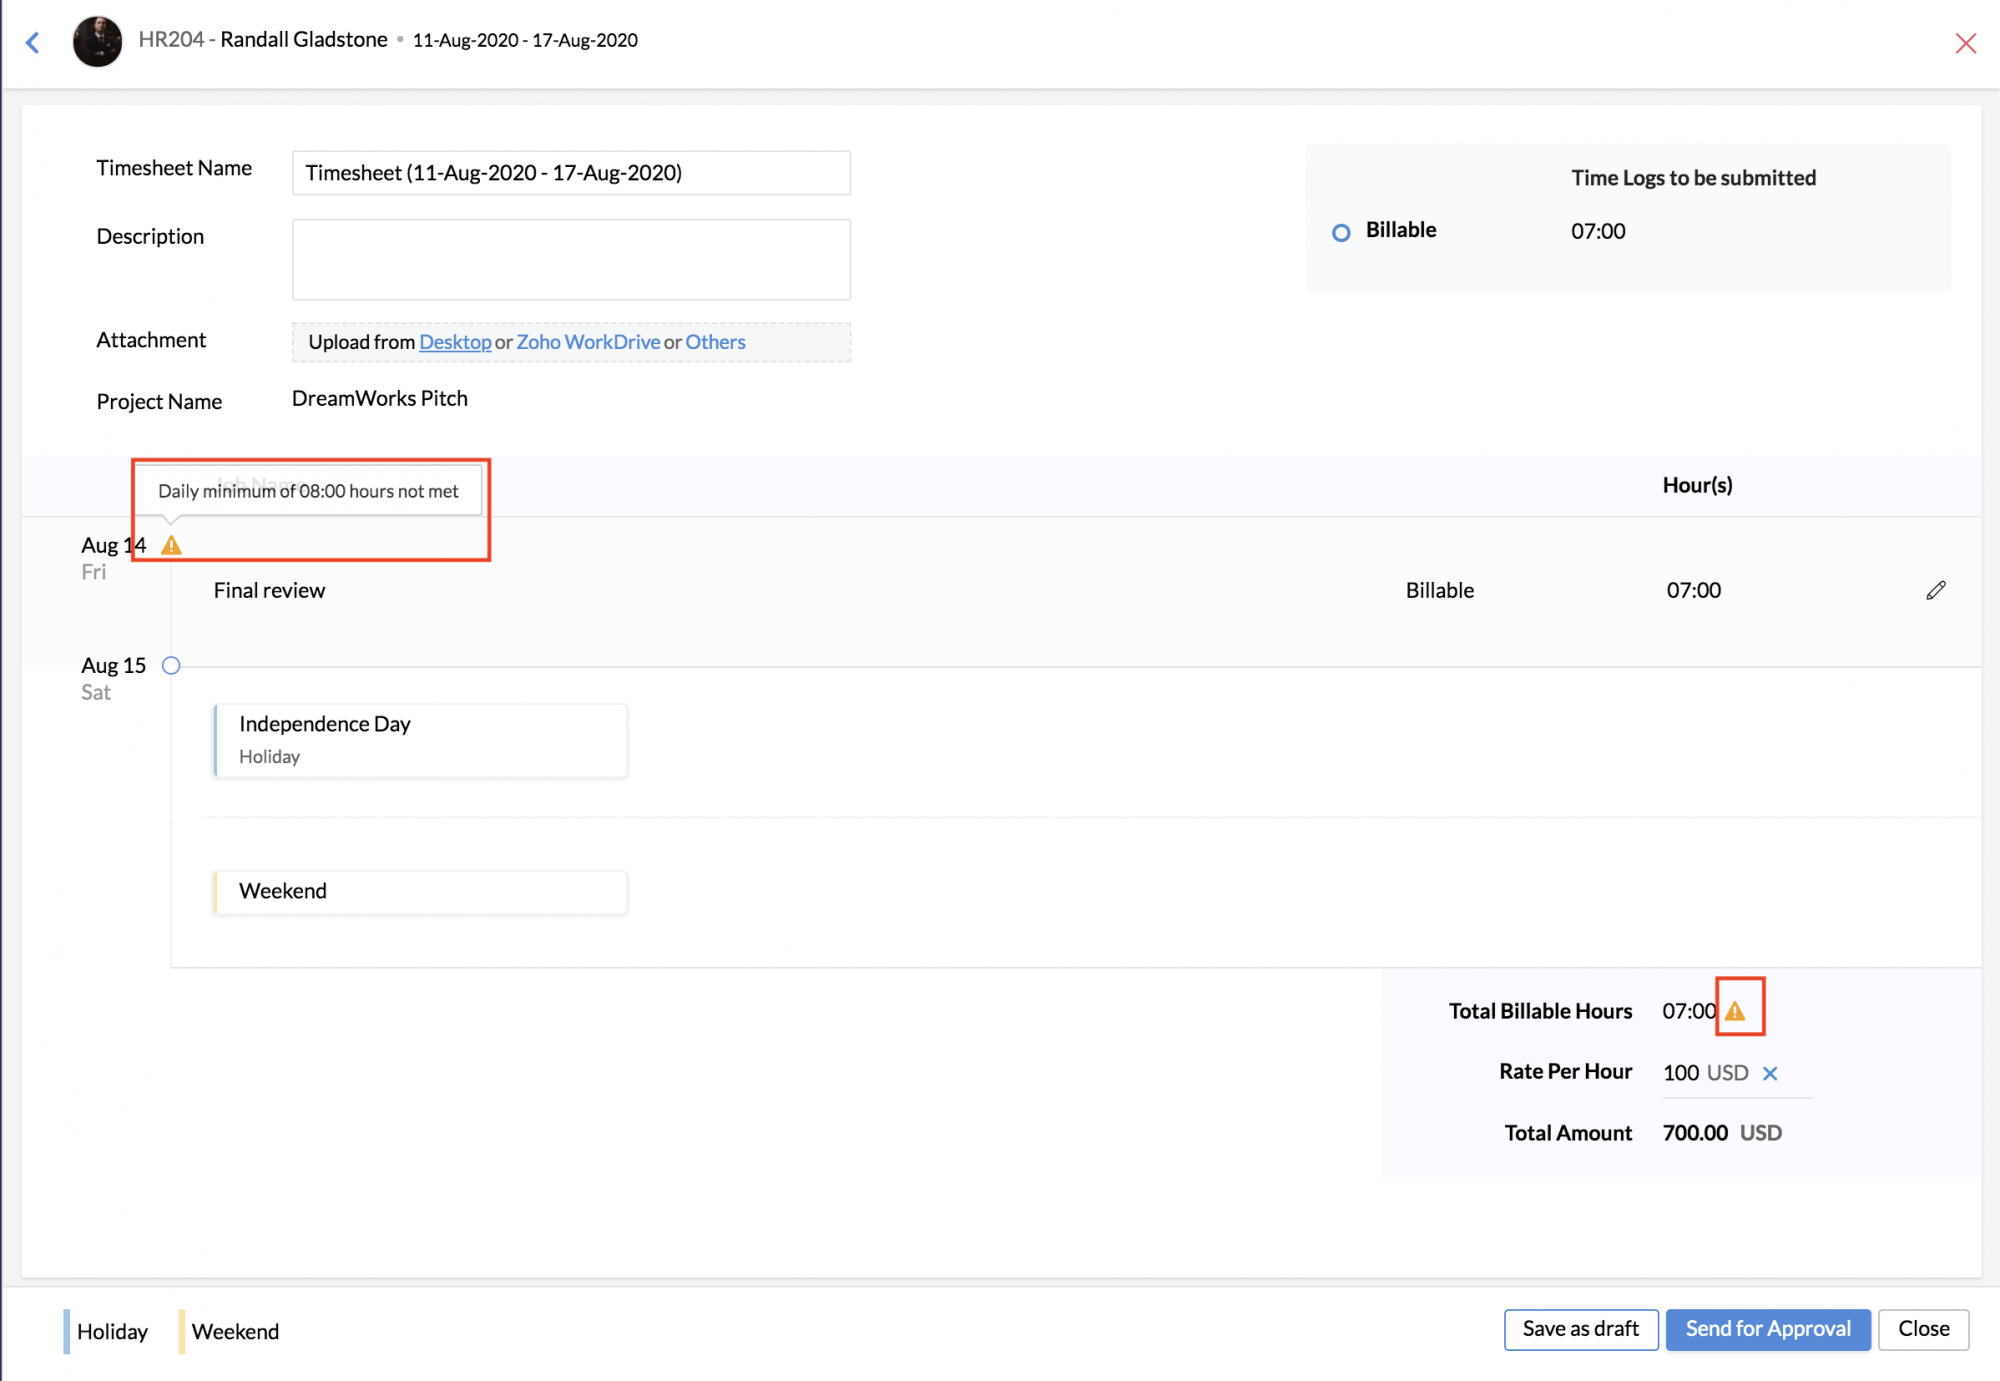
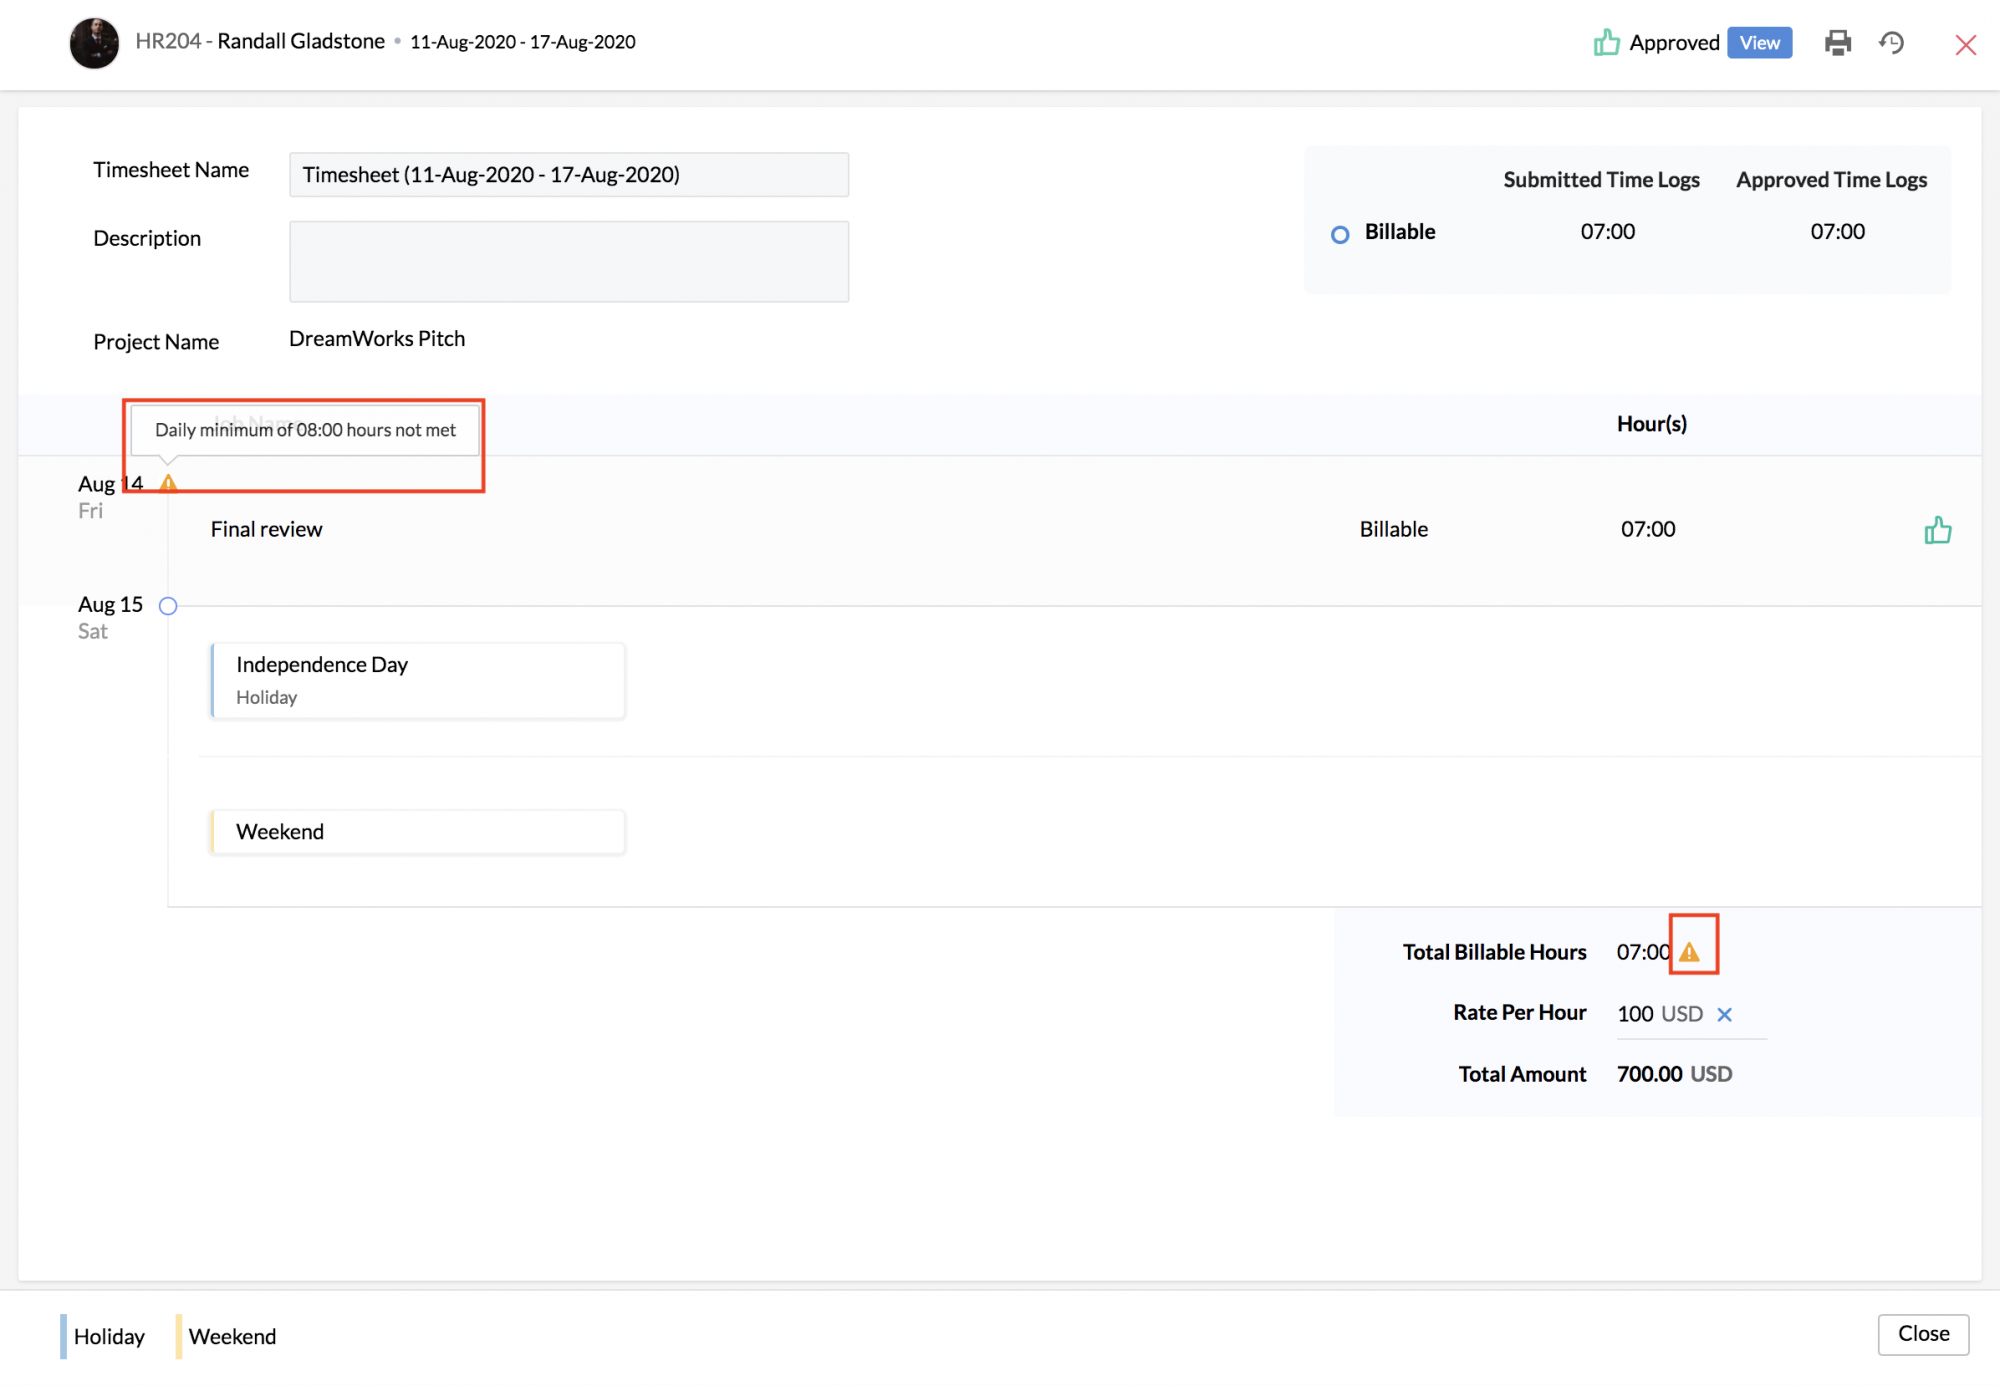
If the timesheet goes for approval, the approver will also receive an alert indicating that the user has not met the set minimum hours criteria. This information will be useful for the approver before they approve or reject the timesheet.
The same setting can be configured for specific users or locations under Timesheet > Settings > Specific Settings.
Note:The criteria set will not apply to weekends, leaves and holidays.
Maximum hours criteria for timesheet submission
This setting lets you include a maximum hours criteria for a user submitting a timesheet. This criteria lets you set maximum hours for time logged for a day and for a week.
To enable this setting,
- Navigate to Timesheet > Settings > Timesheet Settings.
- Go to the Timesheet Settings section.
- Select Enable for Maximum hours criteria for timesheet submission.
- Enter the minimum hours for Per Day and Per Week, as required.
- Click Submit.
This setting serves as an alert for a user when they submit a timesheet. If the setting is enabled, the user will be prompted with an alert if their total logged hours exceed the maximum hours set. They will, however, be able to submit their timesheet whether or not their total logged hours exceeds the set criteria.
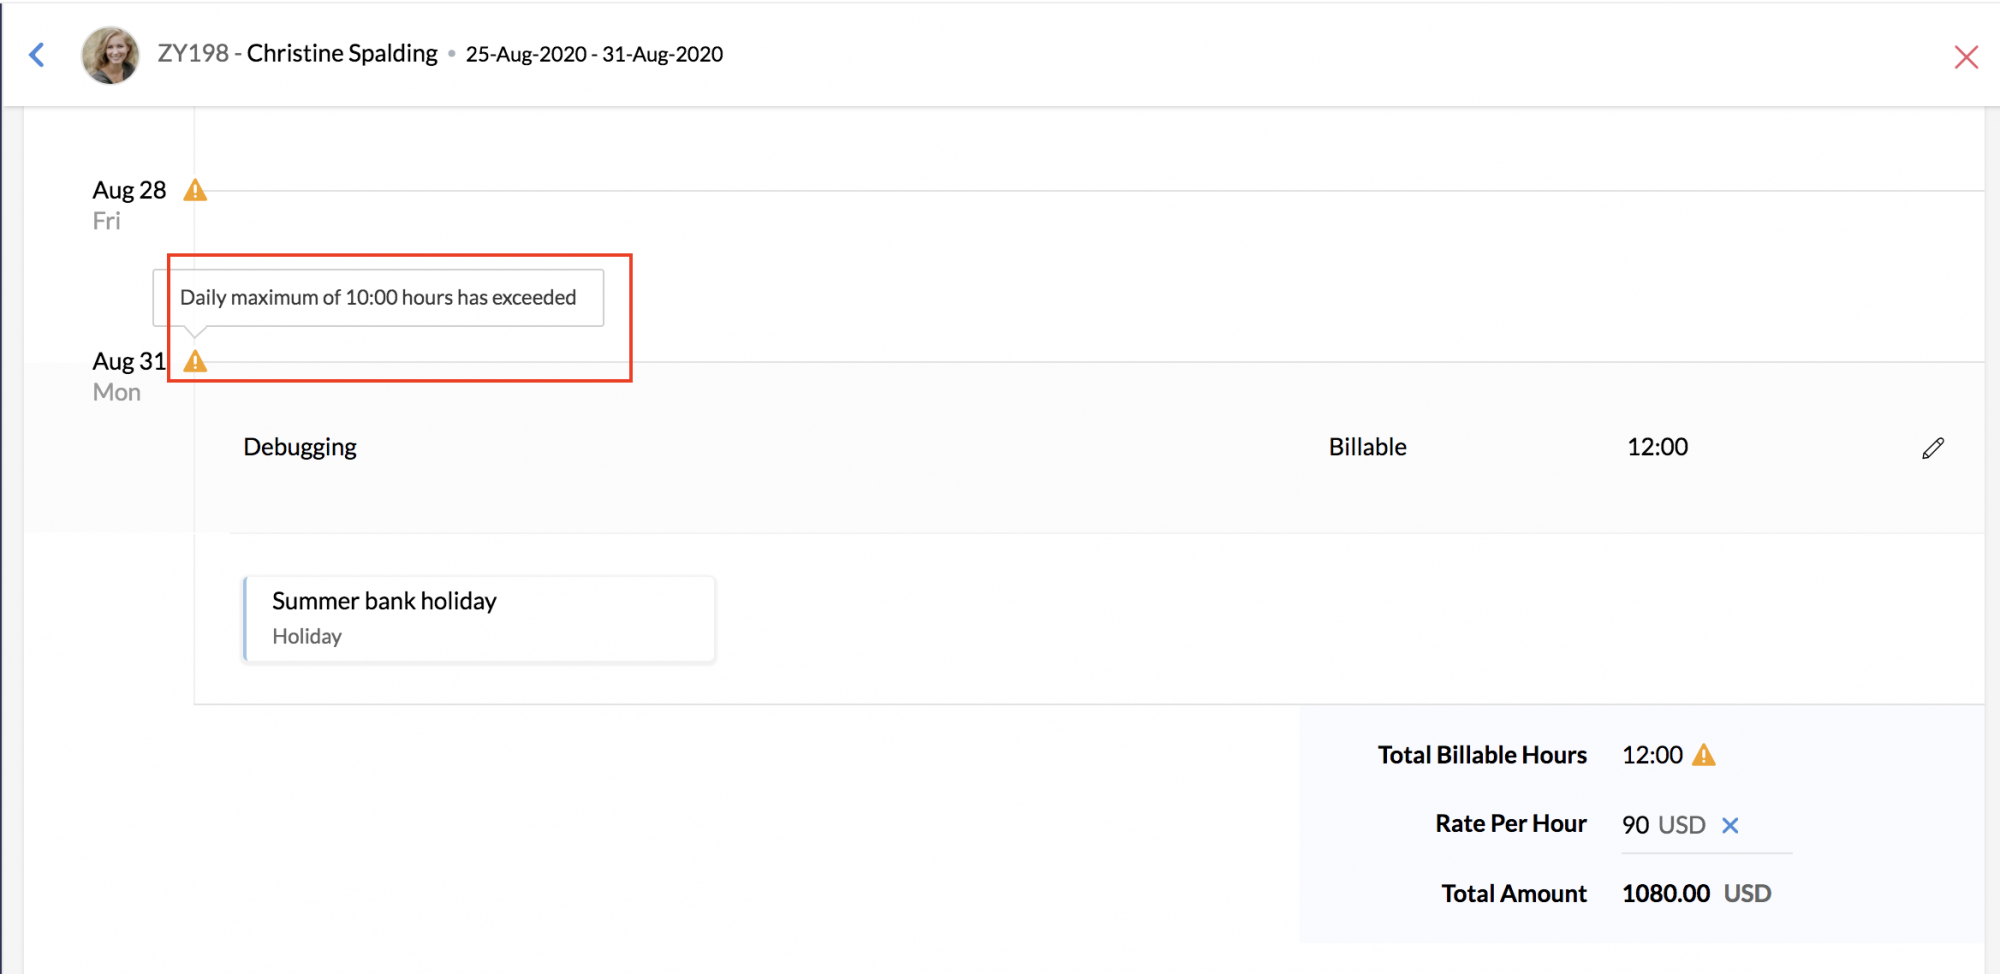
If the timesheet goes for approval, the approver will also receive an alert indicating that the user has exceeded the set maximum hours criteria. This information will be useful for the approver before they approve or reject the timesheet.
The same setting can be configured for specific users or locations under Timesheet > Settings > Specific Settings.
Note:The criteria set will not apply to weekends, leaves and holidays.
Display rate per hour for
In some organizations, the employee's rate per hour in the timesheet is preferred to be hidden to some users. Let's say you want the rate per hour in timesheet to be hidden from the employee:
- Go to Timesheet > Settings > General Settings
- Under Timesheet Settings, go to Display rate per hour for
- Uncheck Employee
- Click Submit
Note: Rate per hour will be shown to Admin by default and cannot be unchecked.
Approver can edit time logs during approval
Typically, while approving or rejecting a timesheet, approvers will not be given the option to edit the timesheet. The timesheet will be rejected and the employee will have to resubmit it. This option gives the flexibility for the approver to make modifications to the billable status, hours of the time logs and work item during approval of the timesheet, thereby speeding up the process.
To enable this option,
- Go to Timesheet > Settings > General Settings
- Under Timesheet Settings, enable Approver can edit time logs during approval
- Click Submit
Customize mail template for timesheet approval
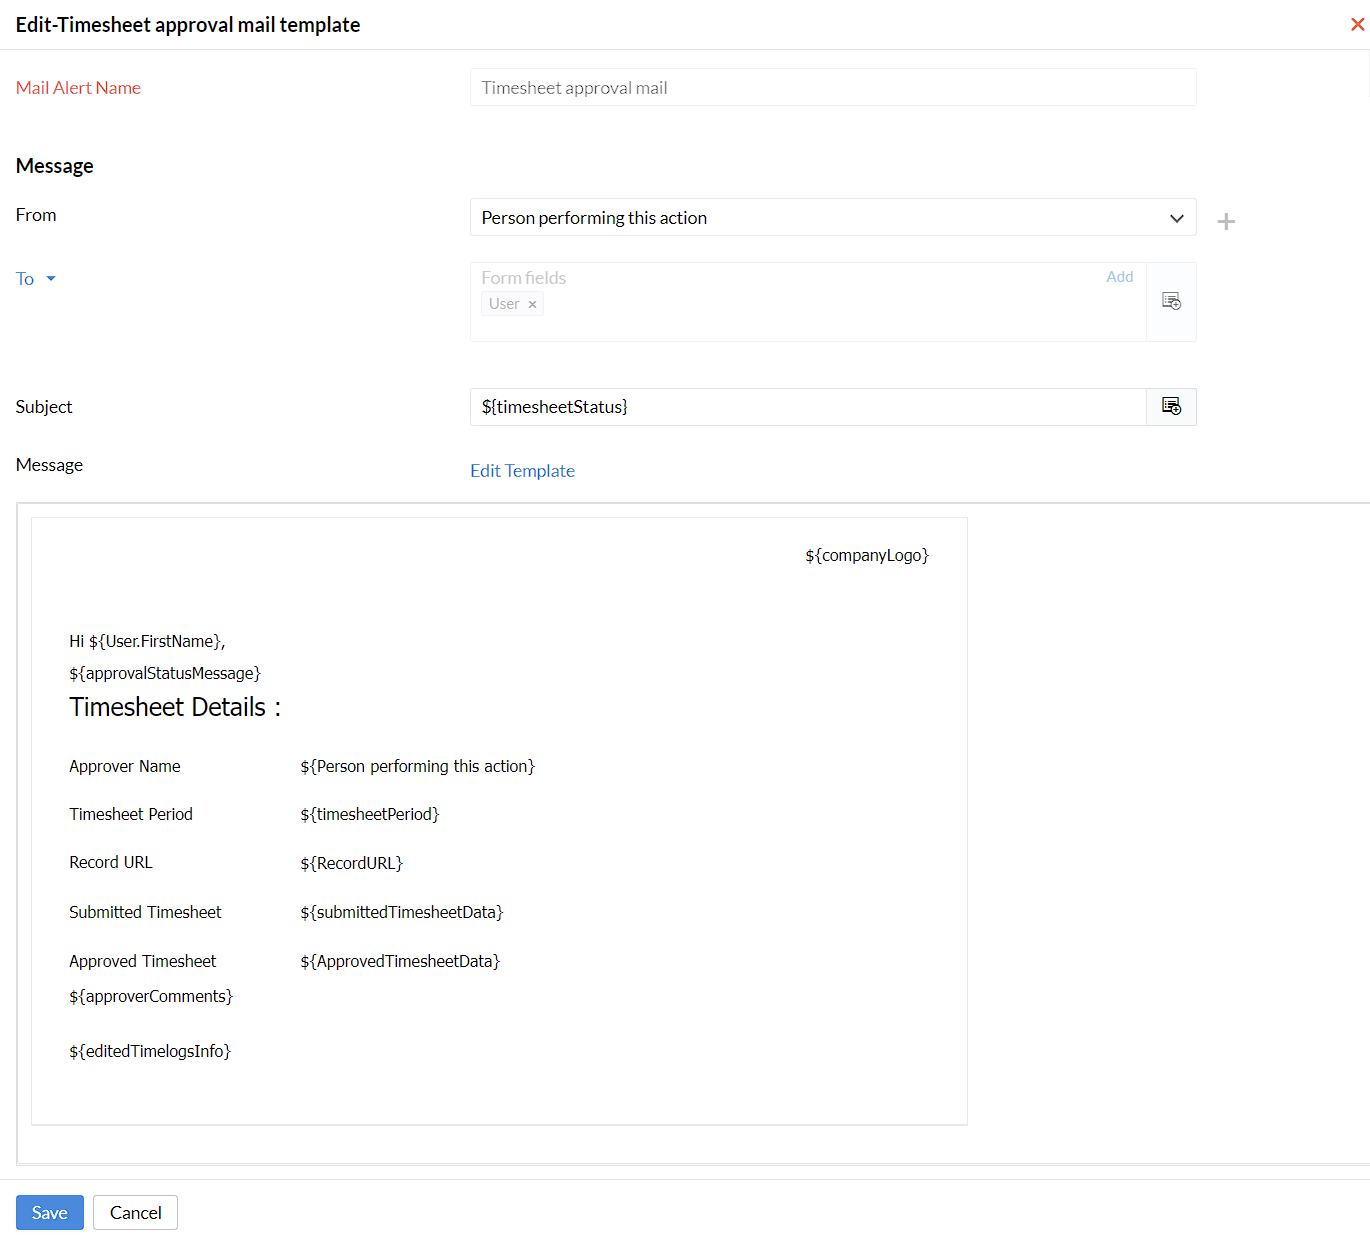
This option opens the possibility of customizing the timesheet approval email message that is automatically triggered. (click here for approval settings)
To customize the approval mail template,
- Go to Timesheet > Settings > General Settings
- Under Timesheet Settings, click Customize mail template
- Once the necessary changes are done, Click Save
Payroll Calculation Settings
Include Paid Leave
You can enable Include Paid Leave to include paid leave as part of your payroll calculations.
Once 'Include Paid Leave' is enabled, paid leave will be reflected in the payroll report. Click here to view the payroll report.

Attendance Integration Settings
Hours logged in Timesheet can be converted as attendance entries for the day with this setting, This means that the presence of your employees is notified when they start tracking time for any of the jobs that have been added for them. This eliminates the step of doing a web check-in because, when the employee starts tracking time for a job, it means that the employees have checked-in for the day.
To enable integration of Timesheet with your attendance module, under Attendance Integration Settings, select the type of time log entries you want to push to attendance - Timer, Start and end time or both.

Points to note:
- To enable any option here, the corresponding method of time logging under 'Log time using' setting must have been enabled.
- Under the 'Time entry overlap' setting, if it is set to 'Allow' or 'Warn but Allow', then this setting can't be enabled for start and end time logs as overlapping timings can't be recorded under attendance.
- Only timer and start and end time logs under the 'Log time using' setting will be pushed to attendance.
Export Settings
Certain files contain sensitive information that needs to stay private when they get exported. Such files can be encrypted with a password. The exported file will be accessible only with the password sent to your mail ID and hence ensures a secure export. Follow the steps given below to do this.
For instance, if you would like to export the Payroll Report of your employees secured with a password, password protection for exporting should be enabled in the first place. To do this,
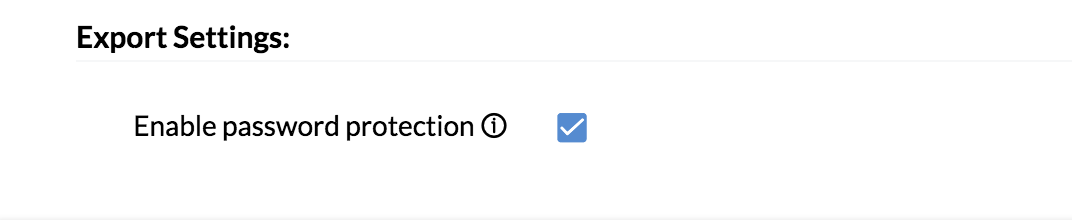
- From your Home page, go to Timesheet > Settings > General Settings.
- Under Export Settings, click on Enable password protection.
- Click Submit.
Now to export the file, in this case, the Payroll report,
![]()
- Go to Timesheet > Reports > Payroll Report.
- Click on the ellipsis icon > Export
- Select the desired format and click Export.
The file will get exported in the chosen format which can be accessed with a password sent to your mail.
Note: If formats .xls, .csv and .tsv are selected, the file gets exported as a .zip file
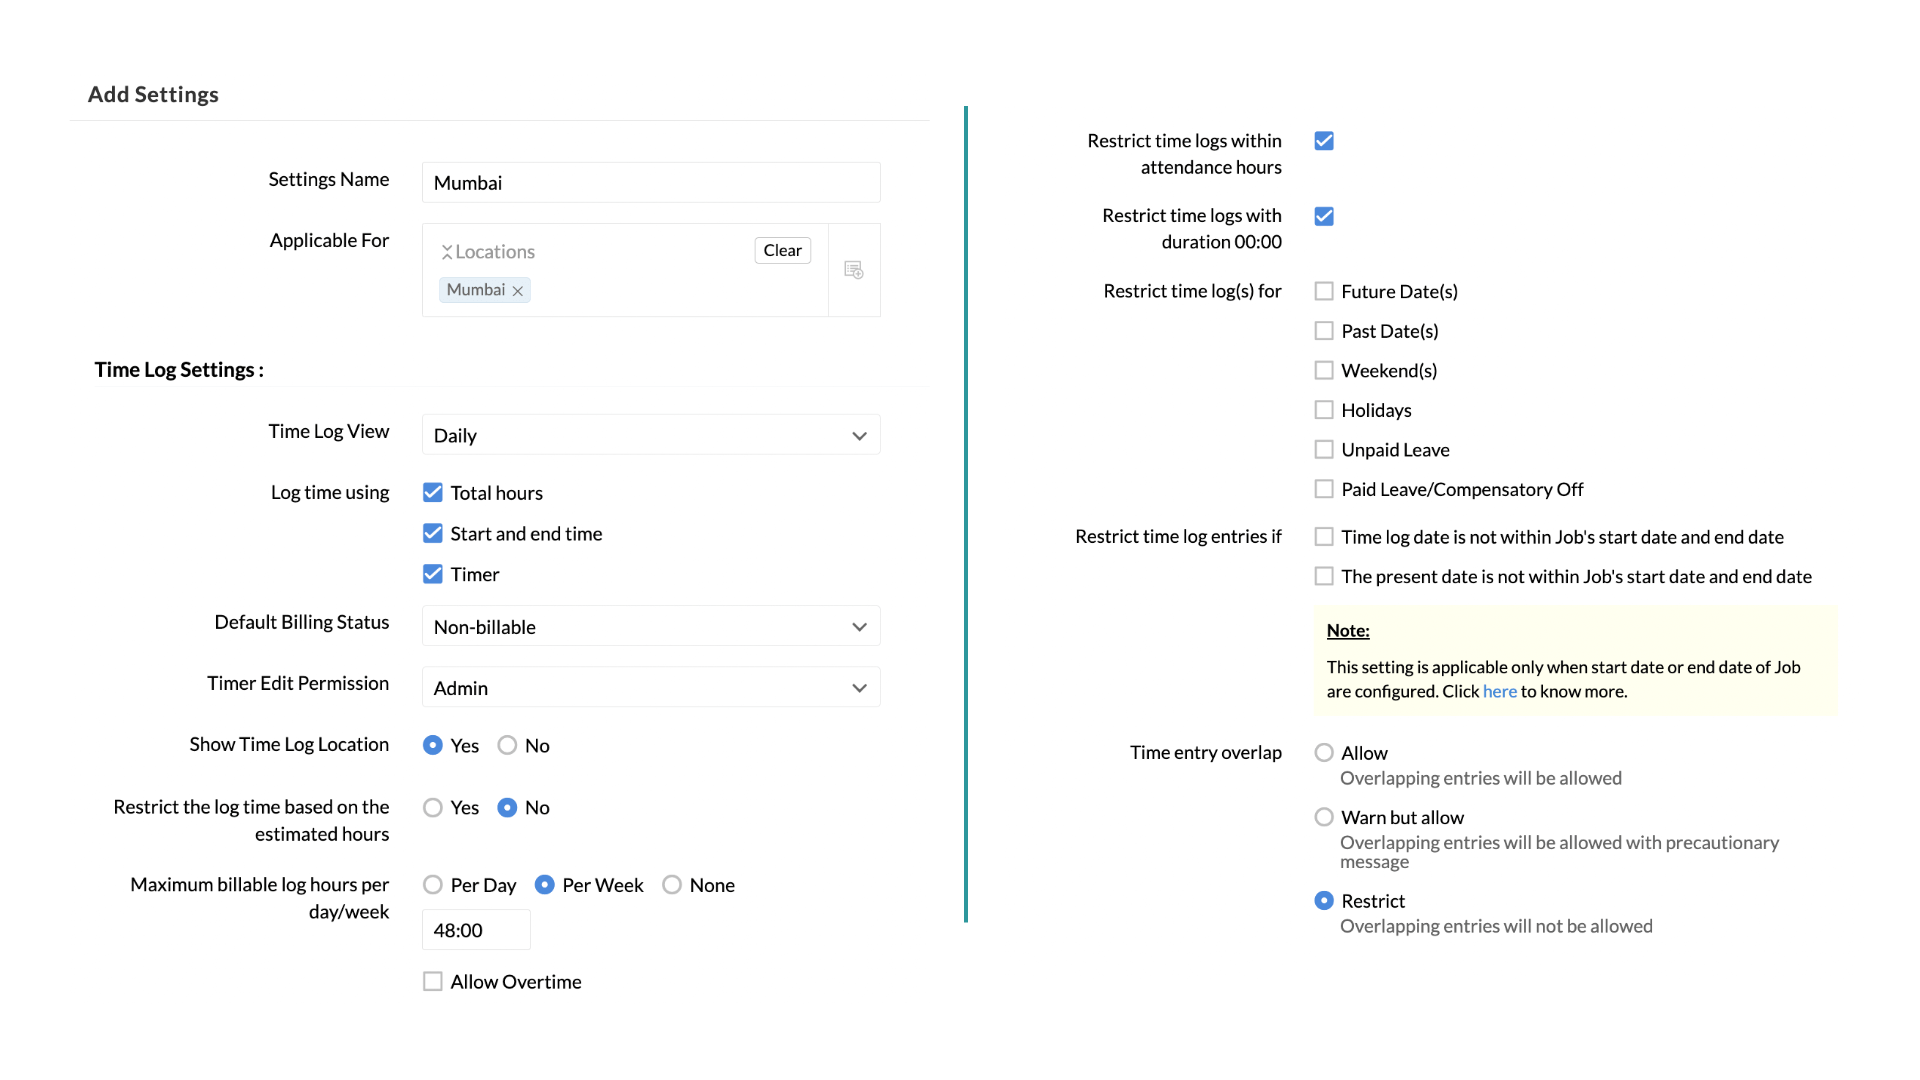
Specific Settings
Specific Settings lets you configure settings that are specific to particular users or locations. This comes to use when you would like to set permissions to certain users or locations alone, different from the rest of the organization.
To add settings,
- From your Home, go to Timesheet > Settings > Specific Settings > Add Settings.
- Provide a name for the settings that you would like to configure.
- Select the locations or users under Applicable For. The settings will be applicable to the users or locations selected here.
Follow the same steps as you do while configuring General Settings for Timesheet. The setting defined here will reflect only for the particular users or locations selected.
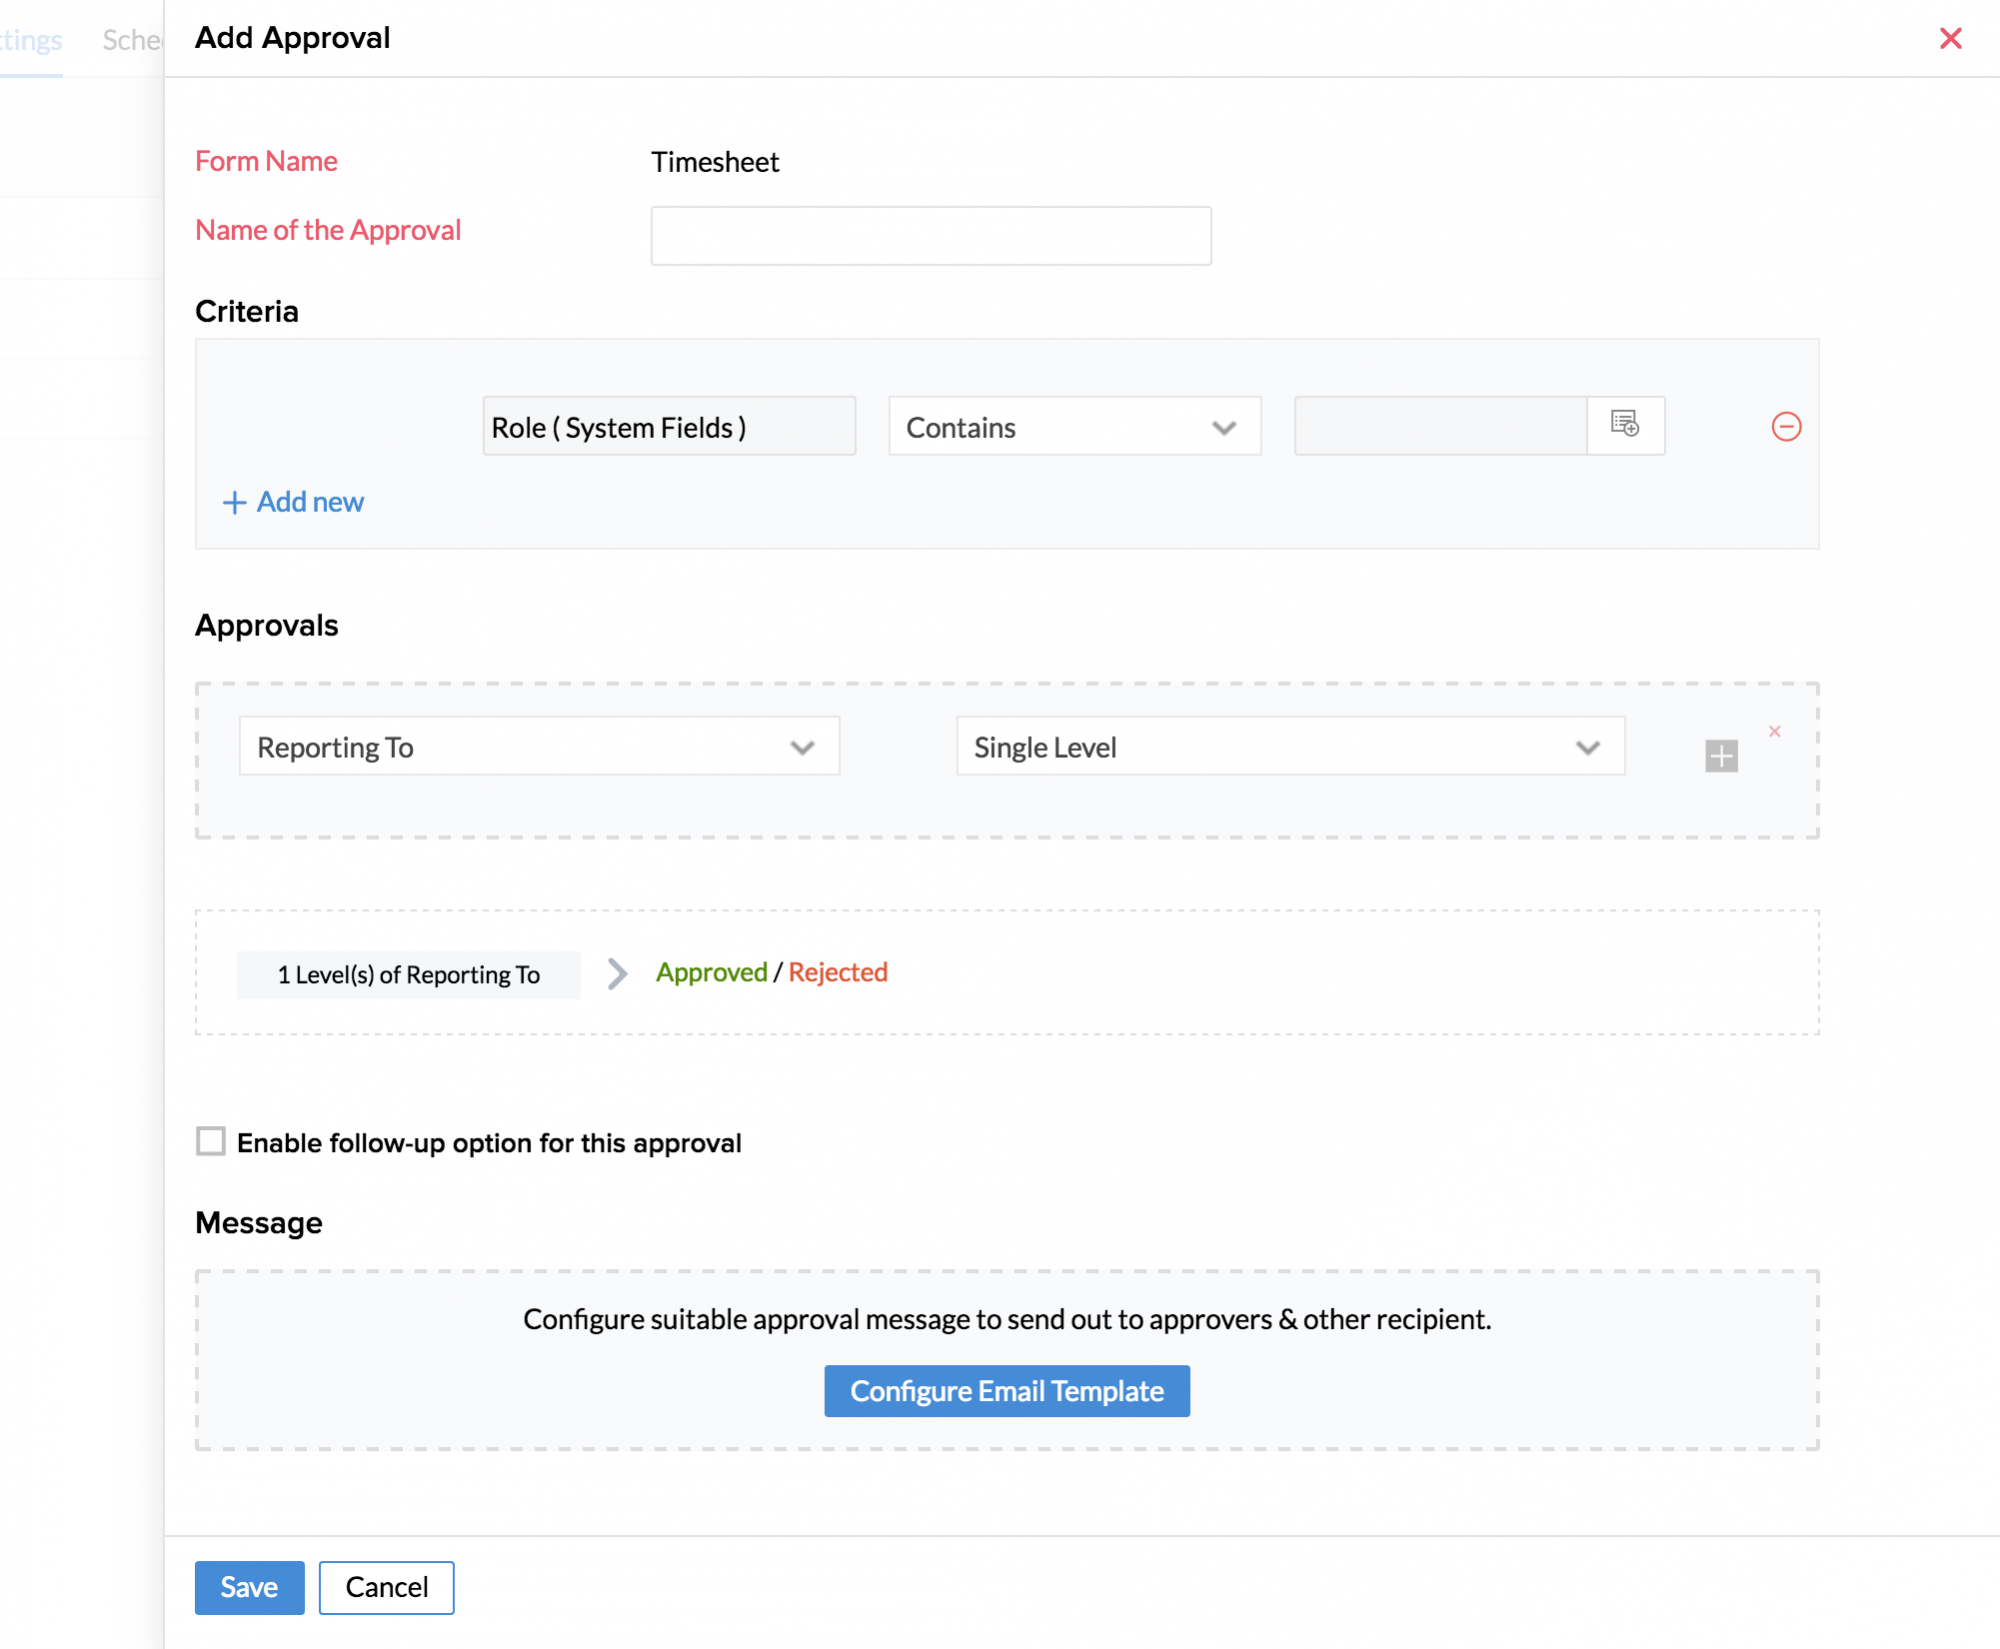
Approval Settings
- From your home page, go to Timesheet > Settings > Approvals Settings.
- Enter Name of the Approval and set criteria if needed.
Approvals
You can either configure approver or allow the system to auto approve or auto reject the record based on the criteria requirements.
Follow the steps given below to configure an approver:
- Click Configure Approver
In the first tab, there are various options like Reporting to, department lead, out of which, you can select one.
Note: Since Time Tracking is done for Projects, you also have the option to create approval based on the Project Manager. While choosing the Approver, you can select Project Manager from the drop down to have the timesheets approved only by the respective Project Manager.
There is also an option where an employee can select the approver while adding the record. Approvals can be set up to five levels of Reporting To.
Under message, there are system options for you to select. Based on your selection, the email will go to the respective person.
Approver - If you select this option, the email will go to the Approver who is configured.
Team mail id of the person performing this action - If you select this option, the follow-up email will be sent to the Team mail id of the person who submitted the approval request.
The person performing this action - If you select this option, the email will be sent to the person who sent the request for approval.
Reporting Manager of login user - If you select this option, the email will be sent to the reporting manager of the person who submitted the approval request.
Other than this, there are lists of Users, Roles, and Departments from which you can select the recipient of the email.
- Click Save once you are done
Note: In the absence of Approval configuration, the data that is shown under Time Logs(both List View and Calendar View) as well as in the Reports will be filtered based on the parameters chosen in the other filters. The Approval Status filter will remain passive since there is no Approval configuration done.
It is possible to disable the approvals that have been configured by making use of the enable/disable options for each Approval configuration under Settings > Approval Settings
As an approver of any Timesheet of your employees, you can view the list of Timesheets that have been sent for your approval under,
- Homepage > Timesheet > Timesheets > My Approvals
You can also approve or reject approvals at a time.To do this,
- From your home page, go to Timesheet > Timesheets > My Approvals.
- Select the timesheets that you would like to approve/reject and click Approve/Reject.
- Enter comments if any and select Approve or Reject.
Scheduler Settings
Sometimes, employees forget to submit their timesheets in spite of reminders.You can have an automated scheduler set to send timesheets for approval.
This scheduler will collate all the time logs for the specified period, create a timesheet and submit it for approval automatically at the selected time. If approvals are not configured, the timesheet will remain as a draft.
Let us look at how to configure schedulers for various scenarios.
Use case 1: Schedule timesheets of the current month to be sent for approval on the last day of every month at 6:00 pm.
Follow the configuration as shown in the screenshot below.

Select options under Applicable For based on the needs of your organization.
Use case 2 : Schedule timesheets of the previous week to be sent for approval on Monday of every week at 6:00 pm.
Follow the configuration as shown in the screenshot below.
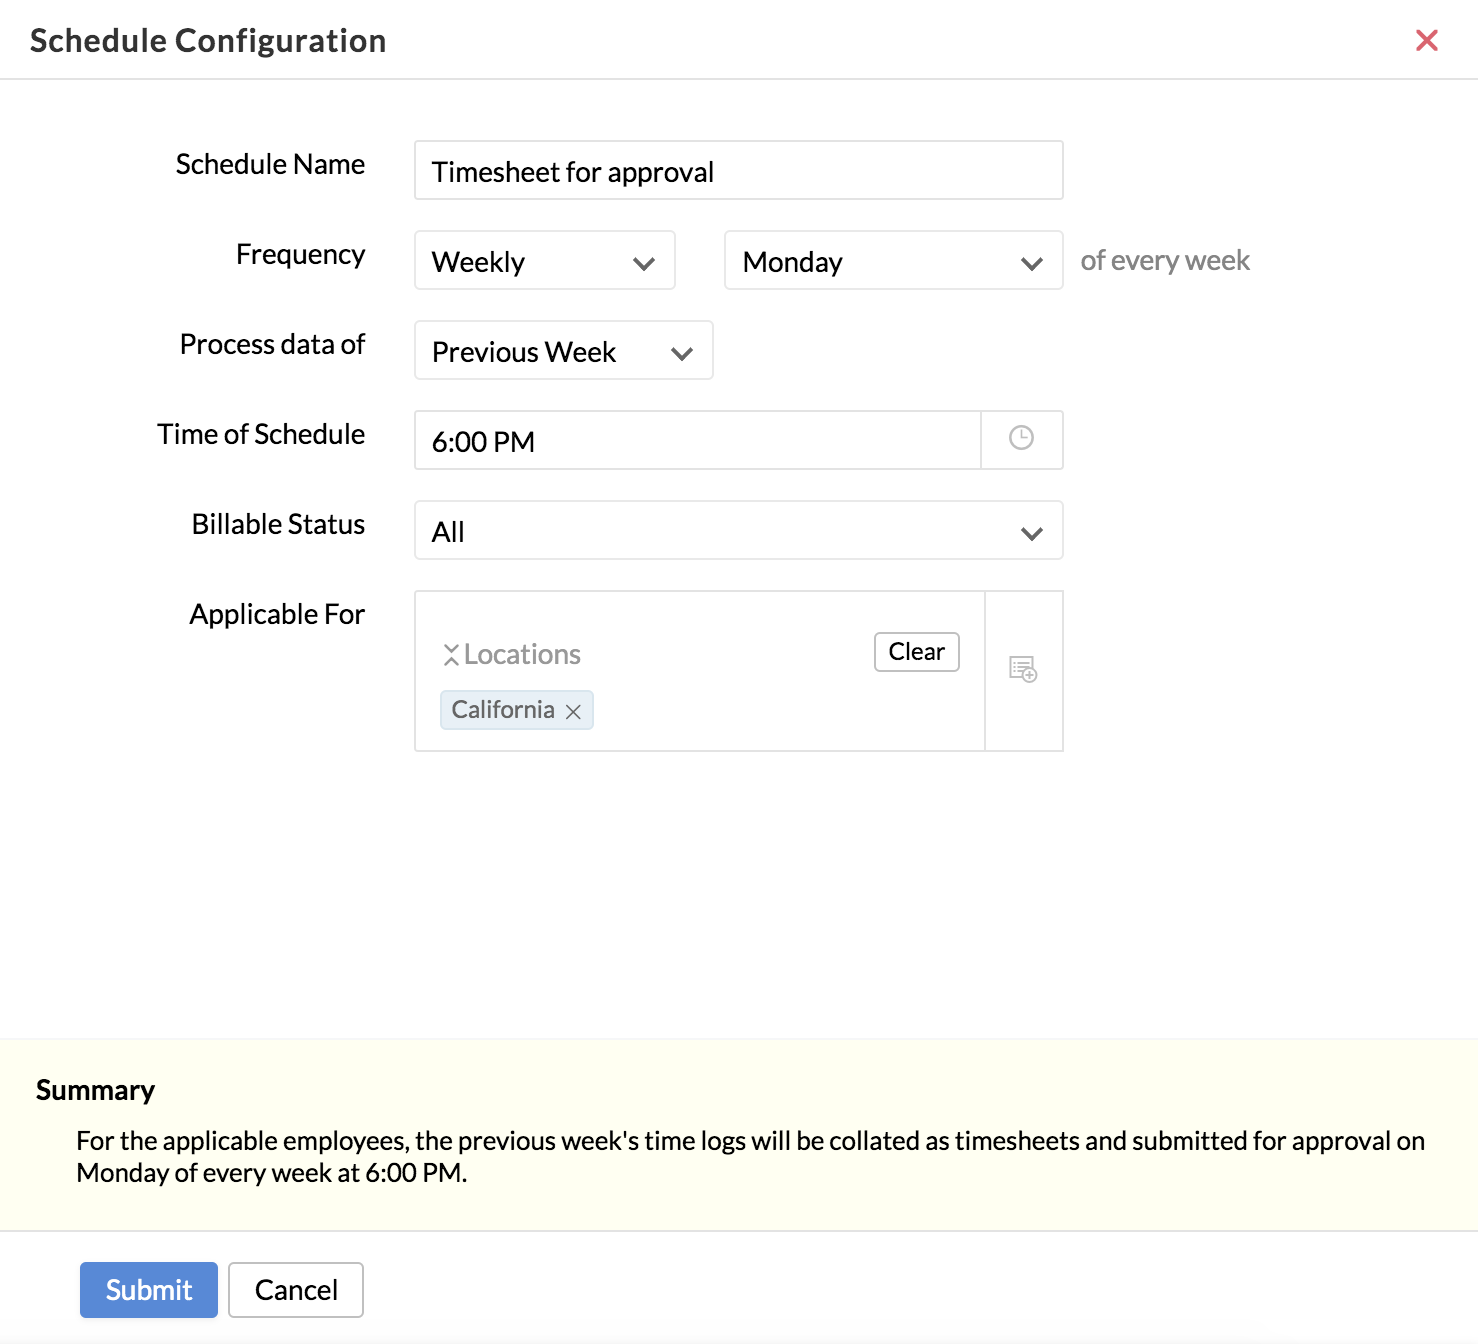
Select options under Applicable For based on the needs of your organization.
Note:
- Schedulers will be triggered based on the location time zones. For applicable employees who are not mapped to locations or mapped to locations without timezones, the scheduler will be triggered based on the company time zone.
- Options chosen under Applicable For (except Users) works with AND criteria. Users option works with OR criteria. For example if HR ( department), Manager ( Role) , and John (User) are selected, the scheduler will apply to all HR Managers or John.
Reminder Settings
You can have a reminder set at regular intervals to remind your employees to submit their time logs or timesheets.
Using the reminder settings, the following actions can be achieved:
- Remind employees when:
- They have not logged time
- They have logged less than a specified number of hours
- They have not submitted timesheets for approval
- They have submitted less than a specified number of hours for approval
- Set the Frequency of when the reminder is to go and for what day/period the employee needs to be reminded about.
- Reporting Managers can also be notified about their reportees.
- Configure applicability and exceptions in the Applicable For section (Applicable and Exceptions tab)
- Specific users can also be notified about all the applicable employees.
Let us look at various scenarios to configure reminder settings.
Use case 1: Reminder to be sent to employees and concerned reporting managers when employees have logged less than 8 hours.
Follow the configuration as shown in the screenshot below:
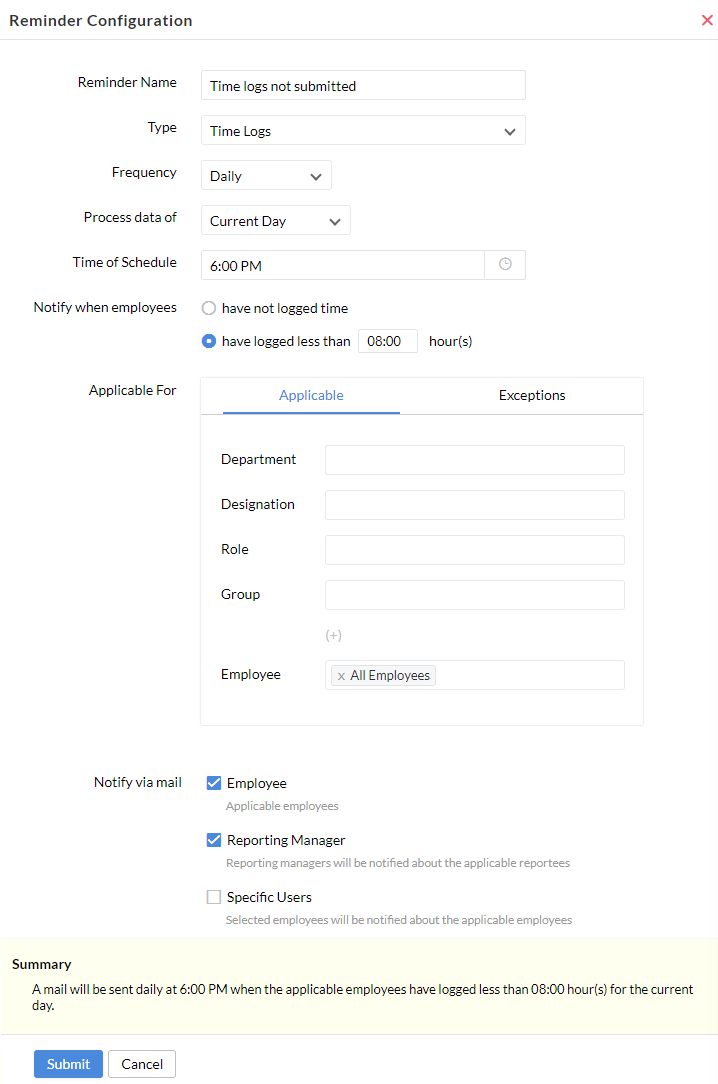
In this example, a reminder is sent at 6:00 PM everyday when users have logged less than 8:00 hours. It is applicable for all employees, and the notification is sent via email to the concerned employees and reporting managers.
Use case 2: Reminder to be sent on Friday of every week at 6 pm if employees have not submitted timesheets for approval from Wednesday of the previous week to Tuesday of current week.
Follow the configuration as shown in the screenshot below:
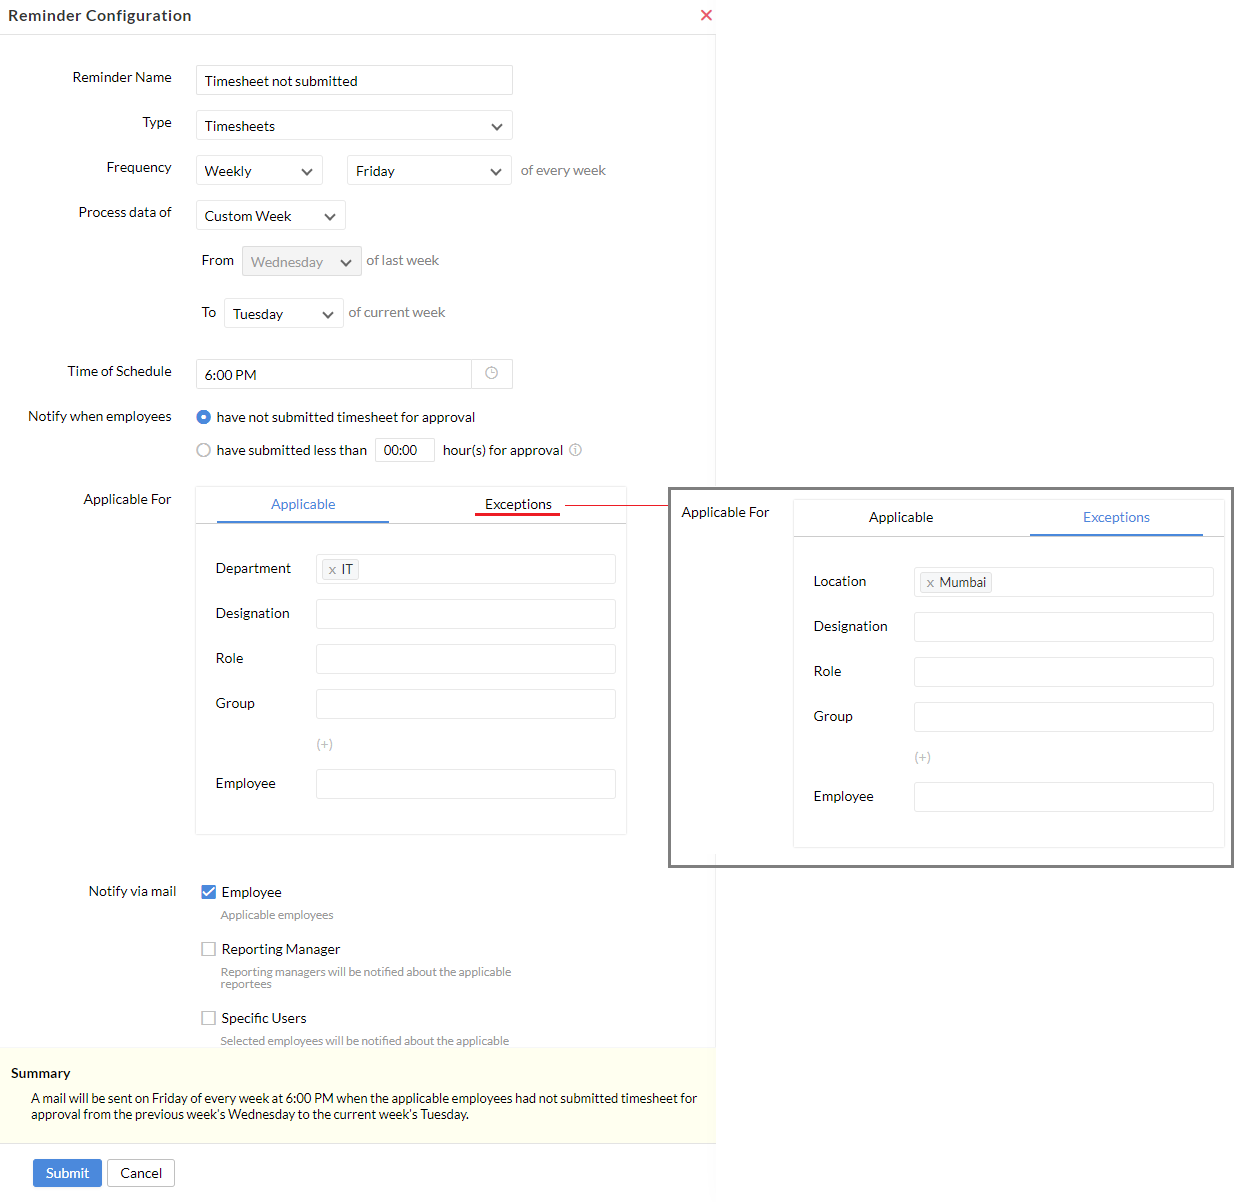
In this example, the employees are notified when timesheet is yet to be sent for approval, applicability is set for IT department staff in all locations except Mumbai.
Note:
- Schedulers will be triggered based on the location time zones. For applicable employees who are not mapped to locations or mapped to locations without timezones, the scheduler will be triggered based on the company time zone.
- Options chosen under Applicable For (except Employee) works with AND criteria. Employee option works with OR criteria. For example if HR (department), Manager ( Role) , and John (User) are selected, the scheduler will apply to all HR Managers or John.
Payroll Settings
- From your home page, go to Timesheet > Settings > Payroll Settings.
- Click 'Add Employee Rate'.
- Select the employee from the drop-down and enter the Rate per Hour.
- Similarly, enter the OT rate per hour and extended OT rate per hour.
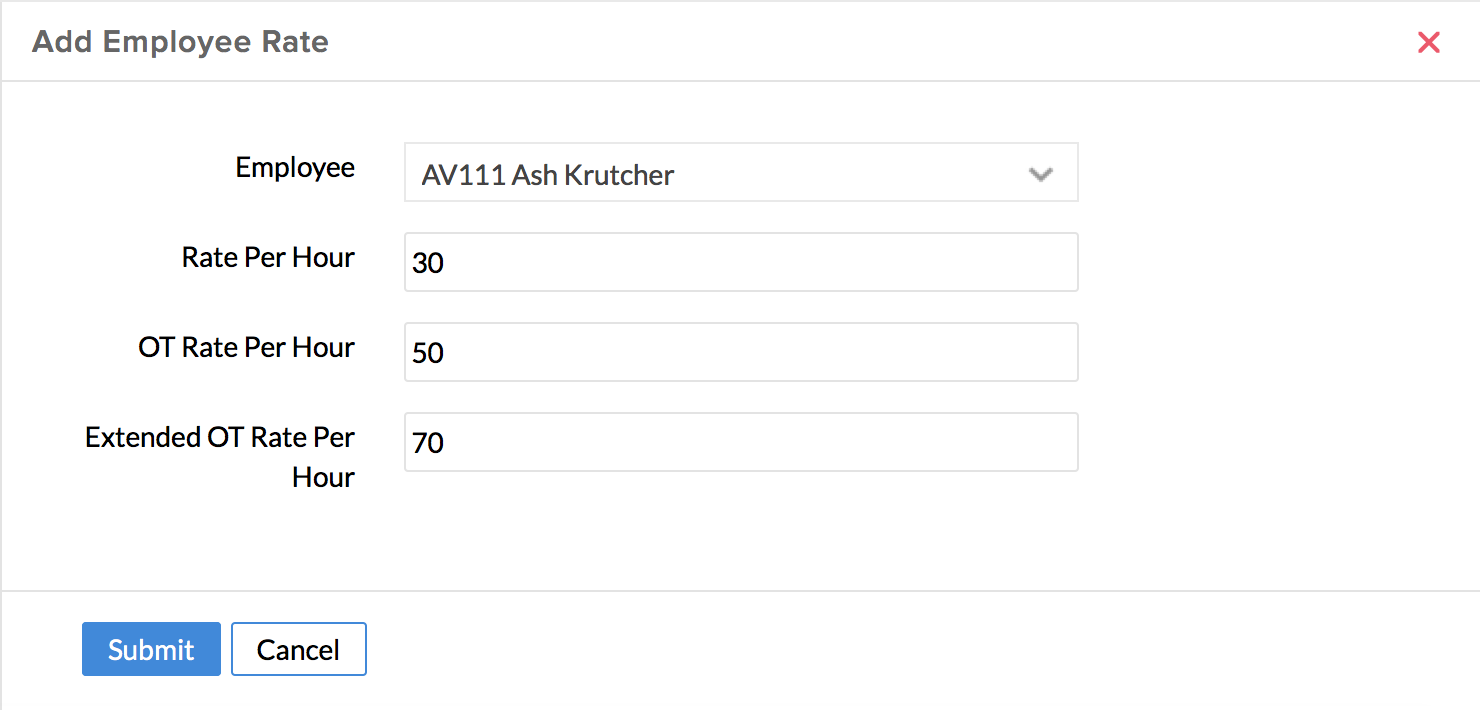
- Click Submit.
In this case, the rate that you would like to fix for the first 2 hours of OT should be specified under 'OT Rate per hour' and the rate that you are going to fix for the next 3hours should be entered under 'Extended OT Rate per hour'. Once this is done, the rates will be calculated as follows:
- Total OT rate = OT Rate per hour x OT hours mentioned in Settings
- Total Extended OT rate = Extended OT Rate per hour x Extended OT hours mentioned in Settings
Note: The currency for this rate will be based on the location of the employees if they are assigned to locations. Location-based currencies are added under Time Tracker > Settings > Billing Settings > Currency.
You can use the + icon to add more locations and assign currencies accordingly. In cases where the location is not defined, the rate per user will be applicable as per what is defined as the default currency of the organization.

- Click Submit
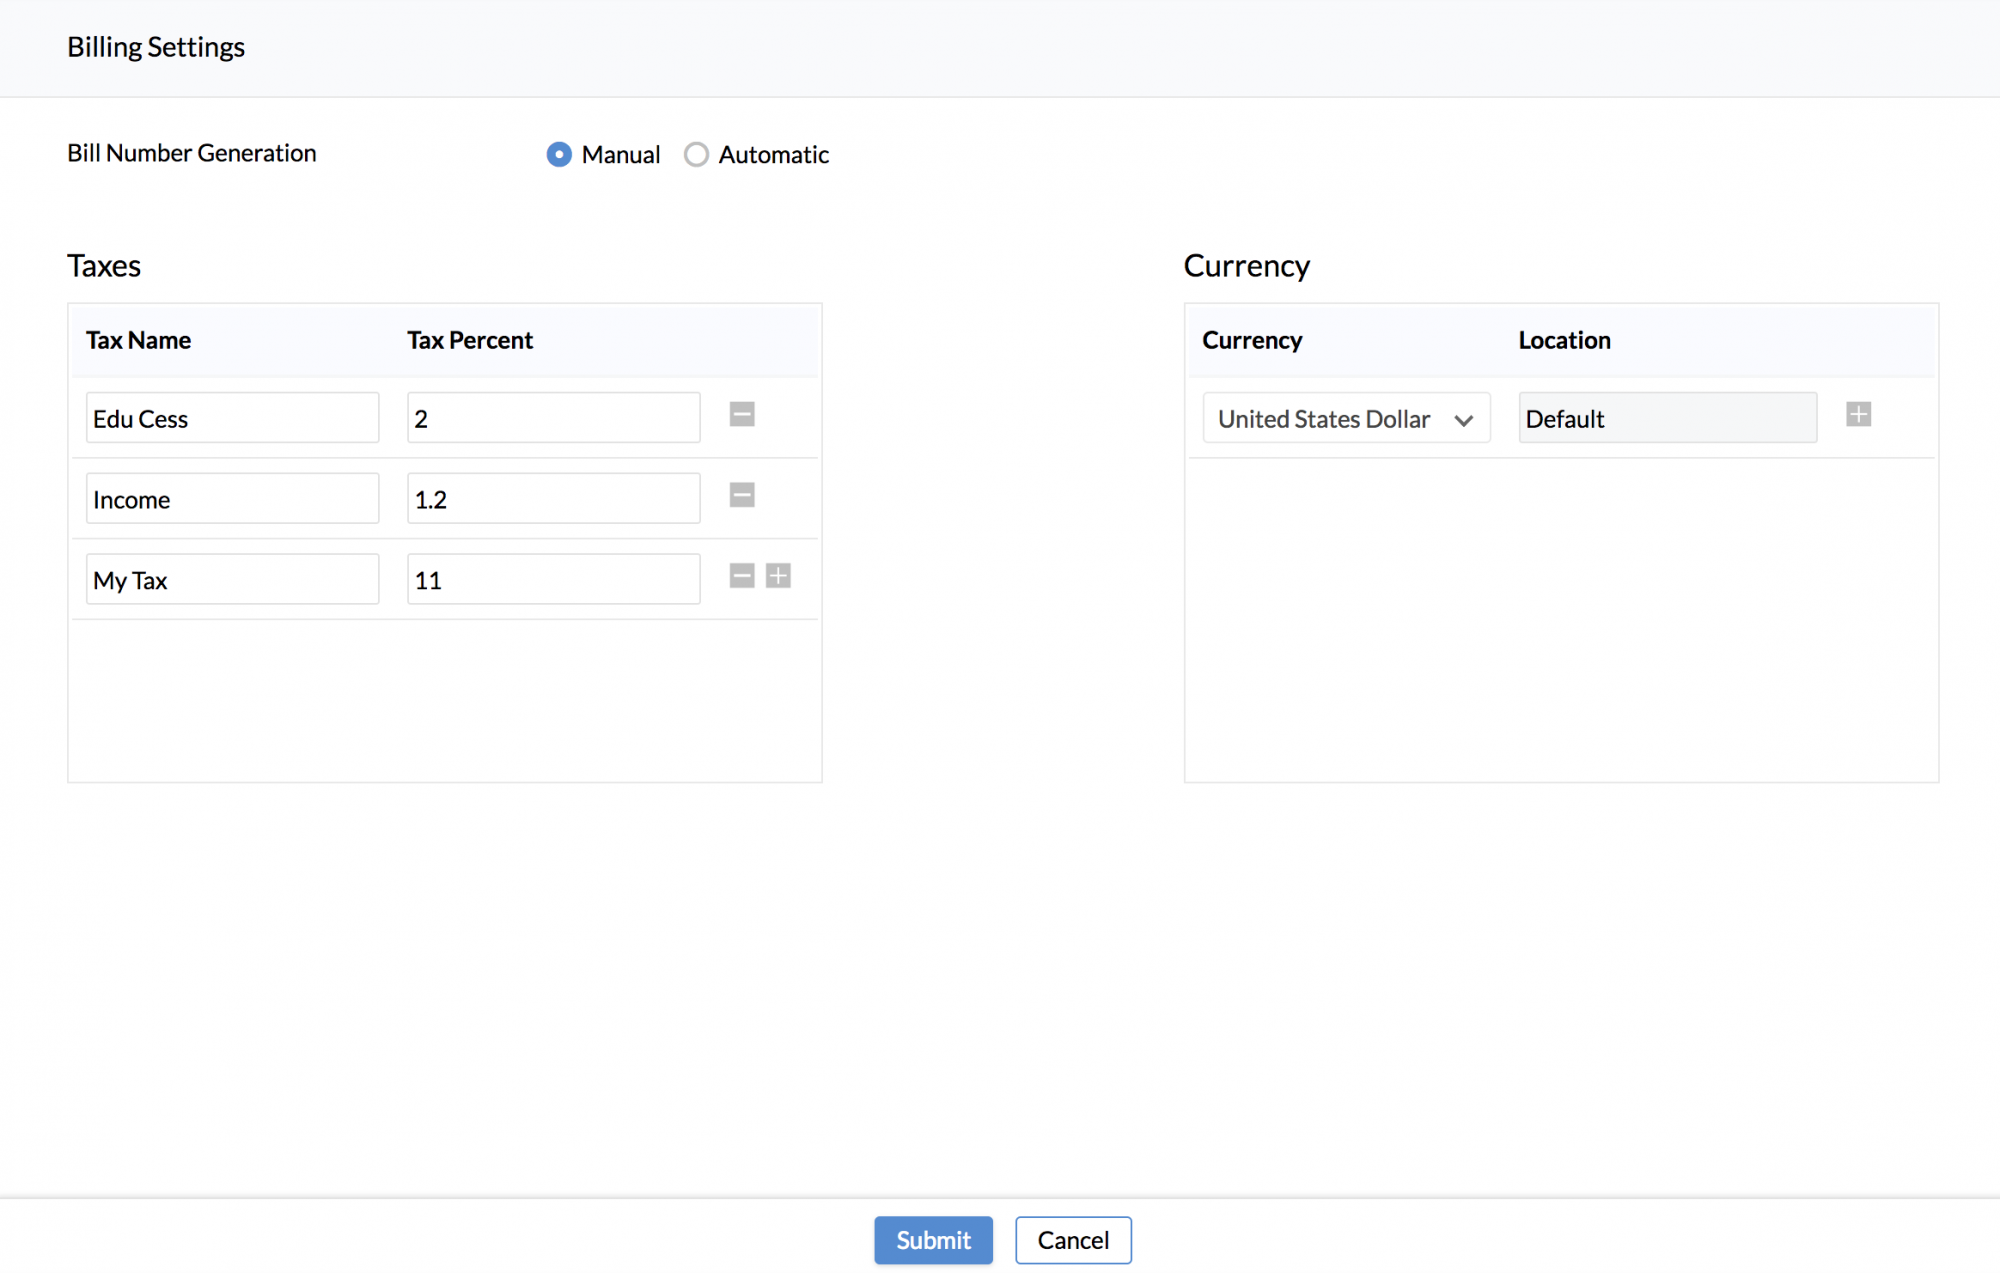
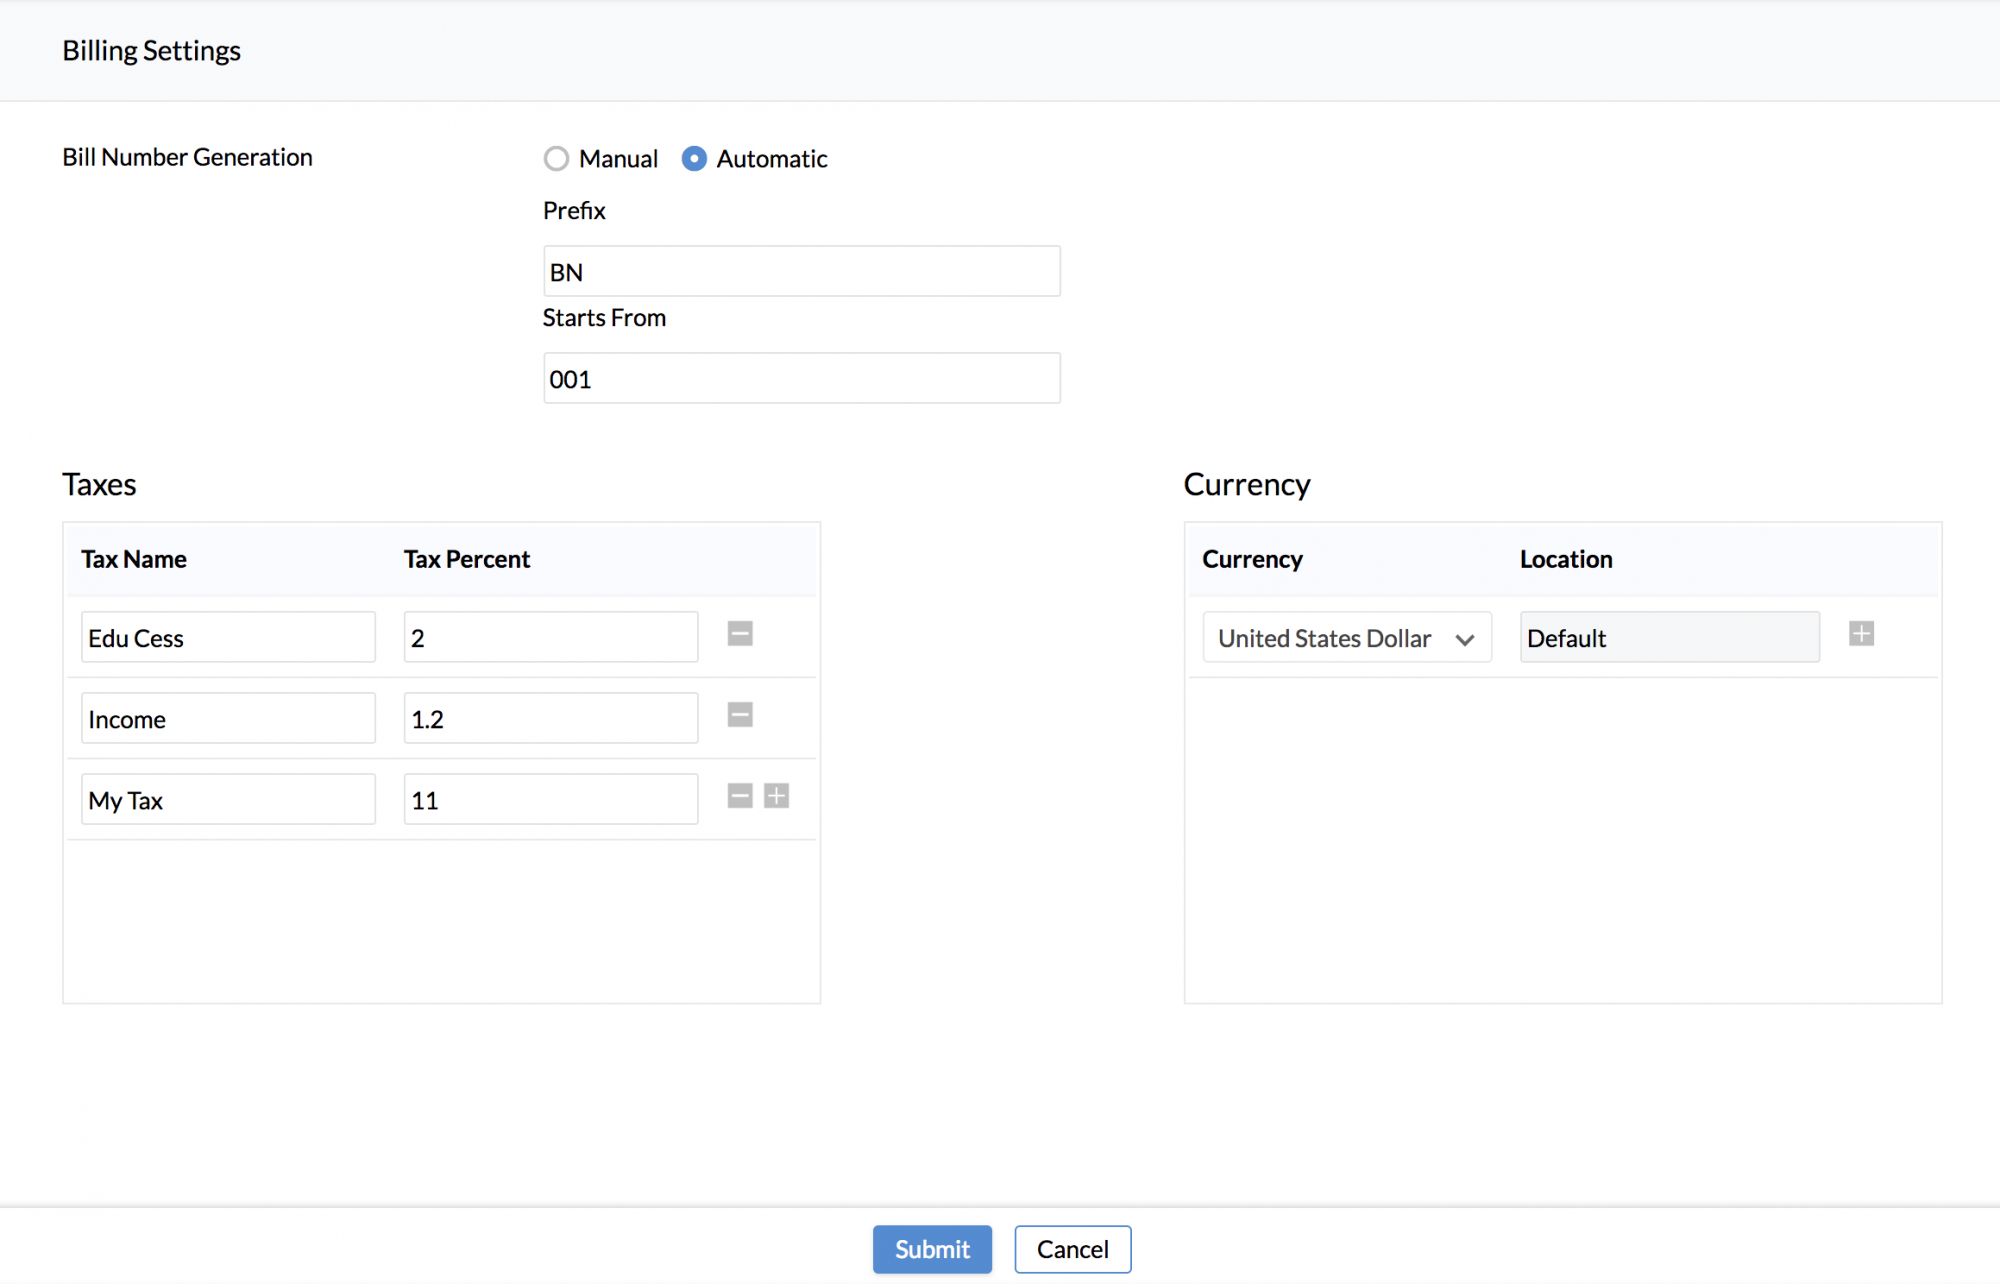
Billing Settings
Billing Settings lets you incorporate taxes into your bills, currency setting for your bill, numbering bills and more.
To have a currency set for your bills,
- From your home page, go to Timesheet > Settings > Billing Settings
- Click Edit settings
You will be able to edit the currency.
Note: If you have not chosen a currency while adding the Client, then, the currency that you select here (in Billing Settings) will be used to generate the bill for the Client.
- Click Submit
To incorporate taxes for the bills,
- From your home page, go to Timesheet > Settings
- Click the Billing Settings tab
- Click Edit settings
- Under Tax Name, give a name
- Under Tax Percent, define the percentage
- Click the + icon to add another row
- Click Submit.
![]() Tip: Click here to know more on Bill Generation in Zoho People
Tip: Click here to know more on Bill Generation in Zoho People
Pay Period Settings
Creating a pay period can help you define set timelines for your payroll to be processed and for the payroll report to be generated in the set periodicity.
Follow the steps given below to configure a pay period.
- From your home page, go to Timesheet > Settings > Pay Period Settings.
- Click + Configure Pay Period.
- Give pay period name and select the cycle.
- Give an end day for the pay period.
The start day will get populated automatically.
Note: The pay period will be dependant on the values you select here. For example, if you want to process payment for the month of July, with your pay period ending on the 25th of July, then you have to select 25 in the end day. This means that the salary processed will be from the 26th of the previous month until the 25th of the current month.
- Select the Payroll processing day - the LOP report and the Overtime report of the period will be processed on this day by 11:59 PM. Any modifications to the timesheet entries ( leave and attendance entries) will be locked at 11:59 PM if Lock is enabled.
- Select the Payroll report generation day - the payroll report under Leave will be generated on this day at 00:00 AM. LOP report of the period will be locked once the payroll report is generated.
- Enable Process leave encashment if you want leave encashment to be processed for the applicable employees.
- Enable Lock if needed.
- Under Applicable Location, select the location for which the pay period is applicable.
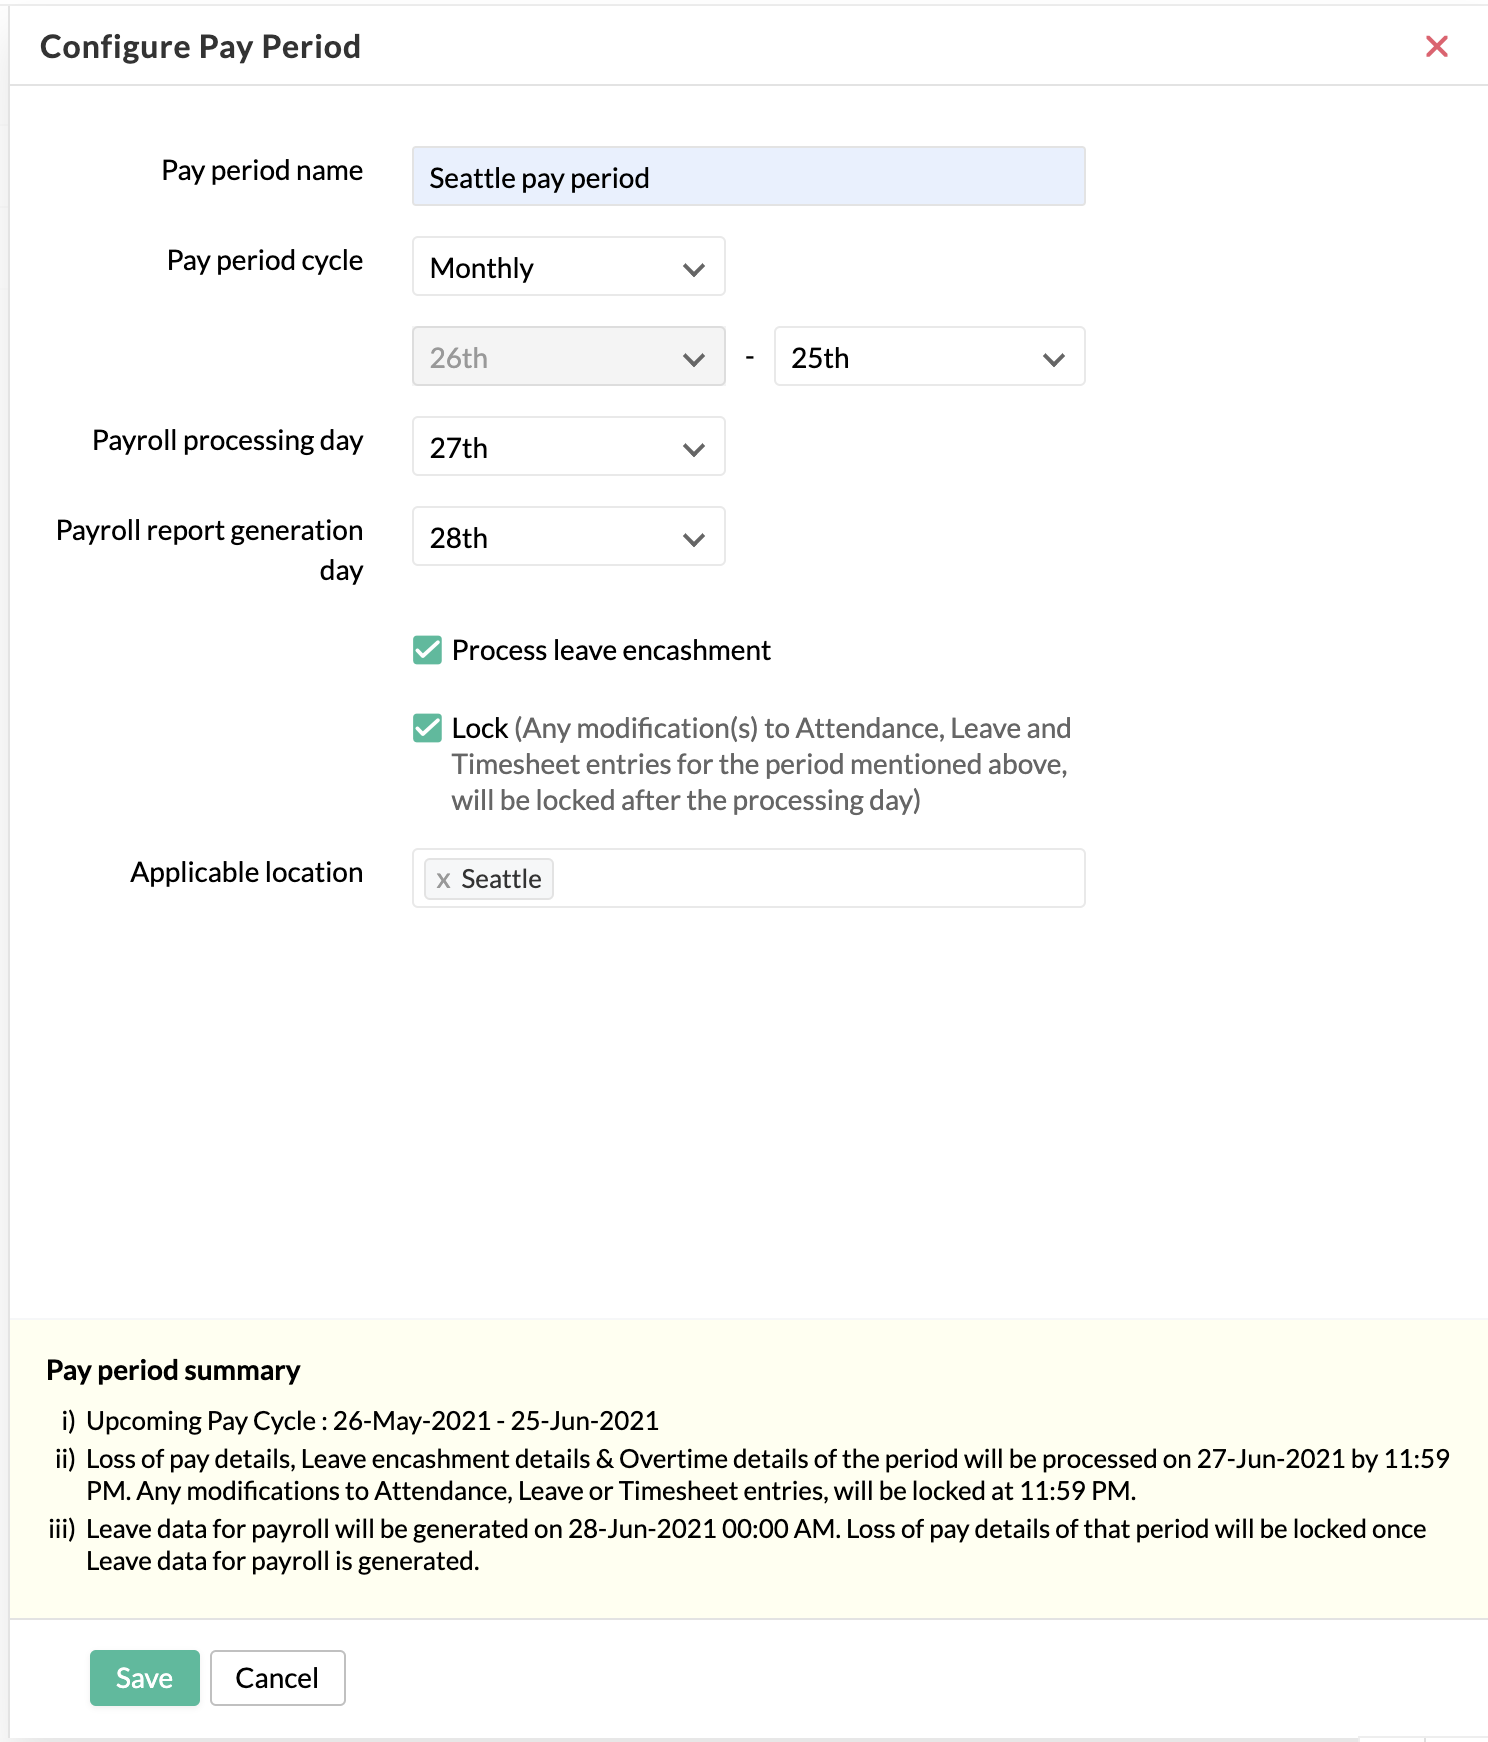
- Click Save
Note: Pay Period settings can be also configured under Attendance > Settings > Pay Period Settings and Leave > Settings> Pay Period Settings.