


Timesheets
Introduction:
Timesheets are an optimal way to measure the time taken by employees on Jobs. In Zoho People, you can create Jobs, Projects, and Clients and have employees/users log time for jobs done for the Projects of various Clients.
Creating Jobs:
Adding Jobs and logging time for them helps in keeping a track of work done by employees. Generally, jobs are associated with Projects which are in turn associated with Clients of the organization. Having said that, it is also possible to add a job without associating it with a Project. Given below are the steps to add a job.
- From your home page, go to Timesheet > Projects/Jobs > Jobs

- Click Add Job
- Enter the Job name
- Select a Project if required.
 Tip: Click here to know how to add a Project
 - Give a start date and end date for the job
- Under Assignees, select the assignees for the particular job
- Enter the hours for the assignee in the 'Hours' that appears against the assignee. Likewise, enter the estimated hour for each assignee against the names
- Under Hours, you will be able to see the total number of hours getting populated automatically
Note: This Hours is the sum of the individual estimated hours that you have given for each employee. Hence, it is important to know that Hours here, refers to the total number of estimated hours to complete this job.

- Give a Rate per hour and Description if needed
- Attach any files that you would like to add pertaining to the job. You can either add a file from your desktop or from the Cloud.
Note: The list of supported services are given below.
- Zoho Docs
- GDrive
- Dropbox
- One Drive
- Box
- Evernote
- Check the Reminder box, if you would like a reminder to be set for the job
Note: When you check the Reminder box, you will have an email automatically sent to you due to the workflows that are configured. You can see this workflow under Setup (gear icon) > Automation > Workflows under the name 'Job Reminder'.
![]() Tip : You have to ensure that the status of this workflow is enabled.
Tip : You have to ensure that the status of this workflow is enabled.

- Under Billable status, select Billable or Non-Billable depending on the nature of the job
- Click Submit
You have now created a job and you can see it when you click Timesheet > Projects/Jobs > Jobs.
![]() You can also add job while you log time. Click here to know more.
You can also add job while you log time. Click here to know more.
Adding Projects:
Projects are assignments that employees work on. Follow the steps given below to create a Project.
- From your home page, go to Timesheets > Projects/Jobs > Projects

- Click Add Project
- Enter Project name
- Select Client name from the drop down
![]() Tip: Click here to know how to add a Client
Tip: Click here to know how to add a Client

- Click Choose from CRM if you would like to pick a client from your list of clients in CRM
- If you are picking a client from CRM, select from the options like Lead, Accounts, Contact, and Potential
![]() There is an option to Add a CRM client directly here. Click Add, Enter the details and click Submit. The CRM client that you have added here will get pushed to CRM automatically.
There is an option to Add a CRM client directly here. Click Add, Enter the details and click Submit. The CRM client that you have added here will get pushed to CRM automatically.
- Enter other details as required

- Click Submit
![]() You can add a Project while logging time. Click on the 'Add Project' option in the Select Project drop down when you log time (Timesheet > Time Logs), enter the required detail and have the Project added.
You can add a Project while logging time. Click on the 'Add Project' option in the Select Project drop down when you log time (Timesheet > Time Logs), enter the required detail and have the Project added.
Adding Clients and Importing Clients from CRM:
If an organization wants to track time for work done for their clients, Timesheet is the best option. In Timesheet, Jobs are done for Projects which are associated with Clients. So, getting Clients added into the system is very important. Follow the steps given below to add a Client to your system.
- From your home page, go to Timesheet > Projects/Jobs > Clients

- Click Add Client
- Enter values for the mandatory fields like Client Name, Currency etc
Note: If there are bills to be generated for a particular client, the currency that is defined here will be used. Click here to know how to generate a bill.
- Under Billing Method, select Hourly Job Rate or Hourly User Rate
Note:
- The bill will be generated depending on the option that you choose here. If you select Hourly Job Rate, then the bill will be generated based on the Rate per hour that you define when you create Job (Timesheet > Project/Jobs > Add Job > Rate Per Hour).
- If you select Hourly User Rate here, then the bill will be generated based on the Rate you define for the user which you have defined under Payroll settings (Timesheet > Settings > Payroll Settings > Add user Rate)

- Click Submit
The client is now created on your system and Projects can be associated to this client.
If you have a Zoho CRM account, you can also import CRM clients into Zoho People. Follow the steps given below.
- From your home page, go to Timesheet > Projects/Jobs
- Click on the ellipsis icon at the right corner of the page and click on Import from CRM


- In the drop-down, make a selection from the options, Lead, Account, Contact, and Potential
- Select the customer names and click Submit
Your CRM clients are now imported into your Zoho People account.
Time Logging:
1. Using 'Log Time' option
- From your Home page, go to Time Logs > Log Time

- Enter other details as required
- Select Job Name.
![]() You can also add a new job here by clicking Add Jobs.
You can also add a new job here by clicking Add Jobs.
- Select the date as required
- Under Hours, you can either select Hours and enter the number of hours or select Start & End and enter the time there
- Click Save

2. The next method of logging time manually is by entering time in the Daily, Weekly and Monthly time logs.
![]() Tip: Click here to know how to use Daily, Weekly, and Monthly logs.
Tip: Click here to know how to use Daily, Weekly, and Monthly logs.
3. The third method of logging time manually is by Importing time logs.

![]() Tip: Click here to know how to import logs.
Tip: Click here to know how to import logs.
Automatic method Using Timer:
Timers can also be used to log time. You can use the Timer in two ways.
1. Given below are the steps for the first method.
- From your home page, go to Timesheet > Time Logs
- Select the Job for which you need to log time
- Enter other details as required
- Click on the Timer to start recording time
- Click Save

You can also pause the timer and resume it when you continue work on the same job.
2. The second method of using Timers is explained below.
- From your home page, go to Timesheet > TIme Logs
- Click on Log Time
- Select details as required
- Click Start Timer
- Click Save
Time logging will get started for this job and you can see the Timer running in the List View.
Note for Timer:
- You can add notes while the Timer is running by clicking on the Notes icon. This cannot be done after the Timer is stopped.
- You can use the Timer only when you log time for the current date. Similarly, you can resume or pause the timer only for the current day.
Logging time using Timer can also be done from the Calendar View. Click here to know how.
Note for Time Logging:
- Though there are two methods to log time, the method of logging depends on the Settings configured under Timesheet > Settings > General Settings > Time Log Type. Time Logging can be done only based on the option chosen here.
- The Billing Status of the job depends on the status chosen under Timesheet > General Settings > Default Billing Status
Timesheets:
A time sheet is a collection of one more time logs. As a first step to create a timesheet, you need to have time logs created.
The image given below shows the steps involved in having a timesheet created.
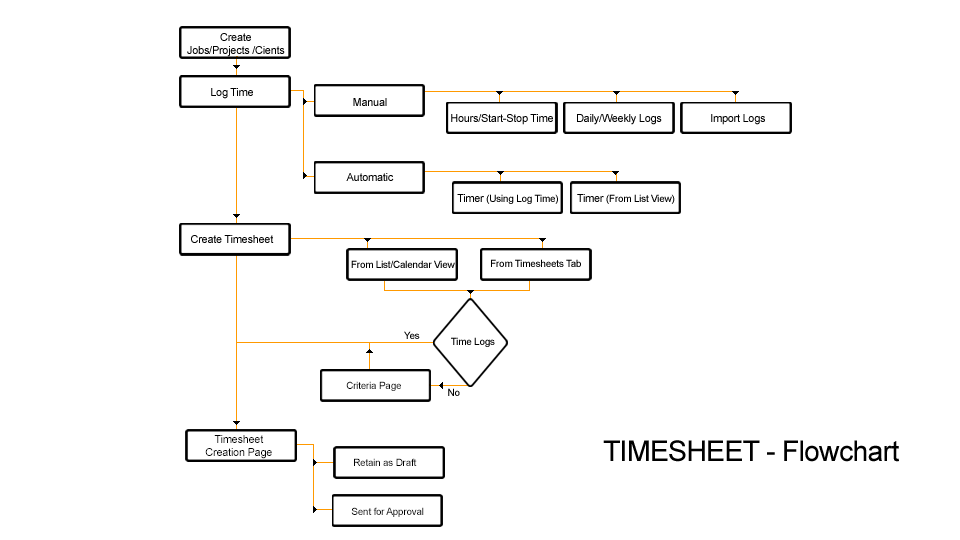
There are two ways in which you can create a timesheet. Given below are the steps to submit a timesheet.
1. In the List View and Calendar View of your Time Tracker, at the right bottom corner, you will be able to see an icon which says 'Not Submitted'. This has the list of time logs that are not submitted for approval. When you click on this, you will be able to see the timesheet creation page. If you go from the list view page, your timesheet creation page will display the logs of the current day or current week as per what you have define in the Settings page (Timesheet > Settings > General Settings > Time Log Settings > Time Log view).
If you go from the Calendar View page, your timesheet will display the logs of the entire month.
2. You can also choose to create timesheet by clicking on Timesheet > Timesheets > Create Timesheet
All timelogs created in the current week or month (according to the option chosen in the configuration page) will get displayed.
Note: If there are no time logs for the period (current day or month), then you will be taken to the criteria page before the timesheet creation page. Here, you will be able to choose the period for which there are time logs available for timesheet creation.
Once you have collated all the time logs, click Submit
Your timesheet will be displayed under Timesheet > Timesheets > My Timesheets.
If approvals are configured, then the timesheets will go to the approver. Otherwise, you can see the timesheet with the status 'Draft' under My timesheets. Even if there are approvals configured, you can choose to keep your timesheets in 'Draft' until the time you want to submit them. To do this, you need to uncheck the box 'Send for Approval'.
Note: The rate that is used in the timesheet is based on the rate per hour defined for the particular user.
![]() Tip: Click here to know how to define the rate per hour for a user.
Tip: Click here to know how to define the rate per hour for a user.
You also have another option where you can schedule timesheets to go for approvals automatically.
- From your home page, go to Timesheet > Settings > Scheduler settings
- Enter the details
- Under Applicable for, make the selection as required from the drop down options available
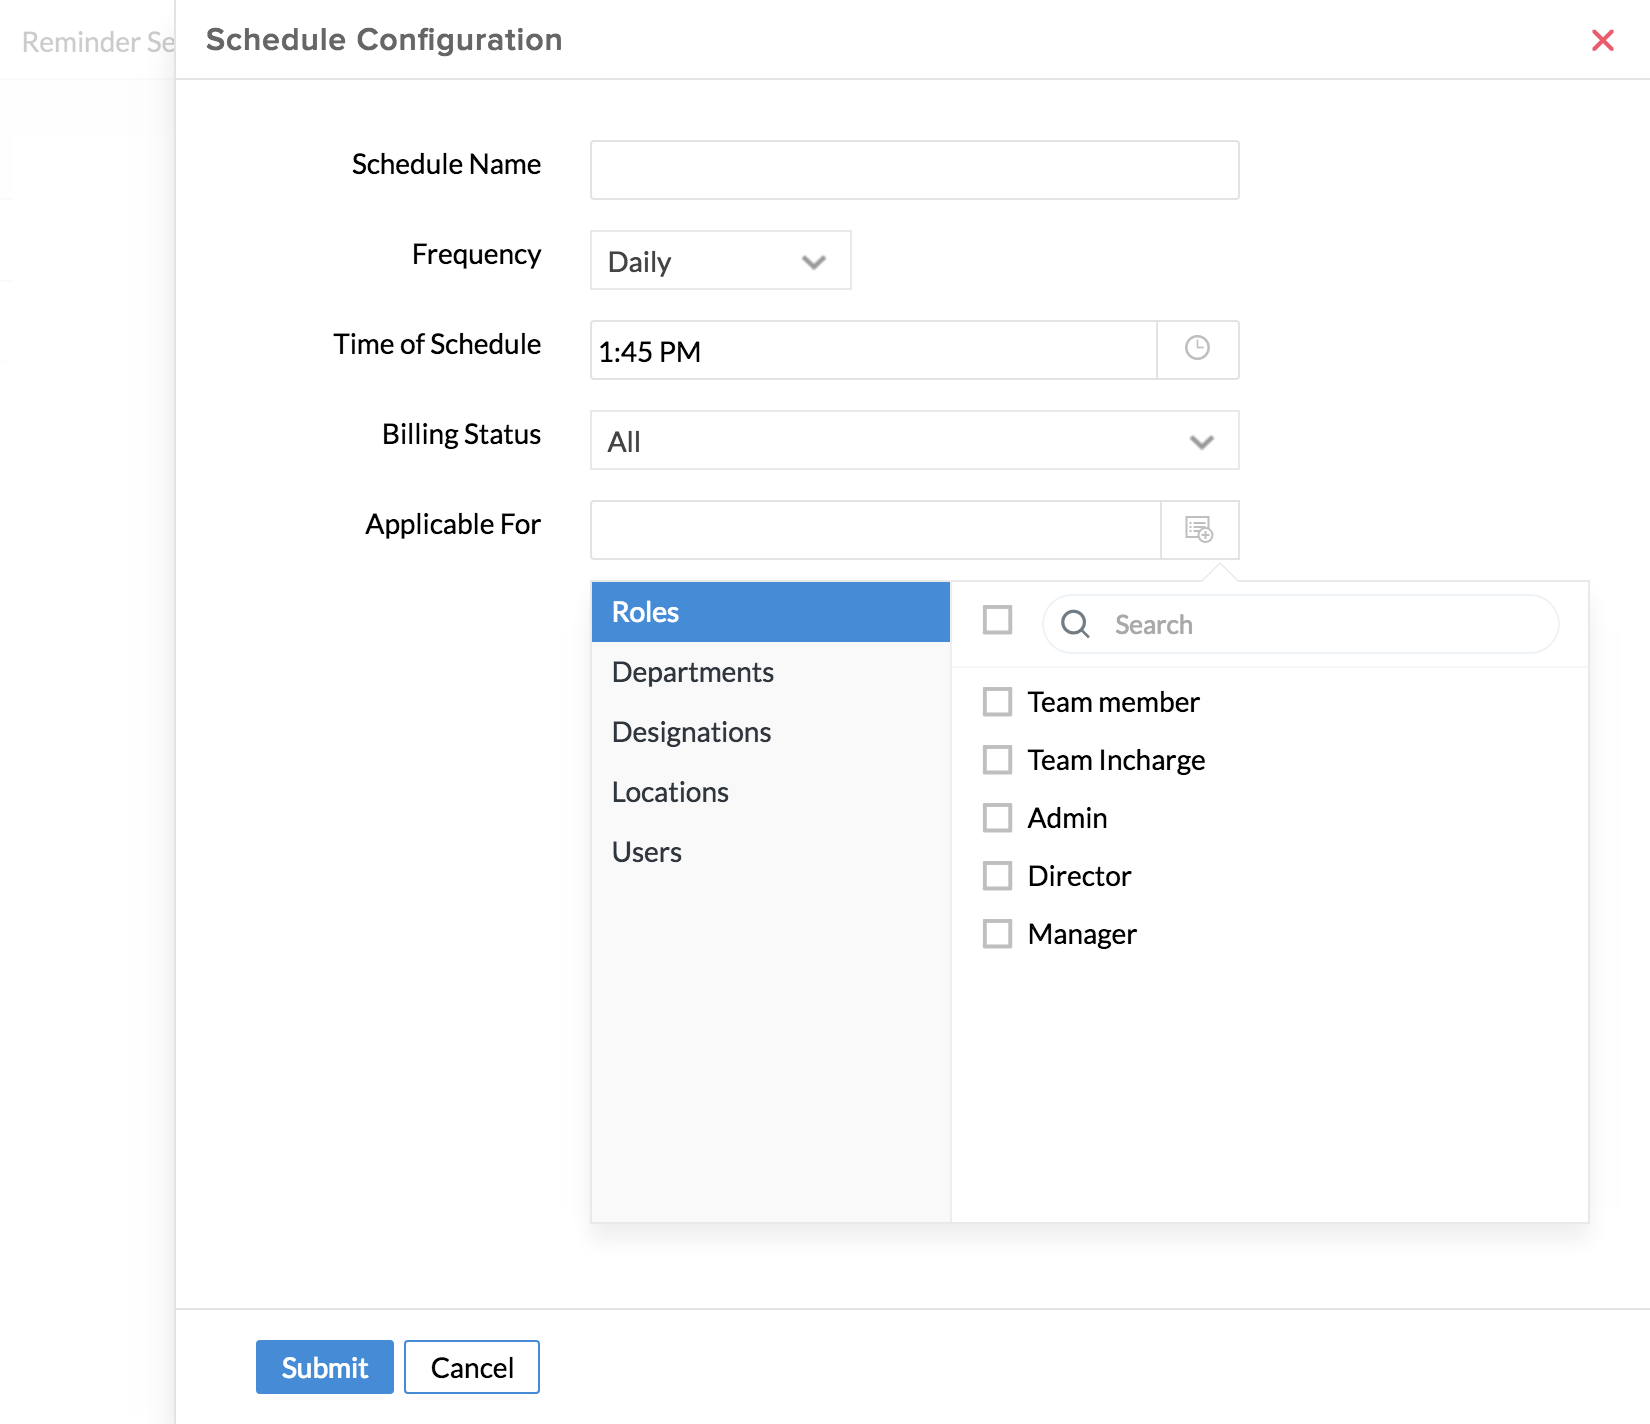
- Click Submit
The timesheets will go for approval automatically at the time chosen in the scheduler. If Approvals are not configured, the Timesheets will remain in Draft.
Take a look at this webinar which shows you how to create a Timesheet on Zoho People.
Geo Tracking:
Geo tracking is done for the time logs thereby helping you see the location from where time tracking is done. To view location, follow the steps given below.
- From your home page, go to Timesheet > Time Logs
- The location icon next to the hours column of the time log, gives you the location from where time logging has been done
Note: For time logs that are done using timers, click on the hours of the time log to see the location/list of locations from where the timer has been run.
Approvals:
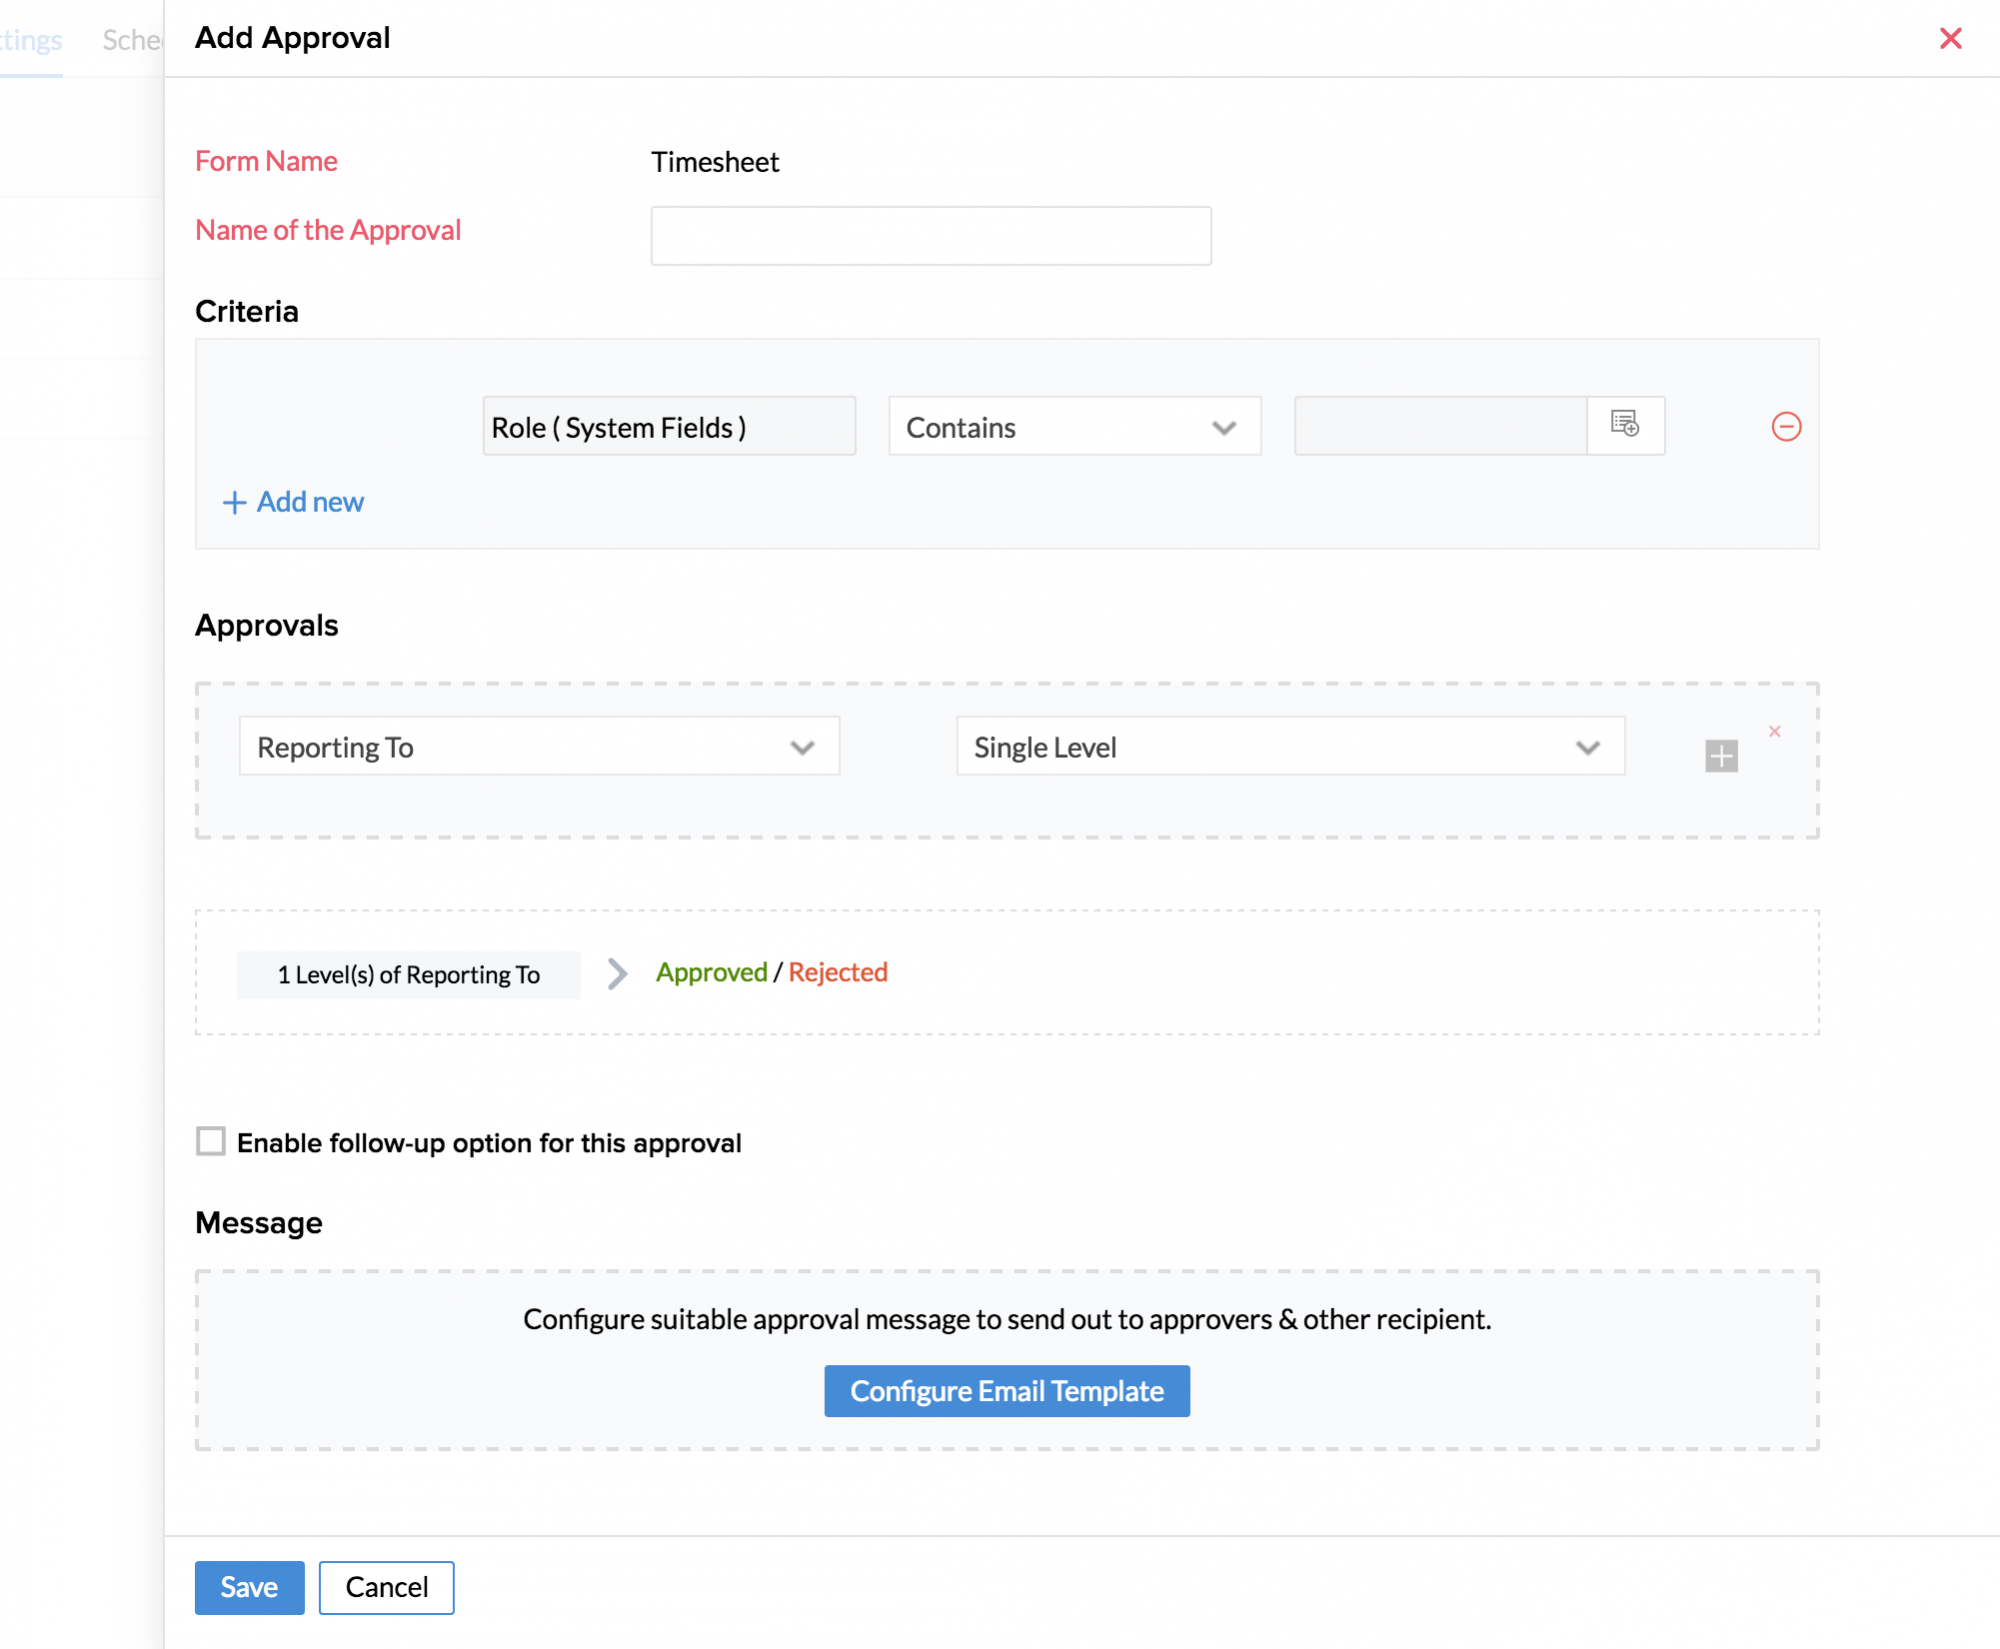
- From your home page, go to Timesheet > Settings > Approvals Settings
- Enter Name of the Approval and set criteria if needed
Approvals
You can either configure approver or allow the system to auto approve or auto reject the record based on the criteria requirements.
Follow the steps given below to configure an approver:
- Click Configure Approver
In the first tab, there are various options like Reporting to, department lead, out of which, you can select one.
Note: Since Time Tracking is done for Projects, you also have the option to create approval based on the Project Manager. While choosing the Approver, you can select Project Manager from the drop down to have the timesheets approved only by the respective Project Manager.
There is also an option where an employee can select the approver while adding the record. Approvals can be set up to five levels of Reporting To.
Under message, there are system options for you to select. Based on your selection, the email will go to the respective person.
Approver - If you select this option, the email will go to the Approver who is configured.
Team mail id of the person performing this action - If you select this option, the follow-up email will be sent to the Team mail id of the person who submitted the approval request.
Person performing this action - If you select this option, the email will be sent to the person who sent the request for approval.
Reporting Manager of login user - If you select this option, the email will be sent to the reporting manager of the person who submitted the approval request.
Other than this, there are lists of Users, Roles, and Departments from which you can select the recipient of the email.
- Click Save once you are done
Note: In the absence of Approval configuration, the data that is shown under Time Logs(both List View and Calendar View) as well as in the Reports will be filtered based on the parameters chosen in the other filters. The Approval Status filter will remain passive since there is no Approval configuration done.
It is possible to disable the approvals that have been configured by making use of the enable/disable options for each Approval configuration under Settings > Approval Settings
Once Timesheets are approved, you can have bills generated for Clients. These bills can be sent to Zoho Books and Zoho Invoice for Invoice generation. You can also send the bills to QuickBooks and have Invoices generated. The approved time logs can be pushed to QuickBooks and from there you can proceed to payment transactions.