Employee Exit
If an employee exits from your organisation, whether it is due to termination by the employer, resignation, death, or due to some disabilities, you’ll have to Initiate Exit Process for that employee in Zoho Payroll.
Note: It is recommended that you collect the POI (Proof Of investments) before you initiate the exit process.
To initiate exit process:
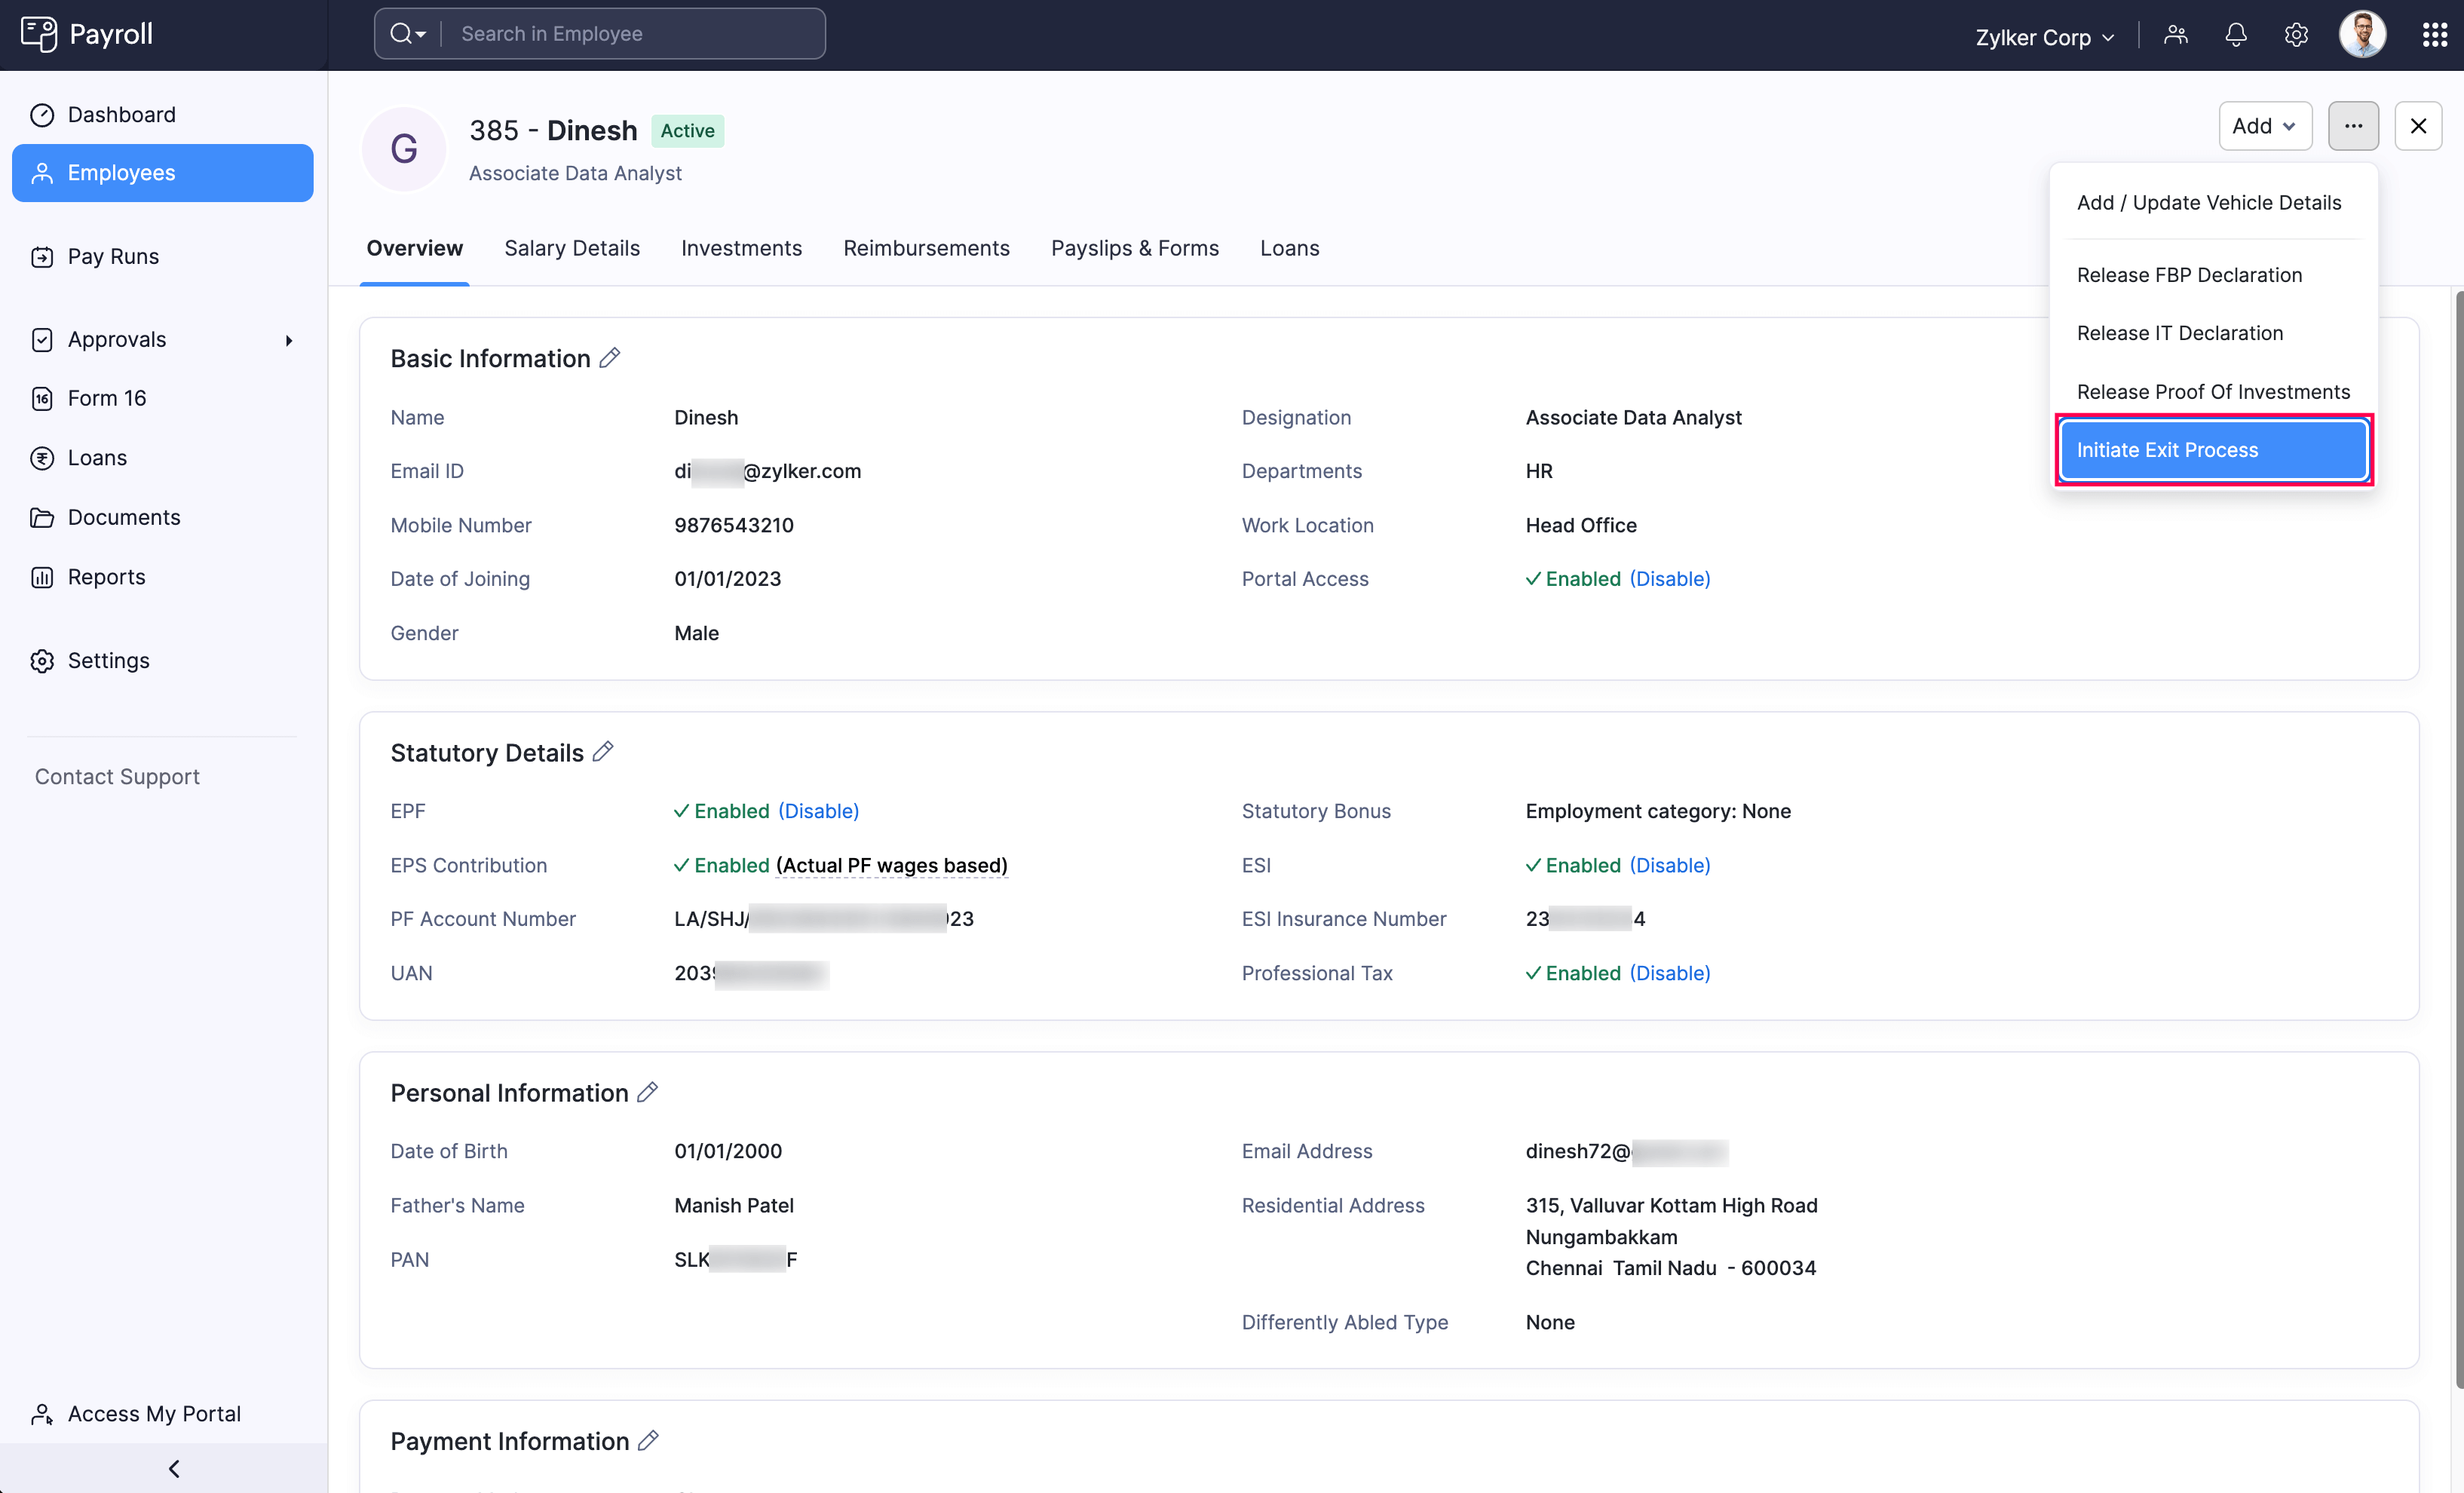
- Go to Employees from the left sidebar and select the employee for whom you want to initiate the exit process.
- Click More icon and select Initiate Exit Process.
- In the Employee Exit Details page, you’ll have to enter details regarding the exit.

| Field | Description |
|---|---|
| Last Working Day | Enter the last working day of the employee. |
| Reason for Exit | Reason the employee is leaving the organisation. |
| Personal Email Address | The employee’s personal email address in which you’ll be sending the full and final settlement payslip, TDS sheet and Form 16. |
| Notes | Internal comment for initiating the exit process. |
- Click Proceed after entering all the details in the respective fields.
Process Final Settlement Payroll
Once you’ve entered the Exit details of the employee, you’ll be redirected to the Final Settlement Payroll page, where you can:
- Enter the Organisation’s Payable Days and Employee’s Payable Days for that particular month.
- Enter the LOP (Loss Of Pay) days, if any.
- Enter Additional Earnings for the employee if any. Additional earning is an earning other than the employee’s regular salary.

- If any amount has to be deducted from the employee’s salary, you can enter it under Deductions by clicking Add Deduction.

- You can enable notice pay by checking the option under Notice Pay for the employees who are in their notice period.
- If the organisation owes the employee, select Payable and if the employee owes the organisation, you can select Receivable.
- Enter the amount in the Payable Amount or Receivable Amount field.

- If you want to enter any note in the final settlement slip, you can add them under Notes.
- Click Save and Continue to proceed.
- In the following page, click Submit to proceed with the exit. If you’re a user who has approve access then click the Submit and Approve button.
After getting the pay run approved, you’ll have to record payment in the Pay Runs page. Here’s how:
- Go to Pay Runs and click View Details & Pay.
- Click Record Payment on the top right corner of the page.
- Select the payment date and check the Send payslip notification to exited employee option, if you want to send payslip notification to the employee.
- Click Confirm to record the payment.

Process Final Settlement For Multiple Employees At Once
If you’re looking to terminate multiple employees simultaneously, you have two methods to achieve this: importing data or manually adding employees to the final settlement payroll.
Method 1: Importing Data for Bulk Termination
Note: You can process bulk termination of employees by importing data in the correct format.
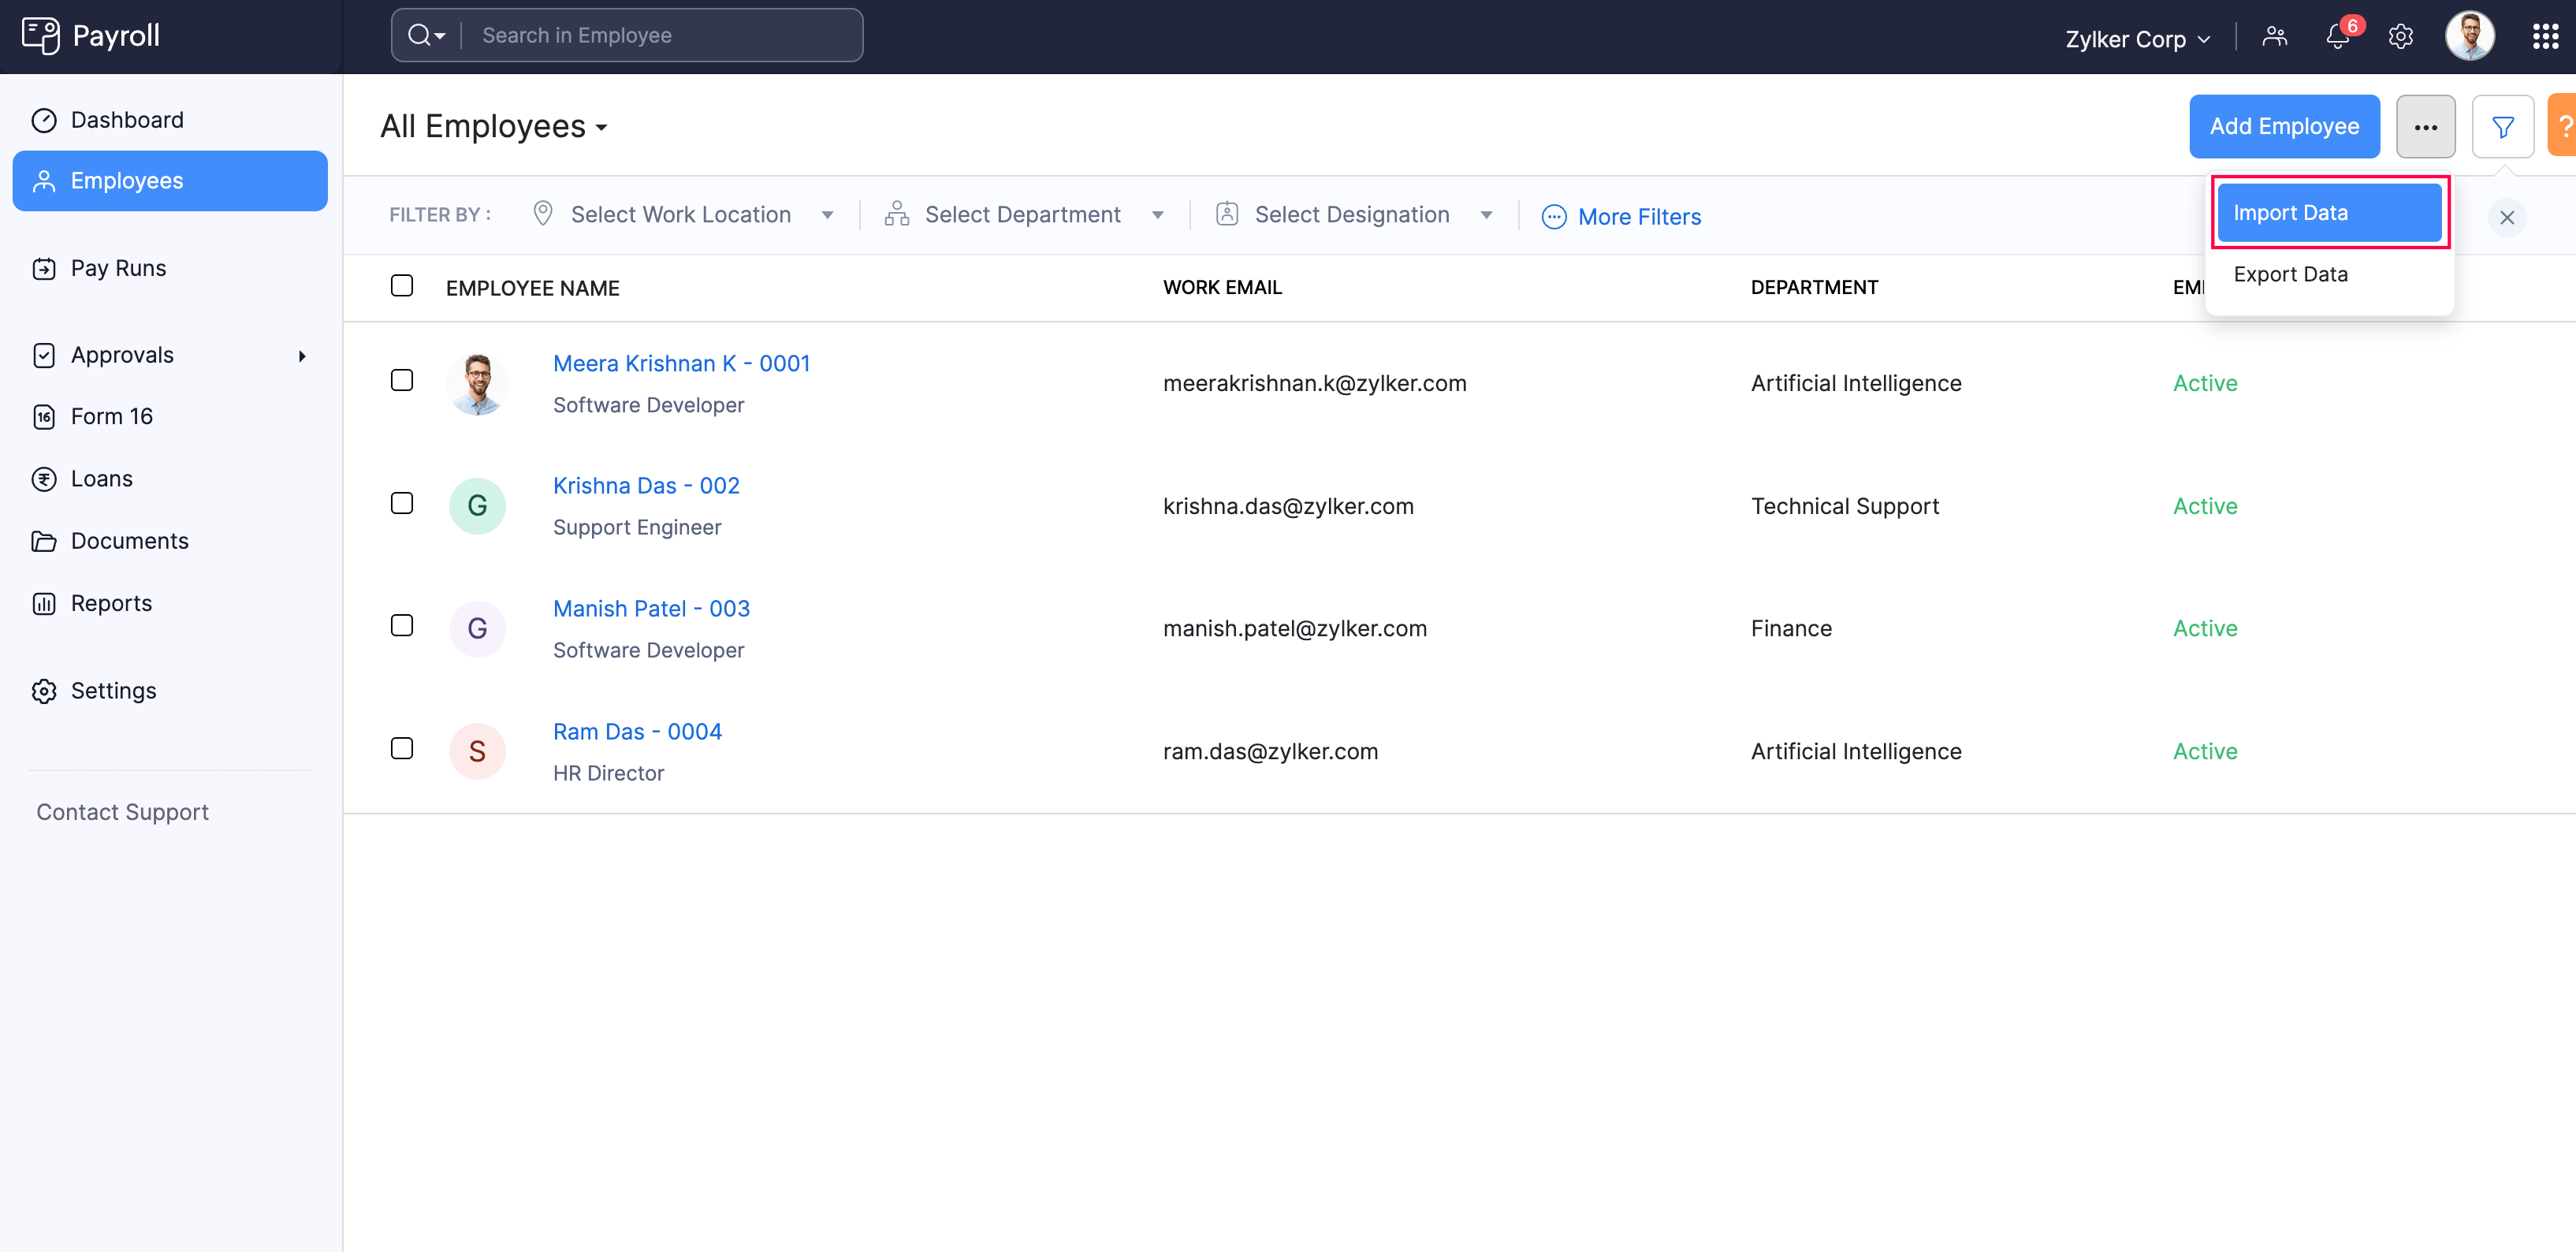
Go to Employees.
Click the More icon on the top right corner and select Import Data.
- Choose Employee Exit Details as the type of import.

Pro-tip: Download a sample .csv or .xls file to understand the correct format.
- Ensure your bulk termination file aligns with the correct format.
- Click Next.
- Ensure that Zoho Payroll Fields are correctly mapped with Import File Fields.
- Click Import.
After importing the file, review the details in the bulk and final settlement payroll and proceed with processing it.
Method 2: Manually Adding Employees to Bulk Final Settlement Payroll
- Go to Employees in the left sidebar.
- Select the employee you wish to terminate.
- Click the More icon and select Initiate Exit process.

- Enter the exit details and select pay as per pay schedule as the option for when you want to settle the final pay.

- A final settlement payroll will be created.
Note: Do not process the final settlement payroll until you’ve added all other employees to it for bulk termination.
To add other employees to the final settlement payroll:
- Initiate the exit process for each additional employee.
- Select pay as per pay schedule as the option.
Once done, these employees will be included in the final settlement payroll, which now becomes a bulk final settlement payroll.

With these steps, you can efficiently handle bulk termination and streamline the final payroll process for multiple employees.
Filter Exited Employees
You can filter exited employees using the Exited Employees filter in the Employees page. To do that:
- Go to Employees and click the filter dropdown on the top-left corner.
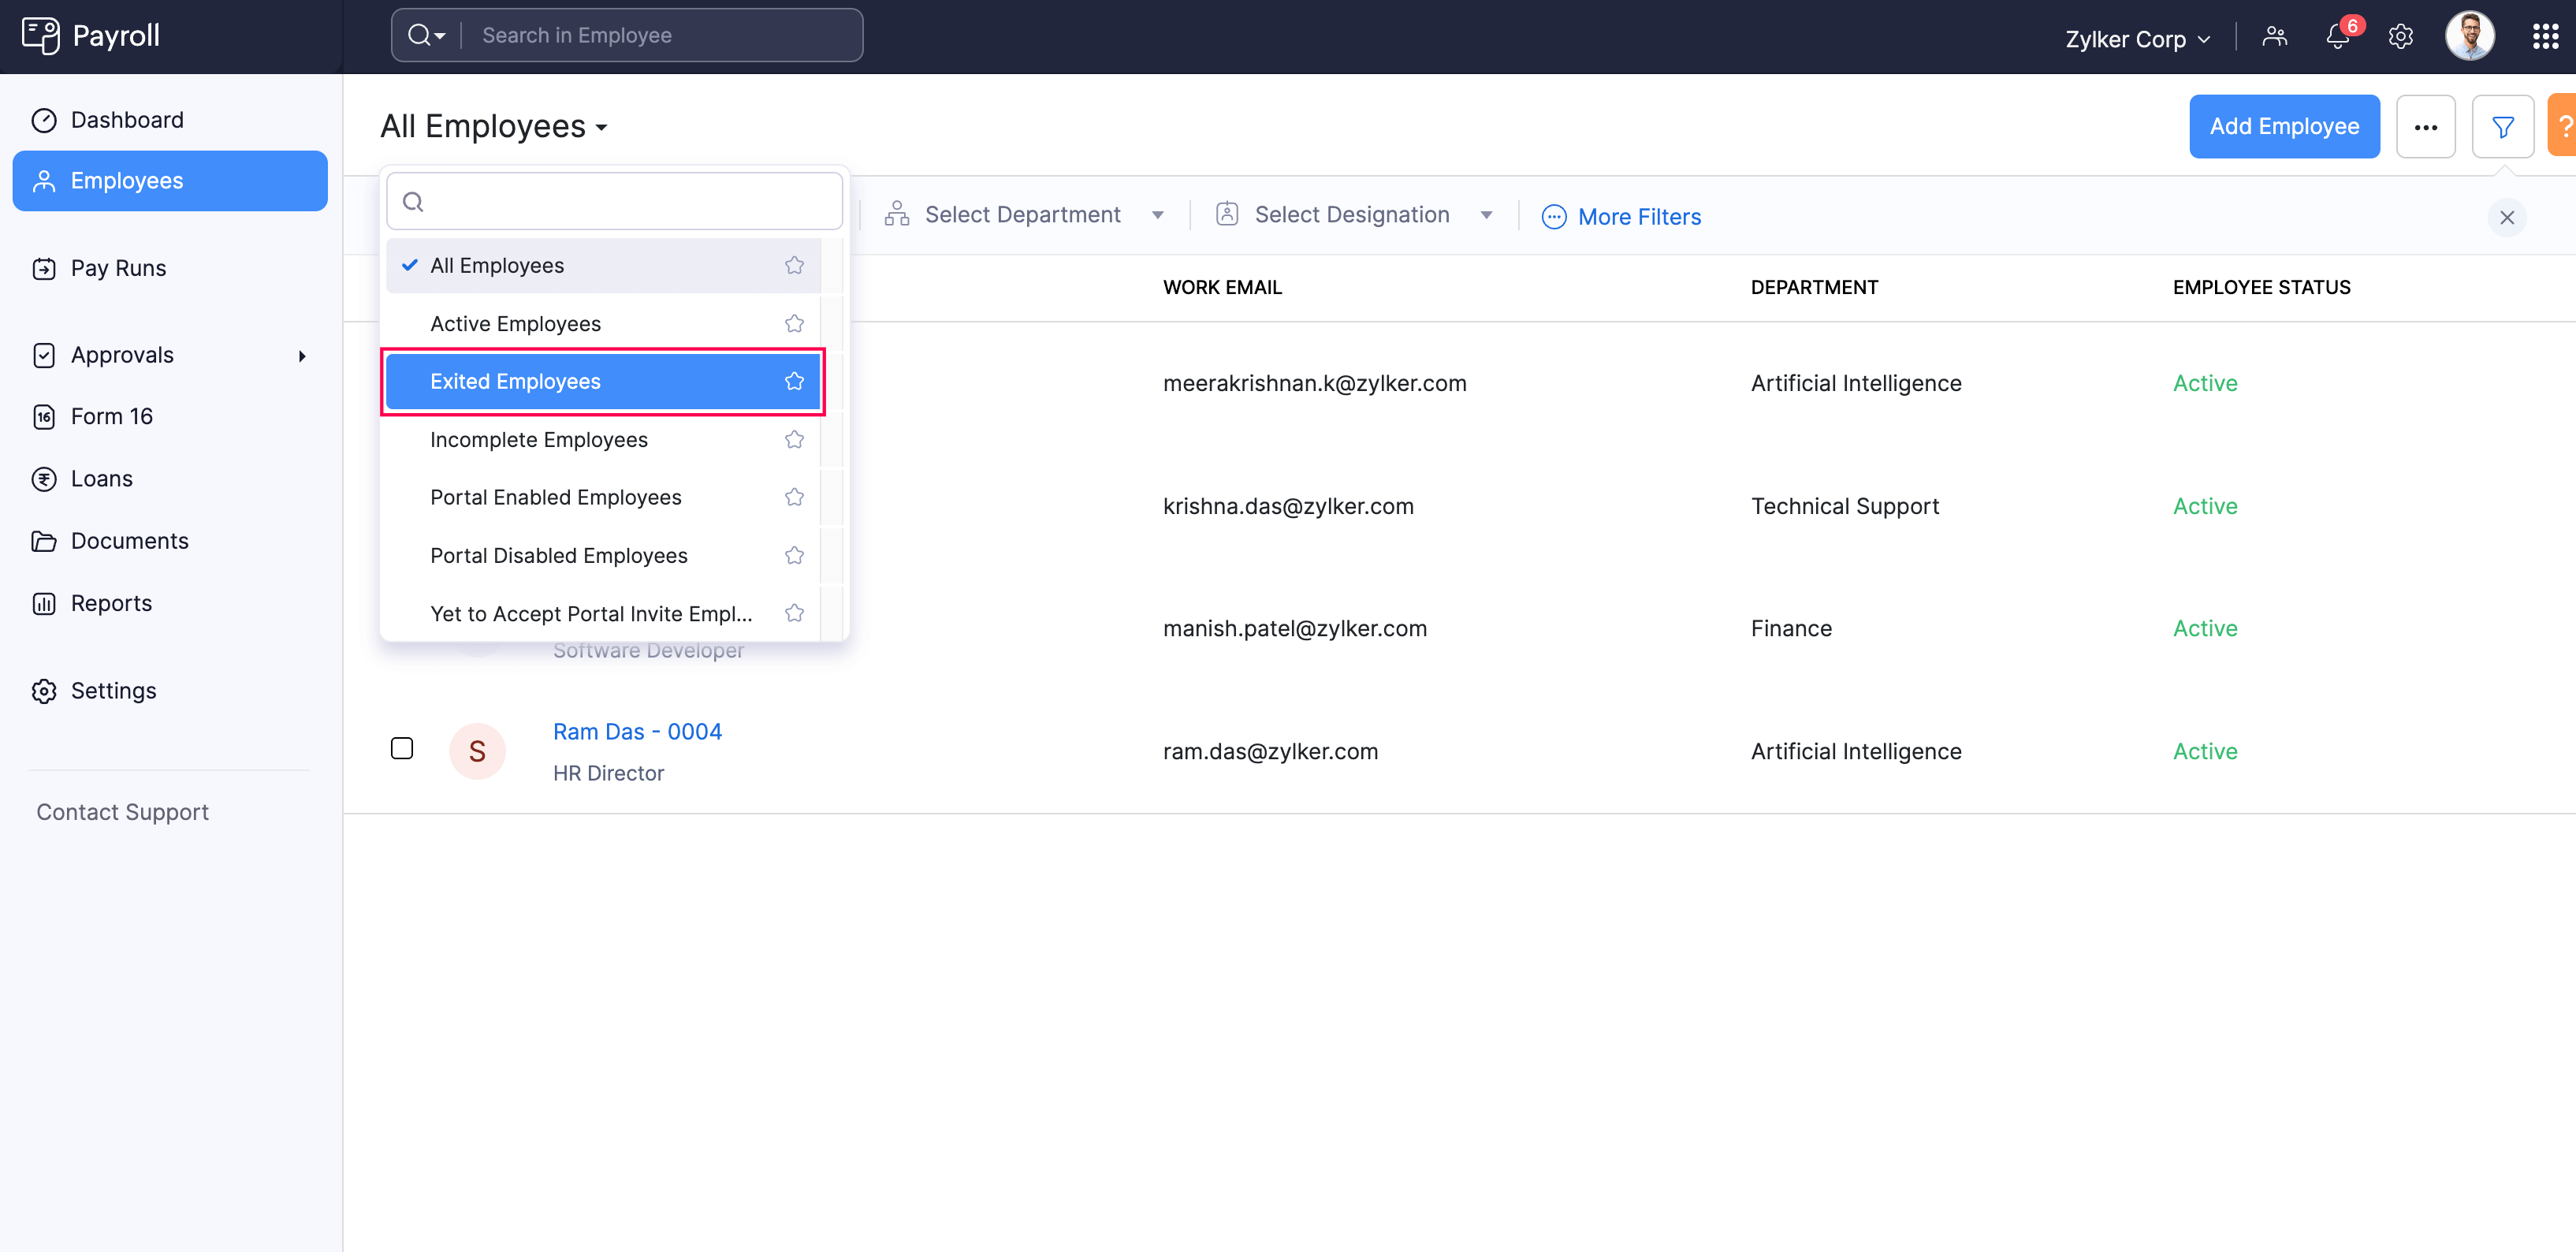
- Select Exited Employees from the dropdown and you’ll be able to view all the employees who exited from your organisation
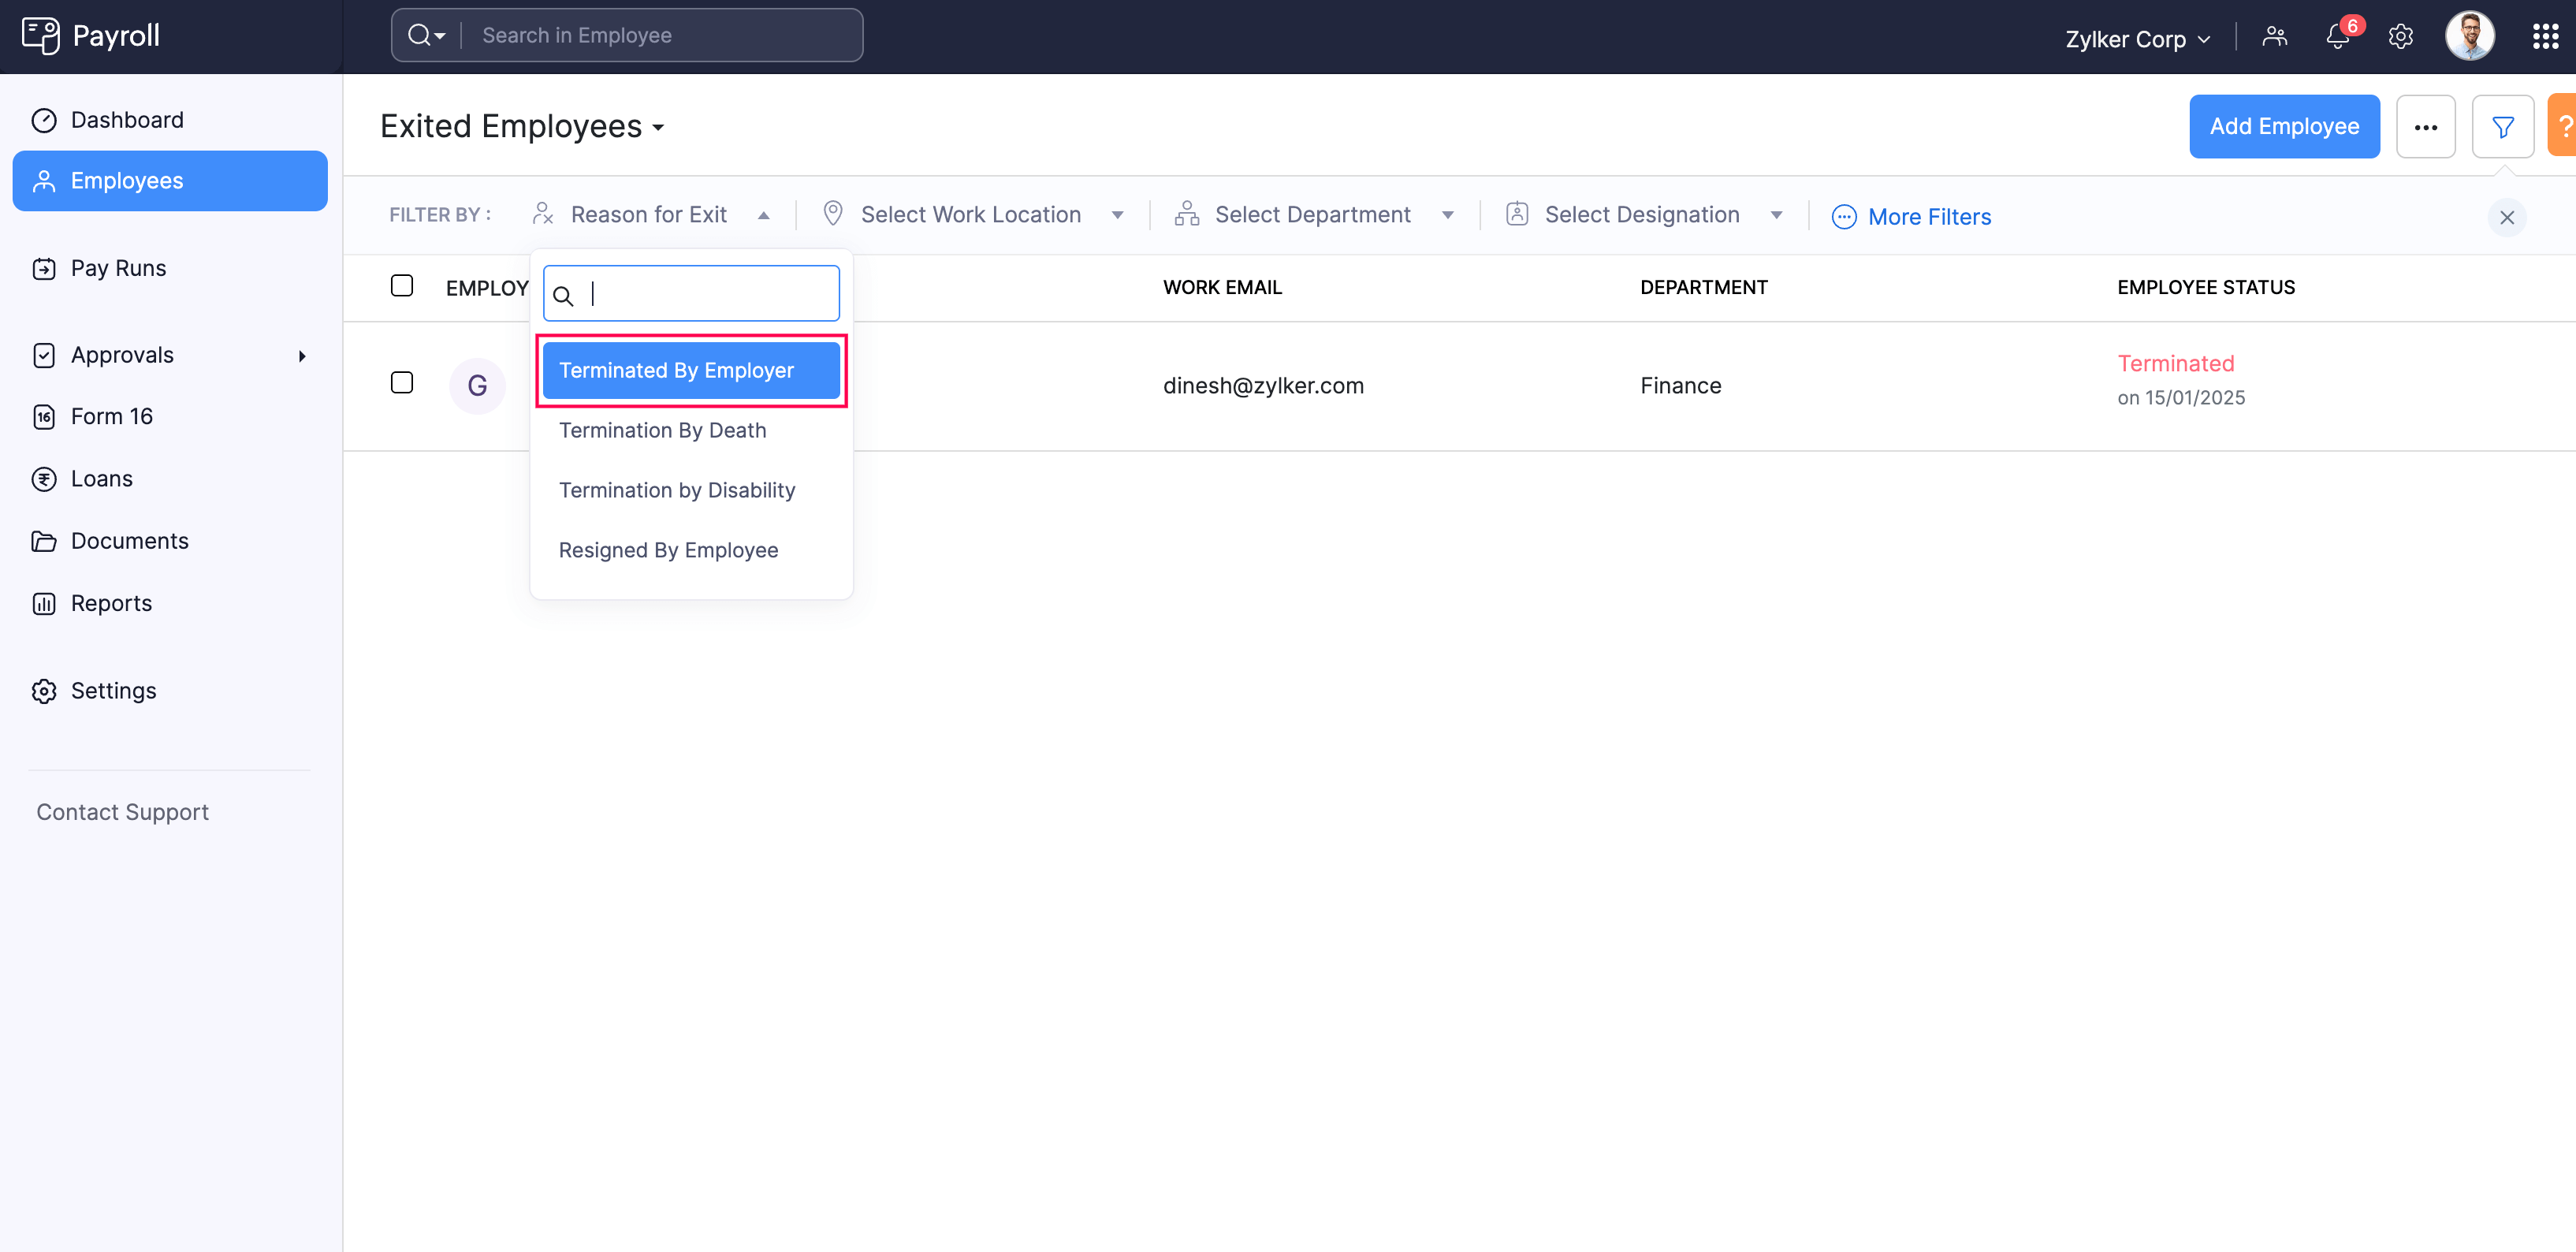
You can also filter employees based on their reason for exit. Here’s how:
- Click the Reason for Exit dropdown on the top left corner.
- Select the exit type.
Employee Exit for Organisations Integrated With Zoho People
- Log in to your Zoho People account.
- Go to Settings and then navigate to Employee Profiles.
- Select the employee’s profile for whom you want to initiate the exit process.

- Scroll down to Employee Status and select the status as either Terminated or Resigned from the dropdown.
- Enter the Exit Date.
- Click Submit.
- Now, go to your Zoho Payroll organisation and navigate to Zoho Apps from Settings.
- Click View Details next to Zoho People.
- Click Instant Sync to sync the data of your Zoho People organisation with Zoho Payroll.
Note: By default, the data gets synced every 24 hours.

On the right side of your Home page, a notification will be shown regarding the exit of the employee along with the Exit Process button under To Do Tasks.
- Click the Exit Process button in the To Do Tasks section and you will be redirected to the Final Settlement Payroll page where you’ll have to process the final settlement payroll.

Revert Exit Process
You can revert the exit or termination process for contractors for whom the final settlement payroll has not been processed. Here’s how:
- Go to Employees and select the Exited Employees filter.

- Select the employee for whom you want to revert the exit process.
- In the Overview page, click the More icon and select Revert Exit Process.
Note If you have already processed the final settlement payroll, you will not be able to revert the exit process. You can choose to rehire the employee instead.
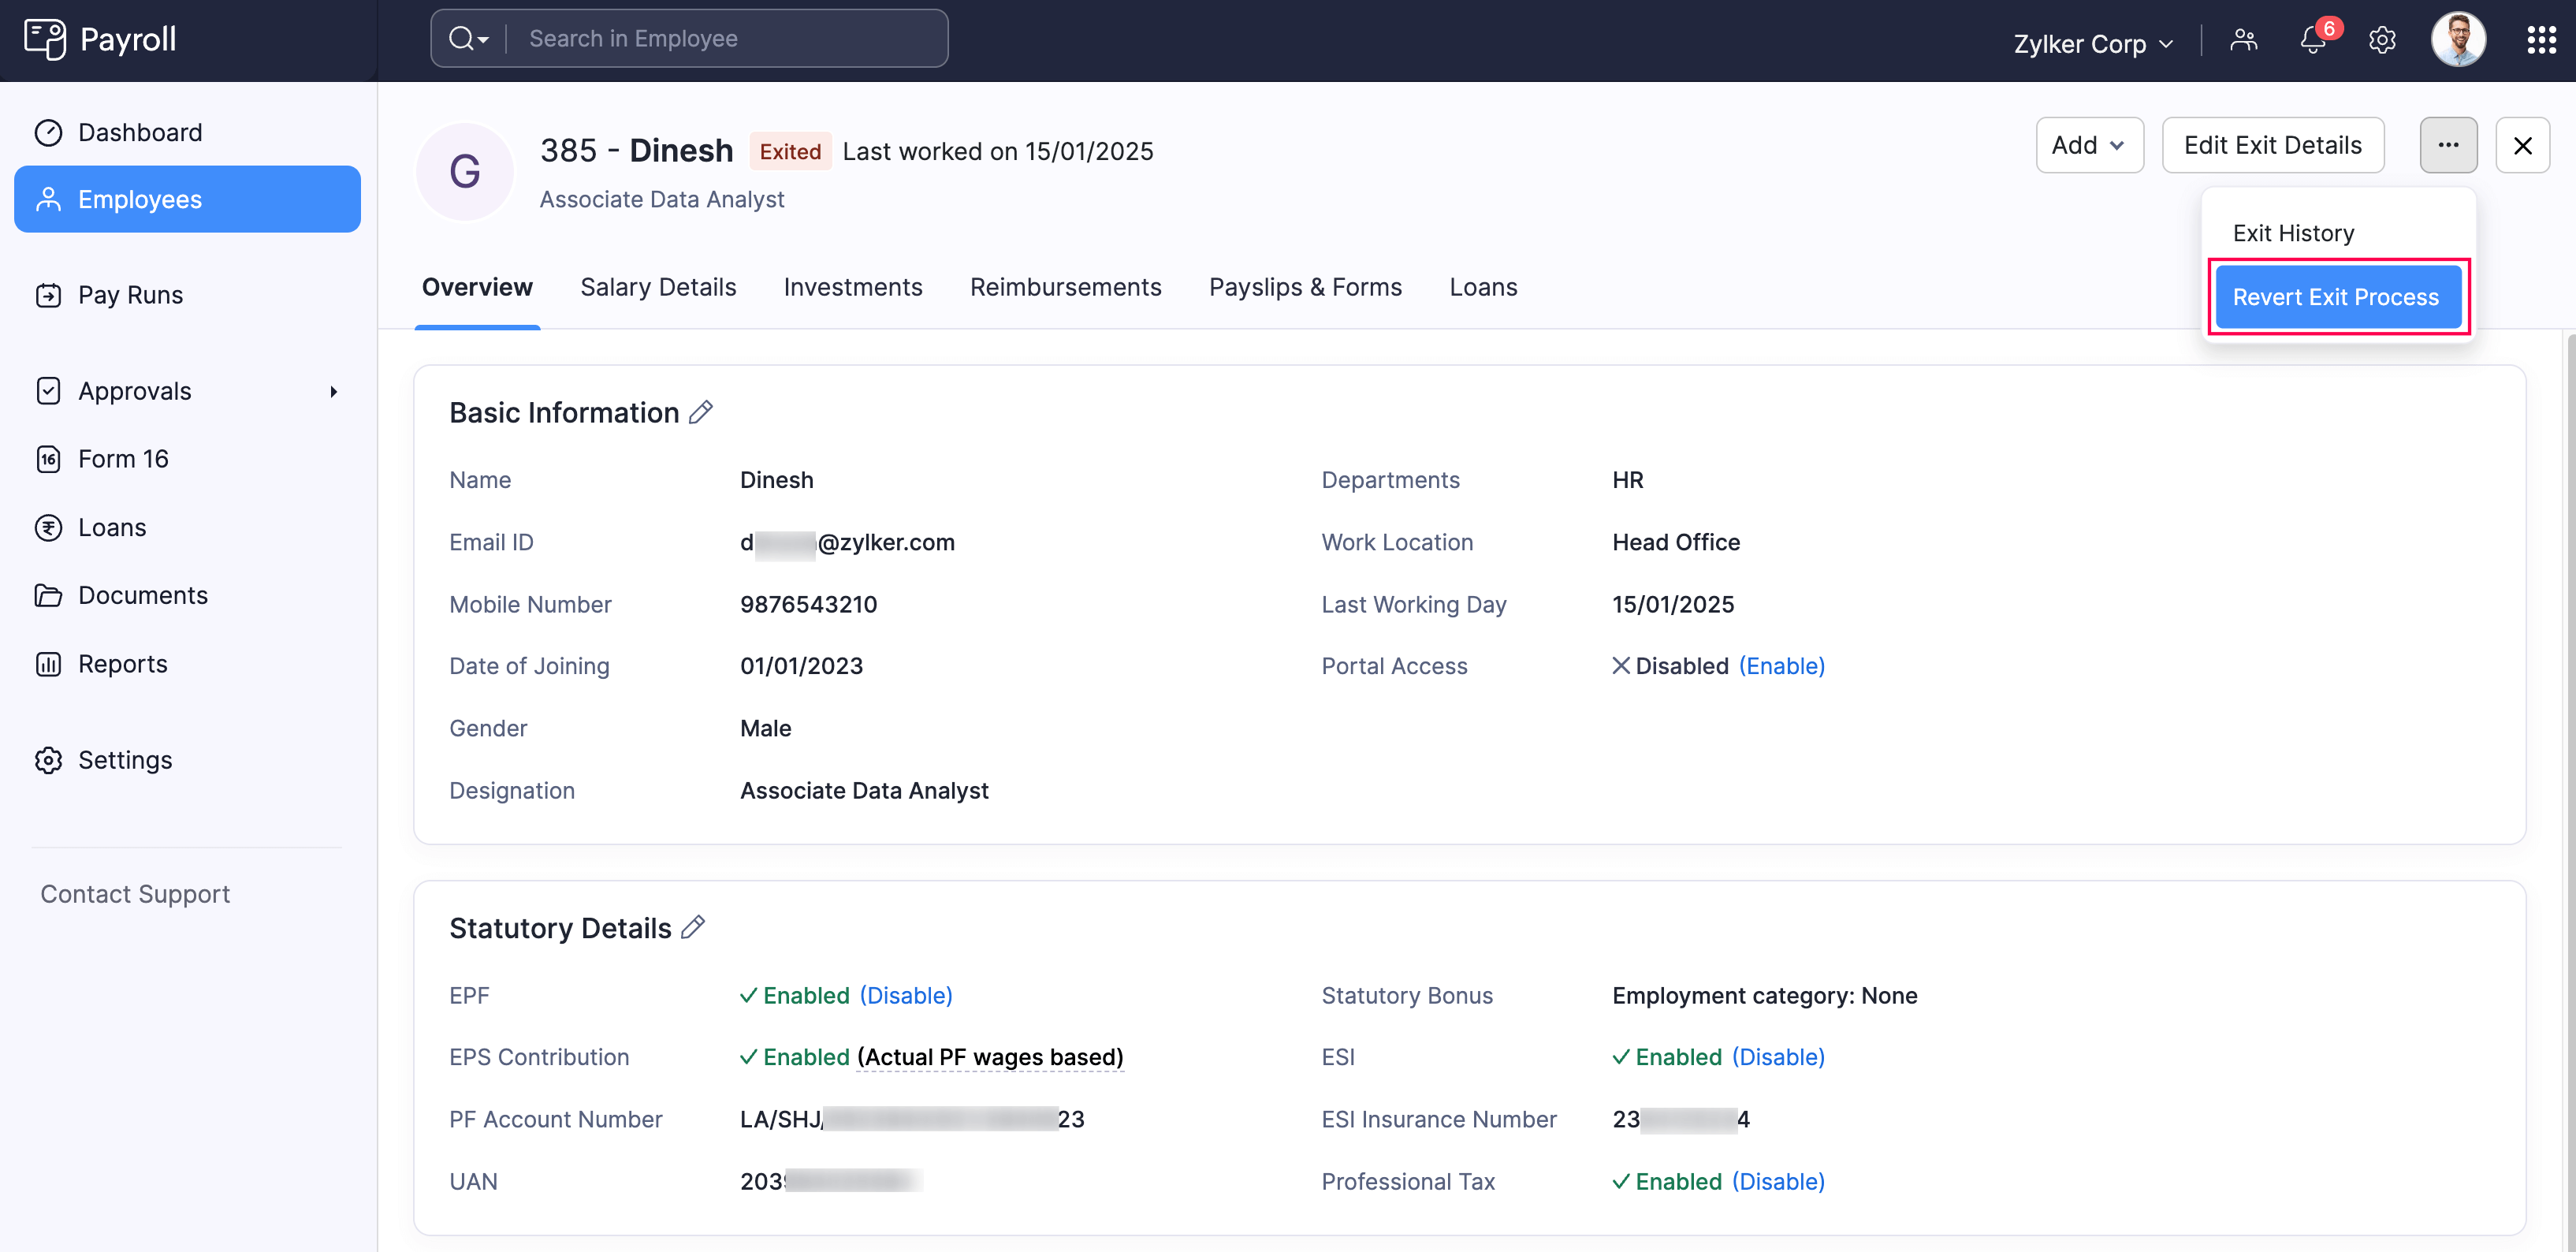
- In the following popup, enter the reason for reverting the exit process and click Proceed.

- After clicking Proceed, you’ll be redirected to the Employee’s Profile. You’ll have to enter the salary details of the employee again in the Salary Details page.
Other information of the employee will be populated automatically as per the information entered earlier. You can edit those details if needed.


 Zoho Payroll's support is always there to lend a hand. A well-deserved five-star rating!


