Push Notifications
Overview
Push notifications are one of the means to keep your users engaged with your app even when they are not actively using the app. These messages directly push the information to a user's device. Push notifications can be images, texts, or interactive elements. Apptics' push notifications allows you to send contextual and relevant notifications to your app users.
Different types of notifications
Here is a list of different types of push notifications that are generally used to keep engagging with your app users.
- Promotional notifications - These are used to encourage users with some deals, discounts, and so on.
- In-app notifications - These are used while a user is actively using the app such as guided tours of the app.
- Rich push notifications - These can include images, videos, sound for further user engagement.
- Reminder notifications - These are used to remind a user to complete the actions that they left such as payment reminder.
Benefits of using push notifications
Push notifications offers an additional way of keeping your user engagement, retention, and conversion high. They help you in maintaining a higher app visibility, building great communication with your app users, and driving your app users to take actions within the app.
To be able to use Apptics' push notifications for your Android or iOS apps, you need to complete the setup for the same. In the below sections we have detailed the steps on how to get the private key (JSON file) from Firebase and the p12 certificate from Apple for enabling the use of push notifications.
Setup Android push notifications
Firebase Cloud Messaging (FCM) is part of the Firebase developer tools. The FCM API is the only way of sending push notifications to the devices on which your app has been downloaded via the Google Play Store. Google mandates that Android apps that are distributed via the Google Play Store leverage a single connection provided by FCM. And using the FCM API, messages can be sent to all the devices. Zoho Apptics utilizes FCM API internally to send push notifications to the Android devices.
Requirements
- A Firebase account with the required privileges
- An Apptics account with the required privileges
- An Android mobile app
Setup
Create a Firebase project
To be able to access the FCM API, you need to have a Firebase project. Login to Firebase and create a project.

Firebase Cloud Messaging API (v1) is enabled
If you have just created the Firebase project, FCM API should be enabled by default. If you are using an existing project, make sure that the FCM API is enabled.
- Click on the settings icon next to Project Overview and click Project Settings.

- Select the Cloud Messaging tab.

- If the FCM API is disabled, click on menu icon and visit the link mentioned.

- Click enable on the link. You may need to wait for a few minutes for the action to be completed.
Generate the private key JSON file
- In your Firebase Project Settings, click on Service Accounts tab.
- Click on Generate new private key. A warning window will appear on the screen, click on Generate key.
- The private key is a JSON file. Save the JSON file somewhere safe.


Add the JSON file to Apptics
The private key (JSON file) that you got from Firebase needs to be uploaded in Apptics web console so that you can send push notifications to your app users.
- Navigate to Channels > Push notification.

- Click on Android FCM credentials.
- Under Android, select the package Id to upload the JSON file.
- Click on upload button and select the saved JSON file.
- Click Save.

Setup iOS push notifications
Similar to FCM API for Android apps, Apple mandates the use of APNs for all apps that are downloaded via the Apple App Store. As Apple clearly mentions, when it is time to send notifications to apps downloaded via the Apple App Store, a request is forwarded to the APNs which then handles the delivery of the notification to the user's device. Once the notification is received by the APNs, the device OS handles the interactions and delivers the notification to the user's device.
Requirements
- A paid Apple developer account with the required privileges (admin role)
- An Apptics account with the required privileges
- An iOS mobile app
- A Mac computer with Xcode 11 and above.
- Your Xcode project should have the push notification capability added else your project will not reflect in the Apple developer center.
Create an app ID
To be able to use APNs for push notifications, you need to have an app ID created in your Apple account. Login to your paid Apple account and create an app ID.
Enable push notifications capabilities
To enable the push notification capabilities, refer to this section in the apple developer documentation.
Generate the push certificate
A certificate-based authentication helps to establish a secure connection between Apptics server and APNs. You can generate the push certificate from your Apple account. Follow the steps mentioned here for detailed information on generating and using the push certificate.
Add the certificate to Apptics
The p12 certificate that you generated in Apple needs to be uploaded in Apptics web console so that you can send push notifications to your app users.
- Navigate to Channels > Push notification.

- Click on iOS APNs certification.
- Under iOS, select the bundle id to upload the APNs provider certificate.
- Under file, click on upload button and select the saved APNs provider certificate.
- Set the password for the APNs provider certificate.
- Set the push mode, i.e., production (PRD), sandbox (SBX), virtual production (VPRD), virtual sandbox (VSBX).
- Add the certificate expiry date.
- Click Save.

Send push notifications from Apptics console
Once you are set with the FCM API JSON file and the APNs p12 certificate, you can configure the push notifications in the Apptics console.
- Click on Create new notification.
- Add the details such as internal name and schedule the push notification.

- For scheduling the push notification, you can either use the send immediately option (with an expiry date) or schedule the notification to be sent on a particular date along with the timezone (with an expiry date).
- Send immediately - This option allows you to send the push notification immediately to the selected user's device. This notification comes with an expiry date that you can set while configuring your push notifications. For example, you want to send a Christmas Sale notification that you are configuring on 23rd Nov and expires on 31st Dec.
- Schedule notification - This option allows you to plan and schedule the push notifications. For example, you want to send a Christmas Sale notification and would like to plan much in advance. You can configure the notification and set the scheduled on date as 23rd Dec along with the timezone. In such case, once you have published the notification on 15th Dec (planned ahead to avoid last min chaos), the notification will be triggered on 23rd Dec (based on the timezone selected) and will be sent to your user's device. You will also set an expiry of this notification.
- Expiry date allows you to try resending the notifications if they were not sent.
- Click Next.
- Choose the application IDs and the relevant filters for the push notification. You can use different filter options (as shown in the image below) for targeting your users.

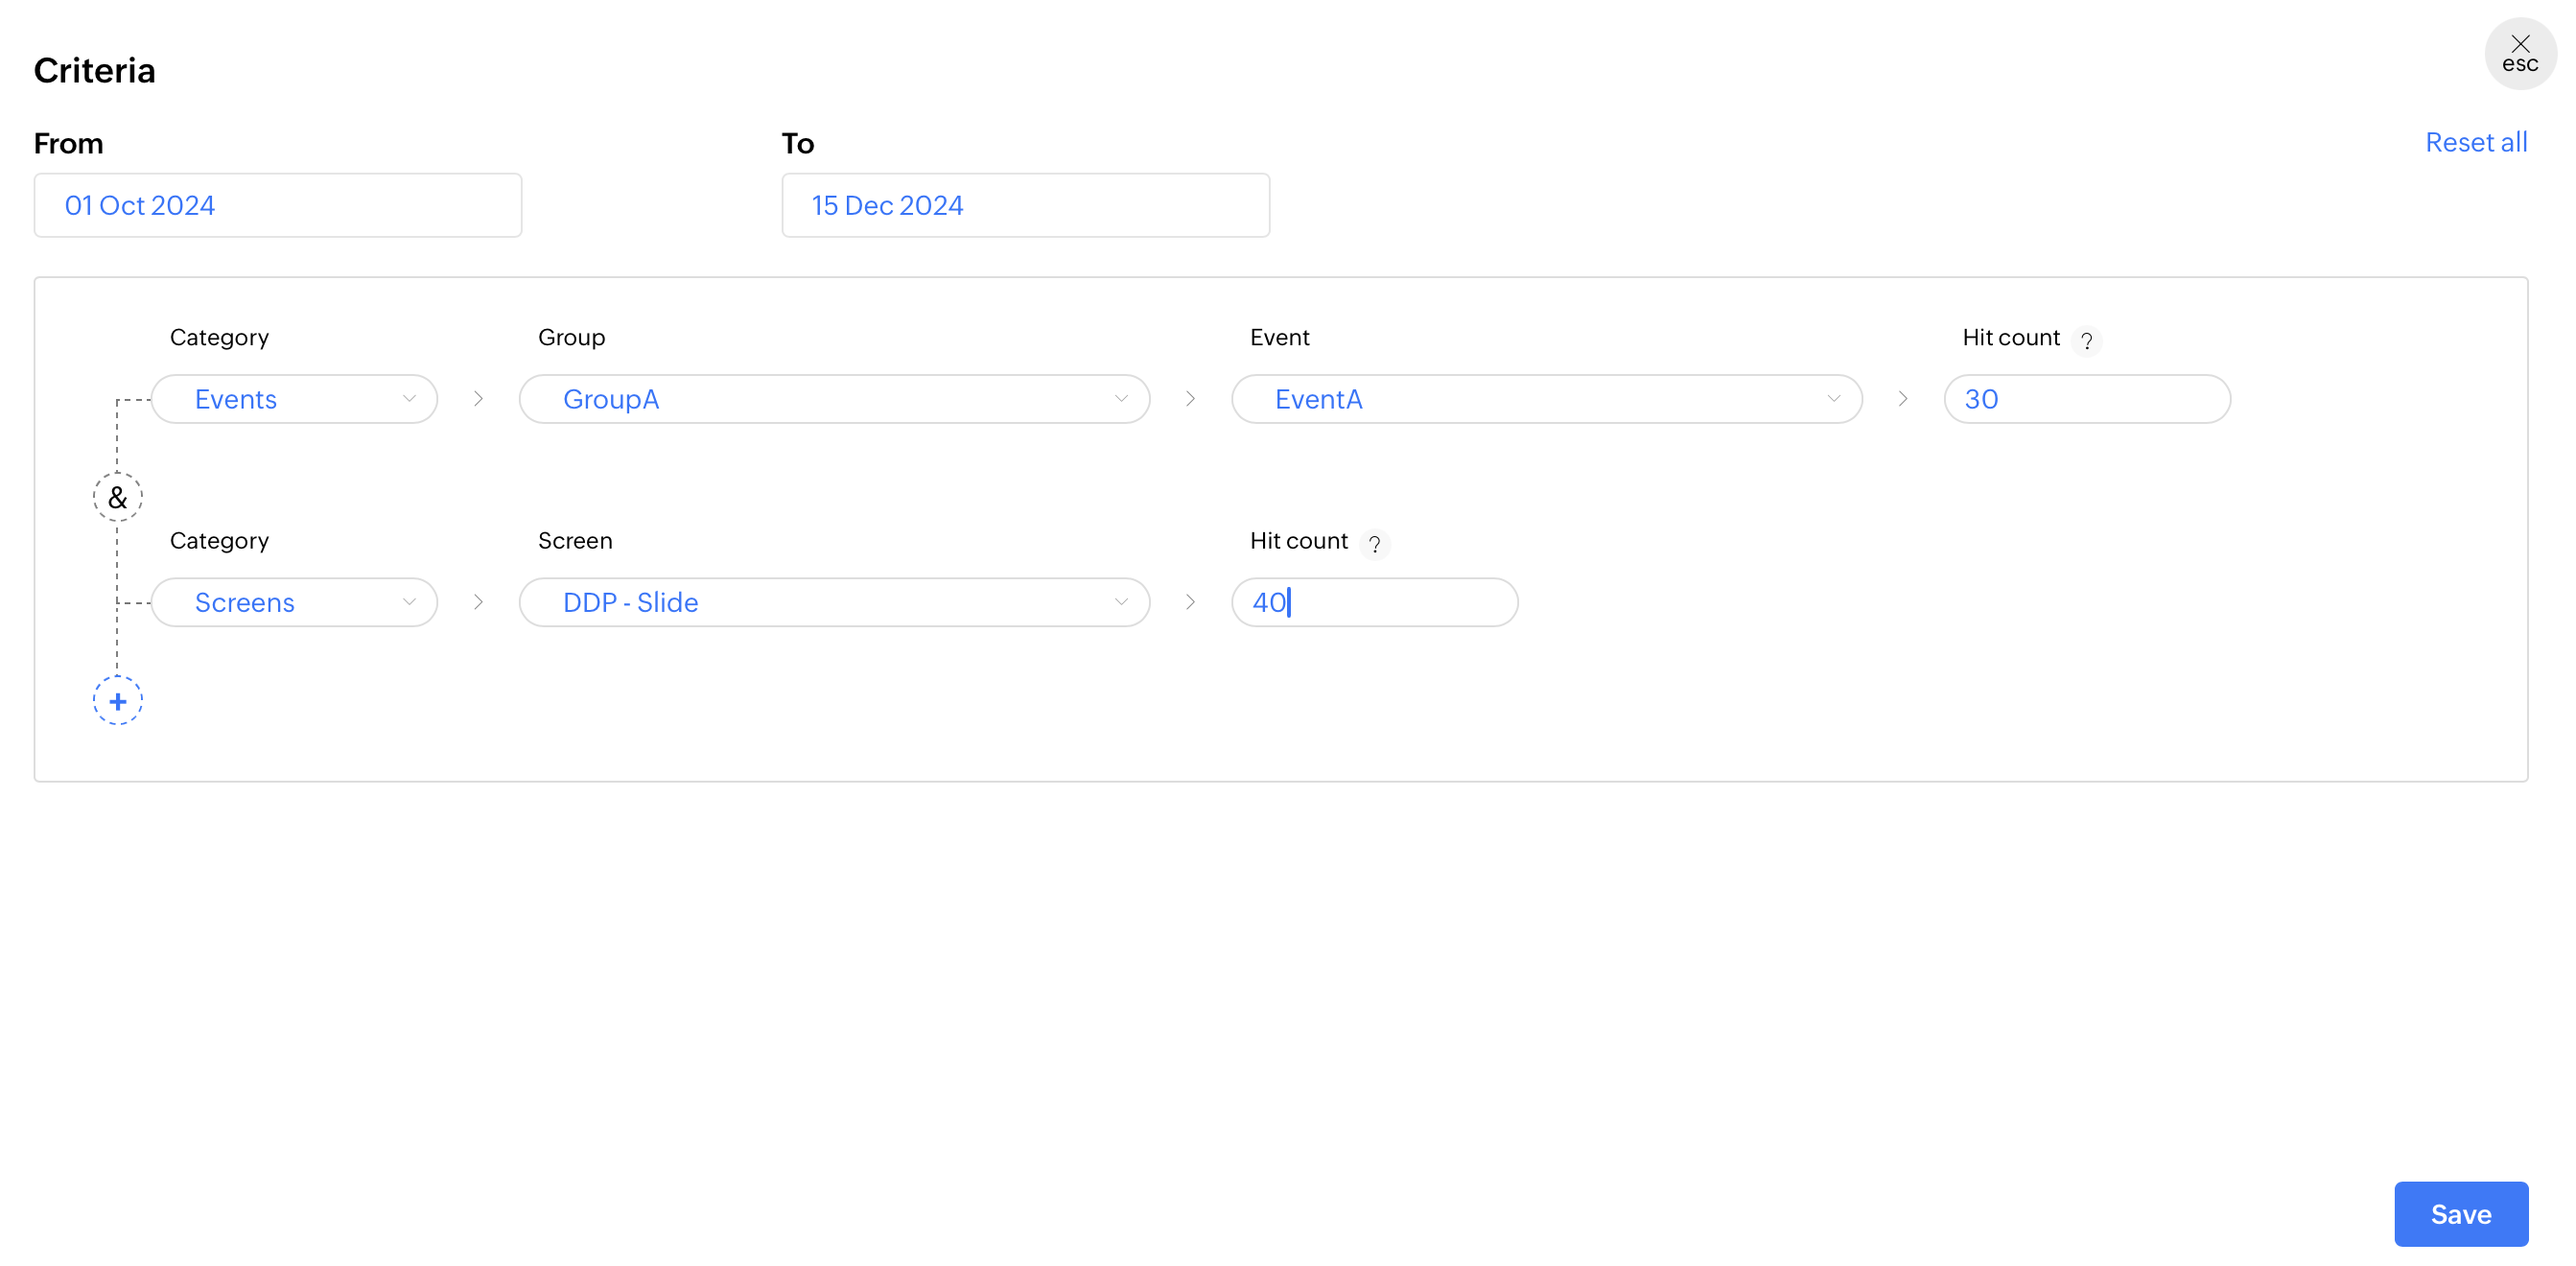
Set the conversion criteria for the push notification along with the from and to date. Conversion criteria helps you define certain set of actions that you app users should complete and once they fulfill the set criteria, they will recieve the push notification that you are configuring. The from and to date ensures the timeline for the set criteria, i.e. the criteria will be applicable from the xx date to yy date.
- Example criteria - If yours is an e-commerce app and you would like to send the notification to users who have made purchases. In such scenario, you can use the event and screen combination. The event can be `purchase_completed` with a hit count of 30 and the screen can be the `give_feedback/rating` with a hit count of 30 from 1st Oct to 15th Dec. The users who fulfill this criteria will receive the configured notification.
- Enable the conversion option to measure the effectiveness of your push notification. The conversion is set as:
- Push notification sent to the users
- Notification opened by the users
- Purchase done by the users


- Test it on your device - You can test the notifications on simulators or test devices before you make it LIVE.
- Application ID - Select the application id for which you want to test the notifications
- Device token - You can get the device token from Xcode or Android studio. Also make sure that the test devices is registered with the APNs certificate or FCM credentials and have debug mode enabled.
- Click Publish on test device. Once done you will receive notifications on the test device that you have configured.

- Click Next.
- Add the message details such as title, message, image URL, and click action.
- Title - This will be the push notification title that your users will read first (most probably).
- Message - Provide a short description for your push notification. For example, if you are sending push notification for the Christmas sale, you can add something like, The biggest sale of the year is on. Flat 50% off on apparel, home decor, and furnishings.
Image URL - Add a display an image for this notification. The image format can be PNG or JPEG. Here are some recommendations for the image size and type.
iOS Android Filetypes Recommended: jpg
jpeg, png, gif
Recommended: jpg
jpeg, png
Resolution Recommended: 2:1 aspect ratio
landscape
Common size:
512x256px
1440x720pxMax width: 4096px
Min width: 300px
Recommended: 2:1 aspect ration
landscape
Common size:
512x256px
1440x720pxMax width: 2000px
Min width: 300px
- Click action - Add the URL of the sale page here to redirect the users. Here in the below example the click action URL is www.happymonkeys/biggestsale.html
- Click Next.

- You can also add some additional elements to the push notifications such as sound and payload.
- Sound - Add audio to your push notification.
- Payload - A JSON dictionary object that includes any custom data that is to be send via the notification. It also contains information about how the system should notify the user.
- Increment app badge - Enable this if you want to show the number of unread notifications to the users. Once you enable this a small circle or number will be shown in the corner of the notifications in iOS devices. The number increases as the unread notification increases.
![]()
- Below are Android specific configurations. You can add these extra elements to the push notifications for Android devices.
- Notification channel - This categorizes the push notifications. You can refer to this guide for more information on how to create and use notification channel. Apptics' SDK guide on how to set it in the SDK.
- App icon - Your app's logo should be available in the app's resource directory. App icon also indicates the new notifications that the users have received. Apptics' SDK guide on how to set it in the SDK.
- Color code - You can change the background color. If it is not set in the SDK, the default color is grey. Apptics' SDK guide on how to set it in the SDK.

- Add the category name (for iOS). The category name allows you to differentiate your push notifications and add relevant action buttons.
- Add the details for the action buttons. Actionable notifications allows the user to respond to the delivered notification without opening the app. For actionable notifications, one or more buttons (as configured below) is displayed along with the notification. Tapping button will send the selected action to the app, which then processes the action in the background.
- You can add upto three action button for a single notification. Refer to actionable notifier and categoryidentifier docs from Apple.
- Add the below details to each action button:
- Action ID - A unique identifier for each action button. It is extracted from the notification payload and used by the SDK to track user interactions.
- Button label - The text that will be displayed on each button.
- Icon path - Optional icon displayed with the action button.
- Click action - The URL which will be opened when the user clicks on the action button.

- Preview and verify all the details. Once done, publish the push notification or you can also save it as a draft.
- For the notifications that are saved as draft, you can revisit them anytime and edit the details.
- Once published, the push notification will be listed in the console along with the details.
- If you want to edit, clone, or delete the notification, click on the three dots at the right corner.
- If you click delete, the notification and all the associated data will be deleted from the Apptics console.

- Click on the individual push notification for deeper analysis into the stats such as targeted, failed, success, received, opened, and the conversion rate.

Push notifications SDK
Once you have completed the above mentioned steps, you need to add our SDK to your app. You can find the detailed steps on how to add the SDK to your app in the below mentioned links: