User Management
Users
The Users tab gives you an overall view of the users in your organization, their eDiscovery/ Email Protection status (enabled/disabled) and the department to which each user belongs. An administrator can manually enable or disable the eDiscovery and Email Protection services for users who joined newly or for whom the service was already enabled.
Click on a user's name to view detailed information about the user. Here, you can see which eDiscovery rule is associated with each user. By default, users are associated with the EDISCOVERY_Filter configured at the time of your organization setup. To define a new filter, refer to Ingestion Filter.
The actions that you can do from the Users section are as follows:
- Create user manually
- Import users via CSV
- Import from other email service providers
- Import from other Zoho services
- Change member to admin
- Delete users
- Export users as CSV
- Filter users
Create a user manually
Follow these steps to create a user manually:
- Log in to Zoho eProtect and select User Management on the left menu.
- Click Create on the Users page.

- Enter the user's First Name and Last Name. The Username gets auto-generated. You can change this if required.
- Enter a password in the Password and Confirm Password fields.
- If you want the user to change his/her password in their first login, select Force user to change password on first log in.
- Use the Select Department drop-down to add the user to an existing department in the organization.
- Enable/disable Email Protection and eDiscovery as per your requirement.
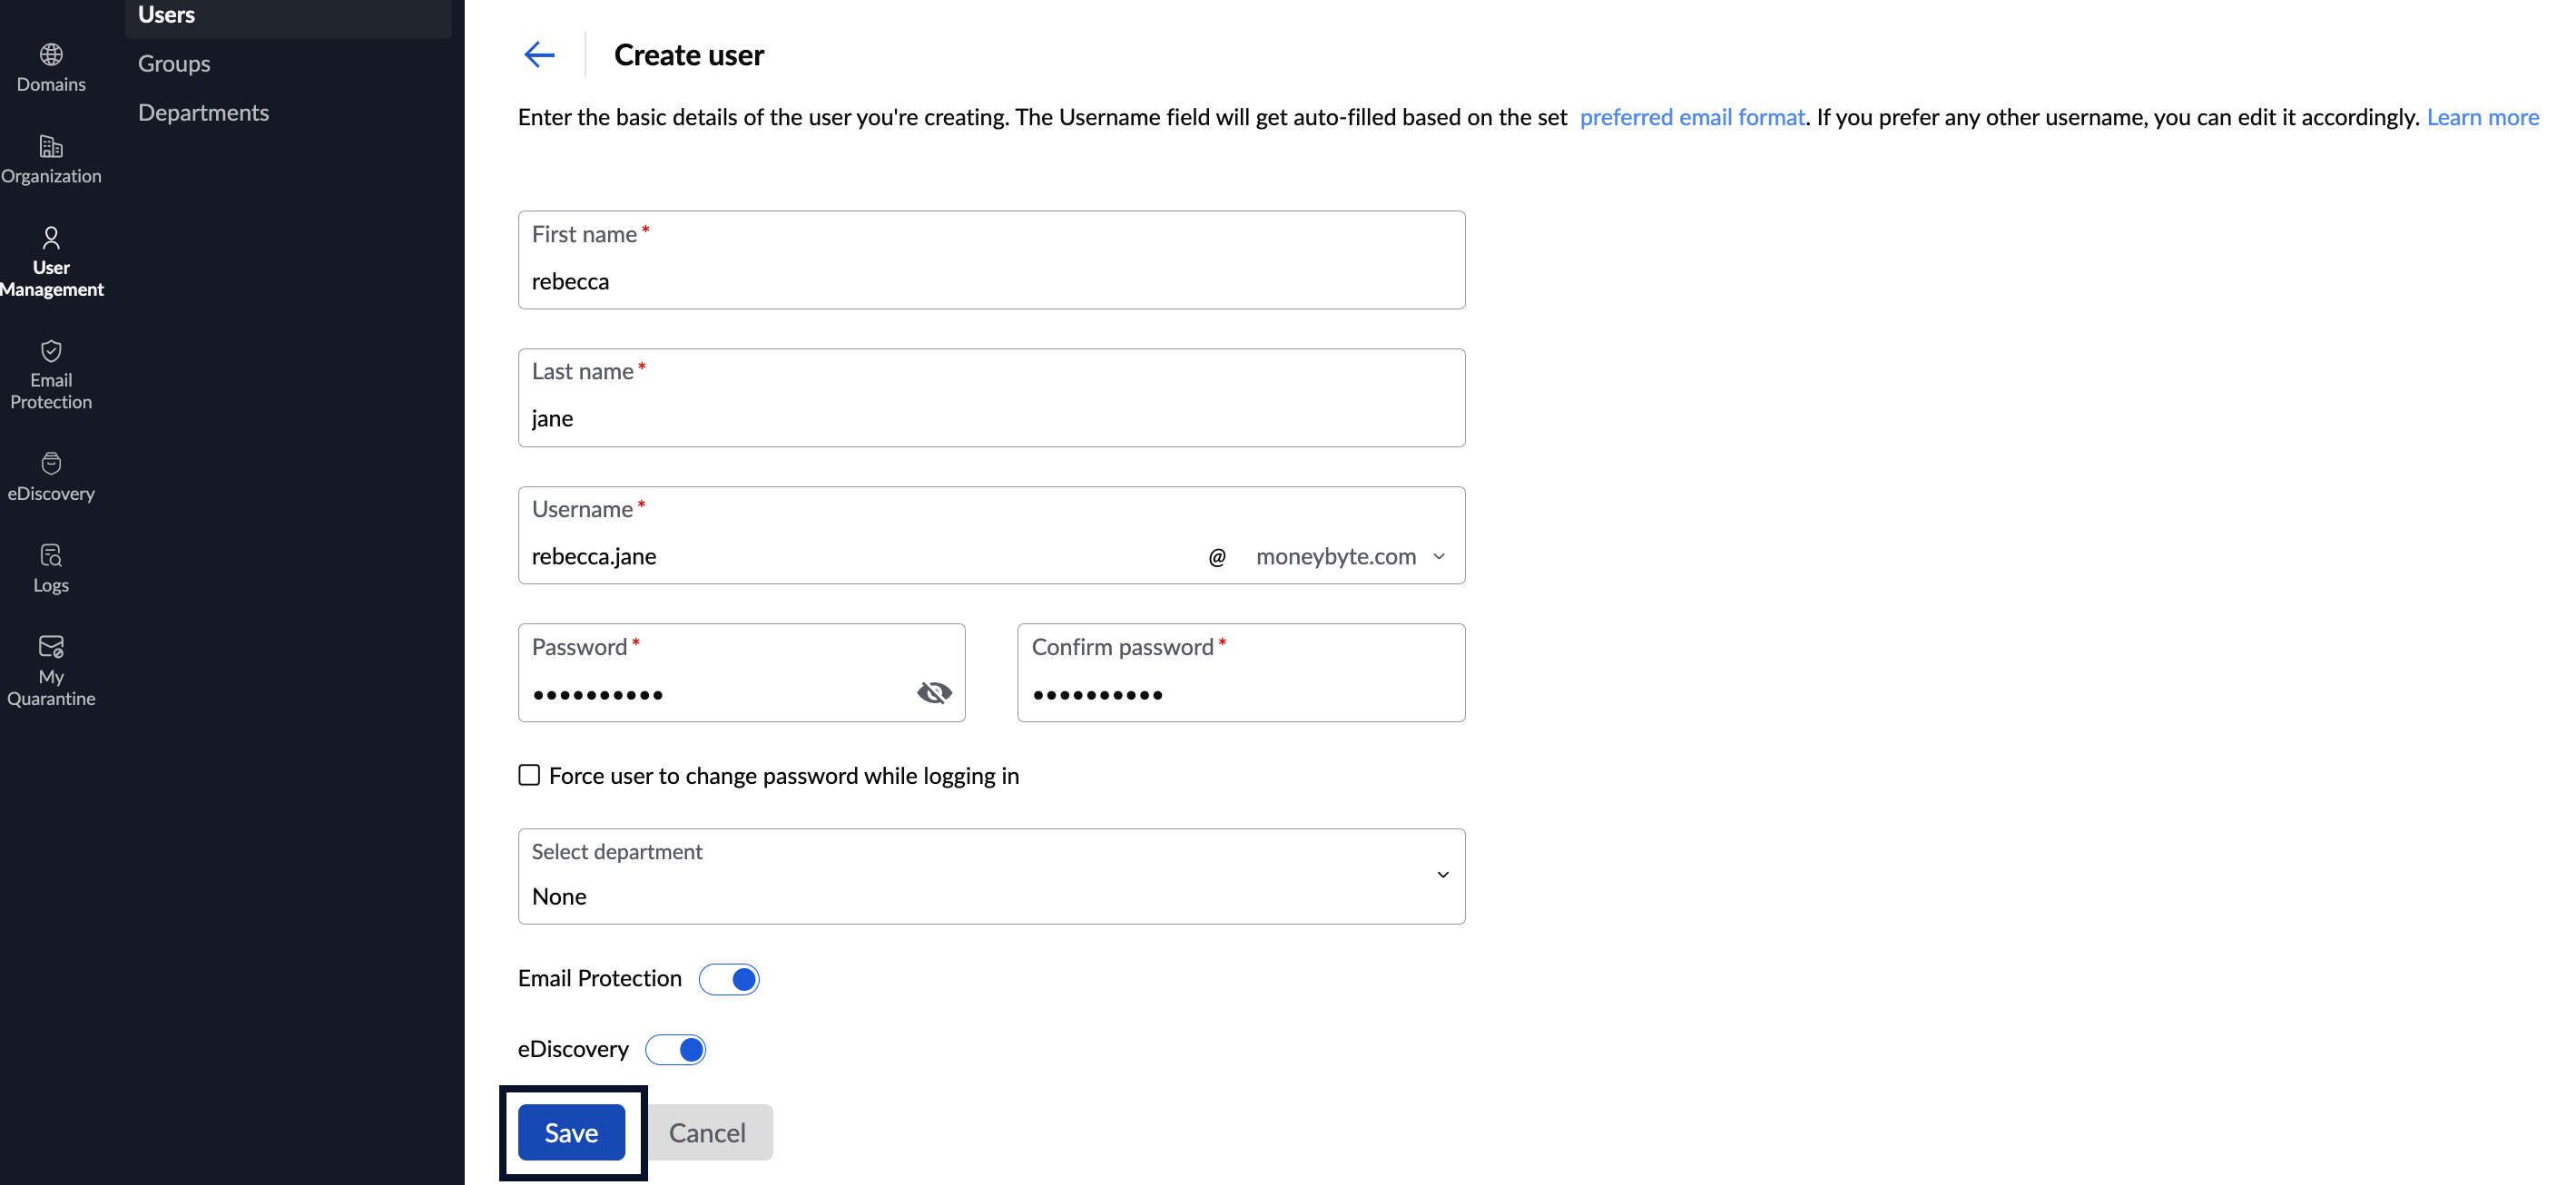
- Click the Save button.
Import users via CSV
Follow these steps to import bulk users using a CSV file:
- Log in to Zoho eProtect and select User Management on the left menu.
- Navigate to Users, click Import and select Import using CSV file from the drop-down menu.

- Click the Import button.
- Use the drop-down menu to select the preferred domain to which you wish to import the users.
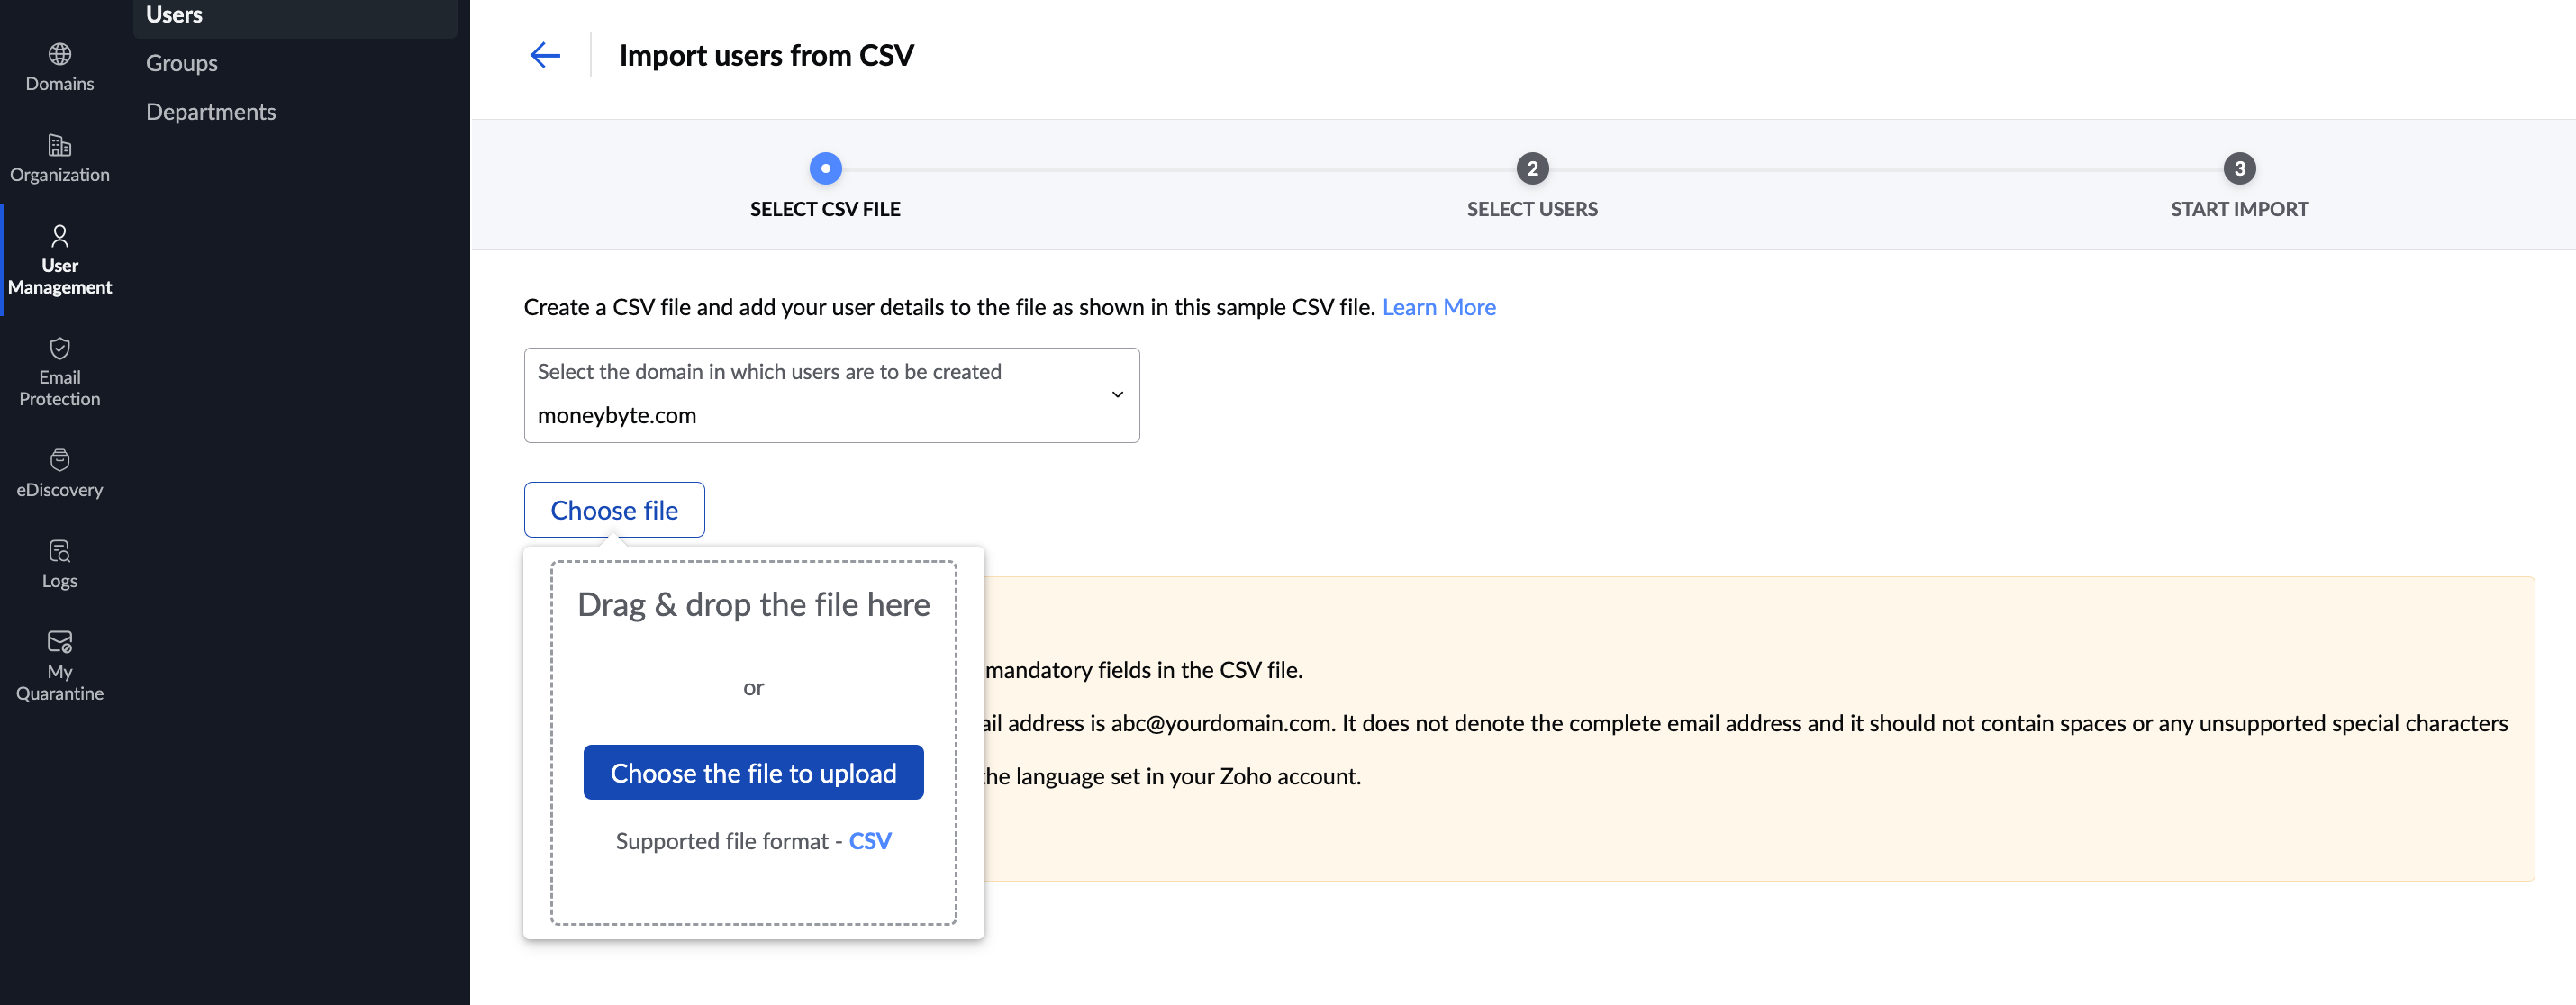
- Select Choose file.
- You can either drag and drop or Choose the file to upload. The users in your CSV file will be displayed for you to further scrutinize. You can choose to import all or only select users depending on your requirement.
- Click Proceed once you choose the users.
- On the START IMPORT page, Name your import for future reference.
- Enter the password for the users being imported and reconfirm the password.
- If required select the desired options from the below:
- Force users to change password on next log in
- Import users only if provided group exists
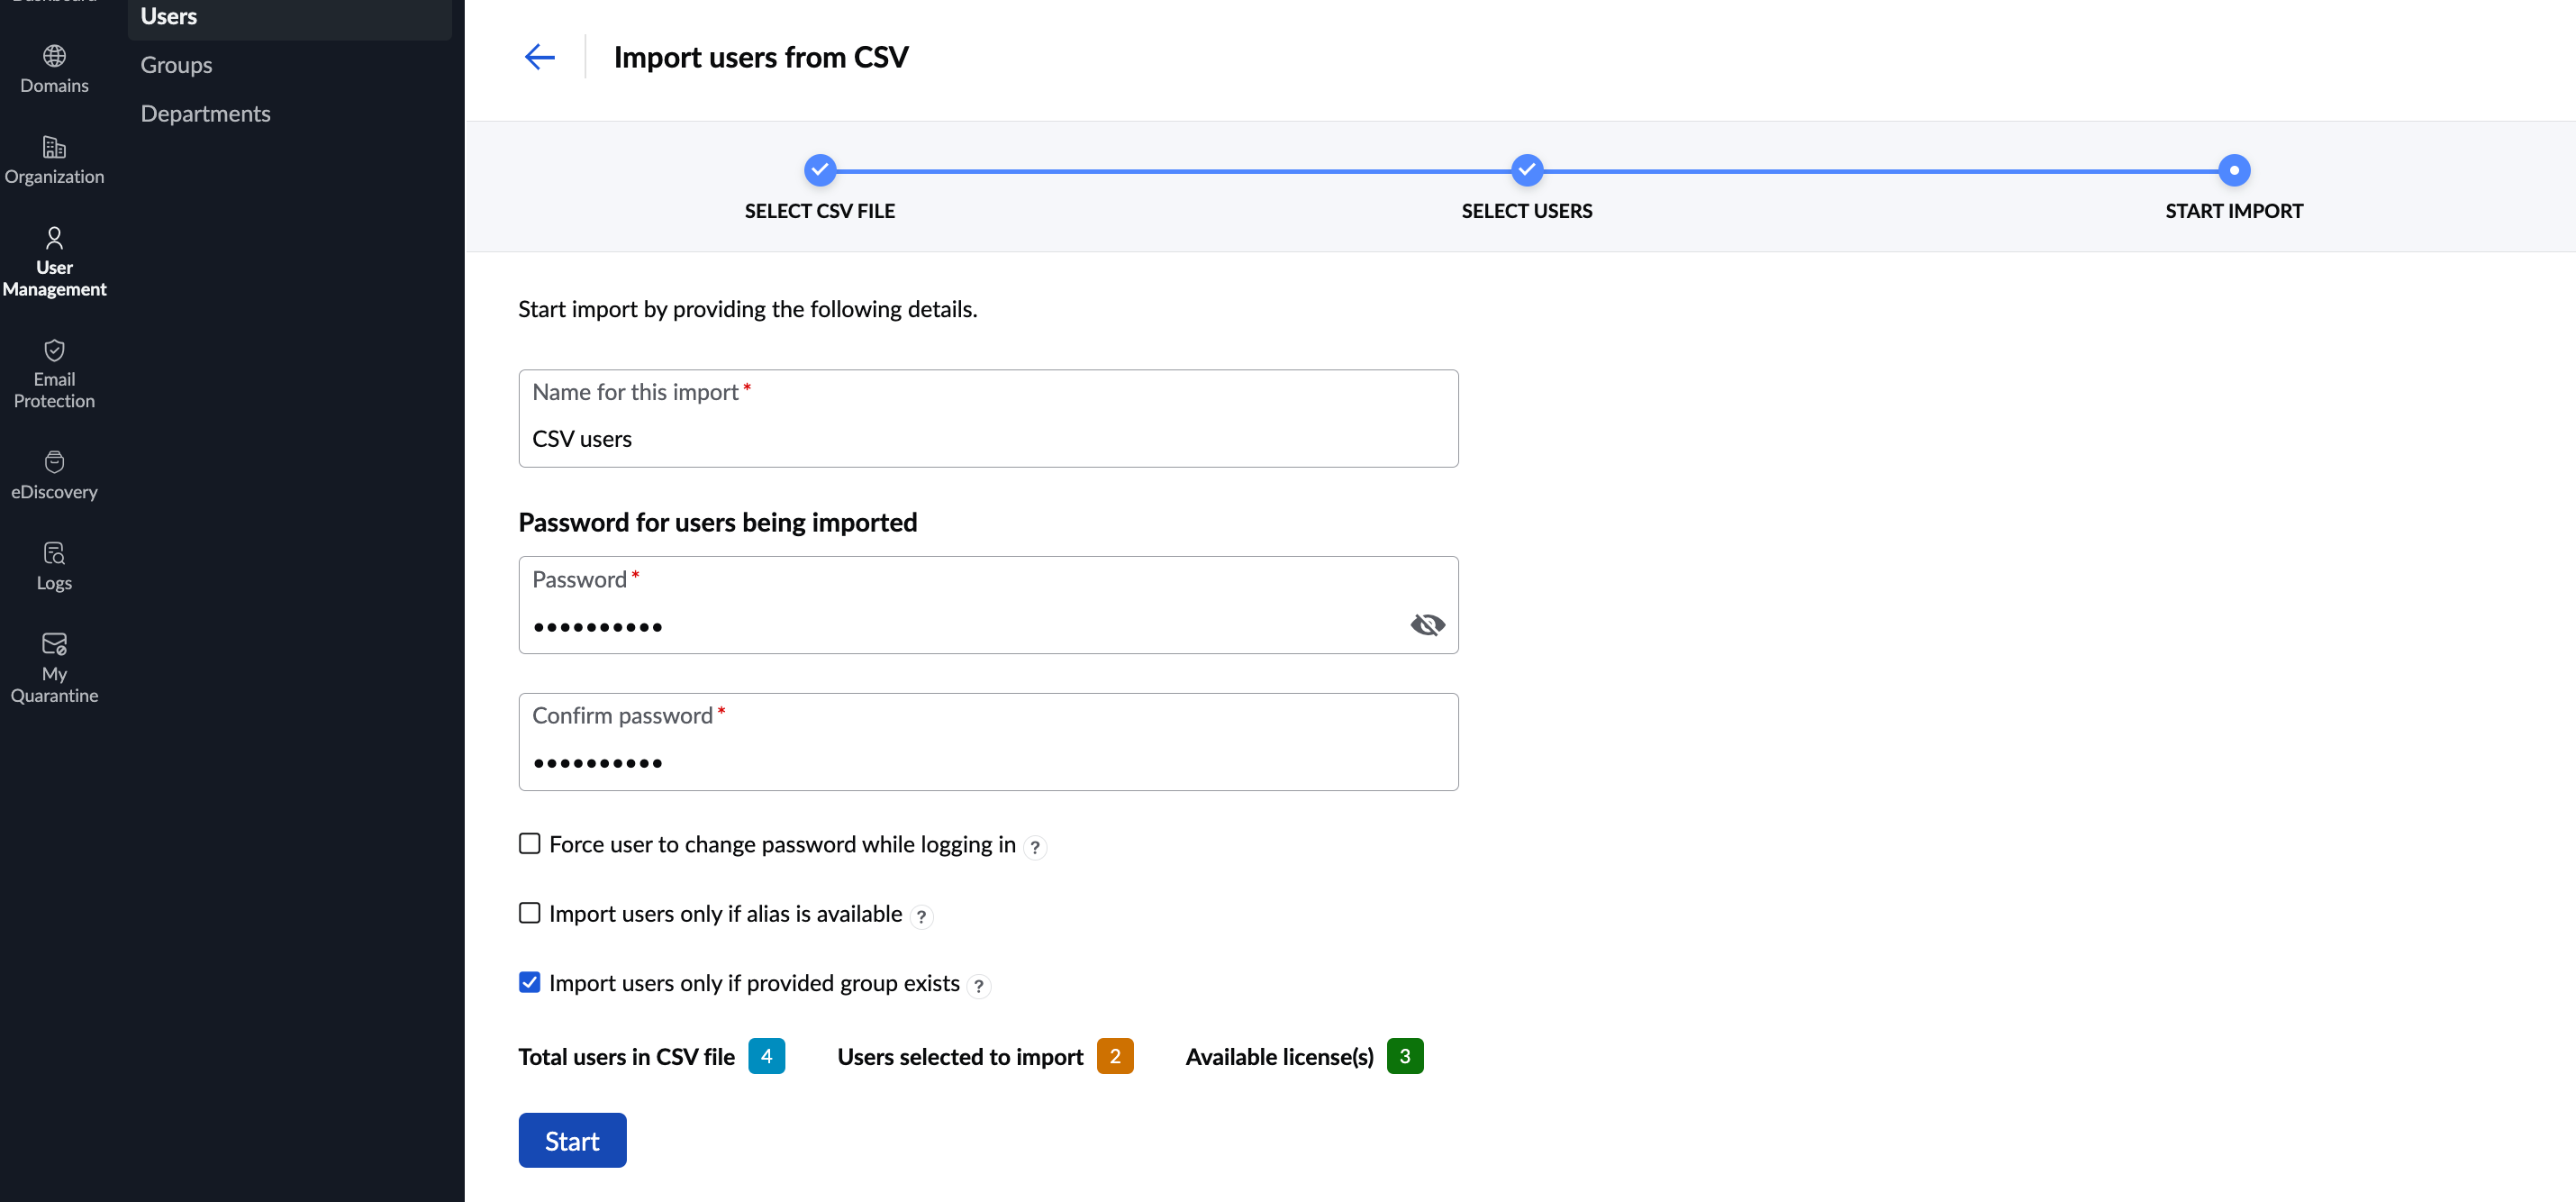
- Click Start.
- The import status on success and failure of user upload will be displayed. If the import status does not refresh automatically, you can click the refresh icon. You can start using other features in eProtect and access the import status in the Import using CSV file page.
Import from other email providers
- Log in to Zoho eProtect and select User Management on the left pane.
- Navigate to the Users section and select the Import drop-down.
- Select Import from other email providers.
- Select the email provider you wish to import from in the drop-down. Click Proceed.
- Select the hosted domains you wish to create groups with and click Proceed.
- Select the groups from the desired domains.
- Enter a suitable name for the import and click Start.
- If the details provided are accurate, the groups will be added to eProtect.
Import from other Zoho services
If your organization uses other Zoho products, you can quickly import the users from that Zoho service to your eProtect account. Follow these steps to import users from other Zoho services:
- Log in to Zoho eProtect and select User Management on the left menu.
- Navigate to Users and click Import.
- Select Import from other Zoho services. The users who are part of other Zoho services but not added to Zoho eProtect will be listed.
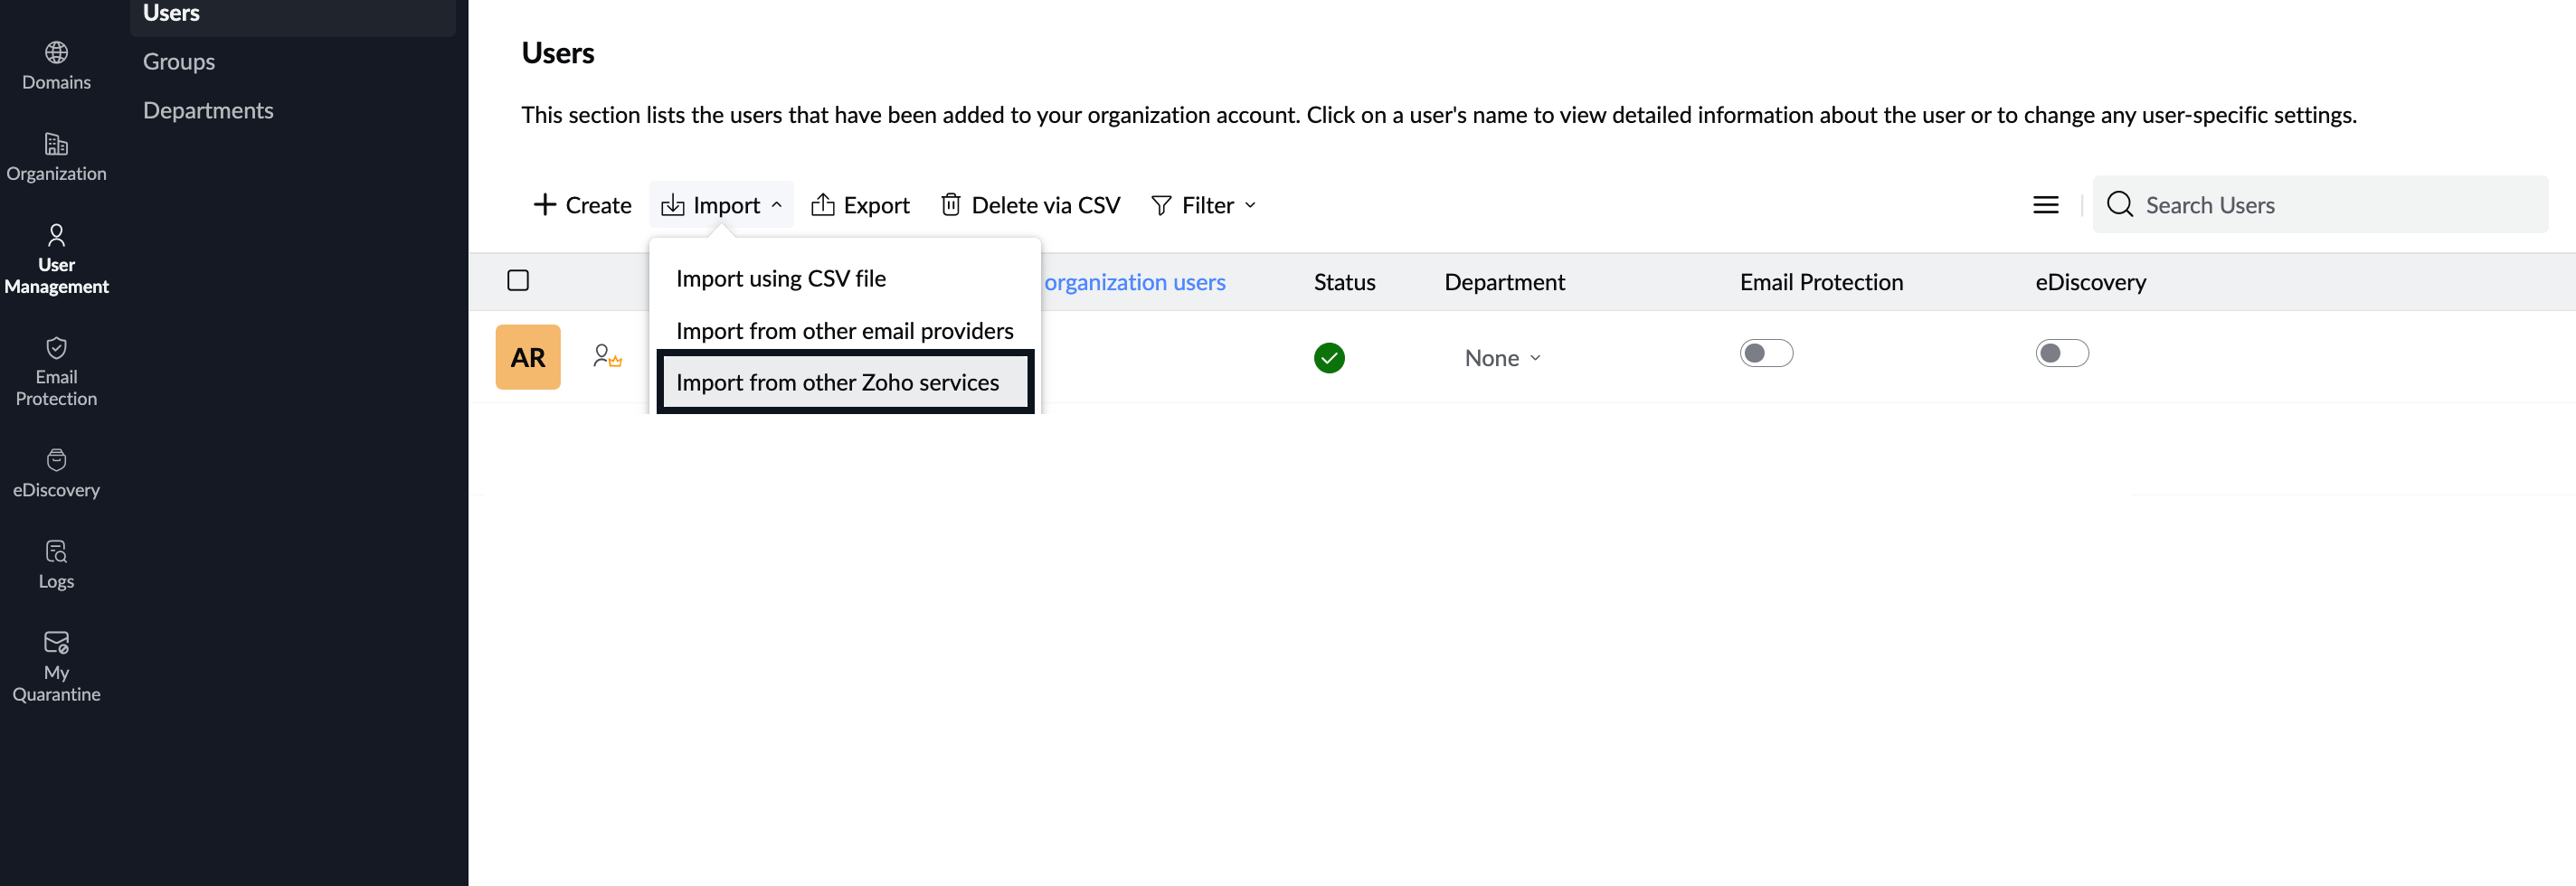
- Select one or more users and click Import. Alternatively, hover over a user and click the Import button.
- Click Proceed.
- Use the drop-down menu to select the preferred domain to which you wish to import the users.
- On the START IMPORT page, Name your import for future reference.
- Enter the password for the users being imported and reconfirm the password.
- If required select the desired options from the below:
- Force users to change password on next log in
- Import users only if provided group exists
- Click Start.
- The import status on success and failure of user upload will be displayed. If the import status does not refresh automatically, you can click the refresh icon.
Steps to change the role of a Zoho eProtect member
You can change the role of any user to admin and admin to a user by following these steps:
- Log in to Zoho eProtect and select User Management on the left pane.

- In the Users page, select the checkbox on the user for whom you want to change from Member to Admin.
- Click the Change role drop-down and select Admin. The user's role gets updated and you can see an admin icon near the username.
Delete Users
If you want to delete users for some reason, you can delete manually one user at a time or delete bulk users using a CSV file.
Follow these steps to delete users manually:
- Log in to Zoho eProtect and select User Management on the left pane.
- Navigate to the Users page and hover over the user whom you want to delete and click the delete icon.

- Alternatively, select the checkbox on the user whom you want to delete and select Delete from the top menu.
- Enter your admin password, select Delete from all Zoho services (if required) and click Ok. The selected user gets deleted from your organization.
Follow these steps to delete bulk users via CSV:
- Log in to Zoho eProtect and select User Management on the left pane.
- Navigate to the Users page and select Delete via CSV from the top menu.
- You can either drag and drop or Choose the file to upload. The users in your CSV file will be displayed for you to further scrutinize.
- Enter your admin password, select Delete from all Zoho services (if required) and click Delete. The users in the CSV file get deleted from your organization.
Other Actions
In addition to the above, you can also filter the users and export them. Follow these steps to filter or export the users:
- Log in to Zoho eProtect and select User Management on the left pane.
- Navigate to the Users page and select Filter from the top menu.
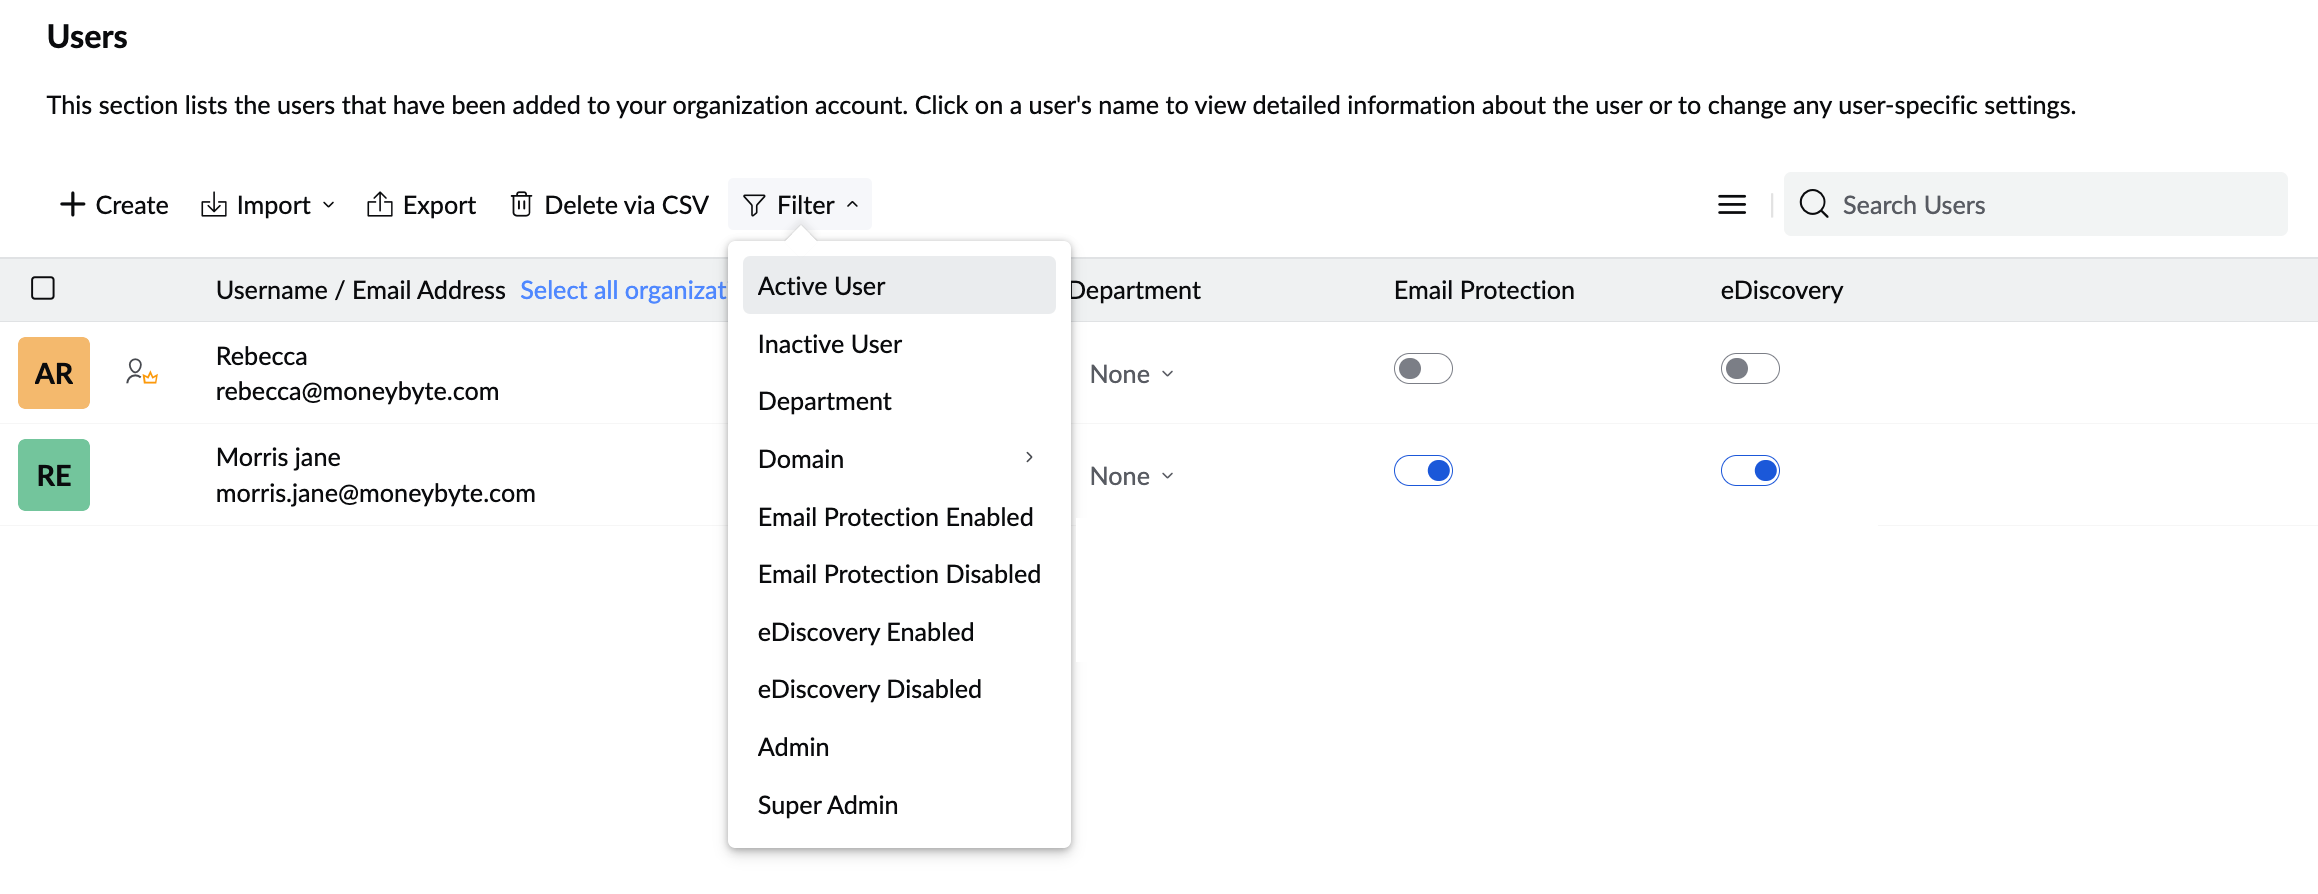
- Select the preferred filter from the drop-down to narrow down the result.
- To export the users, select Export from the top menu.
- Select Encrypt with password to prevent unauthorized access to your data.
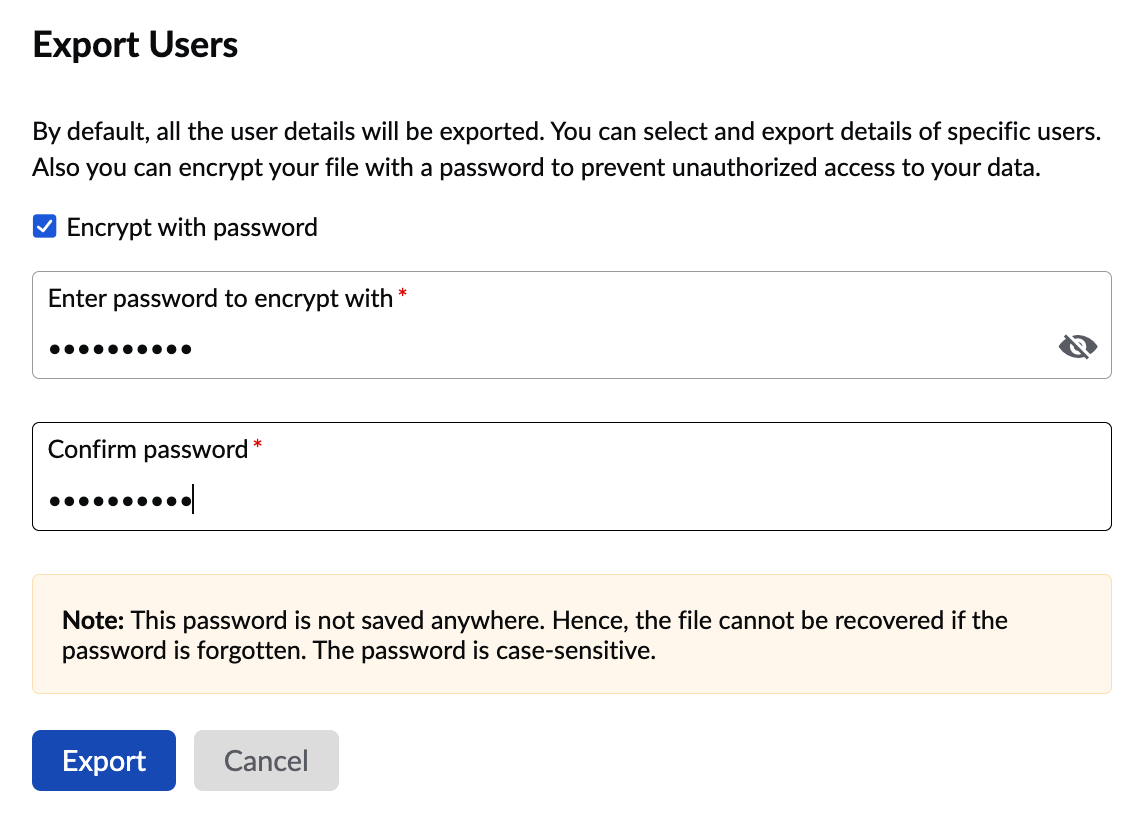
- Enter a password to protect the CSV file and click Export. The user list gets downloaded as a CSV file.
Groups
Groups are common email addresses shared by a set of users for a common purpose. This section lists the groups that are added to your organization account. Click on a group's name to view the details or to change any group-specific settings. You can do the following actions on the Groups page:
- Create a new group
- Import groups via CSV
- Import groups from other email service providers
- Edit group settings
- Export groups as a CSV
- Delete groups
Create Group
Follow these steps to create a new group:
- Log in to Zoho eProtect and select User Management on the left pane.
- Navigate to the Groups page and select Create from the top menu.

- Enter a Group Name, Group Email Address, and choose Moderator's mailboxes and User mailboxes.
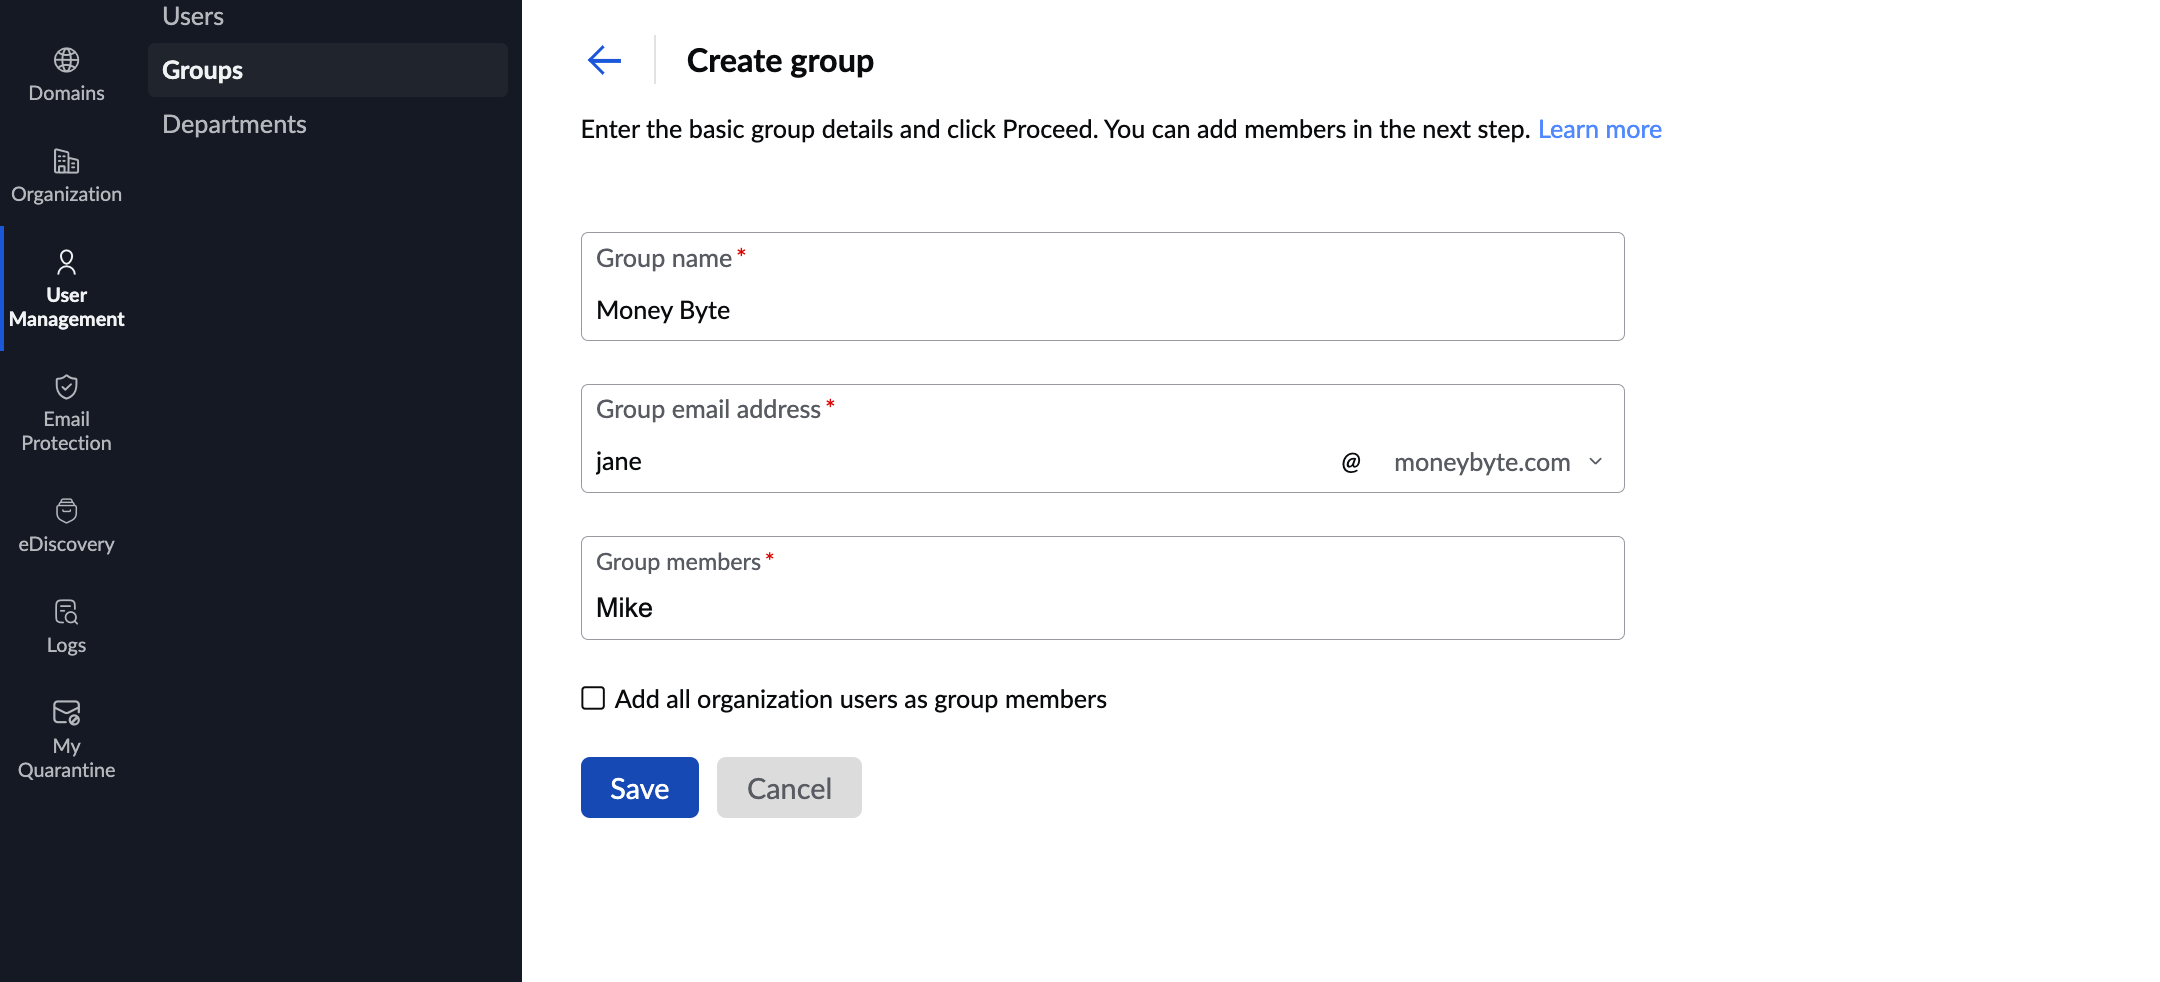
- Click the Save button.
Once you add a group, you can then edit the group settings.
Import Group
If you have your organization's groups in the form of a CSV file, you can import them easily. Follow these steps to import multiple groups via CSV:
- Log in to Zoho eProtect and select User Management on the left pane.
- Navigate to the Groups page and select Import from the top menu.
- Select Import using CSV file and click Import.

- Using the drop-down menu, select the domain in which the groups are to be imported and click Choose file.
- You can either drag and drop the CSV file or Choose the file to upload.
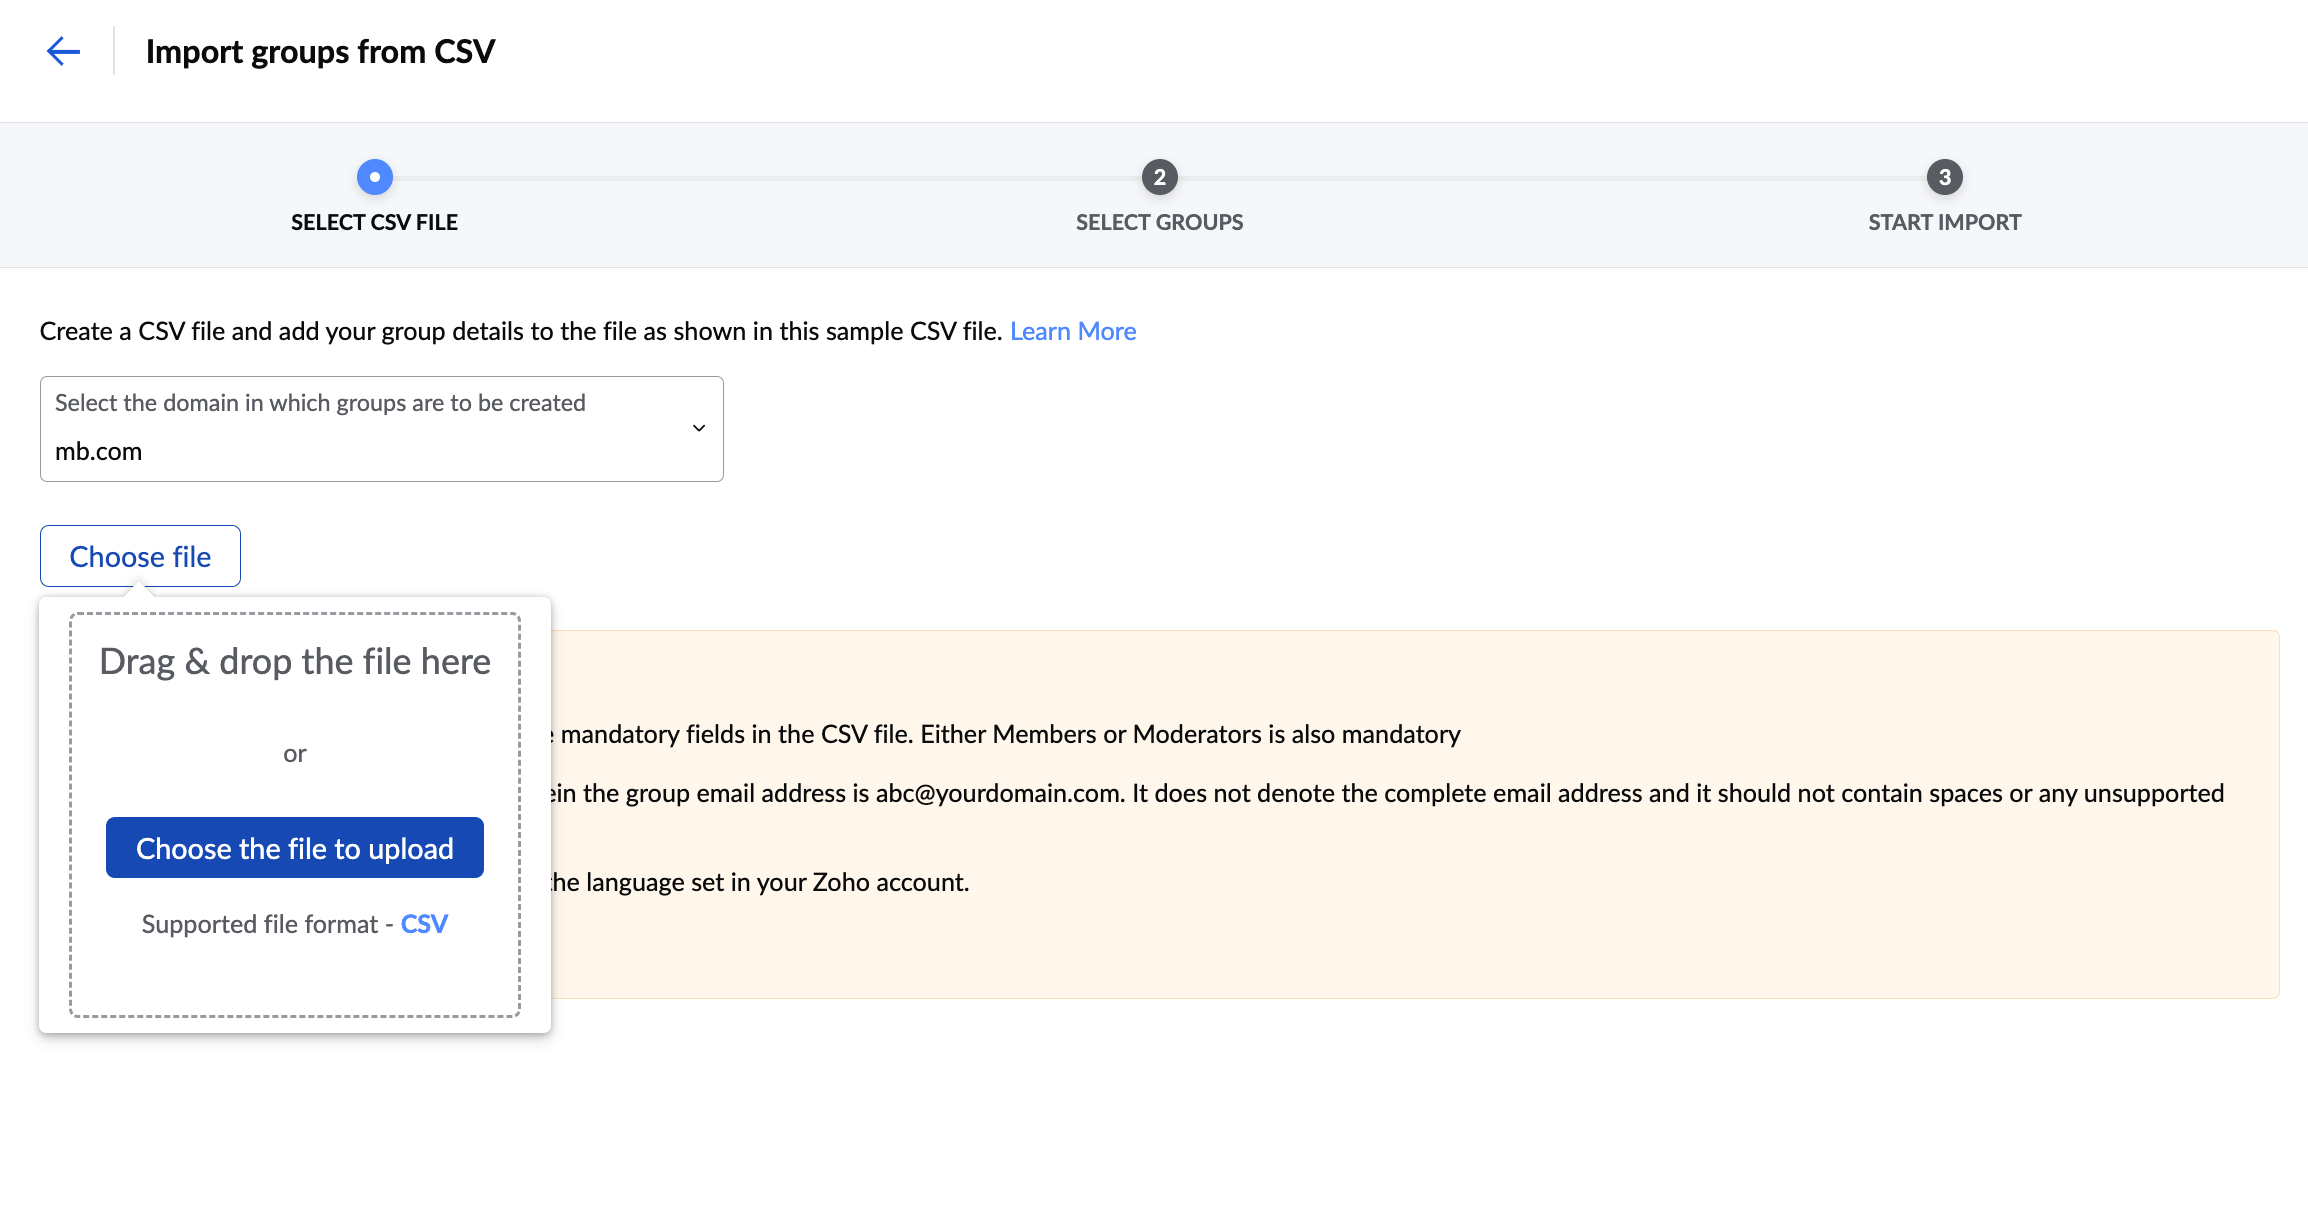
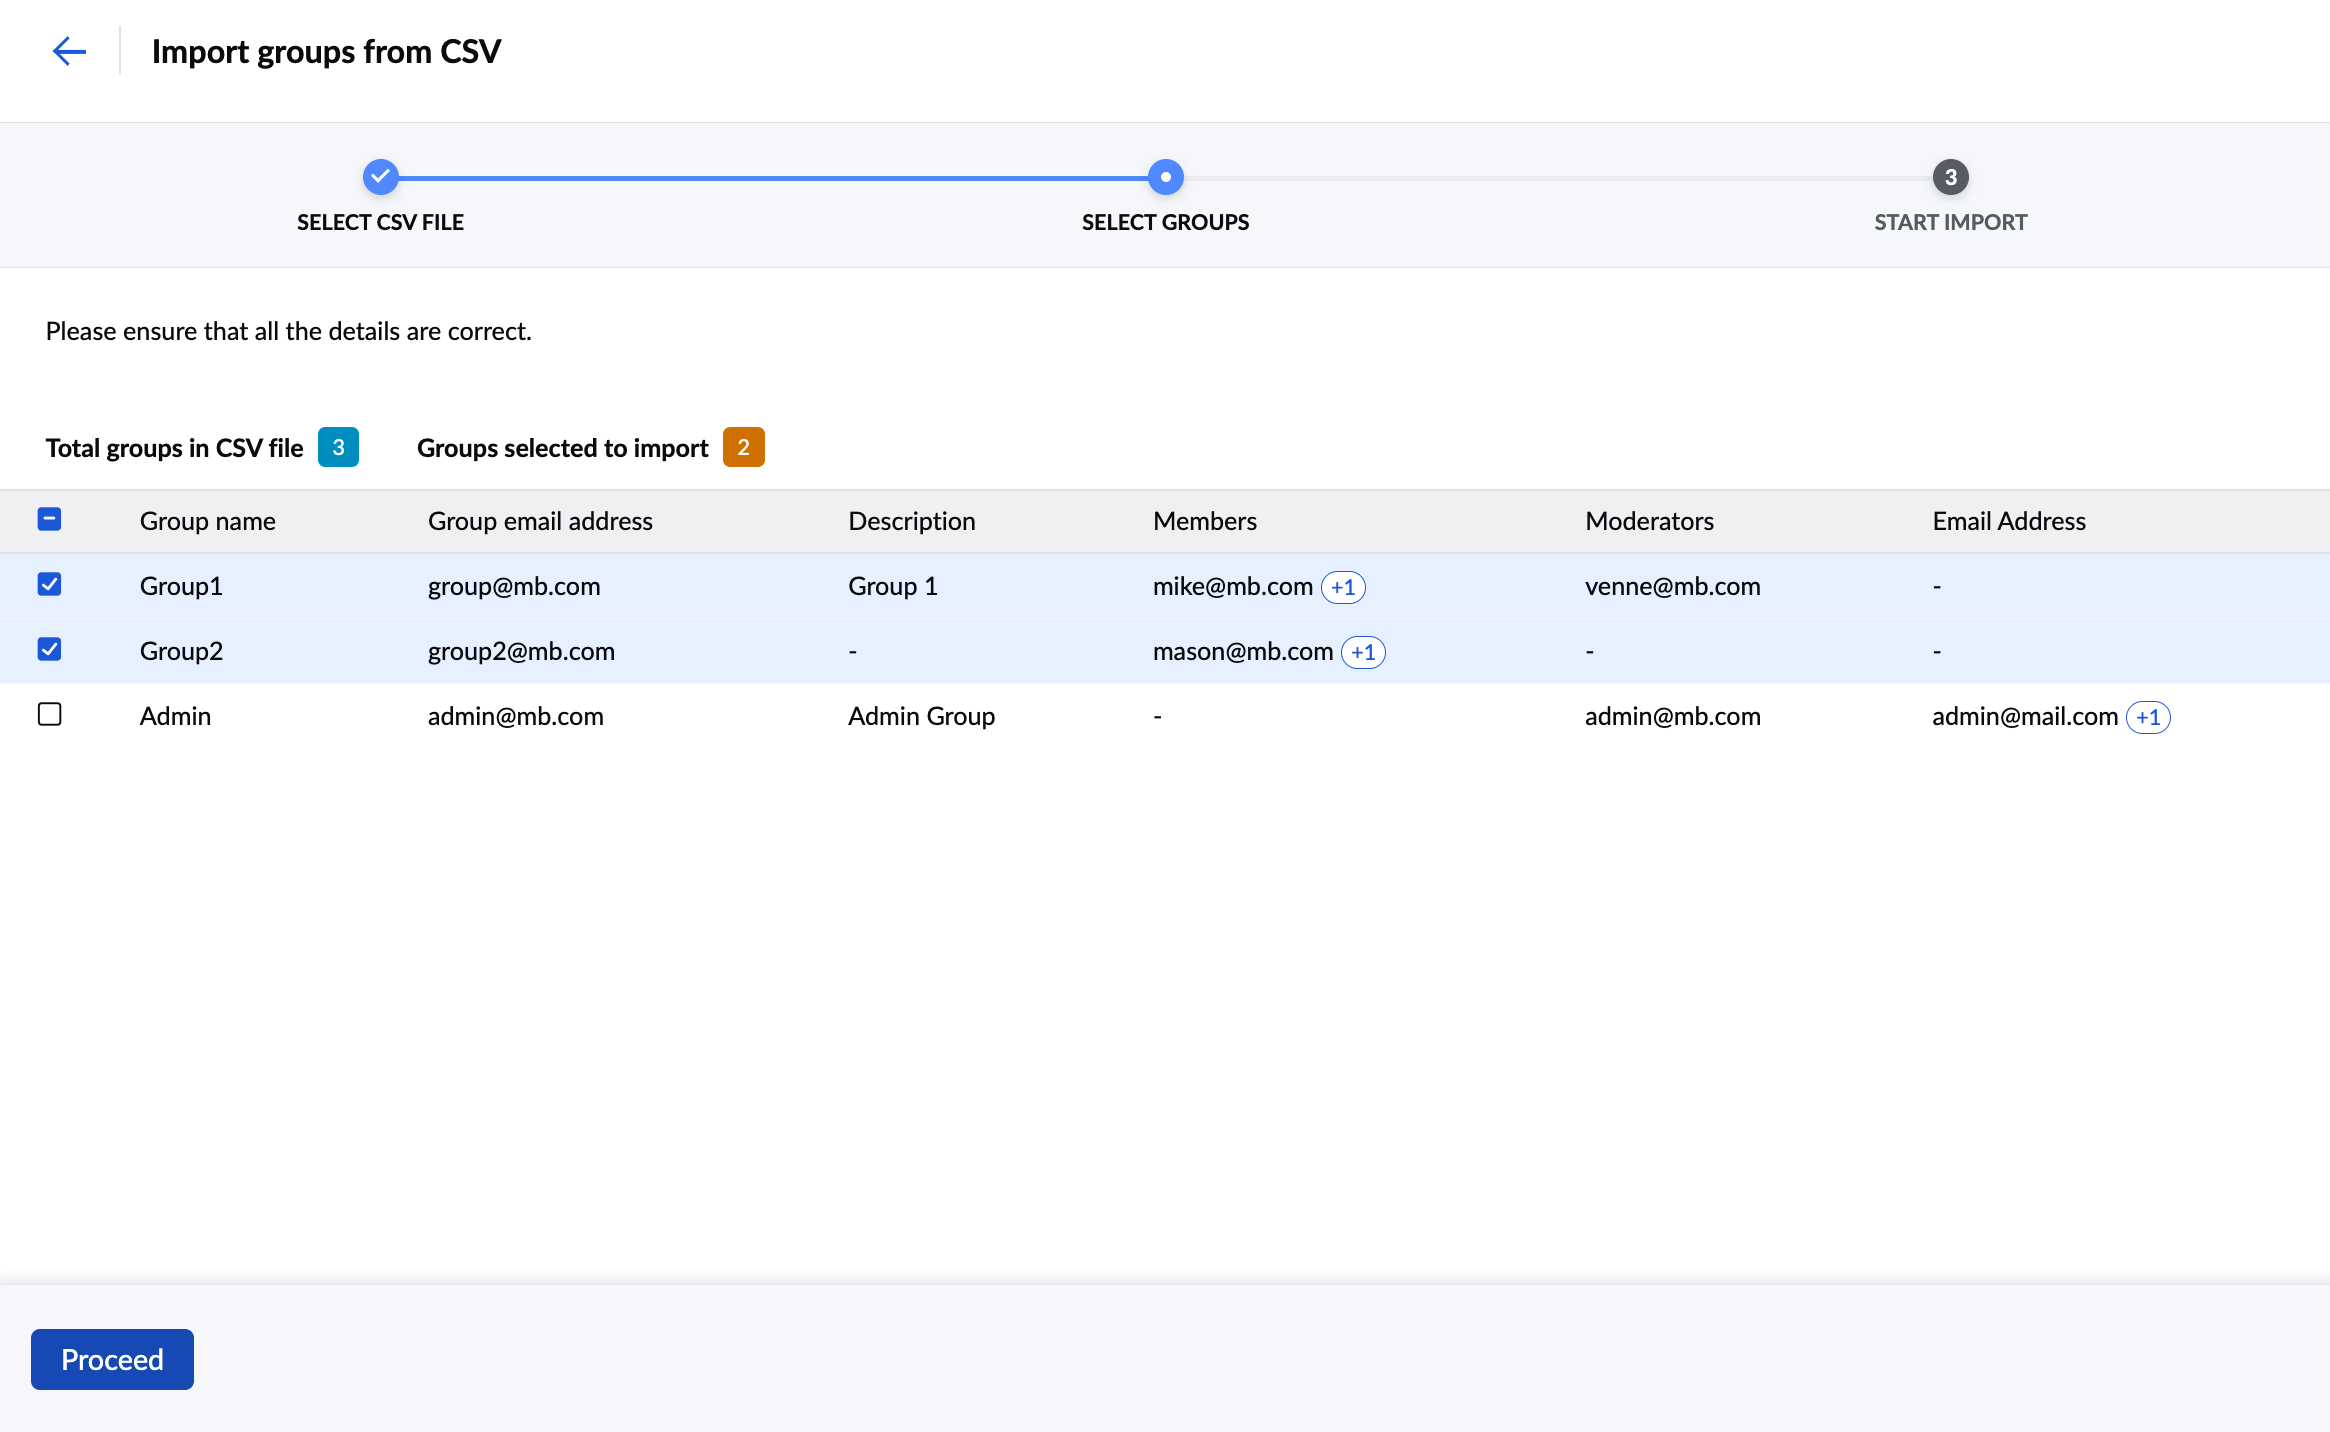
- Verify the group details and click Proceed.
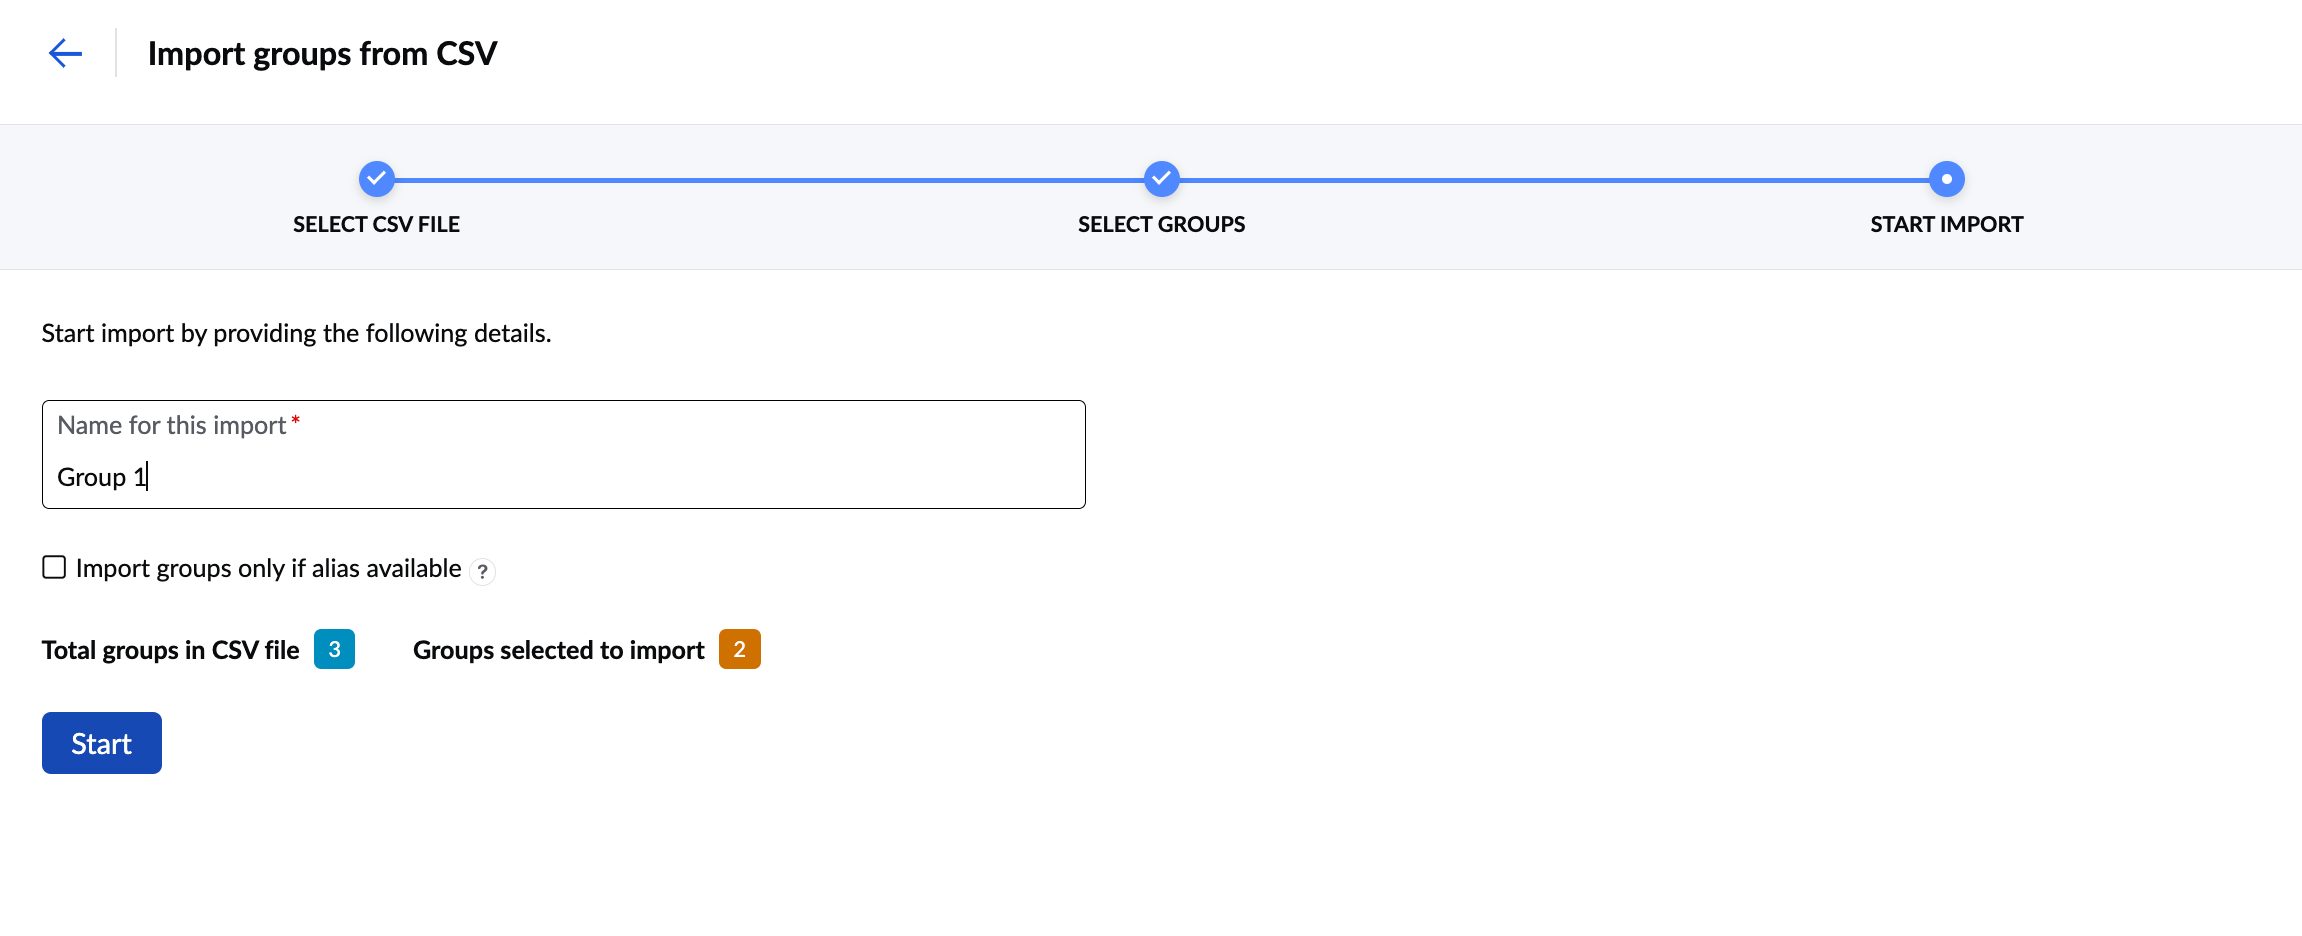
- Enter a name for the import for future reference and click Start.
- Click the refresh icon to view the latest import status.
If the details in the CSV file are valid, the groups will be added to eProtect.
Import group from other email providers
- Log in to Zoho eProtect and select User Management on the left pane.
- Navigate to the Groups section and select the Import drop-down.
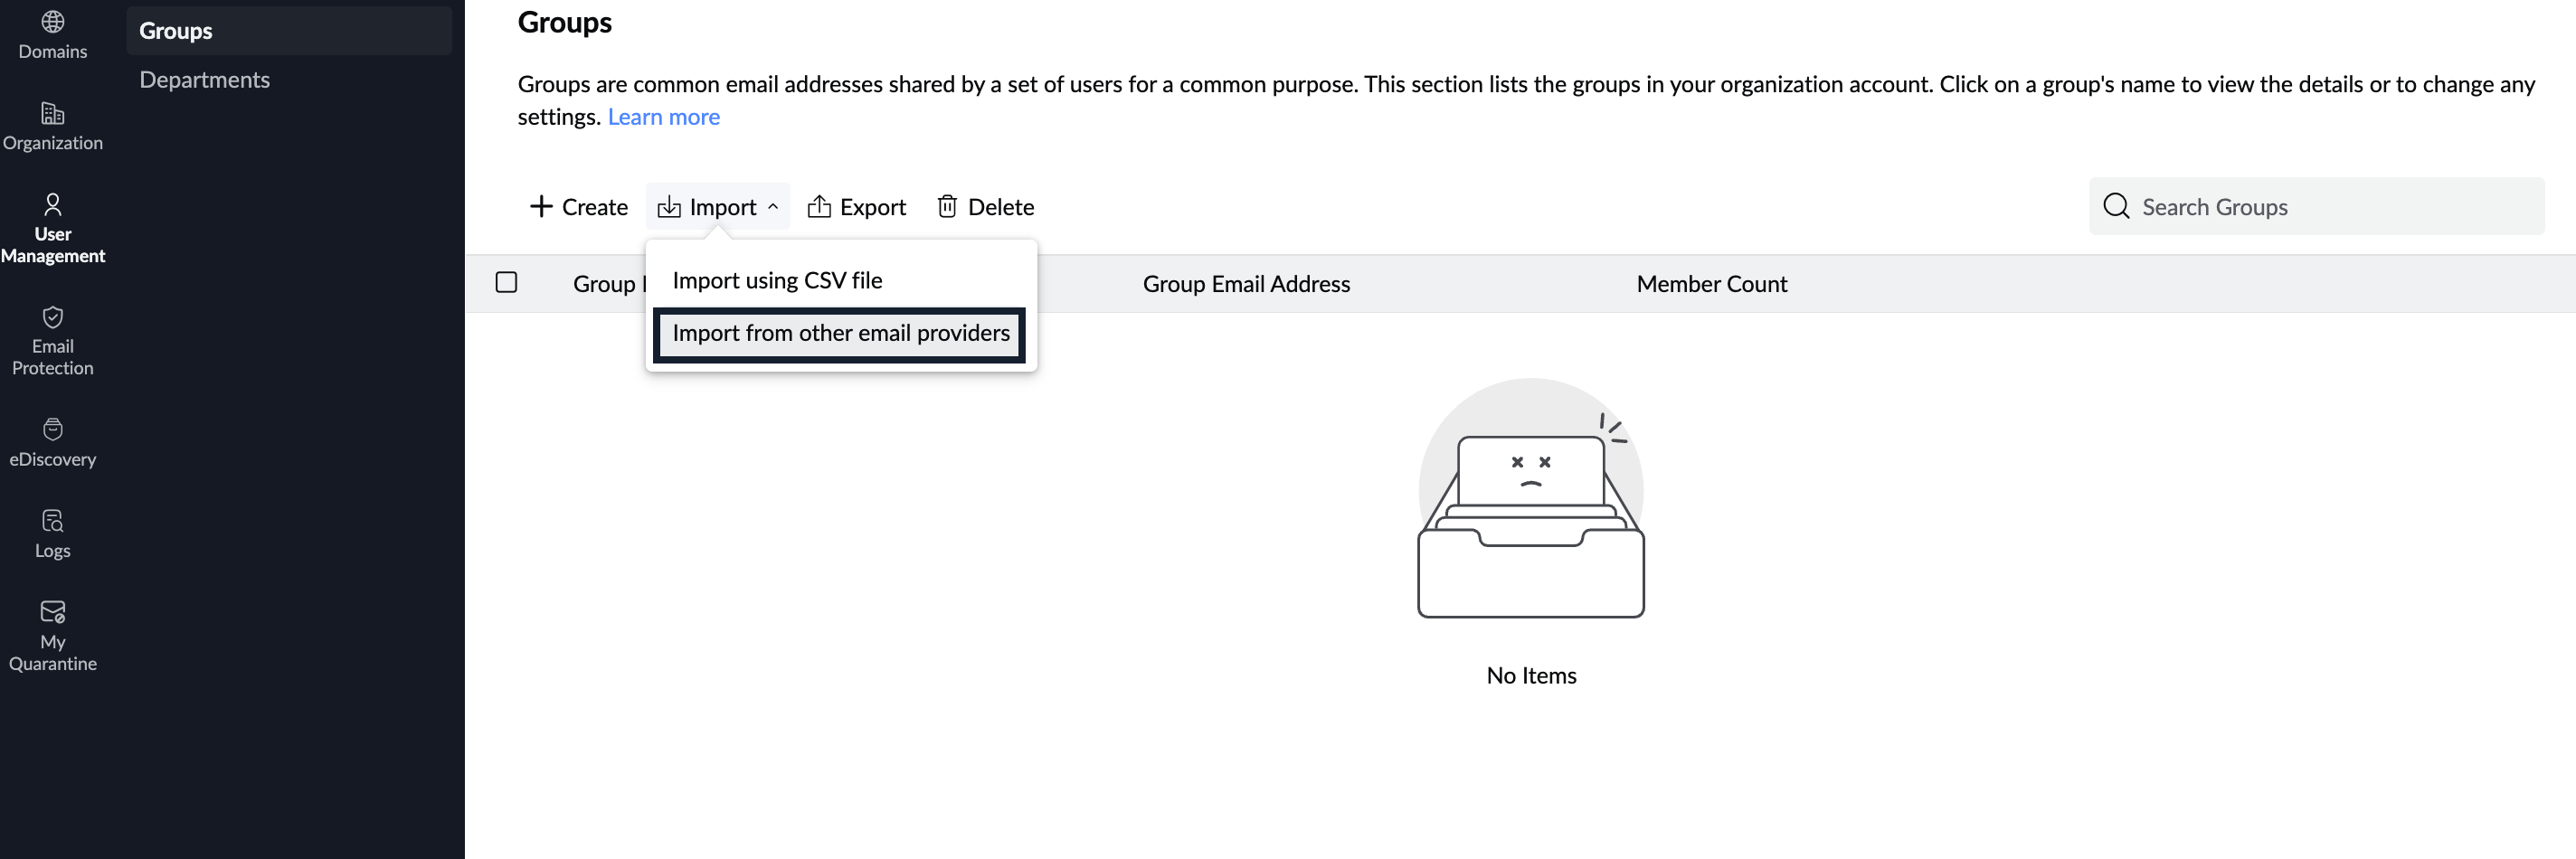
- Select Import from other email providers.
- Select the email provider you wish to import from in the drop-down. Click Proceed.
- Select the hosted domains you wish to create groups with and click Proceed.

- Select the groups from the desired domains.
- Enter a suitable name for the import and click Start.
- If the details provided are accurate, the groups will be added to eProtect.
Edit Groups
You can edit the group members, and define unique anti-spam settings for the group. Follow these steps to manage your groups:
- Log in to Zoho eProtect and select User Management on the left pane.
- Navigate to the Groups page and select the group which you want to edit. The General settings appear and list the user id and email addresses.
- To add users to the group, follow these steps:
- Click Add from the top menu.
- You can either Search and add organization users or Add all organization users.
- In the Select Users dialog, search for the desired users and click Add. The selected users get added to the right pane.
- Once you are done selecting the users, click the Add button. The selected users are successfully added to the group.
- To add bulk users via CSV, follow these steps:
- Click Import from the top menu.
- You can either drag and drop or Choose the file to upload.
- Select Import. Users in the CSV file are added to the group.
- To export the users list, select Export from the top menu and select Encrypt with password and click Export.
- To delete bulk users via CSV, follow these steps:
- Select Bulk Remove from the top menu.
- You can either drag and drop or Choose the file to upload.
- Click the Delete button. Users in the CSV file get deleted from the group.
Steps to modify Anti-spam settings for groups
Follow these steps to manage the anti-spam settings for groups:
- Log in to Zoho eProtect and select User Management on the left pane.
- Navigate to the Groups page and select the group which you want to edit.
- Select the Anti-Spam Settings tab. Any existing email addresses or domains added to the Allowed / Blocked list can be seen.
- Click Add from the top menu and choose either Allowed Emails, Blocked Emails, Allowed Domains or Blocked Domains.
- Enter one or more email addresses/domains separated by a comma and click Save.
The email address or domain gets listed as per the option you selected.
Other Actions
Groups can also be exported or deleted as per the organization's requirements. To export or delete a group, follow these steps:
- Log in to Zoho eProtect and select User Management on the left pane.
- Navigate to the Groups page and select the group which you wish to export or delete.
- Hover over the group and click the delete icon to delete that group.
- Alternatively, select the checkbox next to the group and click Delete from the top menu.
- Enter the password and click Ok. The selected group gets deleted.
- To export a group, select Export from the top menu.
- Select Include only groups, members, and member details.
- Select Encrypt with password to prevent unauthorized access to your data.
- Click the Export button. The group gets saved as a CSV file.
Departments
Departments are groupings of users within the organization. You can assign users to a department and apply the custom policy or scope to enforce a uniform configuration across the users in a department. The Departments page displays the Department Name, Description and Member Count. Use the search bar at the upper right corner to narrow down the result. You can do the following actions on the Departments page:
- Create a new department
- Import departments using CSV
- Expand/Collapse all departments
- Export departments as a CSV
- Delete departments
- Add users to a department
Create Department
Follow these steps to create a new department:
- Log in to Zoho eProtect and select User Management on the left pane.
- Navigate to the Departments page and click Create on the top menu.

- Enter the Department Name, an optional Description, choose the Parent Department and click Create.
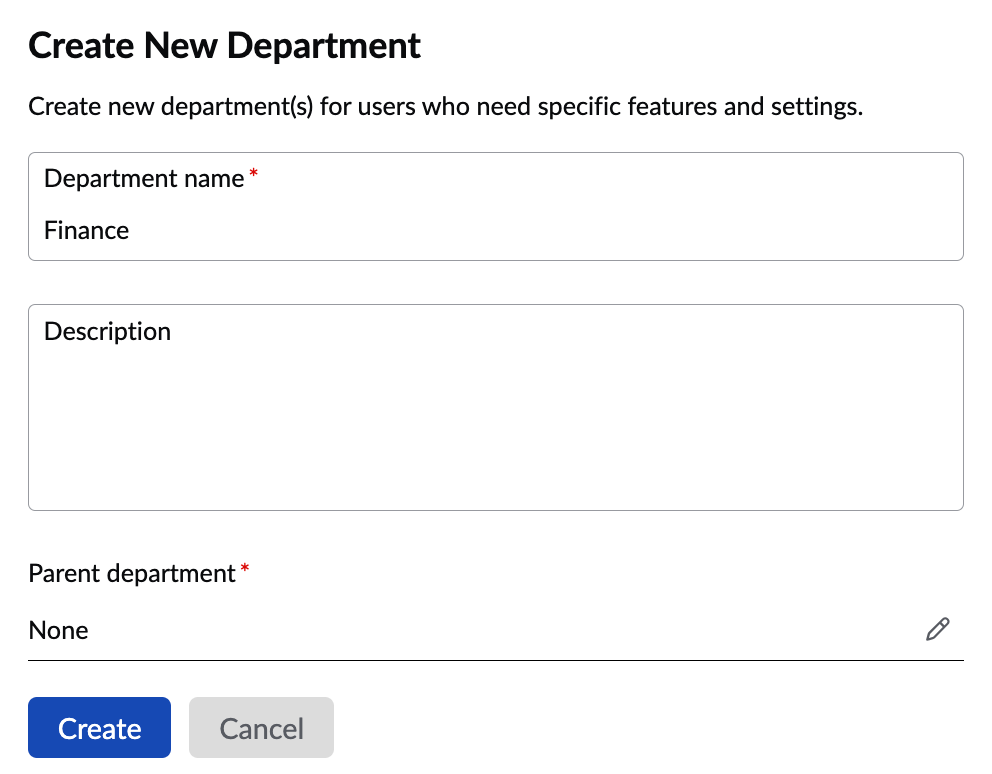
The department will be created. You can now add users to the department.
Import Departments
If you have already saved the organization's departments in a CSV file, you can follow these steps to import bulk departments via CSV:
- Log in to Zoho eProtect and select User Management on the left pane.
- Navigate to the Departments page and click Import from the top menu.
- Select Import using CSV file from the drop-down menu and click Import.
- Select Choose file and upload the CSV file which has your organization's department.
- Review the department details and click Proceed.
- Enter a name for the import for future reference and click Start.
- Click Refresh from the top menu to view the latest status of the import.
The departments in the CSV file get added to eProtect.
Add users to a department
Users can be added to a department from the Users page or from the Departments page. Follow these steps to add users to a department:
- Log in to Zoho eProtect and select User Management on the left pane.
- Follow the Create users manually steps to add a new user to the department.
- To modify an existing user's department from the Departments page, follow these steps:
- Navigate to the Departments page and select the department. You can view the existing users in the department if there are any.
- Click the department name of a user under Department.
- Choose the preferred department from the Change Department dialog and click Change. The user's department gets updated successfully.
- Alternatively, navigate to the Users page and click the department name for a user and choose the preferred department.
- Click the Change button. The user's department gets updated successfully.
Other Actions
After you create or import departments, you can export or delete a department if required. Follow these steps to export or delete a department:
- Log in to Zoho eProtect and select User Management on the left pane.
- Navigate to the Departments page.
- Select Export from the top menu.
- Choose Include only departments, members and member details if you do not want additional fields.
- Select Encrypt with password to prevent unauthorized access to your data.
- Enter a password to protect the CSV file and click Export. The user list gets downloaded as a CSV file.
- Follow one of these steps to delete a department:
- Hover over the department and click the delete icon. Enter the password and click Ok.
- Select the checkbox next to a department and select Delete from the top menu. Enter the password and click Ok.


