Install Actions
How Can I...
Sometimes, you might want your extension to run a customized script immediately after installation or upgradation. For example, you might want to create sample data, or send an email notification about the installation to the CRM users or to an external system, or kick off a batch operation to populate a new field across a large set of data. This cannot be achieved with the help of a custom function or workflow rules. To help you achieve this, Zoho Developer allows you to bundle a post install script along with your extension.
The post install scripts are small snippets of codes or commands that are to be executed immediately after the extension is installed or updated.
Create a post install script
To add a post install script to your extension
- Log in to your Zoho Developer console and click Extensions for Zoho CRM.
- Select the extension you'd like to modify and click Edit.
- Select Install Actions in the left pane.
- Select Extension and click On Installation.
- In the Deluge Script Editor, write the required code.
- Click Save and Execute if you want to test your code or else simply click Save.

Note
- You can write only one post install script per extension.
- The post install script gets triggered automatically when the extension is installed or updated.
- This script can be triggered only once.
InstallParamMap Variable
The installParamMap variable can be used only with the post install script and is used to obtain the following data from Zoho CRM:
- Organization ID - The unique Organization ID of the Zoho CRM account in which the extension is installed. The syntax to obtain the org ID is <variable_name>= input.installParamMap.get("organizationId");
- Installer ID - The unique ID of the user who installs the extension. The syntax to obtain the installer ID is<variable_name>= input.installParamMap.get("installerId");
- IsInstall - This is used to check whethere the extension is installed for the first time or is an upgradation. The syntax for this task is<variable_name>= input.installParamMap.get("isInstall");
- PreviousVersion - The value of the previous version of the extension in case of an update. The syntax to obtain the previous version number is<variable_name>= input.installParamMap.get("previousVersion");
Example
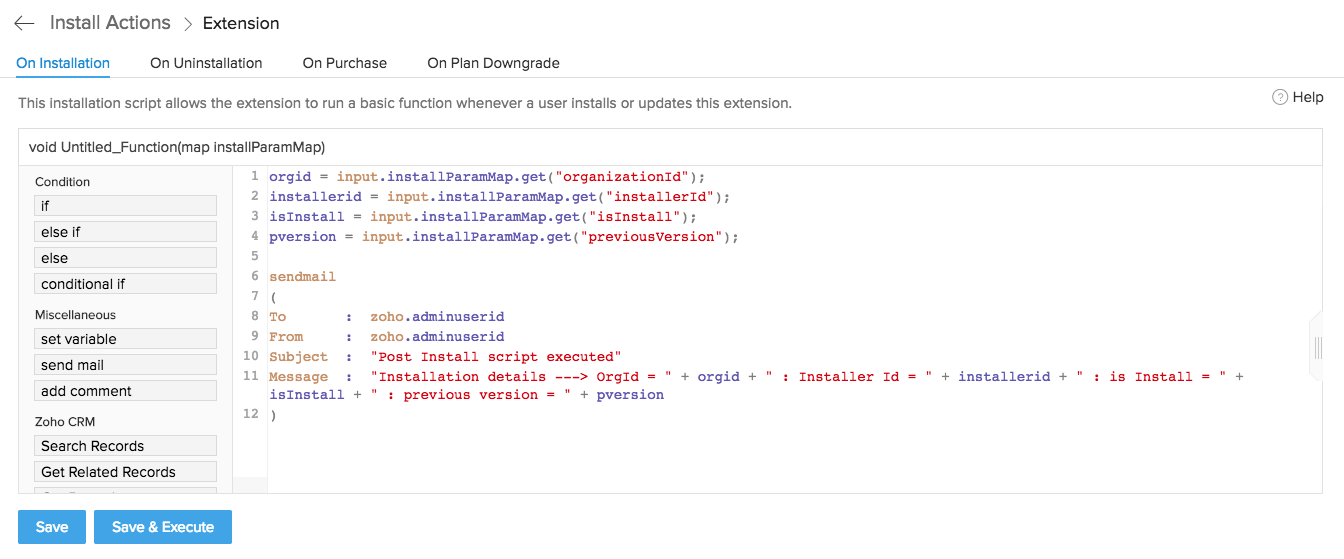
Consider the following scenario, A user who installs your extension wishes to alert all the other users in the CRM system about the installation via an email. This can be achieved with the help of a simple post install script.
orgid = input.installParamMap.get("organizationId");
installerid = input.installParamMap.get("installerId");
isInstall = input.installParamMap.get("isInstall");
pversion = input.installParamMap.get("previousVersion");
sendmail
(
To : zoho.adminuserid
From : zoho.adminuserid
Subject : "Post Install script executed"
Message : "Installation details ---> OrgId = " + orgid + " : Installer Id = " + installerid + " : is Install = " + isInstall + " : previous version = " + pversion
)
This script when executed, sends an email to admin of the CRM system with the details of the extension and the user who installed the extension.
Similarly you can perform any action using the post installer script.
Create a post uninstall script
To create a post-uninstall script
- Log in to your Zoho Developer console and click Extensions for Zoho CRM.
- Select the extension you'd like to modify and click Edit.
- Select Install Actions in the left pane.
- Select Extension and click On Uninstallation.
- In the Deluge Script Editor, write the required code.
- Click Save and Execute if you want to test your code or else simply click Save.
- Publish the extension again to make this change effective.
Create an on authorization script for connectors
Occasionally, you might want to run a customized script immediately after a connector has been authorized. For example, you might want to register webhooks or create users. These objectives cannot be achieved with a custom function or workflow rules. To help you achieve this, Zoho Developer allows you to create an add-on script that will get executed post authorization of the connector.
The post authorization script is a snippet of code or command that is to be executed after authorization of the connector.
To include a post authorization script for a connector:
- Click Extensions for Zoho CRM in the Zoho Developer console homepage.
- Select the extension that the connector has been associated to.
- Click Install Actions in the left pane.
- Select Connectors and click On Authorization.
- Select the connector that you want to include the authorization script in.
- Write the required code in the Deluge Script Editor.
- Click Execute if you want to test your code, or simply click Save to Connector.
Note
- You can only write one post authorization script per connector.
- The post authorization script gets triggered automatically when the connector is authorized.
- This script will be triggered every time the connector is authorized.
Example
Consider a scenario where a user wants to register a webhook that will notify the CRM system when appointments are scheduled (created) in an external system. When this event of receiving a notification is not associated with any user action or input in the CRM system, it can be triggered by including a post authorization script for the connector. Thus, the webhook will be created when the extension that has the connector is used in the CRM system. Similarly, you can perform any action using the post authorization script for connector.
apiresponse = zoho.crm.invokeConnector("crm.zapikey", getmap);
zapikey = apiresponse.get("response");
crm_signal_webhook_url = "https://platform.zoho.com/crm/v2/settings/custom_function/acuityschedulingext.createevent/execute?zapikey=" + zapikey;
scheduledMap = { "triggerEvent" : "appointment.scheduled", ("targetUrl") : crm_signal_webhook_url };
response = zoho.crm.invokeConnector("acuityschedulingext.acuityscheduler.regsiterwebhook", scheduledMap);
info response;
webhookid = response.get("id");
setResp = zoho.crm.invokeConnector("crm.set", { "apiname" : "acuityschedulingext.webhookid", "value" : webhookid });
For registering a Webhook, a deluge function needs to be defined that can be exposed as a REST API. Once this function (createevent) is defined and saved, the REST API URL will be generated. This URL (https://platform.zoho.com/crm/v2/settings/custom_functions/acuityscheduling .createevent) is the Webhook URL that has to be provided to the third-party application. The code for the function is given below:
appointmentId = resp.get("id");
getsingleappointmentMap = { "id" : appointmentId };
response = zoho.crm.invokeConnector(("acuityschedulingext.acuityscheduler.getsingleappointment"), getsingleappointmentMap);
responseMap = (response.get("response")).toMap();
fName = responseMap.get("firstName");
lName = responseMap.get("lastName");
mobile = responseMap.get("phone");
email = responseMap.get("email");
eventName = responseMap.get("type");
createContactMap = { "First_Name" : fName, "Last_Name" : lName, "Mobile" : mobile, "Email" : email };
m = map();
l = List();
l.add(createContactMap);
m.put("module", "Contacts");
m.put("data", l);
contactResp = zoho.crm.invokeConnector("crm.create", m);
info contactResp;
newContactResp = (contactResp.get("response")).toMap();
newDataMap = (newContactResp.get("data")).toMap();
contactId = newDataMap.get("id");
createEventMap = { "Event_Title" : eventName, "Who_Id" : contactId, "All_day" : false, "Start_DateTime" : ("2017-09-08T15:58:00+05:30"), "End_DateTime" : ("2017-09-08T15:58:00+06:30") };
mapp = map();
lapp = List();
lapp.add(createEventMap);
mapp.put("module", "Events");
mapp.put("data", lapp);
EventResp = zoho.crm.invokeConnector("crm.create", mapp);
info EventResp;
Note
For more details about registering webhooks, refer to the guide on Custom SalesSignal
In the example mentioned above, after the webhook is successfully created, new record will be added in Contacts and Events module whenever a new appointment is created in the third-party application. The ID of the newly created webhook is set as an organization variable so that the value of the ID is available globally to be used at a later stage. To set the organization variable, follow the below steps:
- Click on Extension Settings in the left pane.
- Click Create.
- Enter the values as shown below:

- Click Save.

After the webhook is successfully created, the following response will be obtained:
Create an on revoke script for connectors
After revoking the authorization of a connector, it might become necessary to nullify the workflow/action(s) associated with the connector. For example, you might want to disallow users from sending mail/SMS. These objectives cannot be achieved with the help of a custom function or workflow rules. To help you achieve this, Zoho Developer allows you to add a script (snippet of code or command) which will get executed during revocation of authorization of the connector.
To include a script post revocation of authorization of a connector:
- Click Extensions for Zoho CRM in the Zoho Developer console homepage.
- Select the extension that the connector has been associated to.
- Click Install Actions in the left pane.
- Select Connectors and click On Revoking.
- Select the connector you want to add the script to be executed in after revocation of the connector authorization.
- Write the required code in the Deluge Script Editor.
- Click Execute if you want to test your code, or simply click Save to Connector.
Note
- You can only write one post connector revocation script per connector.
- The post connector revocation script gets triggered automatically when the authorization of the connector is revoked.
- This script will be triggered every time the connector authorization is revoked.
Example
On revocation of the connector authorization, a registered webhook is deleted.
m = { "id" : webhookid };
resp = zoho.crm.invokeConnector("acuityschedulingext.acuityscheduler.deletewebhook", m);
m = { "apiname" : "acuityscheduling.webhookid", "value" : 0 };
setOrgVar = zoho.crm.invokeConnector("crm.set", m);
Execute a script on purchase
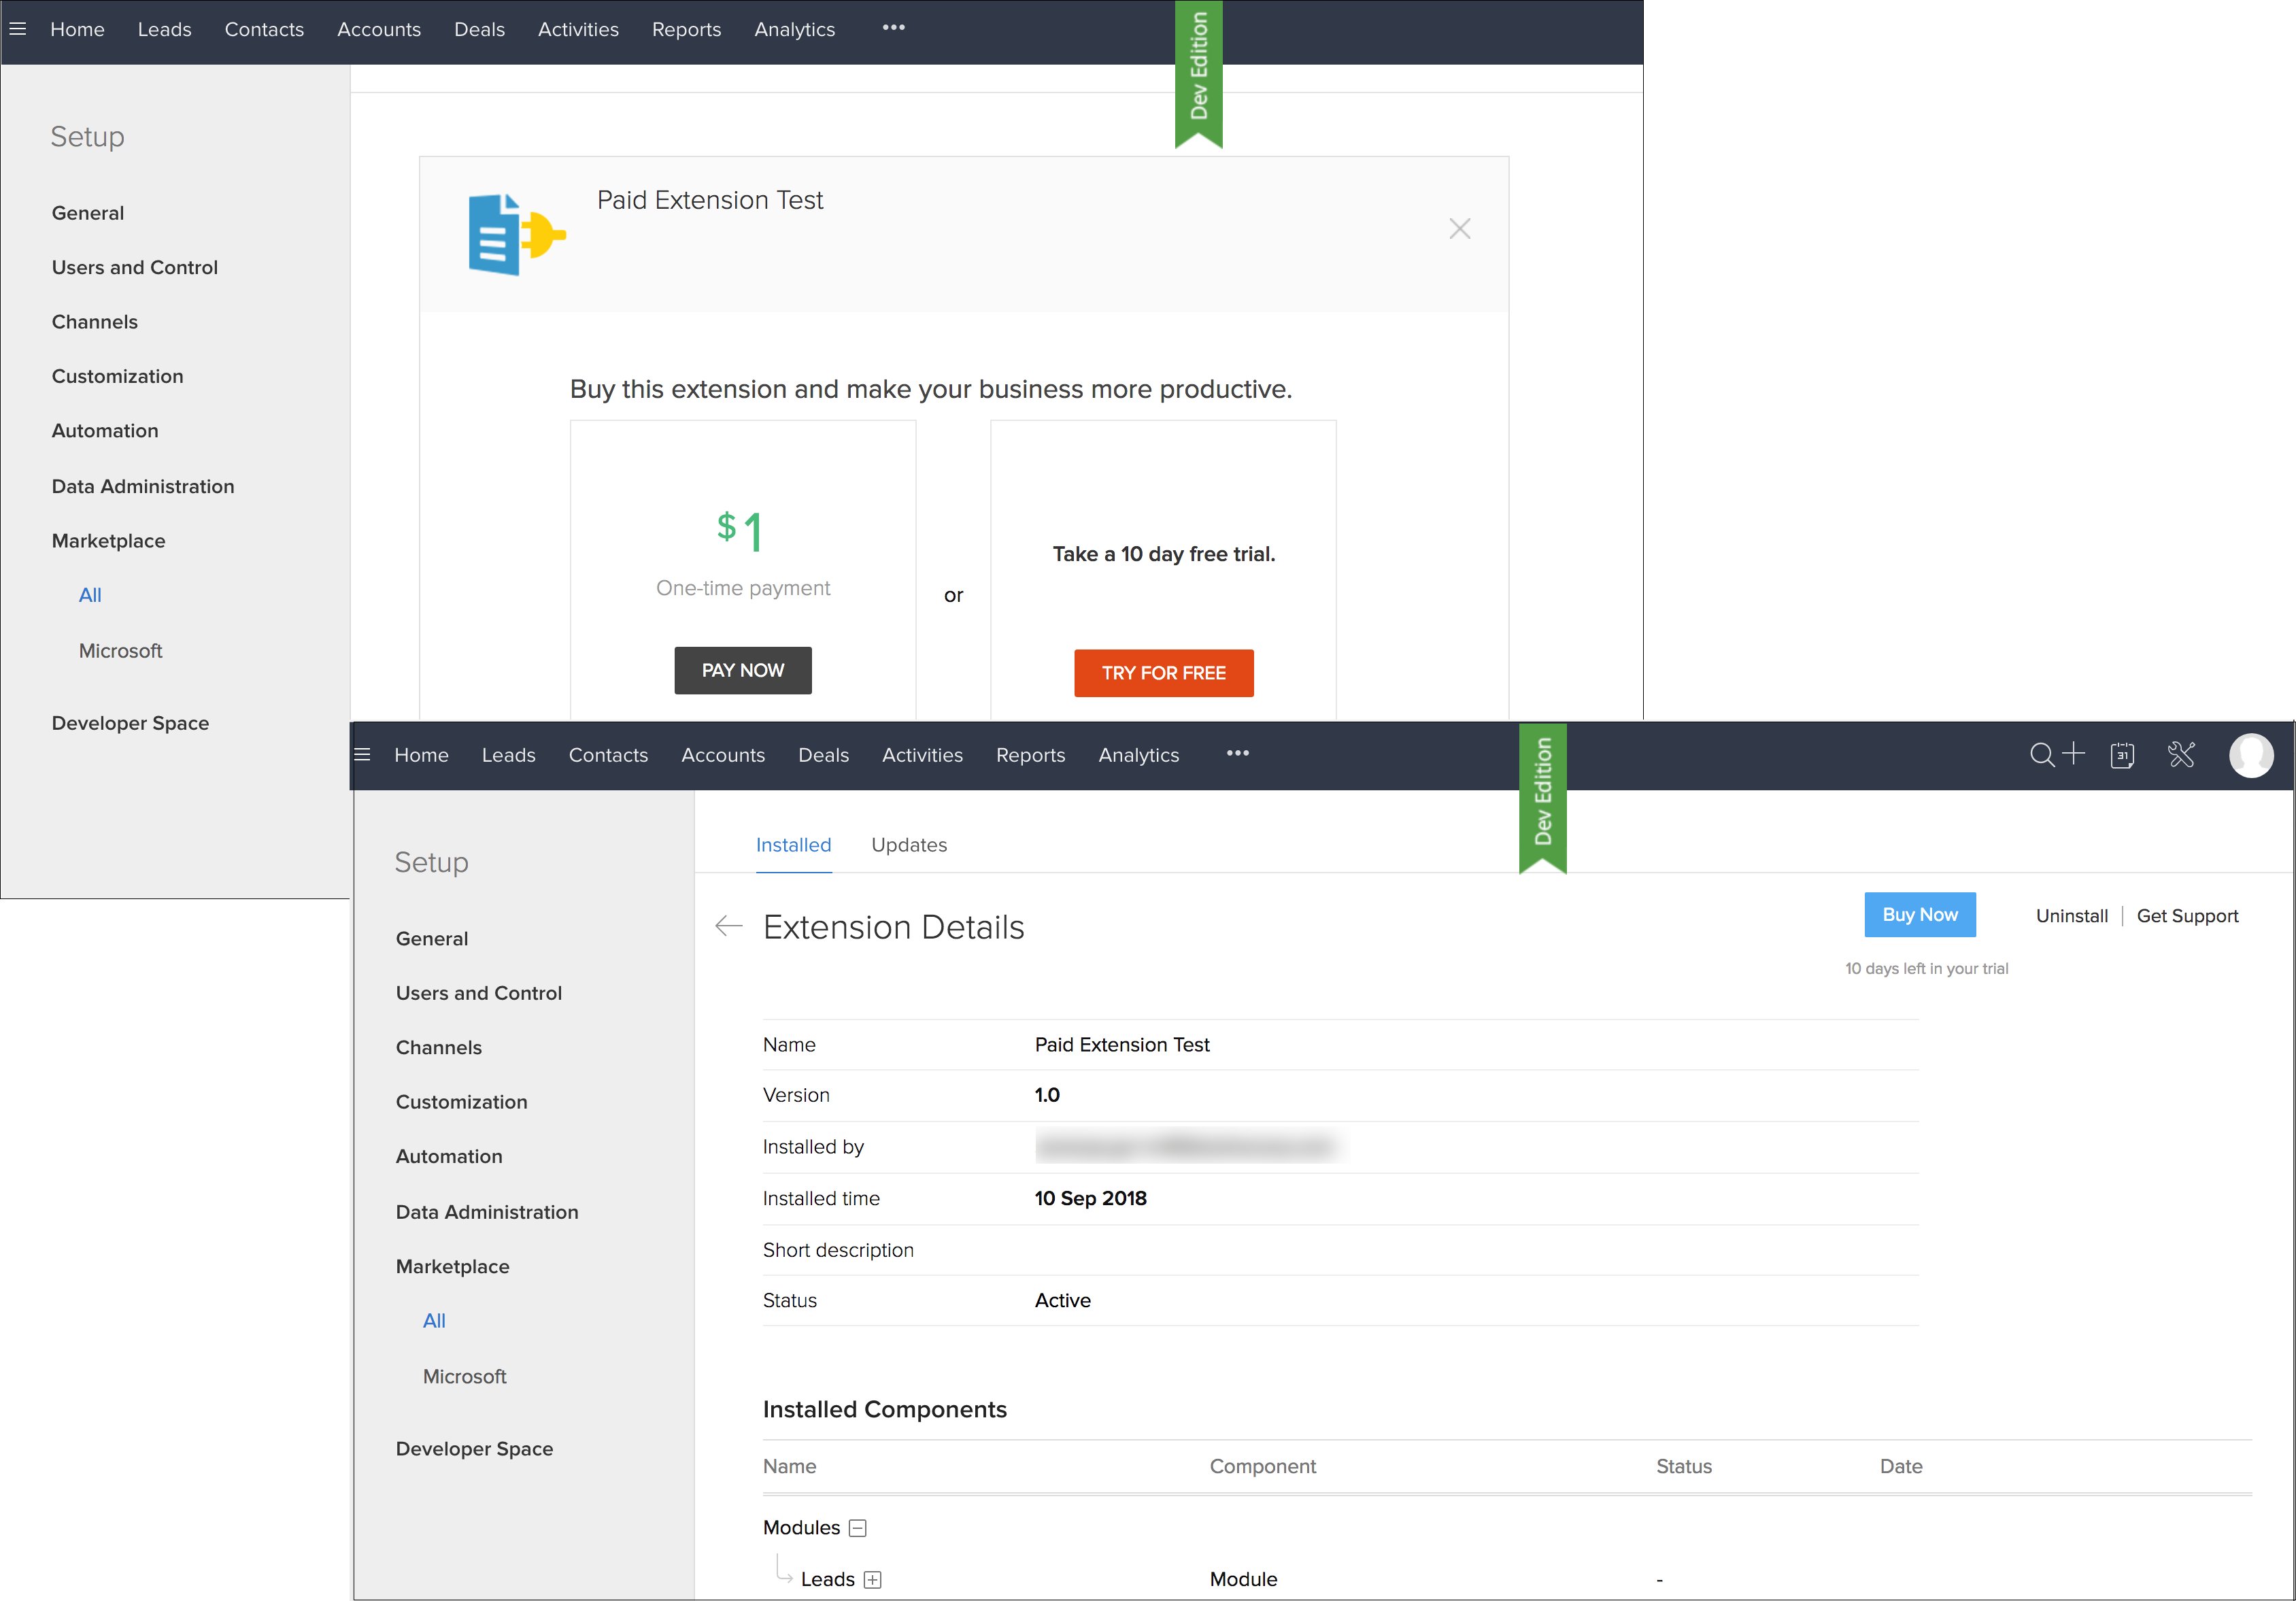
Using Install Actions - On Purchase, you can execute activities when the end user buys an extension. You can use the script to enable certain features in the extension, notify users of the upgrade, etc.
The below screenshot depicts an extension's direct purchase and a purchase after the trial period (which can be done by navigating to Setup > Marketplace > All > Installed and clicking on Buy Now).
To include an on-purchase script for an extension:
- Log in to your Zoho Developer console and click Extensions for Zoho CRM.
- Select the extension you'd like to modify and click Edit.
- Click Install Actions in the left pane.
- Select Extension and click On Purchase.
- In the Deluge Script Editor, write the required code.
- Click Save and Execute if you want to test your code, otherwise click Save.

Note
- This feature will be available only for paid extensions.
UpgradeMap Variable
The upgradeMap variable will be available for the on-purchase script and can be used to obtain the following parameter values from Zoho CRM:
- Organization ID - The unique Organization ID of the Zoho CRM account in which the extension is installed. The syntax to obtain the org ID is <variable_name>= input.installParamMap.get("organizationId");
- Installer ID - The unique ID of the user who installs the extension. The syntax to obtain the installer ID is<variable_name>= input.installParamMap.get("installerId");
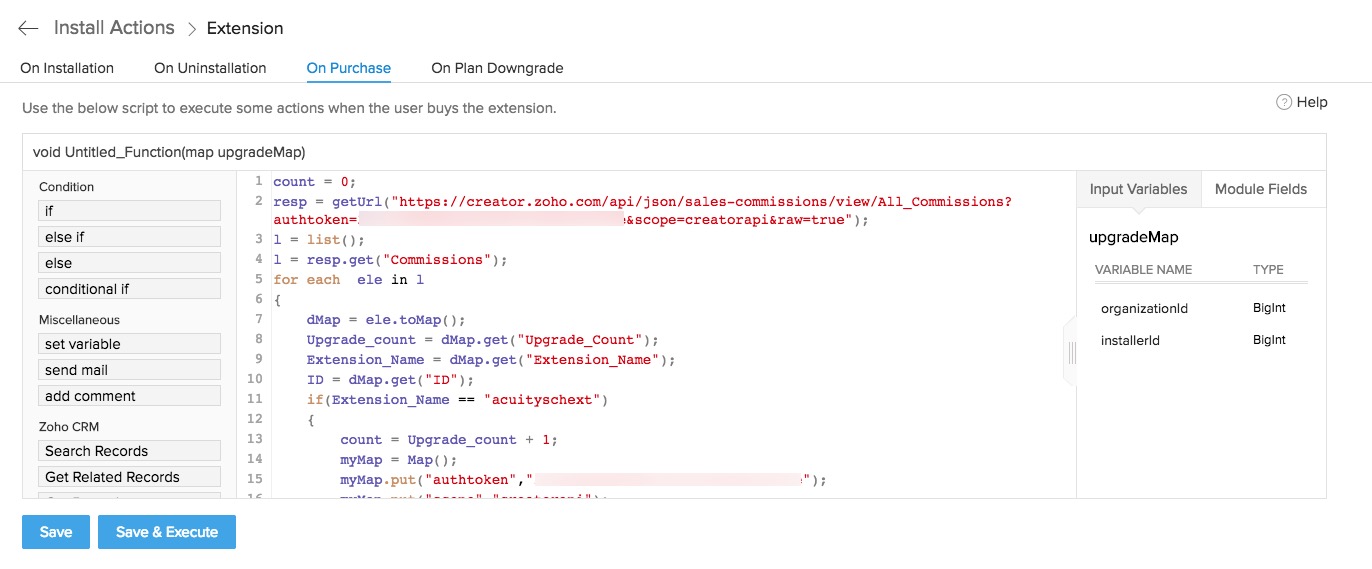
Example
Imagine you have a creator application to keep track of the number of upgrades and downgrades of your extension. You can post data to this application whenever an upgrade happens.
count = 0;
resp = getUrl("https://creator.zoho.com/api/json/sales-commissions/view/All_Commissions?authtoken=21XXXXe&scope=creatorapi&raw=true");
l = list();
l = resp.get("Commissions");
for each ele in l
{
uMap = ele.toMap();
Upgrade_count = uMap.get("Upgrade_Count");
Extension_Name = uMap.get("Extension_Name");
ID = uMap.get("ID");
if(Extension_Name == "acuityschext")
{
count = Upgrade_count + 1;
myMap = Map();
myMap.put("authtoken","21XXXXe");
myMap.put("scope","creatorapi");
myMap.put("Upgrade_Count",count);
myMap.put("criteria","Extension_Name=acuityschext");
resp = postUrl("https://creator.zoho.com/api/zoho_ownername/json/sales-commissions/form/Commissions/record/update",myMap);
info resp;
}
}
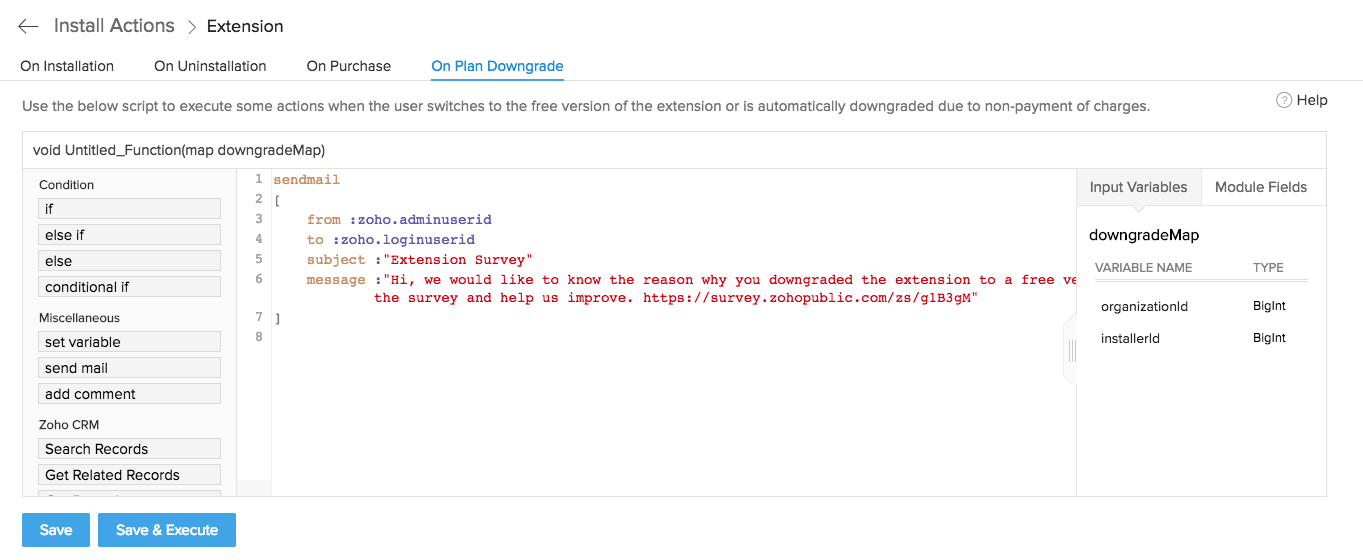
Execute a script on plan downgrade
Using Install Actions - On Plan Downgrade, you can create and execute a script to carry out actions when an end user's extension pricing plan is downgraded.
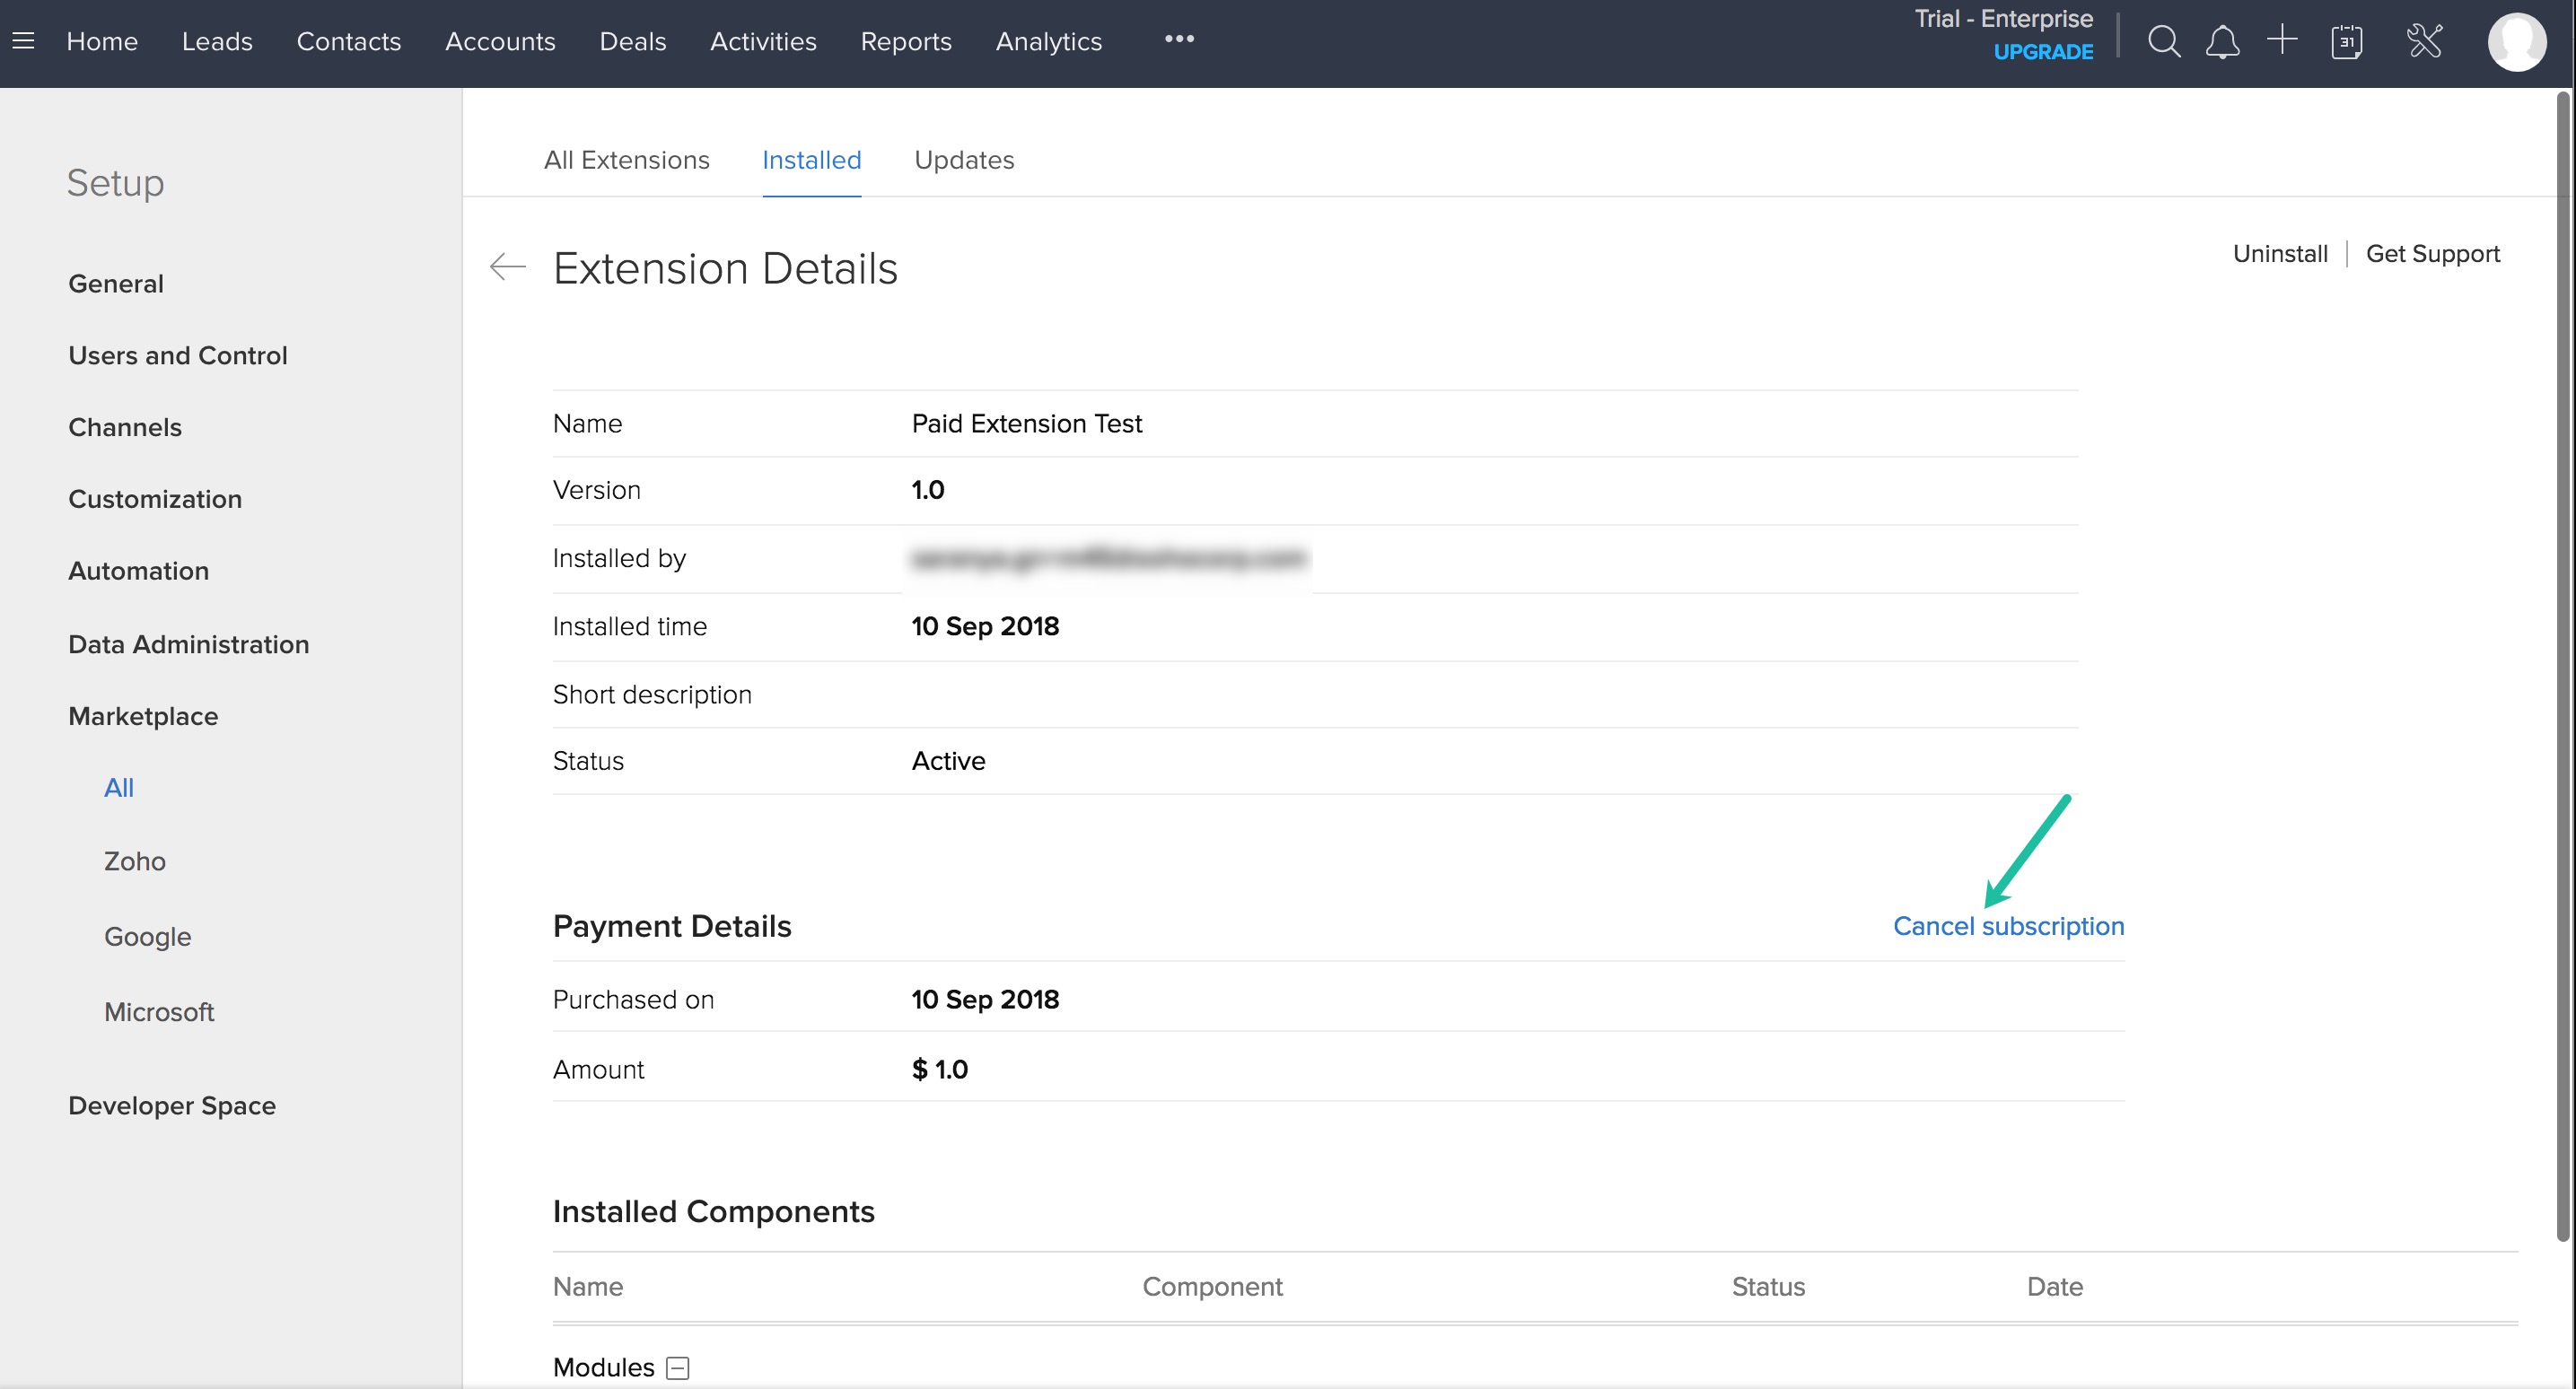
Paid extension end users can be downgraded to the free version. This can happen in one of two ways:
- The extension is automatically downgraded to the free version due to non-payment of charges by the end user.
- The end user chooses to leave the paid plan of the extension. The end user does this by selecting Cancel subscription in the Extension Details page (Setup > Marketplace > All > Installed and select the desired extension) in their CRM application as referred to in the screenshot below.

When either scenario happens, you might want to carry out some actions. This can be as varied as disabling certain features in the extension, notifying users of the downgrade, sending a survey link to obtain feedback, or issuing a reminder to upgrade.
To include a plan downgrade script for an extension:
- Log in to your Zoho Developer console and click Extensions for Zoho CRM.
- Select the extension you'd like to modify and click Edit.
- Click Install Actions in the left pane.
- Select Extension and click On Plan Downgrade.
- In the Deluge Script Editor, write the required code.
- Click Save and Execute if you want to test your code, otherwise click Save.

Note
- This feature will be available only for paid extensions.
DowngradeMap Variable
The downgradeMap variable will be available for plan downgrade scripts and can be used to obtain the following parameter values from Zoho CRM:
- Organization ID - The unique Organization ID of the Zoho CRM account in which the extension is installed. The syntax to obtain the org ID is <variable_name>= input.installParamMap.get("organizationId");
- Installer ID - The unique ID of the user who installs the extension. The syntax to obtain the installer ID is<variable_name>= input.installParamMap.get("installerId");
Example
A survey link can be sent to end users who downgrade their extension. The survey can be used to capture details of why the user chose to opt out of the paid version of the extension.
sendmail
[
from :zoho.adminuserid
to :zoho.loginuserid
subject :"Extension Survey"
message :"Hi, we would like to know the reason why you downgraded the extension to a free version. Please respond to the survey and help us improve.
https://survey.zohopublic.com/zs/g1B3gM"
]