


Emailing Reports and Dashboards
Zoho Advanced Analytics allows you to email your reports and dashboards to your colleagues for collaborative analysis and insightful decision making.
- How to email a report from the Zoho Advanced Analytics app?
- How to email a dashboard from the Zoho Advanced Analytics app?
- Can I email multiple views from the Zoho Advanced Analytics app?
- Can I email a folder from the Zoho Advanced Analytics app?
- How to schedule email?
1. How to email a report from the Zoho Advanced Analytics app?
You can email reports in any of the following formats in the Zoho Advanced Analytics app:
- CSV - The underlying data in the report will be sent as a CSV attachment.
- Excel - The underlying data will be sent as an excel file.
- PDF – A PDF attachment (table/reports) will be emailed.
- HTML – The reports will be mailed as an HTML.
- Image – This option is available only for charts and the image will be emailed either as a .png file or as a .jpg file.
2. How to email a dashboard from the Zoho Advanced Analytics app?
You can email dashboards only in two file formats - HTML and PDF. The below slideshow explains how to email a dashboard from Zoho Advanced Analytics.
3. Can I email multiple views from the Zoho Advanced Analytics app?
Yes, you can email multiple views from the Zoho Advanced Analytics app. Refer to the below slideshow to know more.
Note
- Dashboards will not be included when exporting multiple views together.
- The table/report will be sent as an attachment to the users.
4. Can I email a folder from the Zoho Advanced Analytics app?
Yes, you can email a folder in the following format:
- Image
- CSV
- HTML
To email a folder, follow the below steps:
- From the home page, hover the mouse over the folder you want to export. An Action icon will appear.
- Click the Action icon. The Action menu drop-down will open.
- Click Email views in this folder and then choose the format you want to export.
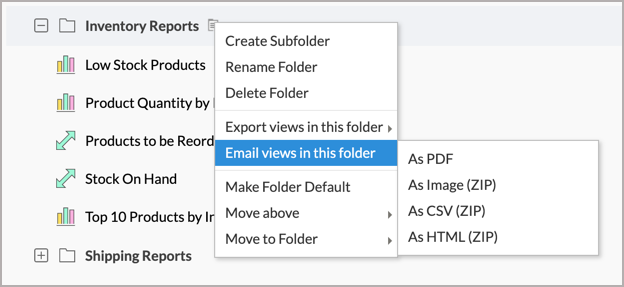
- The Email Multiple Views dialog will open. Follow the steps provided in Email Multiple Views section to email the views in your folder.

5. How to schedule email?
You can periodically schedule emails containing the reports to your users. This helps you update your users with the latest modification in the data.
To Schedule an Email:
- Open the corresponding view which you want to email as an attachment.
- Click the Email icon at the top-right corner and select the format in which you want to email your reports from the Email this View section.
- In the Email as: Settings dialog that opens, specify the email address of the users to whom you want to send the reports.
- Select the Schedule this Email checkbox to schedule emails.
- Select the interval at which you wish to run the schedule.
- Specify a Schedule name and click the Save Email Schedule button.
The views will be emailed regularly at the specified interval.
The below table contains the various options available for scheduling emails at different intervals.
| Option | Description |
| Daily | |
| Repeat Every | Specify the interval in days to email the views. |
| Time | Specify the time to email the views. You can change the Timezone by clicking on the change link. |
| Weekly | |
| Repeat Every | Specify the interval in weeks to email the views. |
| Repeat On | Specify the days of the week when you want to email the views by selecting the corresponding checkboxes.You can select all the working days (Monday to Friday) using the Select Working Days link. |
| Time | Specify the time to email the views. You can change the Timezone by clicking on the change link. |
| Monthly | |
| Repeat Every | Specify the interval in months to email the views. |
| Repeat By: | Specify the day of the month when you want to email the view. This field contains two options. They are: Day of the Month – Select a date to email the view e.g., 15th of every month. Day of the Week – Select a day on a month to email the view e.g., 3rd Tuesday of every month. |
Time | Specify the time to email the views. You can change the Timezone by clicking on the change link. |
| Yearly | |
| Repeat Every | Specify the interval in years to email the views. |
Month and Date: | Specify the date when you want to email the views. This field contains two drop-down for month and date. |
Time | Specify the time to email the views. You can change the Timezone by clicking on the change link. |
Note: Five email addresses can be added in each email schedule.
Editing Email Schedules
To edit an email schedule follow the steps below.

- Open any table/report.
- Click Email > Edit Email Schedule.
- The Edit Email Schedule window will open listing all the schedules created for Zoho Advanced Analytics in the All Schedules tab.
- The All Schedules tab, will display all the email schedules. The Active tab will display only the active email schedules and the Inactive tab will display only the inactive schedules.
- Hover the mouse over the schedule, list of options to edit the schedule will appear.
- Edit – Click this link to open the Email setting screen. Edit the Email setting, the schedule will be modified accordingly.
- Pause - Click this link to pause the schedule.
- Run – Click this link to run the paused schedule.
- Delete – Click this link to delete the schedule.
- Send Now – Click this link to mail the views immediately.
- You can run, pause or delete multiple schedules together by selecting the check boxes adjacent to the schedules and then click the corresponding edit option at the top
Note: Incase the email schedule fails for 5 times or more, it becomes inactive. An email notification will be sent to your email address, every time the schedule fails.