


Creating Blueprints
Table of Contents
Introduction
A Blueprint is simply an online replica of a business process. It captures every detail of your entire offline process within the software. It facilitates automation, validation and collaboration of teams, thus making your process more efficient and free from loopholes.
A Blueprint in your Vertical Solution is designed to help you execute a business process in a well-defined, systematic manner. With a Blueprint you can:
- Define every stage in a process and associate the right people with each stage
- Guide your teams through the execution of the process
- Mandate and validate important information contextually
- Automate routine actions
To learn how to design a Blueprint, let’s consider a scenario. A company that manages vehicle after-sales uses a Vertical Solution to facilitate its day-to-day activities. Their after-sales support involves the following activities:
- Receiving a repair request.
- Checking the car warranty.
- Assessing severity of repair.
- Carrying out an investigation for a severe repair and then preparing a repair plan.
- Commencing the repair after it is assessed.
- Closing the request
Let's see how this process can be designed in Vertical Solution using Blueprint.
Building Blocks of a Blueprint
A Blueprint is designed by creating a sequential order of these stages in a process. Here, the primary building blocks of a Blueprint are - States and Transitions.
State
Each stage in a process is referred to as a "State" in Blueprint. For example, in the above scenario, the different stages are New Request, Check Warranty, Check Severity, etc. Each of these stages will be called a “State”. States must be dragged and dropped in the Blueprint Editor to design the process flow.
Transition
A Transition is a link between two States in a process. It prescribes the conditions required for a record to move from one State to another. For example, the conditions and actions required for a record to move from Request Received to Warranty Checked can be prescribed in the Transition block called Check Warranty.
We will look at these blocks in further detail below.
Designing a Blueprint
Building a blueprint is largely a three-step procedure.
- Enter Basic Info:
Specify the module, layout and field for which the process should be created. - Define the Process Flow:
In the Blueprint Editor, define the process flow right from the Starting or the Default State (whichever applicable) through to the Exit State. - Configure Transition Settings:
Configure Before, During and After Transition settings between different States in the process as required.
Step 1 - Enter Basic Information
- Log in to Zoho Developer Console and click Vertical Solutions.
- Select the application you'd like to modify and click Edit.
- Click Automate in the left pane and select Workflow.
- Select the Blueprint tab and click Create Blueprint.
- In the Create new Blueprint popup, choose the module, layout and field for which the process is being created.
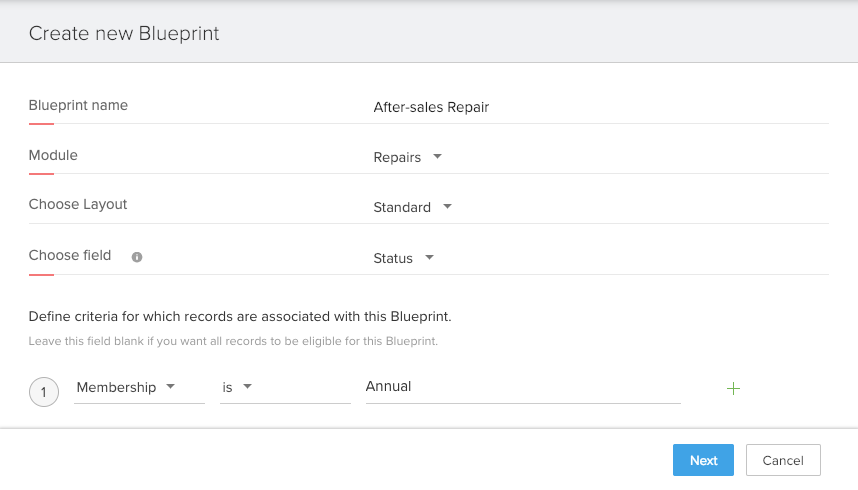
For our scenario, let us choose a custom module, Repairs, Standard layout and the Status field. - Specify criteria for records to enter a process, if applicable. Example, Membership is Annual.
If you don’t enter criteria, all records created in the layout will enter the process. Click Next.

Step 2 - Define the Process Flow in the Blueprint Editor
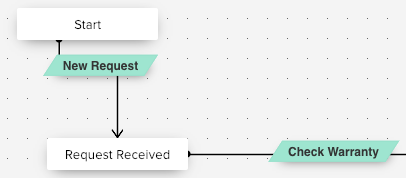
- In Blueprint Editor, drag and drop all the States (stages) that form a part of the process.
- Establish the process flow between the States by connecting the nodes in the State buttons.
Note that the Start State is the equivalent of "None" value of the chosen picklist field. - Create Transitions by clicking on the + button between two States.
To delete a transition, simply Right Click on the transition line and click Delete Transition.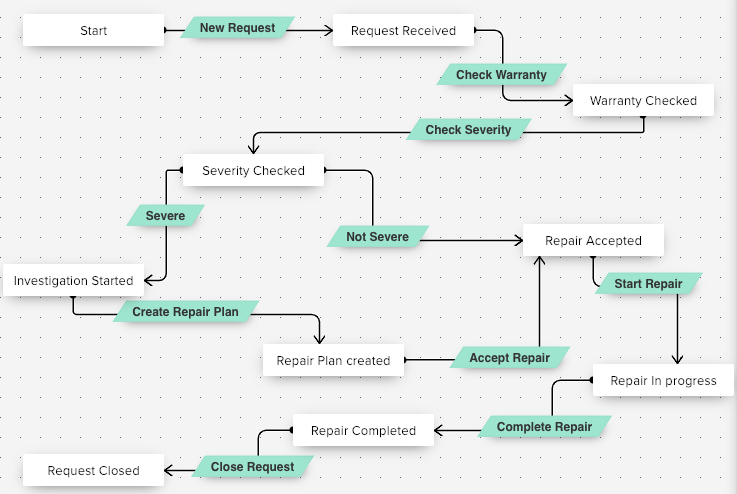

What does the above process flow mean?
This is a pictorial representation of the after-sales repair process. Repair requests entering this process will go through every stage in the order seen in the picture.
- The white buttons represent States in the Blueprint (Repair Request Stages).
- The green buttons represent Transitions (Conditions required to complete each stage).
- Each Transition you configure is displayed as a button on the record's details page.
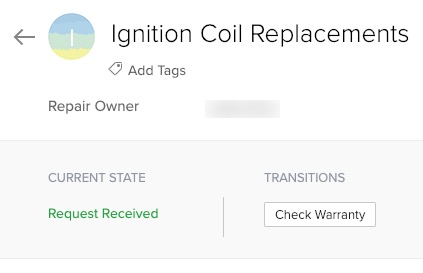
- In the record's details page, to complete a Transition, click on the Transition button and execute the actions mentioned in the ensuing popup window.
Example, clicking on Severe will throw up a popup window, which will guide you in executing this Transition.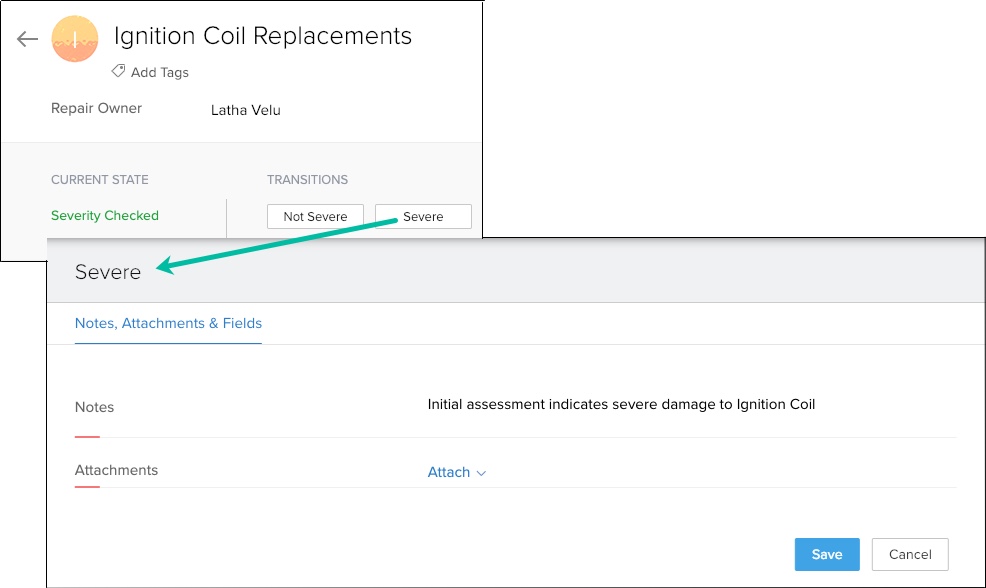
- On successful completion of the Transition, you will move to the next State in the Blueprint.
- The blue button Close Request is called a Common Transition and will appear at all States of the Blueprint.

Save a Blueprint as a Draft
It so happens that sometimes you are not ready to deploy your final Blueprint into Vertical Solution yet, and you need to put some more thought into the process flow. When you publish a Blueprint, you will begin having records entering it - so it's not a good idea to deploy it before it's ready. In this case, you can save a Blueprint as a DRAFT.
You can play around with your States and Transitions in the DRAFT version, and once you are satisfied with the final process flow, you can PUBLISH your draft. Note that the draft version is not a testing environment, rather a canvas of sorts, for you to test your process flow. You cannot test the execution of a Blueprint with the draft version - for now, it's only meant for you to play around with the process flow.
At a given point in time, you can have one Published version and one Draft version of a Blueprint.
- Published version: If a Blueprint is published, it means that it is live in your Vertical Solution. Records meeting the Blueprint criteria will begin following this version of the process flow.
- Draft version: If a Blueprint is saved as a draft, it means that it is not yet deployed in the live Vertical Solution setup, but available for you to experiment, without affecting any existing records.
The moment you edit a Blueprint, you can either publish the changes directly or save the latest version as a draft. You can toggle between the Draft and Published versions in the Blueprint Editor.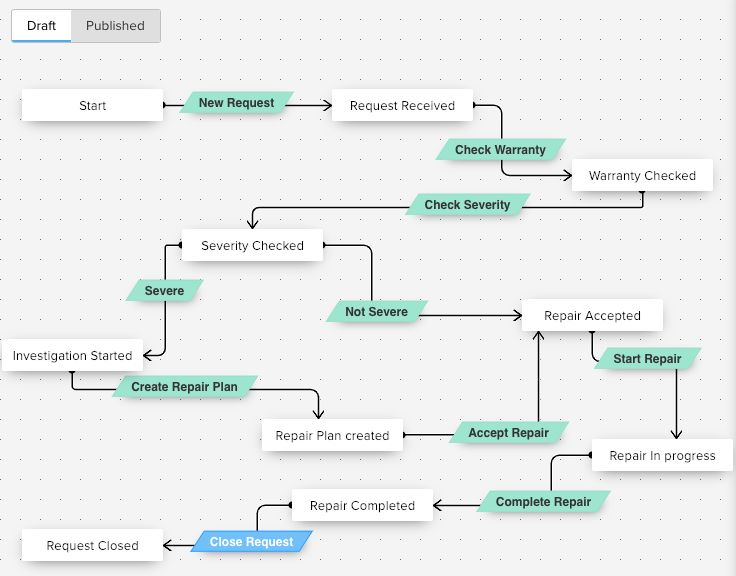
Points to note
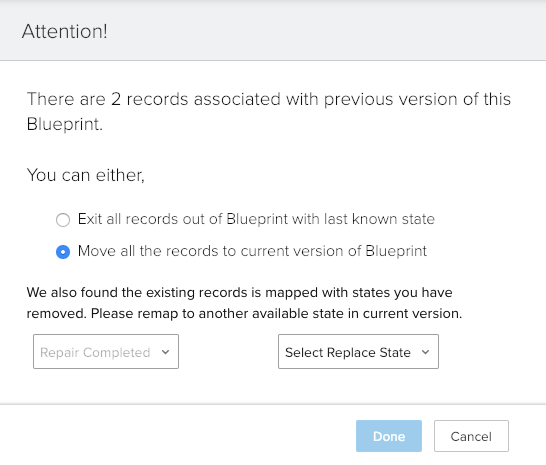
- When you publish your latest changes from the Draft version, if there are existing records already associated with the previous version of the Blueprint, you will be prompted to decide how you want to deal with those records. You can choose between the following options:
- Exit Blueprint, that is, take those records out of the process in their last known State.
- Move all the existing records to the latest version you are about to publish.
- This will ensure that all records in a particular module follow a uniform process flow at a given point in time.

- On editing a Blueprint flow, if you have deleted one or more States, when you republish it, you will again be prompted to either move any existing records to the latest version of the Blueprint or move them out of the process. If you choose to move them to the current version, you will be prompted to re-map the deleted States with the ones available in the modified Blueprint flow.
- If you have deleted a Blueprint and you have had active records in it, you will be prompted to move the records out of the process.
- In the Blueprints list view page, an asterisk (*) denotes a published Blueprint that also has a draft version associated with it.
- A Blueprint that hasn't been published at all and only in drafts, can be identified from its Empty Status (--).
In the following screenshot, "After-sales Repair*" is a published Blueprint, that also has a draft version.
"Leads Qualification" is a Blueprint only in the Drafts mode.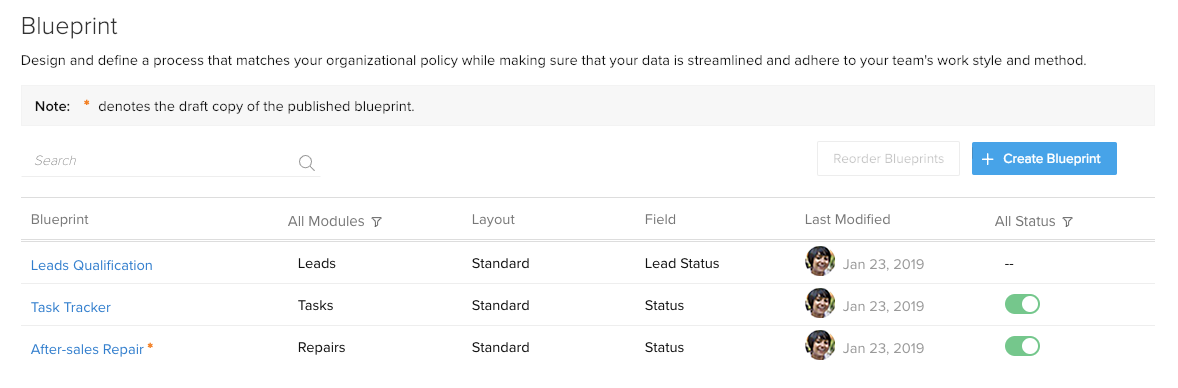
The Status of a Blueprint conveys whether the process is activated or deactivated. - If you wish to discard changes made in the Draft version, simply switch to the Published version and click Save as Draft. Now the published version will overwrite your changes in the Draft version and you can start editing again.


Now that the process flow has been created using States and Transitions, the final step is to define further Transition settings.
Step 3 - Configure Transition Settings
“Transition” refers to the change of state in a process. It is the connecting link between two States, where the conditions for the change are clearly defined. A Transition is made up of three parts - Before, During and After.
For example, let's look at the Transition between the States - Repair Plan created and Negotiation Done. Let's name this Repair Accepted. In the case of our Vertical Solution, following are some guidelines to be observed while configuring the Transition settings in this scenario.
- While accepting to take up the repair, it should be ensured that the estimated duration of the repair does not exceed seven days.
- As soon as the Accept Repair transition is executed, a call should be made to the mechanic to whom the repair job will be assigned.
Let's see how we can accommodate all of these points in the Blueprint.
Before Transition
Define Criteria that dictate exactly when this Transition should be available for the records in a process. Example criteria: "Repair plan accepted is Yes". In this case, the Transition will be shown to records only when the Repair plan accepted? field is updated to Yes. If you have no such conditions, you can skip the criteria section. In such a case, the Transition will be visible on all records right away.![]()
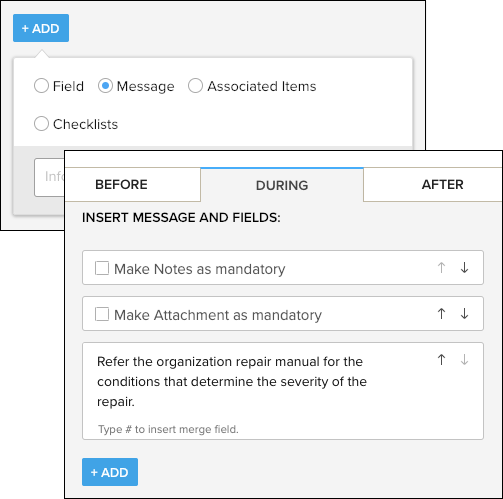
During Transition
This section guides the Transition owners in completing a particular stage in a process by prompting them to enter specific fields, notes, attachments and other information contextually. For example, while accepting a repair, it needs to be ensured that the contact details of the customer have been captured. In such a case, all these details can be mandated in the During Transition section of the Accept Repair Transition.
Following are the details that you can mandate in the During Transition section:
- Mandate and validate fields across modules
- Include checklists
- Mandate Associated Items
- Add a message to Transition owners
- Make notes mandatory
- Make attachments mandatory
Mandate and validate fields across modules
You can guide users to enter information required as part of your process by mandating fields at the appropriate stages. These could be fields from the primary Blueprint module or related modules (using lookup field). For example, during the Accept Repair transition, you can mandate the following fields:
- Customer Name, Phone, Email
To mandate fields of the Blueprint module and related modules
- In the During Transition tab, click Add.
- Choose the required module from the drop-down list.
- Select the field to be mandated.
Repeat this action for the number of fields required.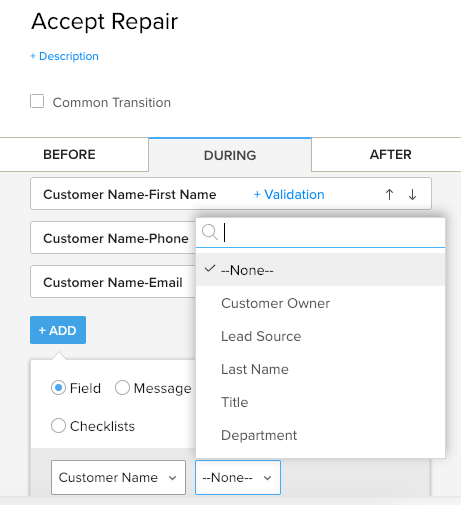
- Validate fields to ensure that the user enters acceptable values.
Here, the estimated duration of repair should not exceed 7 days from the date of accepting the repair.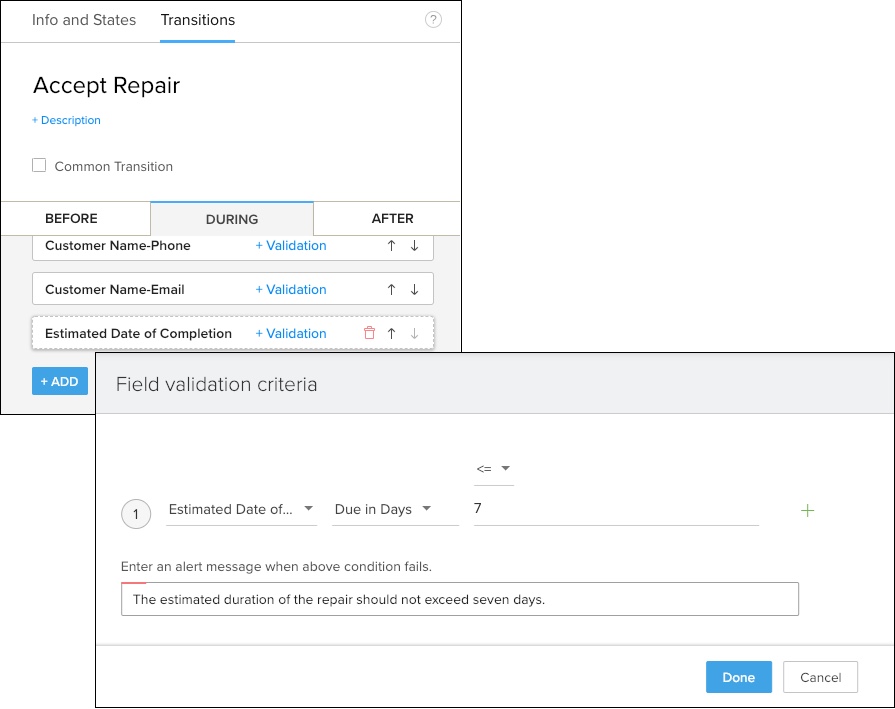


Include checklists
Checklists are nothing but To-do items to help your users keep a clear track of the number of tasks and items they must complete in order to get through each stage of a process. This helps you better streamline every tiny step that you take towards executing a stage so that you never miss what’s important at the moment.
Checklist will be part of your During Transition, which, when configured by the manager or the process architect, will be shown to the eligible transition owners.
For example, in our repair process, the following items could be part of a Repair Plan Checklist assigned to the Create Repair Plan transition.
- Abide by the guidelines mentioned in the organization's repair SoP.
- Get plan reviewed by supervisor.
To mandate checklists
- In the During Transition tab, click Add.
- Select Checklists.
- Add a title for the checklist and the list of To-do items.
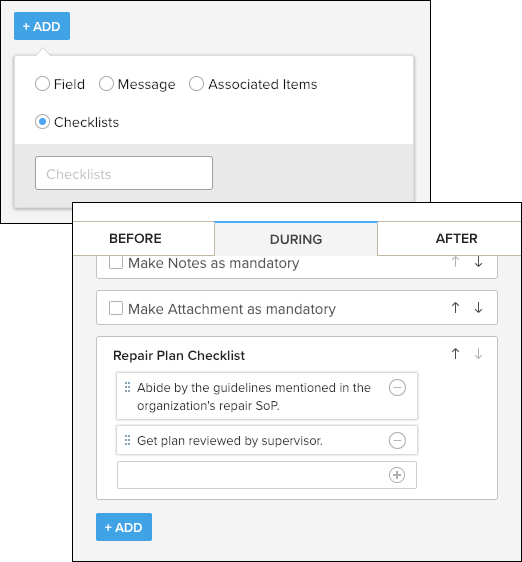
This will be displayed to the selected Transition owners. Only when the Transition owner "checks off" these items from the list, will he/she be able to proceed to the next State in the Blueprint. This gives you a solid, clear picture of progress of each stage.

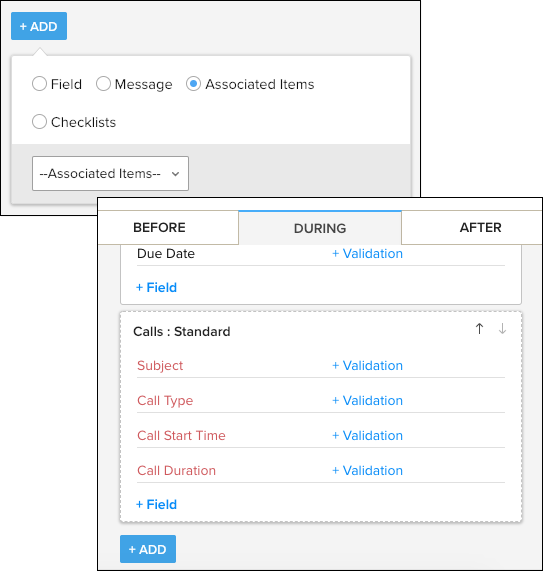
Mandate the Creation of Associated Items
Apart from fields and checklists, you can mandate the creation of items associated to the Blueprint module as listed below:
- Tasks
- Events
- Calls
- Quotes
- Sales Orders
- Cases
For example, once the repair has been accepted, a task should be assigned to the mechanic who would take up the repair and also a call should be made to the mechanic.
To mandate the creation of associated items
- In the During Transition tab, click Add.
- Select Associated Items.
- Choose from the Associated Items dropdown list: Tasks and Calls.

Add a message to Transition owners
There's nothing like clear instructions to users to make sure they execute a process efficiently. Include messages to users at each stage, so that every Transition owner knows what's expected of him/her.
To add a message to the Transition owners
- In the During Transition tab, click Add.
- Select Message.
- Write a suitable message in the text box.

Make notes mandatory
You may want to know additional details about various aspects of a process, such as when a user categorizes a repair as Severe, they can add a note detailing the reasons for labelling it so. These additional details could be added as notes - and these notes could also be mandated in the During Transition stage of a process.
To make notes mandatory
- In the During Transition tab, select the Make Notes as Mandatory checkbox.
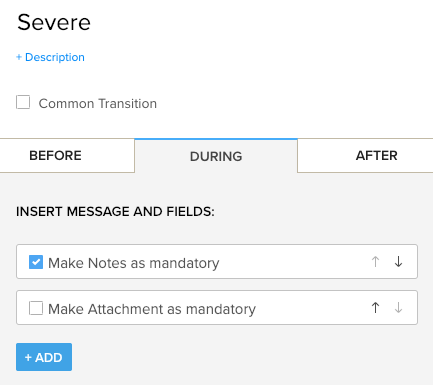
So here, while executing the Severe transition, the transition owner will be required to enter details of the repair as notes, as outlined in the message.

Make attachments mandatory
Any process, be it sales, insurance, manufacturing or real estate - any business process for that matter brings with it the need for several documents. Sales contracts, Service Level Agreements, Legal Documents and so on are required at different stages of a process. You can mandate them at the required stage in a Blueprint.
To make attachments mandatory
- In the During Transition tab, select the Make Attachment as Mandatory checkbox.
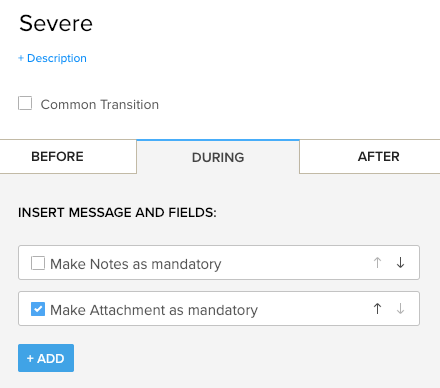
So here, while executing the Severe transition, the transition owner will be required to attach the documents that support the reasons for categorizing a repair as Severe. You can reorder the items to be displayed in the popup window by using the UP and DOWN arrows.

After Transition
Define actions to be automated at the completion of the Transition. Actions that can be automated in the After Transition section are:
- Send Email Notification
- Assign Tasks
- Make a Field Update
- Trigger Webhooks
- Trigger Custom Functions
In our example, a task should be created so that the bill is generated after the Complete Repair transition. So, choose Tasks and add the necessary conditions.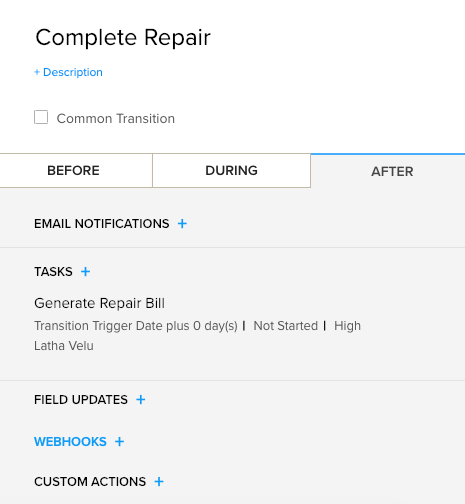
Configure SLAs for States
When you put a process in place in your organization, you need to ensure that it also gets done on time. SLAs help you do exactly that.
"SLA" stands for Service Level Agreeement - and is usually understood in the context of a service provider and customer. This term in Blueprint stands for an agreement of sorts between teams within an organization to communicate the maximum time a user/team can keep a particular record in a said state. For example, if a deal is the "Repair In Progress" stage for too long, the sales manager or the record owner must be notified of this. But how long is too long? If it does stay in a State for too long, who should be notified and what should be done about it?
These details can be configured as part of the Blueprint via SLAs. When you configure an SLA, Vertical Solution watches the records and how long each record is in a particular state. If it exceeds the time limit mentioned, the system will send alerts as configured to the users mentioned in the SLA settings. This helps you be transparent with the progress of a process across your organization and get things done on time.
To configure SLA for a State
- In your Blueprint Editor, click the State for which you wish to configure the SLA. For example, Repair In Progress.
- Set the maximum time limit for which the deal can be in the Repair in Progress State. For example, 7 Days.
- When the deal exceeds the SLA time limit, specify who should be notified and when. For example, escalate one day before to the record owner.
- In addition to this escalation notification, you can set an additional alert to be sent before or after the SLA time limit.
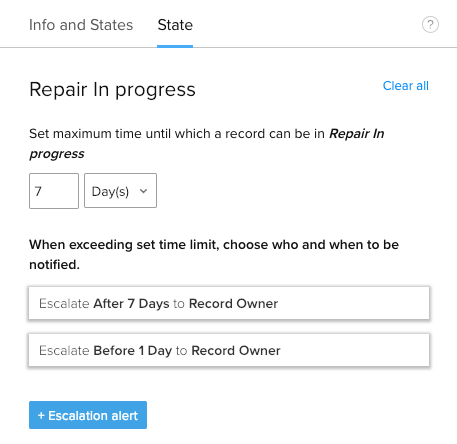
For example, notify the record owner about the SLA time limit 2 hours before the limit expires. This will help you take prompt action before it's too late.

Common Transition
A Common Transition is a Transition that can be executed from all States in a process.
In our example, the repair request will be closed after the stages such as warranty checked, severity checked, repair accepted and so on. So Close Request is a Transition that is available only towards the end of the process. But assume that a request need to be abruptly closed and you want to close the request at the Investigation Started stage itself. In such a case, you must be able to execute the Close Request Transition right then - rather than go through all the intermediary stages.
To make this possible, you must make Close Request a Common Transition by selecting the checkbox as seen in the following image. Once you do, you will see the Close Request Transition on all States. Currently, you can have 25 common transitions per process.![]()
Points to Remember
- Blueprints will be executed in the order in which they are listed in the Blueprint page. You may reorder the processes if required.
- When you have all automation features configured in Vertical Solution, the order in which they get executed are: Assignment rules, workflow rules, approval process, Blueprint and finally case escalation rules.
- Different users can own different Transitions in a process. If a user does not have access to a record but is made a Transition owner, then the user will be able to execute the Transition but not edit the record.
- There can be up to 20 outcomes from a State. That is, one state can be connected to 20 different States through different transitions.
- If you modify* a Blueprint while there are still active records in the process, you will be prompted to either move those records to the latest version of the Blueprint or exit them out of the process altogether.
(*) Modification here refers to:- A change in the process flow
- Deactivation of a Blueprint
- Deletion of a Blueprint
- You cannot delete a Blueprint while there are active records in the process. However, you can deactivate it so that further records do not enter the process.
- Blueprint overrides the field access rights set for a user. For example, if a user has Read-only access to the Amount field, but is responsible to execute a Transition that mandates the Amount field, he/she will be able to update the amount while executing the Blueprint Transition. At all other times, the user will continue to have Read-only access to the field.
- A Transition will be visible only to the chosen Transition owner(s) and users on the Administrator profile. A Transition owner can access records assigned to him/her from the My Jobs module.