Setting up Zoho Payroll
Before you can start processing pay runs using Zoho Payroll, you need to set up your organization, which is a simple and breezy five step process.
To get started, go to the signup page and create a Zoho account. If you already have one, log into your existing Zoho account.
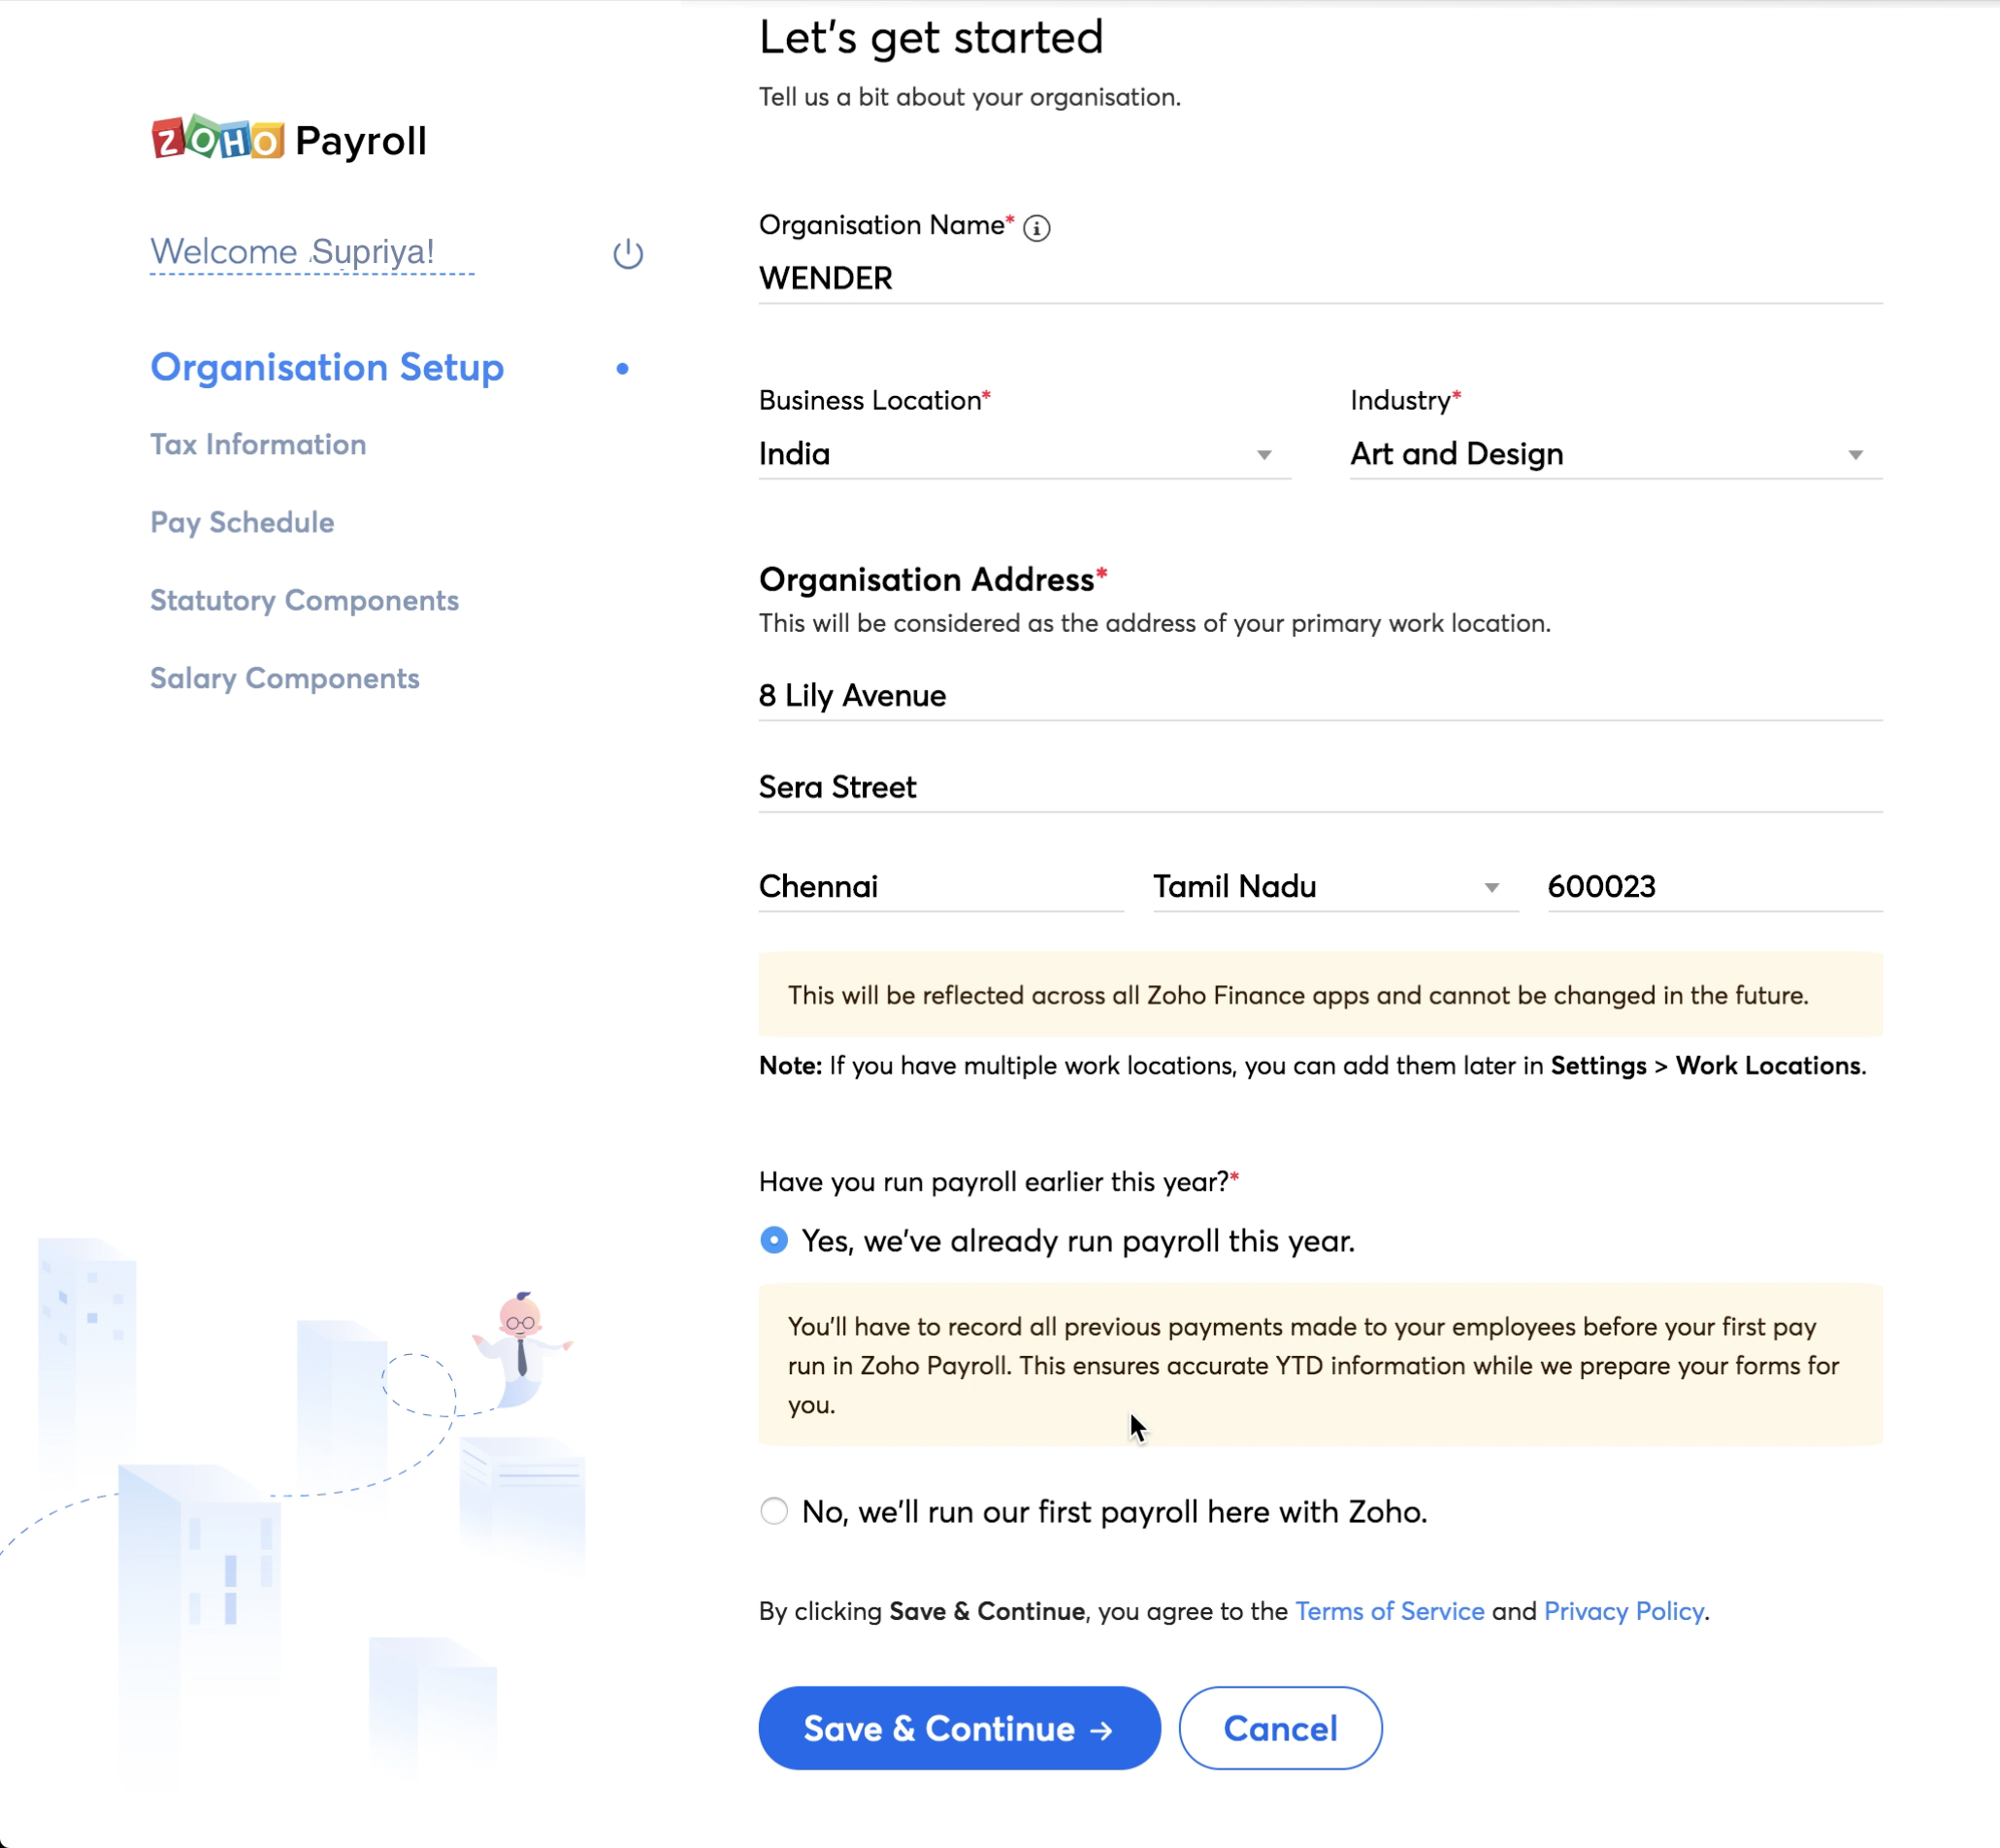
Step 1: Organization Setup
- Enter your Organization Name, Business Location and Industry.
- Enter your Organization Address. This address will be reflected across all your Zoho Finance applications and it will be your primary work location in Zoho Payroll. If your business operates from multiple locations, you can add them by going to Settings > Work Locations.
- Choose whether you’ve already run payroll for this year or you’re running your first payroll of the year with Zoho Payroll. If you’ve been running your payroll already, you need to record/import all the previous payments you’ve made to your employees before you run your first payroll using Zoho Payroll.
- Click Save & Continue.
Step 2: Tax Information
On this page, you need to enter your tax details such as your Personal Account Number (PAN), Tax Deduction and Collection Account Number (TAN), TDS Circle / AO Code and Tax Deduction Frequency. These details will be displayed in the Form 16 we generate for your employees.
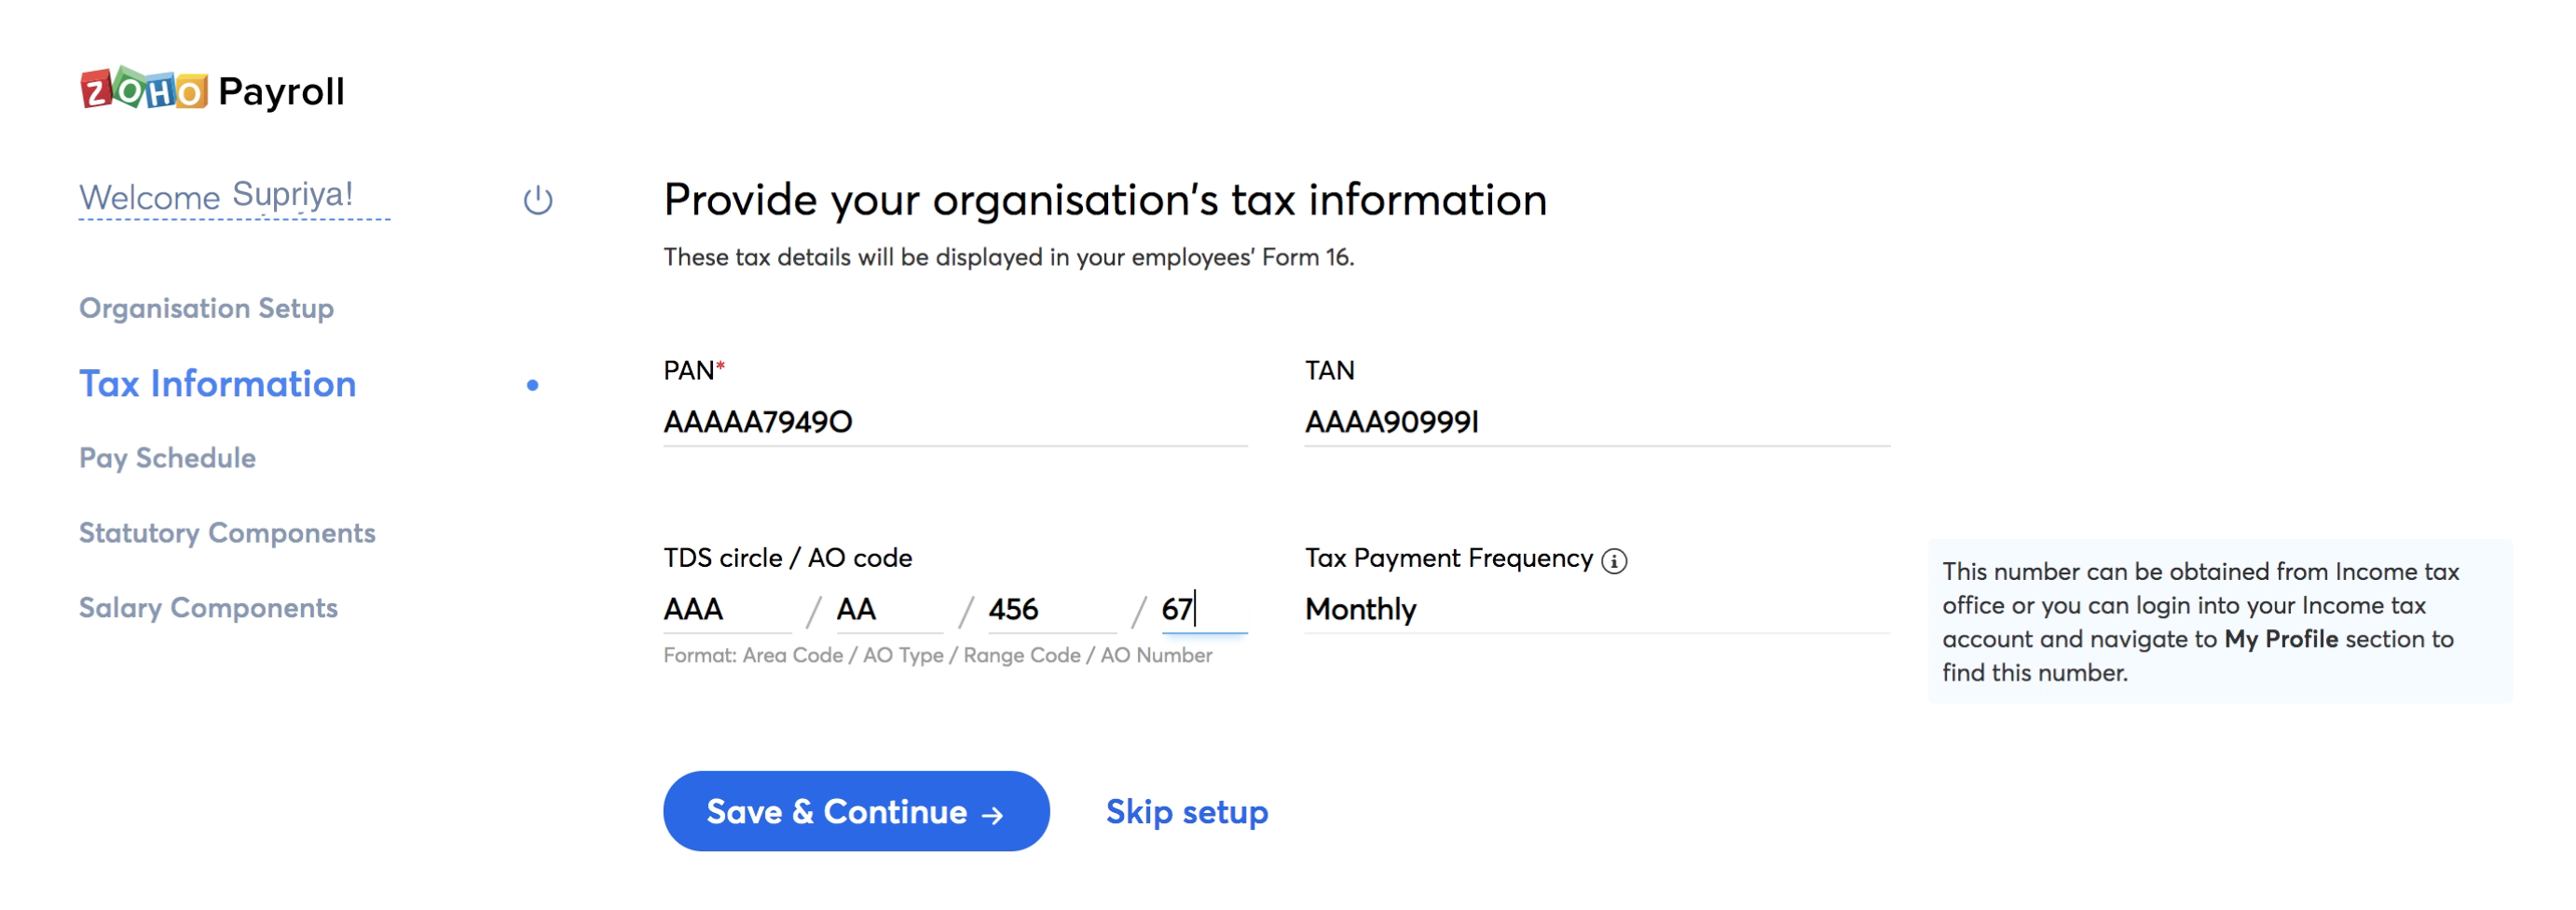
PAN
A Permanent Account Number (PAN) card is a vital document for any taxpayer. PAN is a 10-digit alphanumeric number. Any corporate organization doing business in India requires a PAN card whether it is registered in India or abroad.
TAN
Tax Deduction and Collection Account Number (TAN) is a unique 10-digit alpha numeric code whose primary purpose is deduction or collection of tax. All businesses who deduct or collect tax must have a TAN, quoting it in their TDS documents.
TDS Circle / AO Code
AO Code (Assessing Officer Code) is a combination of Area Code, AO Type, Range Code and AO Number. You can get this number from the Income Tax Office or by logging into your online Income Tax Account and navigating to the My Profile section.
Tax Payment Frequency
Tax Payment Frequency tells us how often you deposit your Tax Deducted at Source (TDS) to the Income Tax Department. It will be set as Monthly by default. If your business follows a different tax payment frequency, write to us at support@zohopayroll.com and we’ll enable it for you.
Click Save & Continue once you’ve entered the tax information.
Step 3: Pay Schedule
Pay Schedule is the combination of two things - your pay frequency, which is how often you pay your employees and your pay date. This will help us to remind you to process your payrolls on time.
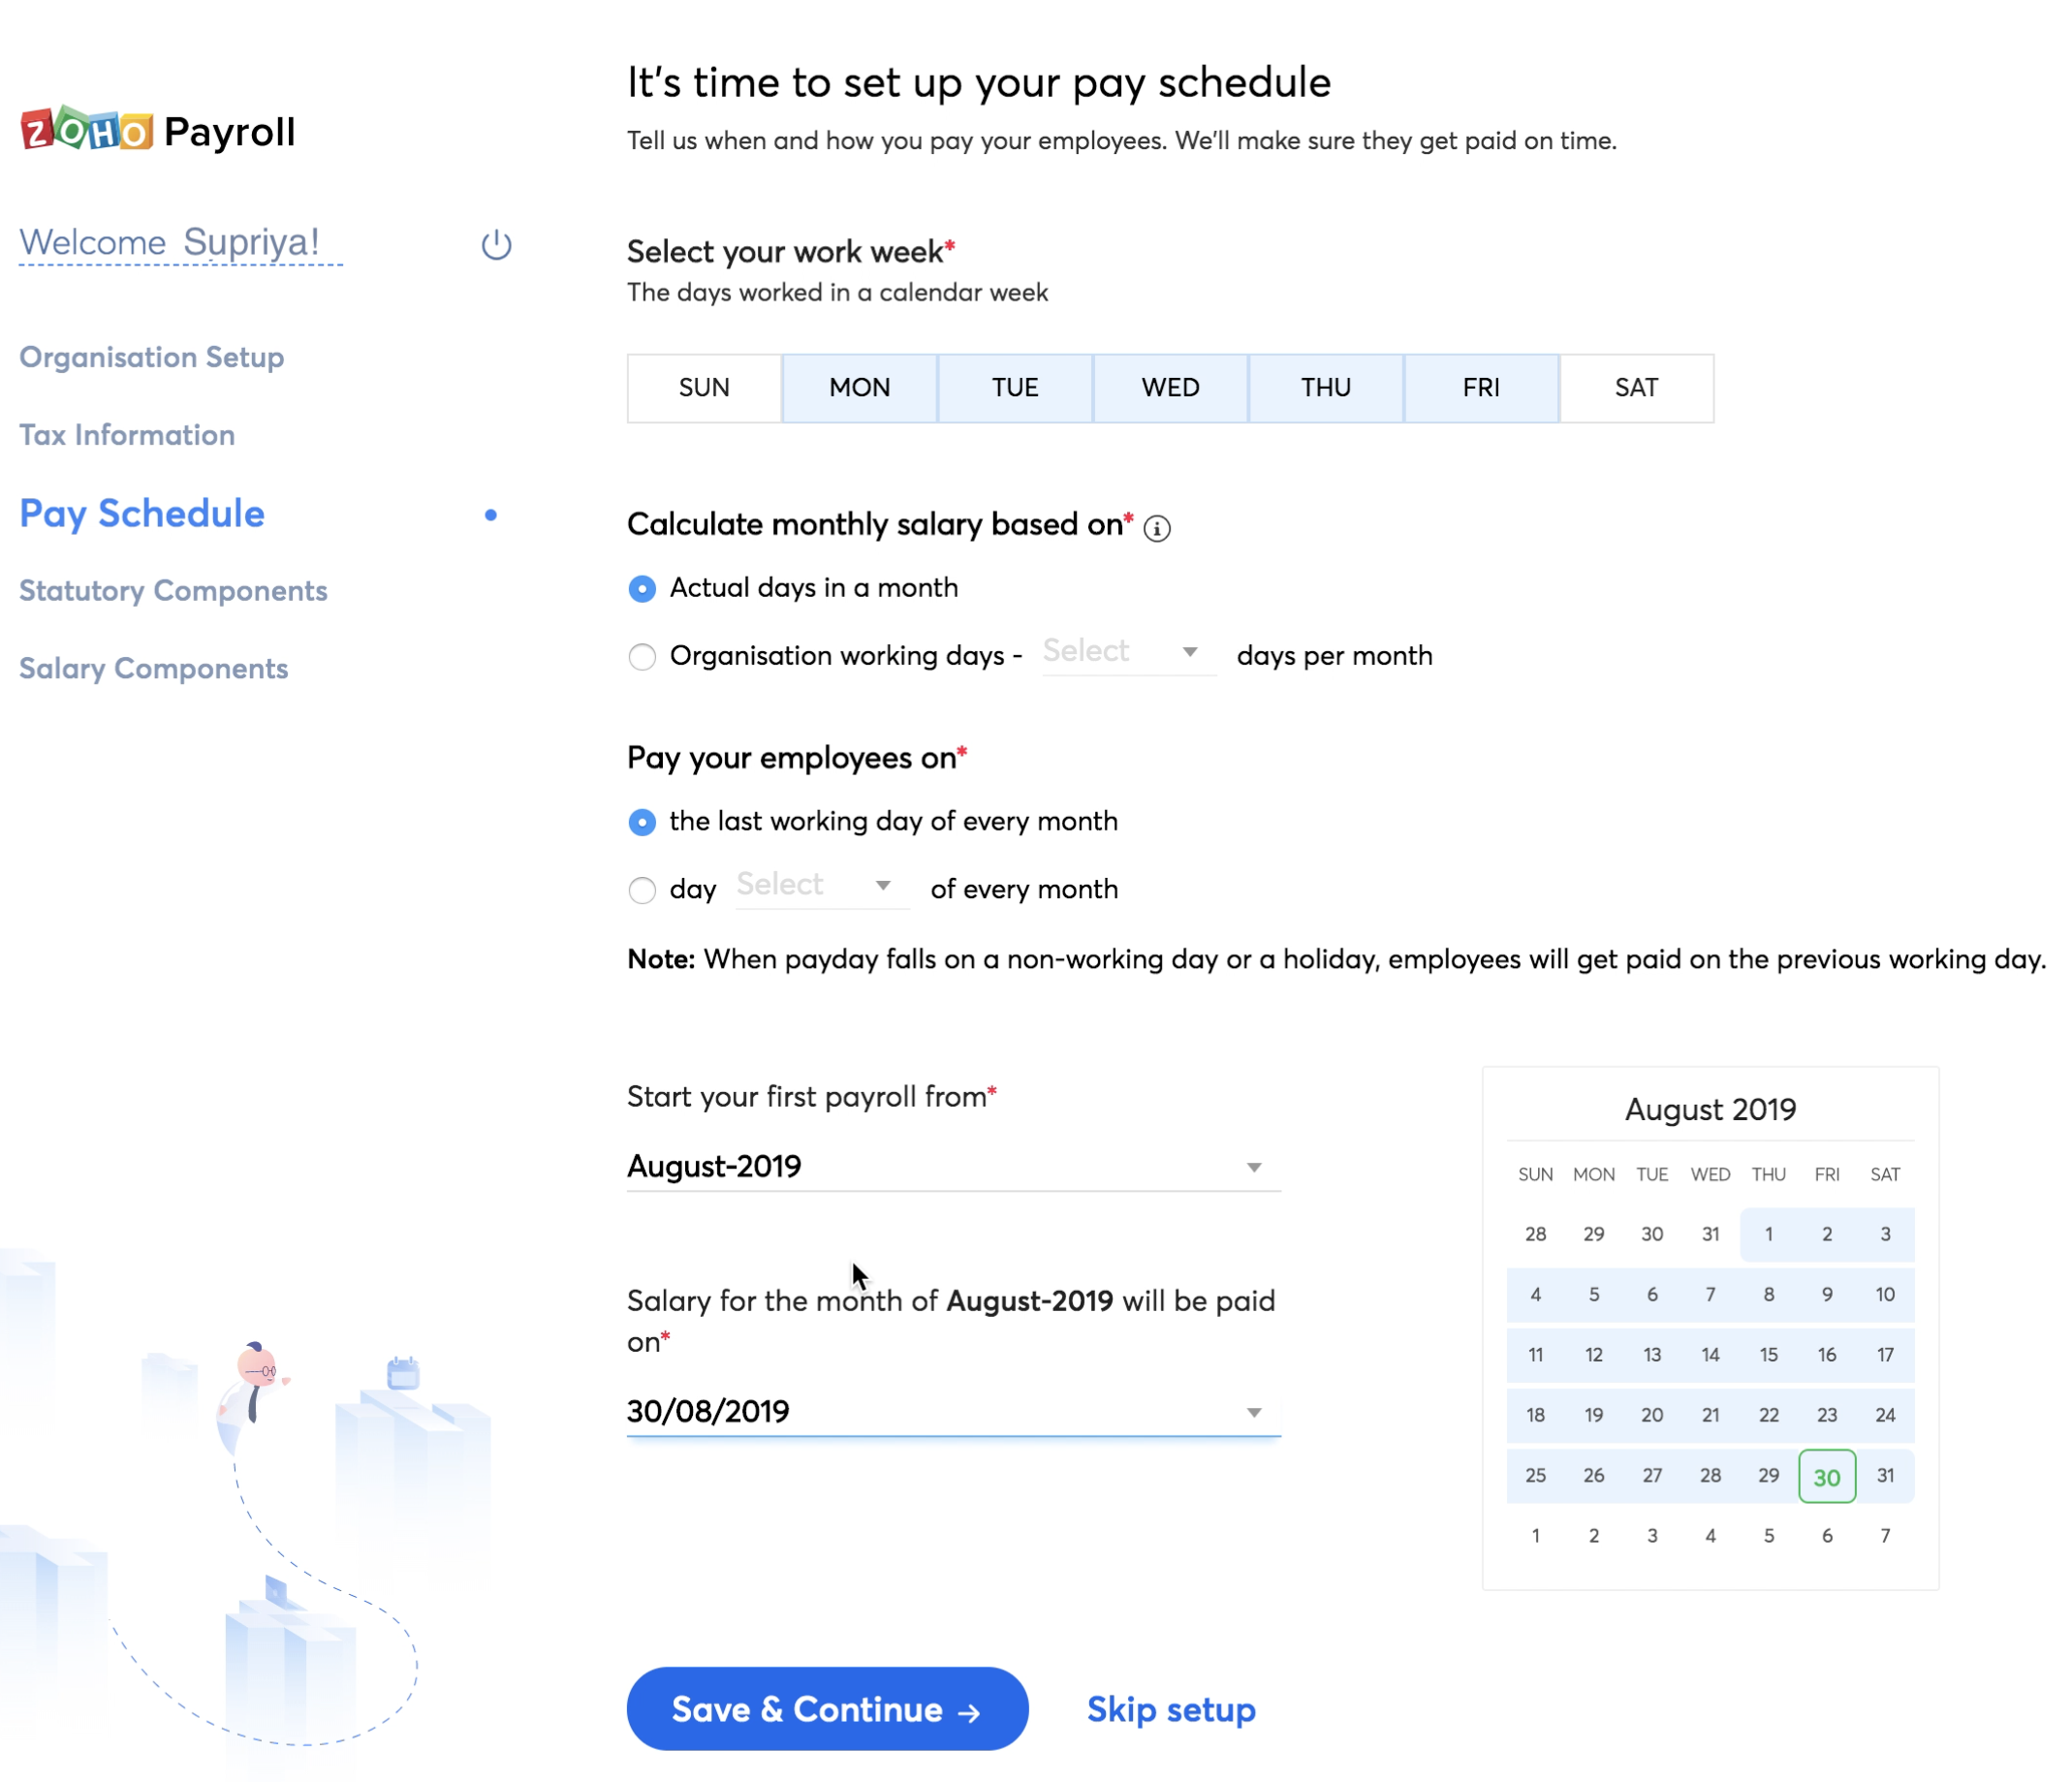
- Select your Work Week, which is the number of days your business works in a calendar week.
- Select whether you want to calculate your employees’ monthly salary based on the actual number of days in a month, or a fixed number of days (say 28) per month. * If you select actual number of days in a month, salary will be calculated as per the work week that you’ve configured (Weekends are considered as work days). * If you select fixed number of days, pay will be calculated only based on the number that you provide.
- Select when you want to pay your employees’ monthly salaries.
- Select the First Pay Period, which is the month on which you wish to run your first pay run in Zoho Payroll.
Step 4: Statutory Components
These are components defined under certain enactments passed by government bodies like Employee Provident Fund Organization (EPFO) and Employees’ State Insurance Corporation (ESIC). Contributions are made by employees and the employer towards the employees’ long term financial and social well being.
There are 4 main statutory components in India:
- Employee Provident Fund (EPF)
- Employee State Insurance (ESI)
- Professional Tax (PT)
- Labour Welfare Fund (LWF)
Employee Provident Fund
EPF is a retirement benefit scheme available to all employees. The main purpose of this scheme is to help employees save a fraction of their salaries every month (12% of Basic Pay + DA), so that they can use it when they retire or if they develop any disability.
To set up EPF for your organization:
- Enter your EPF Number. You can find this in the registration letter received from the Employee Provident Fund Organization (EPFO).
- Select whether you want to include the employer’s contribution as a part of employees’ CTC.
- Check the box next to Eligible for ABRY Scheme, if your organization is registered for the ARBY scheme.
- Check the appropriate Contribution Type: Only Employee or Both Employee and Employer option.
- Select whether you want to restrict employer’s contribution calculation to ₹15,000 of Basic Pay. If you enable this option, employer’s contribution will be calculated only for ₹15,000, even if the Basic Pay exceeds that amount.
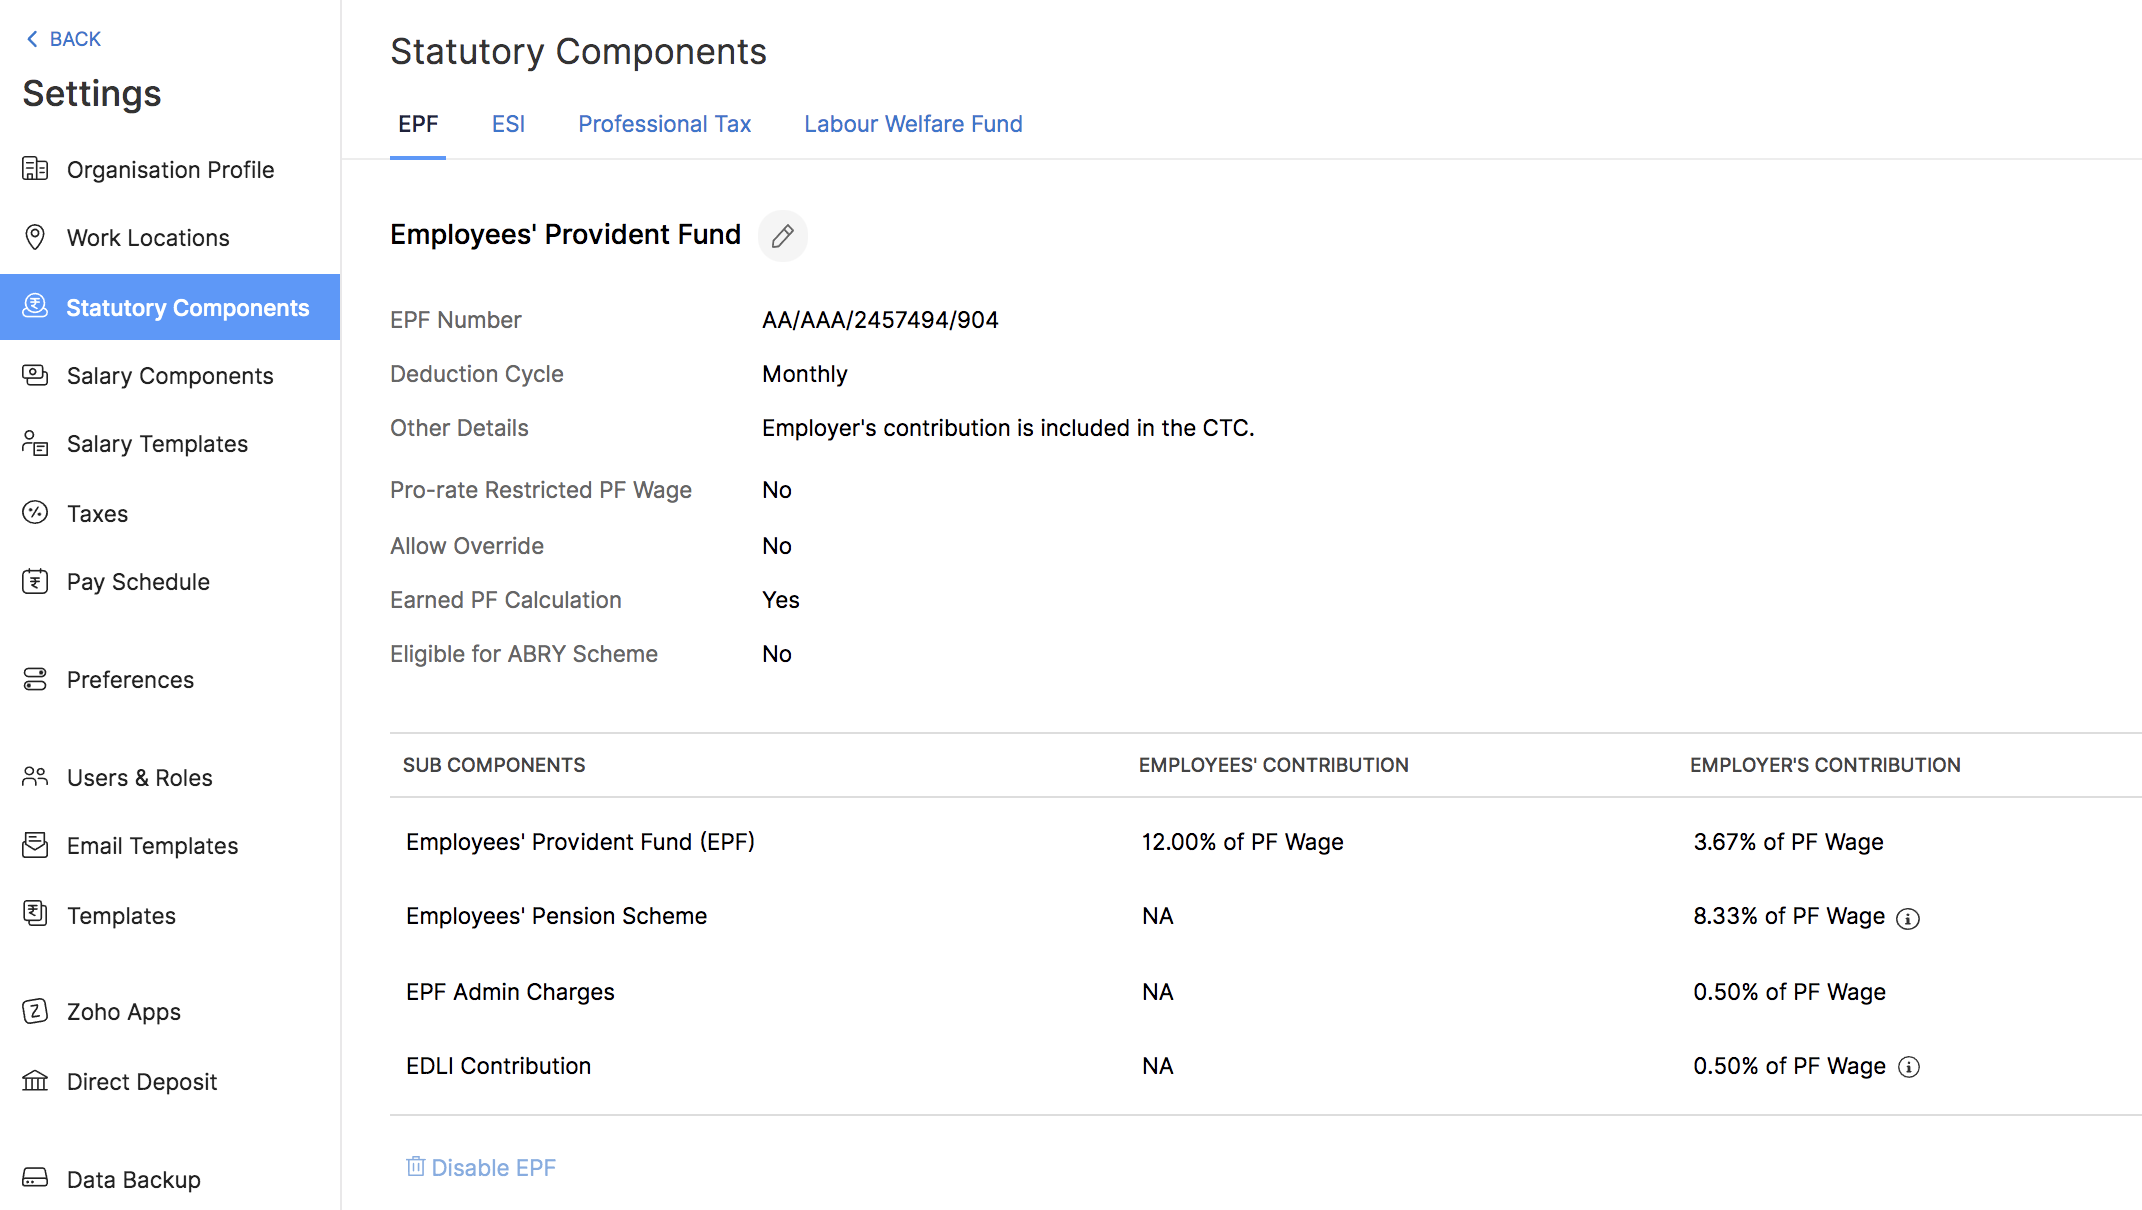
Once you’ve set up EPF for your organization, all you need to do is configure it when you add a new employee. Their PF contributions will be deducted automatically every month.
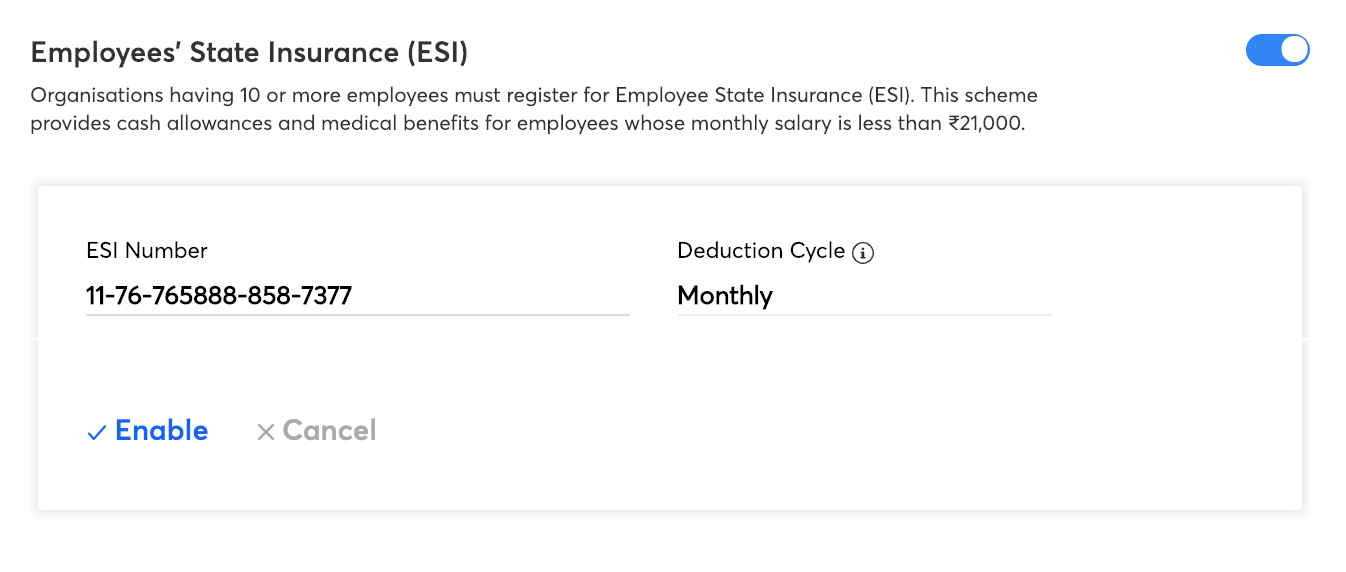
Employee State Insurance
This is a self-financing social security and health insurance scheme applicable only to employees whose monthly salary is ₹21,000 or less. The employees’ contribution for ESI is 0.75% of Gross Pay and your contribution would be 3.25% of Gross Pay. It is available in all states except Manipur, Sikkim, Arunachal Pradesh and Mizoram.
To set up ESI for your organization:
- Enter your ESI Number.
- Make sure that you configure ESI when you add a new employee, if it applies to them.
Professional Tax
It is a tax levied on all professionals and salaried individuals by the State Governments. Employees belonging to different salary slabs would need to pay different amounts as Professional Tax. The tax slabs vary for each state or municipality. The deduction cycle may be monthly, half-yearly or yearly depending on your state.
To set up Professional Tax for your organization:
- Enter your Professional Tax Number.
- The tax slabs will be pre-configured based on your state.
- Modify the existing tax slabs (if needed).
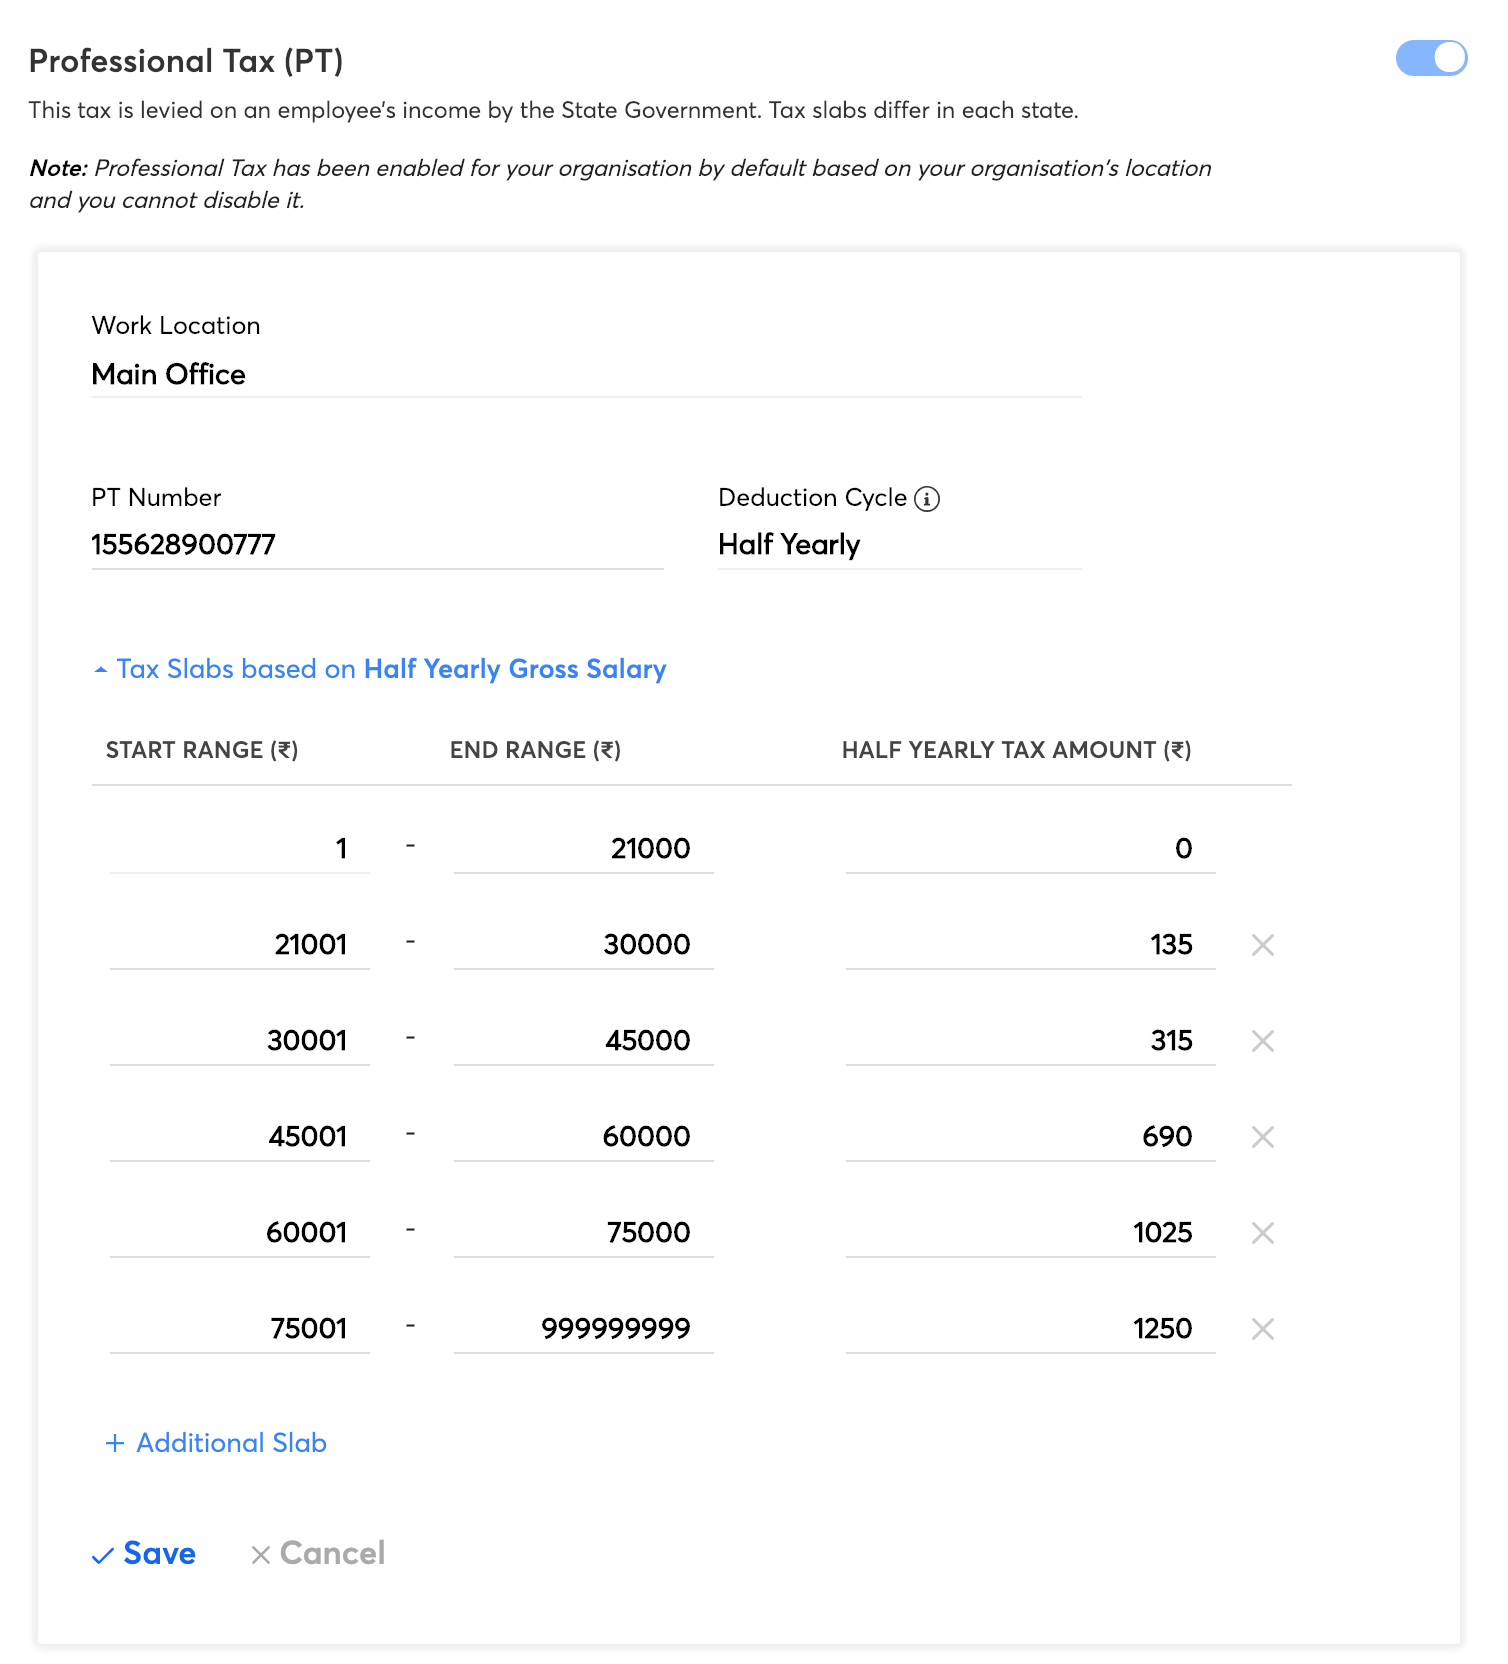
All you need to do now is configure PT when you add a new employee.
Labour Welfare Fund
It is a scheme which ensures social security and improved working conditions for employees. It is applicable only for employees whose monthly salary is ₹15,000 or less. The deduction cycle may be monthly, half-yearly or yearly depending on your state. Click the button to enabled LWF for your organization.
Click Continue once you’ve enable the necessary statutory components.
Step 5: Salary Components
In this section, you can select the earnings, deductions, and reimbursements that your organization offers to its employees. These components will be part of your employees’ payroll once you associate them with the employees.
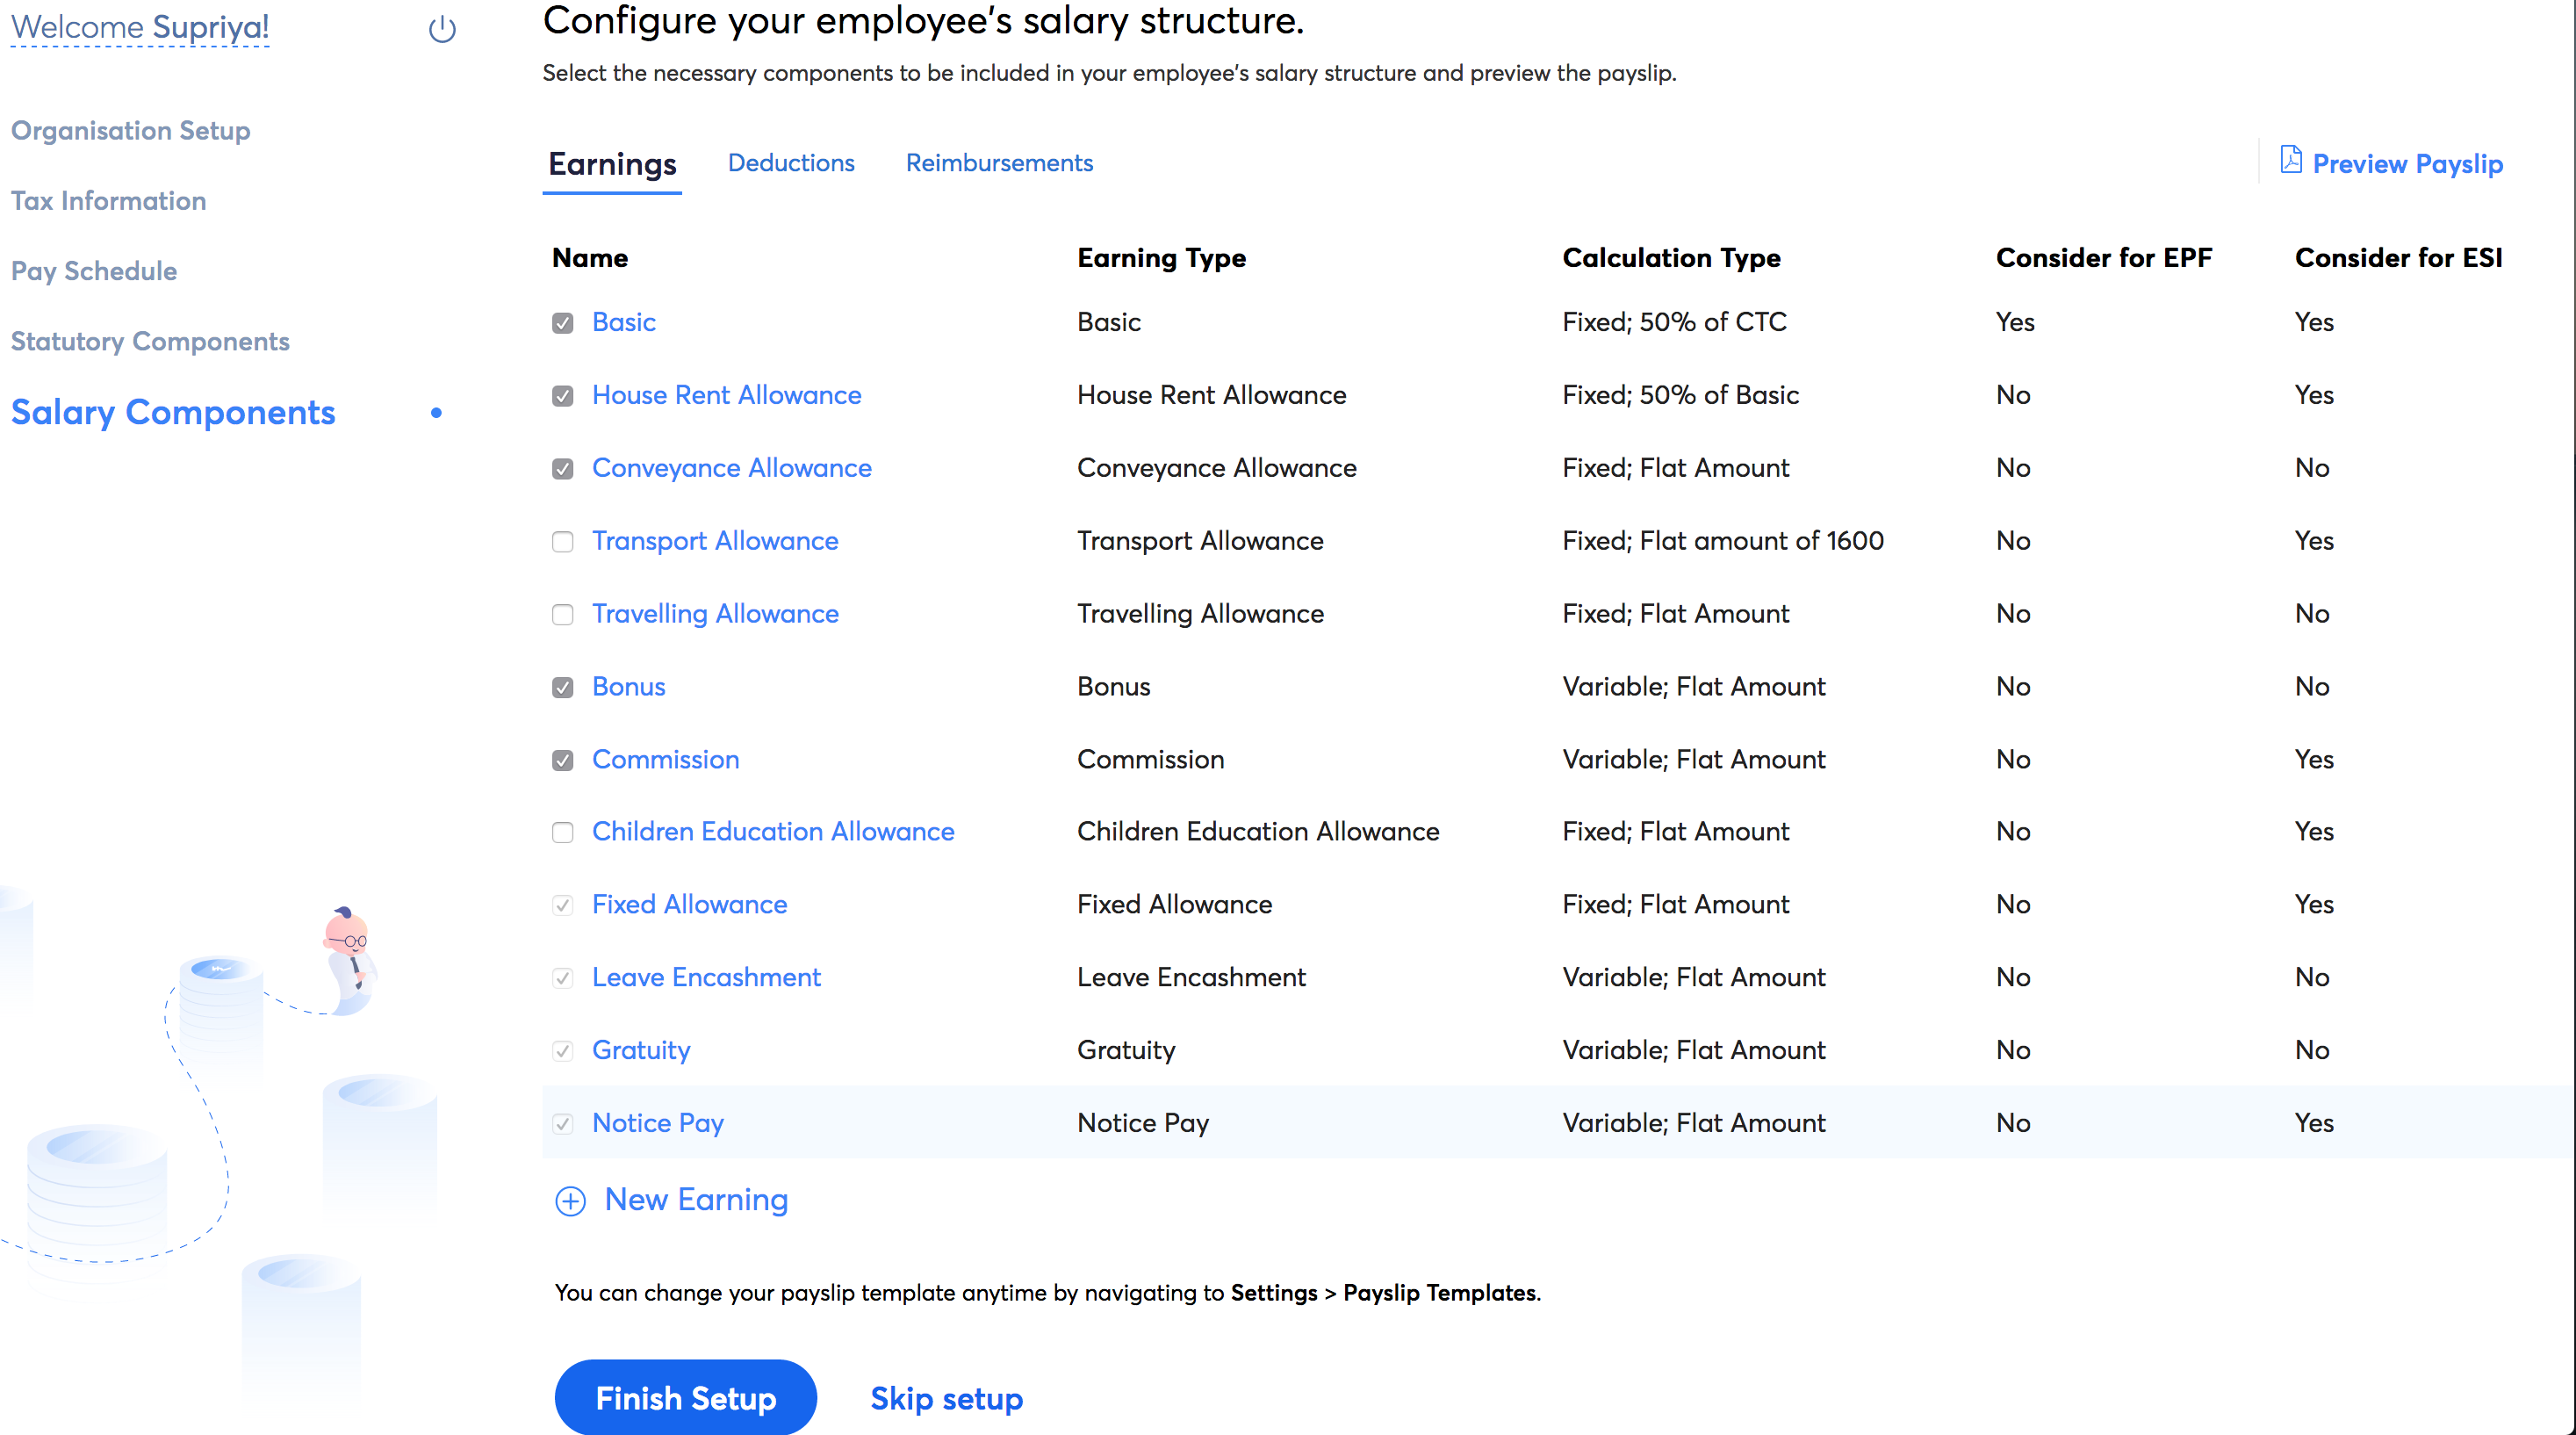
Earnings:
To select the earnings that your organization offers:
- Mark or unmark the checkbox to the left of each salary component to include or exclude it from your active components.
Insight: According to the Provident Fund Act, you can include all earnings except House Rent Allowance to calculate EPF and ESI.
- Click a salary component to modify its Name in Payslip, Calculation Type, Amount/Percentage and other details.
- You can select the following options for each salary component:
- Calculate on pro-rata basis
- Consider for EPF Contribution (EPF will be calculated for a maximum of 15,000 of PF wages)
- Consider for ESI Contribution
- Include as a Flexible Benefit Plan component
- Check Mark this as Active option.
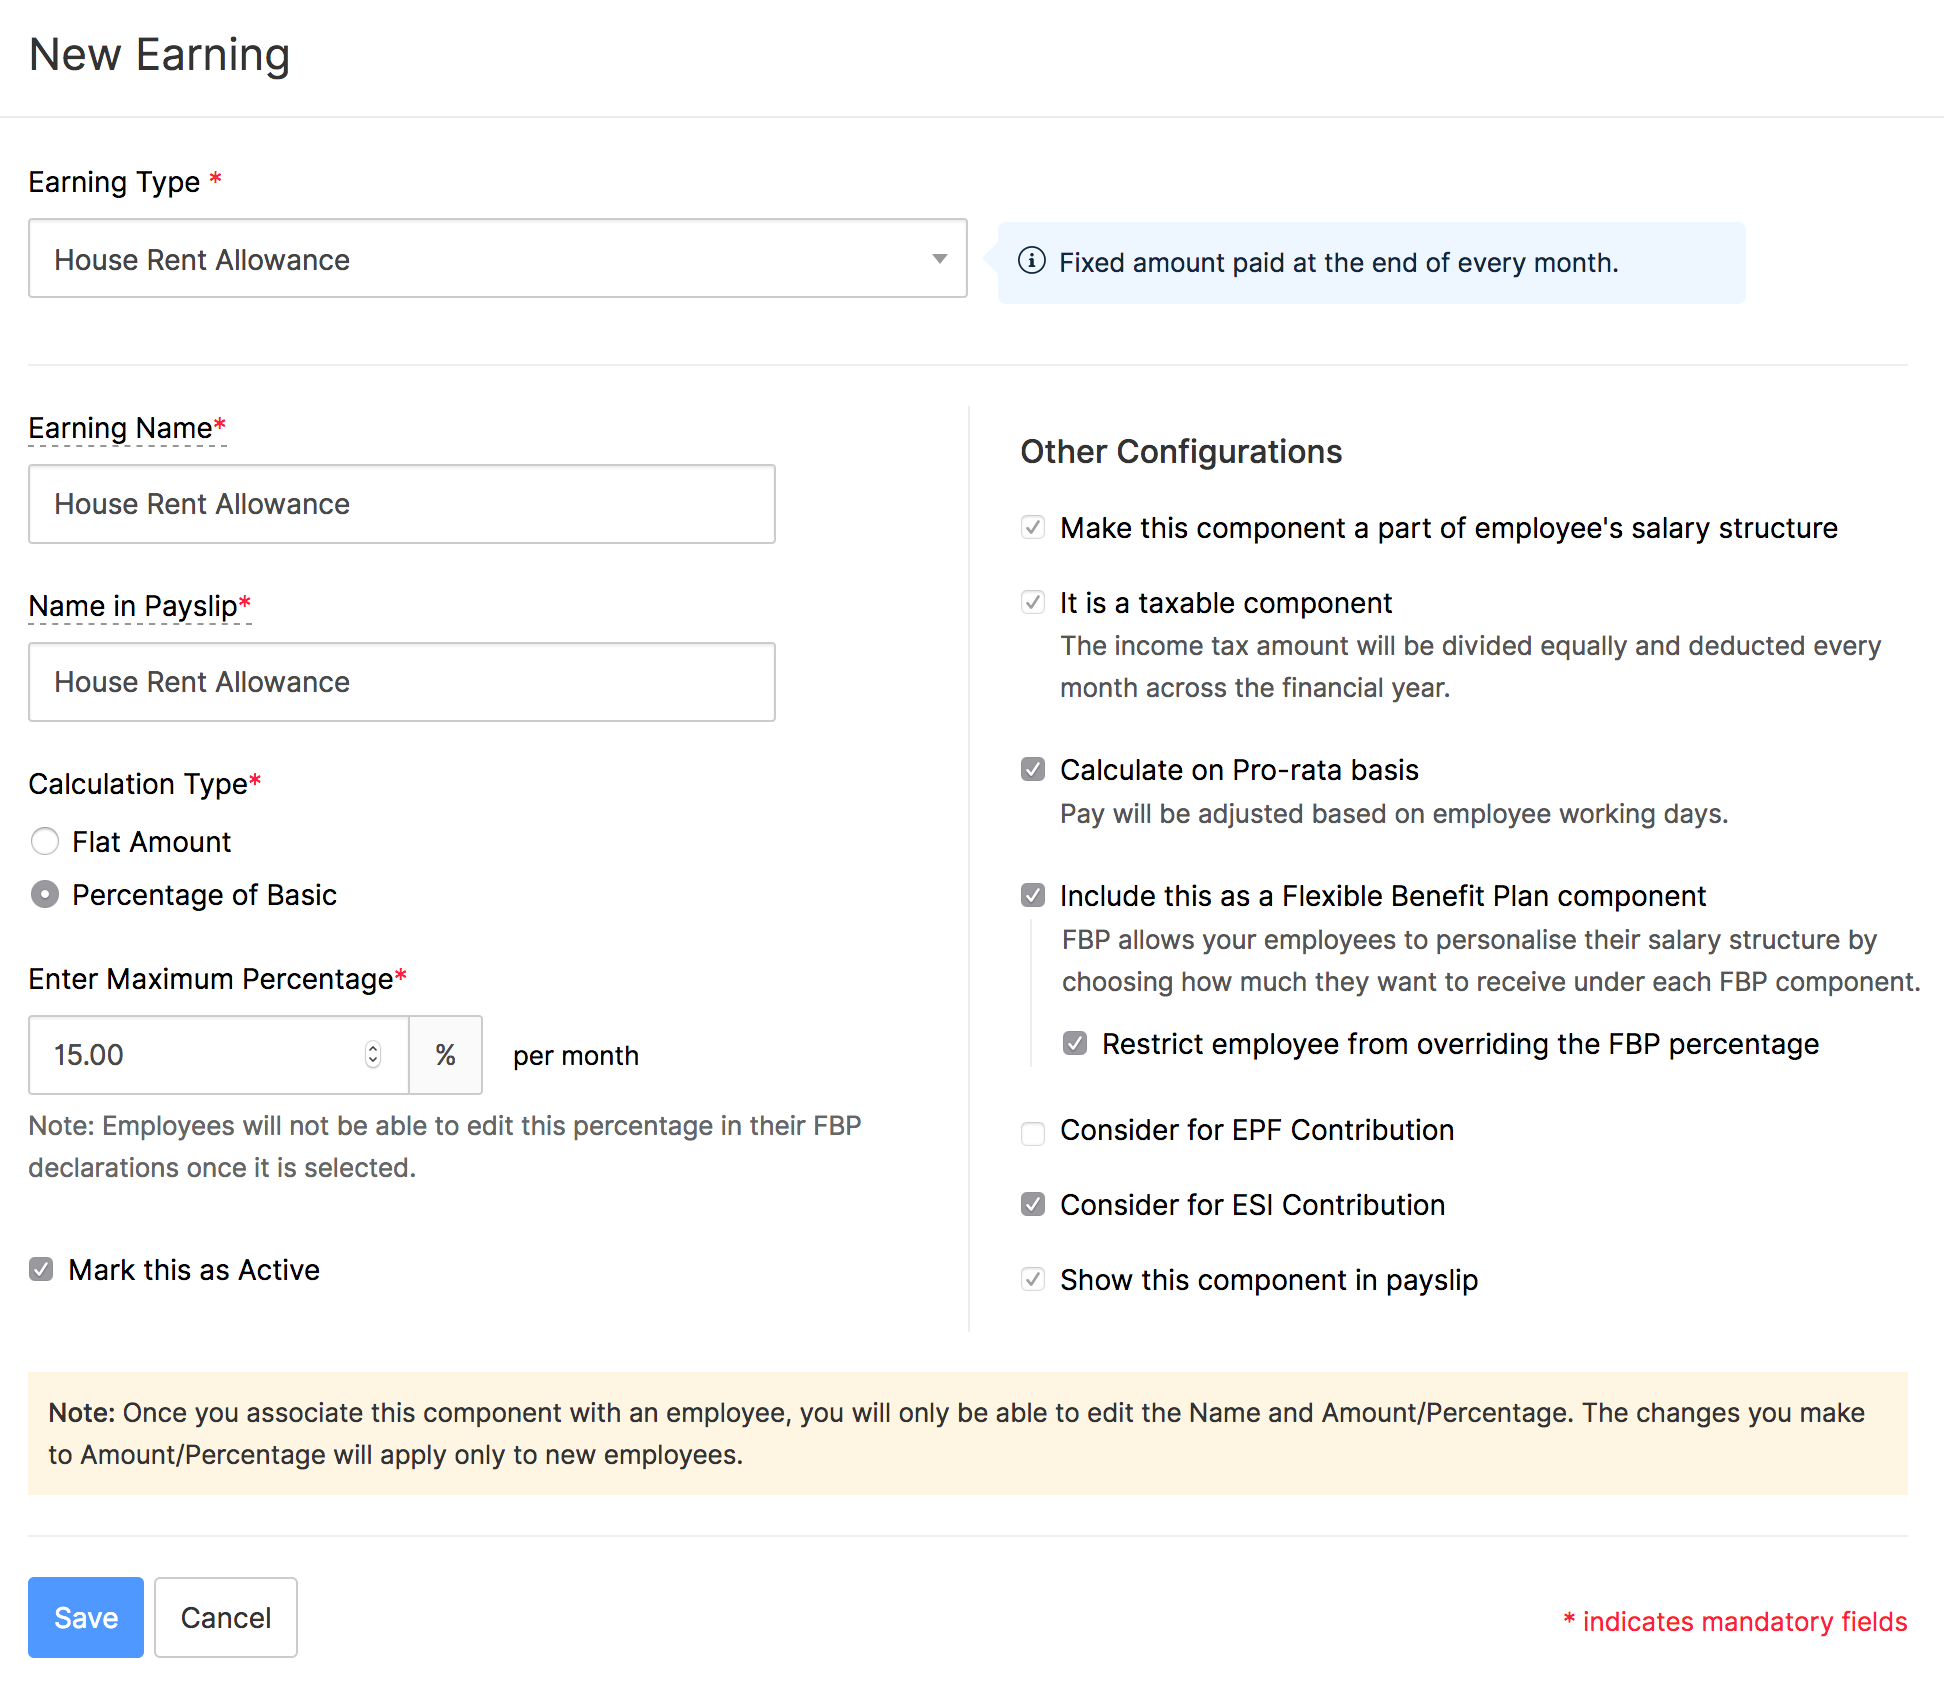
All fixed earnings will be: included as part of the CTC, considered as taxable and shown in the payslip as per the Government norms. Variable earnings can be tax exempted and excluded from the CTC by marking the relevant options.
Deductions:
Deduction is money that’s deducted from your employees’ monthly pay. There are two types of deductions:
- Pre-tax
- Post-tax
Pre-tax
A pre-tax deduction is money taken out of the employee’s pay before income tax is calculated. As a result, they reduce the employee’s net taxable income and thereby reduces income tax. For example, deductions made towards schemes like National Pension Scheme (NPS) or Voluntary Provident Fund (VPF) are pre-tax deductions.
Note: Zoho Payroll does not deposit the deductions to the vendors on your behalf. You will have to deposit the deductions by yourself.
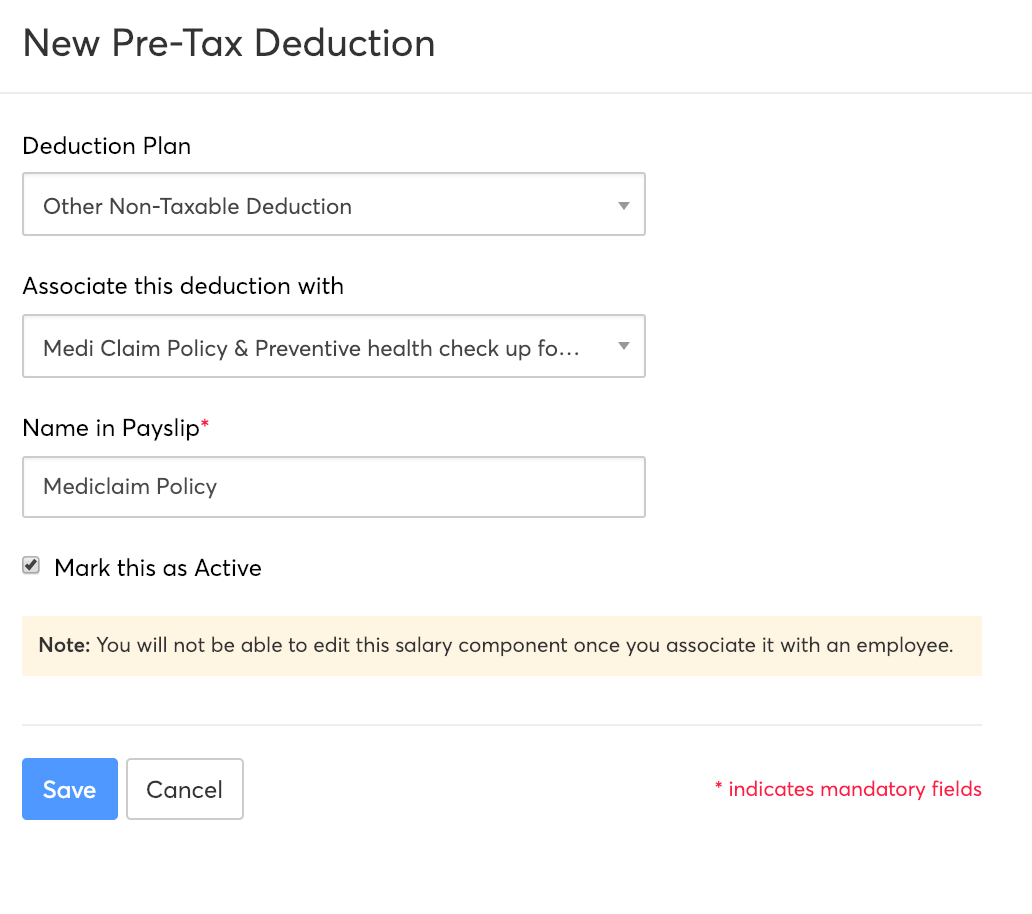
To create a deduction:
- Click Add Component > Pre-Tax Deduction.
- Select a Deduction Type (National Pension Scheme or Other Non-Taxable Deduction).
- If you select Other Non-Taxable Deduction, associate it with one of the investment types mentioned in section 80 of the Income Tax Act.
- Enter a name for this pre-tax deduction to be displayed in payslips.
- If you wish to include employer’s contribution in the CTC, check the option.
- Check Mark this as Active option.
- Click Save.
You can associate this deduction to your employees from the Employee Details page or during pay runs.
Post-tax
A post-tax deduction is money taken out of your employees’ pay after income tax has been calculated. This does not affect the net taxable income of the employee. For example, purchases made in the company grocery store or food court are considered as post-tax deductions.
Note: Post-tax deductions are one time. They won’t recur in subsequent pay runs.
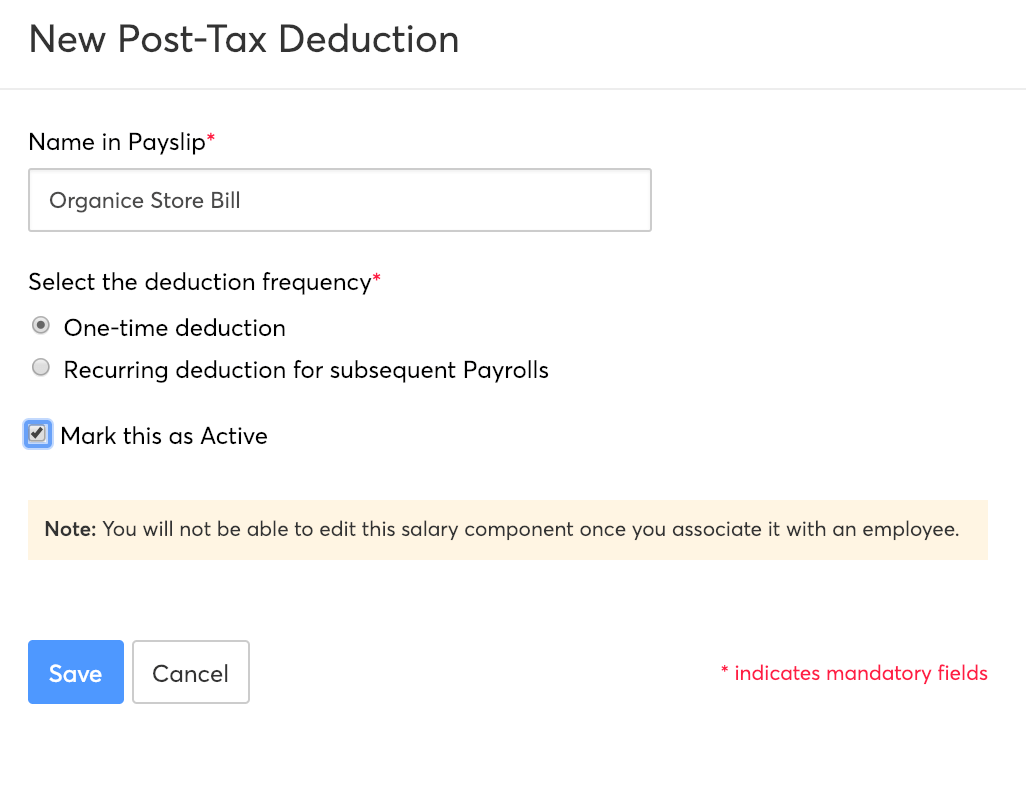
To create post-tax deductions:
- Click Add Component > Post-Tax Deduction.
- Enter the name of the deduction.
- Select whether it is a one-time or a recurring deduction.
- Check Mark this as Active option.
- Click Save.
You can associate this deduction to your employees from the Employee Details page or during pay runs.
Reimbursements
Based on your organization’s salary structure, you can enable reimbursements for your employees.
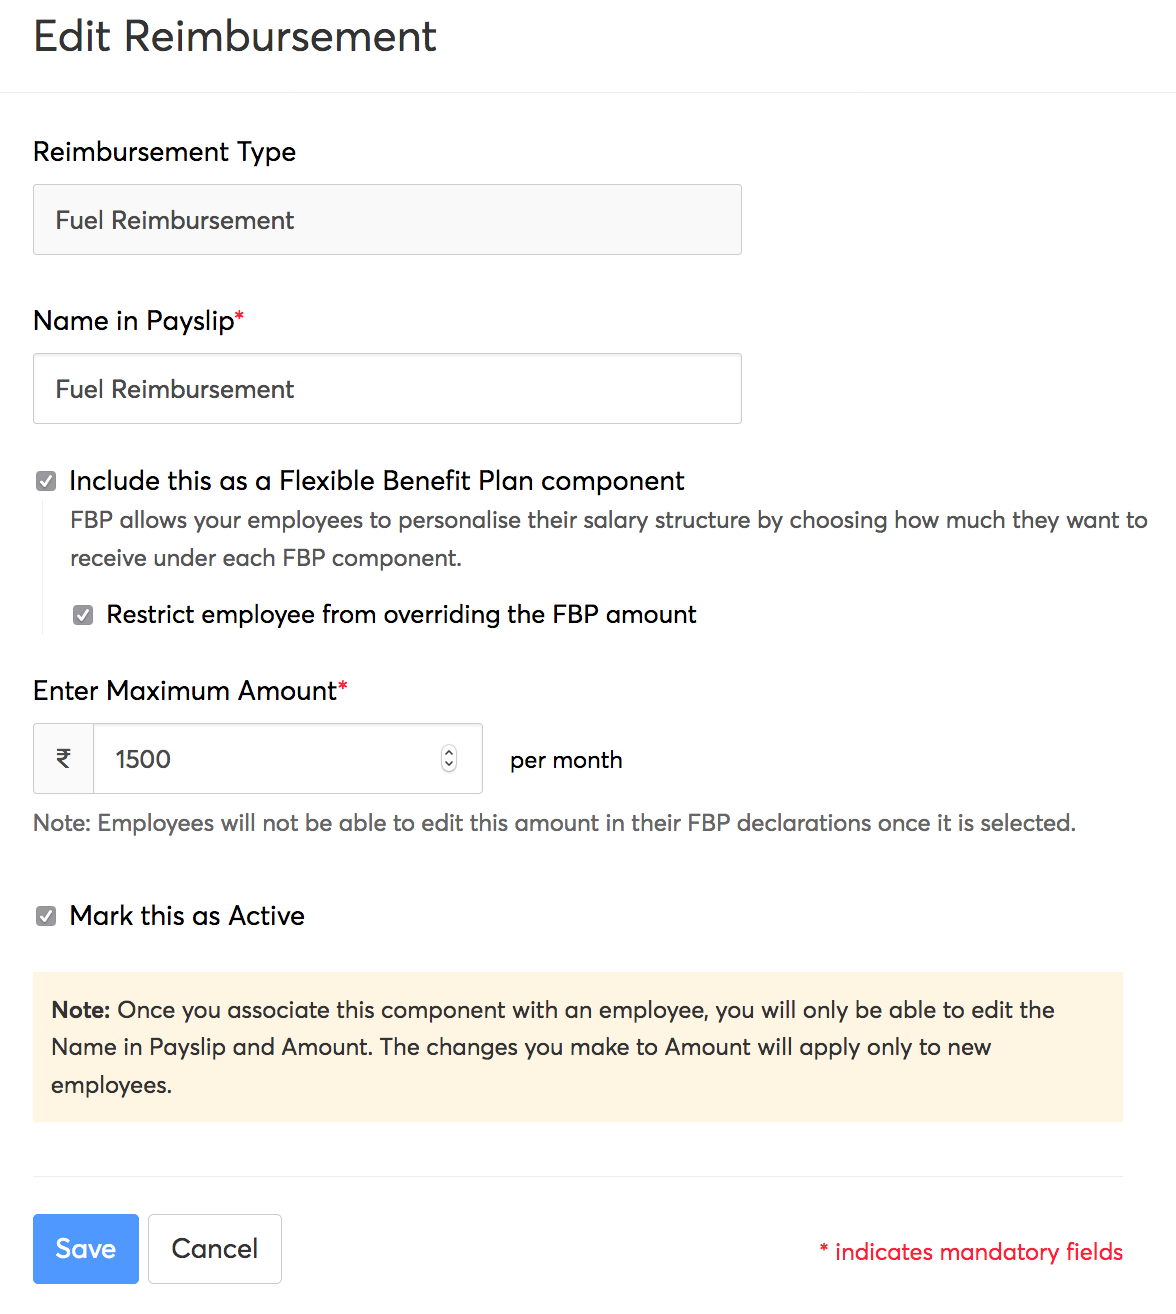
Add Reimbursement Component:
- Select the reimbursement you want to enable for your employees and enter the details.
- Enter the name of the reimbursement. This name will be displayed on payslips.
- Enter the maximum reimbursable value.
- If you want to make the reimbursement a part of Flexible Benefit Plan, check the Include this as a Flexible Benefit Plan component option.
- If you want to restrict the FBP value to 0 or the maximum amount, check the Restrict employee from overriding the FBP amount option. Employees will not be able to edit this amount in their FBP declarations once it is selected.
- Check Mark this as Active option.
- Click Save.
Once you’ve finished configuring all the salary components, click Finish Setup.