Adding a Google Connector to Mail360
Adding a Google connector in Mail360 involves two important steps:
Step 1: Creating a Google Application
Creating a Google application involves designing software that integrates with Google services, such as Gmail, Google APIs, etc. The process involves setting up a new Google Cloud Project, enabling the necessary APIs for that project, handling authentication, and subsequently testing and deploying the project.
A. Setting up a Google Cloud Project
A project in the Google Cloud Console is a foundational element for using Google Cloud Platform (GCP) services. It acts as a container for all the resources, configurations, services, and APIs that you use within Google Cloud. To start using any service within Google Cloud, you need to first create a project.
To create a new project, follow the below steps:
- Go to Google Developer Console.
- Log in with your Google account.

- Click CREATE PROJECT. A New Project page will be displayed.
- Enter a name for the project for your reference.
- Choose Location.
- Click CREATE. A new project is successfully created.

- The recently created project will be listed in the Notifications pop-up. Choose your project from the list by clicking on SELECT PROJECT.

B. Enabling the Necessary APIs
Depending on your application's purpose, you'll need to enable specific APIs.
To enable APIs for your project, follow the below steps:
- From the menu on the Google Cloud homepage, select APIs & services.
- In the sub-menu, select Enabled APIs & Services.
- Click on the + Enable API & Services icon.

- Search for and enable the following necessary APIs in the API Library:
- Gmail API: Provide access to view and manage Gmail mailbox data.
- People API: Provide access to information about profiles and contacts.
Here, we are enabling Gmail API and People API to manage email interactions and gain access to contact information, as per your application's requirement.
C.Authentication
Most Google APIs require authentication, typically done using OAuth 2.0.
Authentication involves two steps:
I. Setting up an OAuth 2.0 consent screen
OAuth 2.0 consent screen is necessary to inform and obtain permission from users when an application requests access to their private data or certain functionalities in their Google account. It ensures transparency and user control over what data the application can access and use.
To set up your project's OAuth consent screen, follow the below steps:
- Click the Navigation menu on the Google Cloud homepage and select APIs & services.
- In the sub-menu, select the OAuth consent screen.

- Choose the User Type as External.
- Click Create. The Edit app registration page will be displayed.
- In the OAuth consent screen section, fill in mandatory fields with the requested information.
- Click Save and Continue. The scopes page will be displayed.

- In the Scopes section, click ADD OR REMOVE SCOPES.

- Search and add the following Google scopes.
- https://mail.google.com/
- https://www.googleapis.com/auth/userinfo.email
- Click Update.
- Click Save and Continue. The Test Users page will be displayed.
- In the Test Users section, click +Add Users to add test users, if you want to.
- Click Save and Continue. A summary will be displayed.
- Review the Summary and make sure the information is correct for your application.
- Click BACK To DASHBOARD. The configured OAuth consent screen will be displayed.
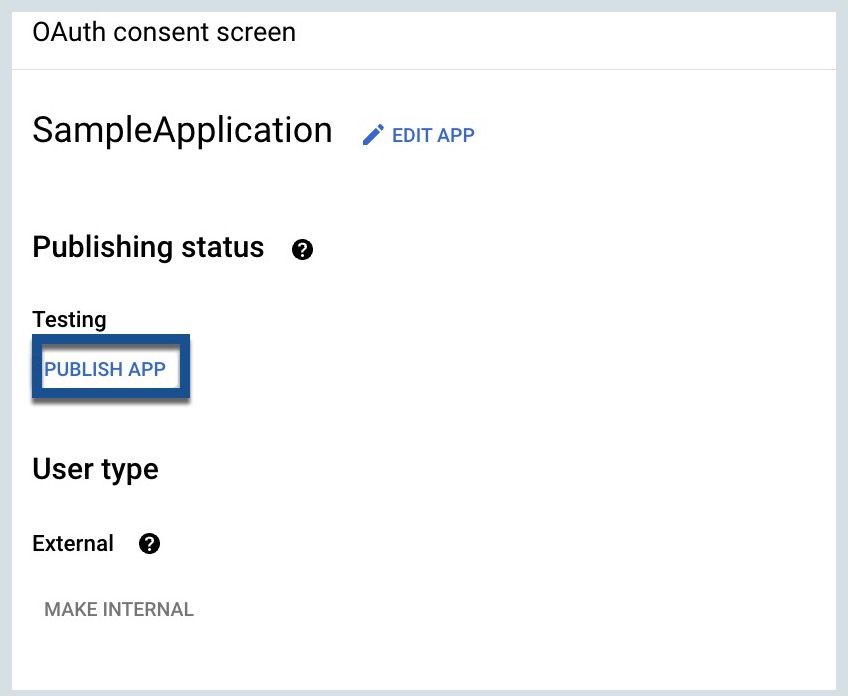
Publishing your newly created application is necessary to make it available to any user with a Google Account.
- On the OAuth consent screen, click the Publish App.
- Click Confirm.

II. Create credentials
Creating credentials is a crucial step to authenticate and authorize your application to access and interact with specified APIs. This ensures a secure and controlled data exchange between your application and the Google service.
To create the credentials, follow the below steps:
- Under Enabled APIs & Services in the left pane, choose the Credentials sub-section.
- Click the + CREATE CREDENTIALS on the displayed page.
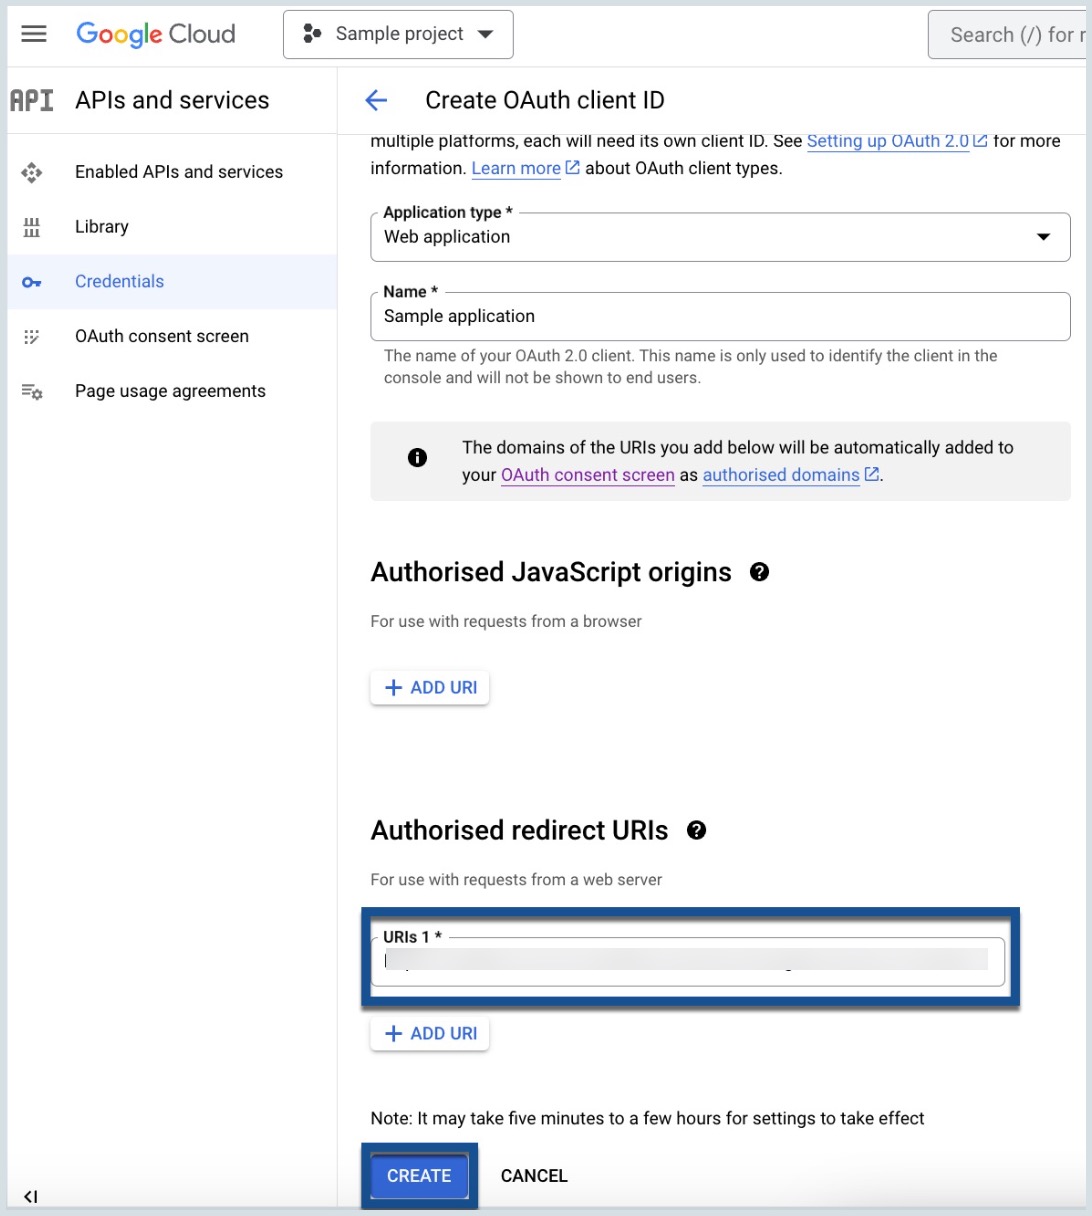
- Choose the OAuth client ID. The Create OAuth client ID page will be displayed.

- Choose the Application Type as a Web application.
- Provide a name for the application for your reference.
- Add Authorized redirect URI, by clicking on the + ADD URI icon. This is to be mentioned to specify where the authentication server should send the authorization code (or tokens) after successful user authentication. Provide here the URI as https://mail360.zoho.com/api/connectors.
- Click Create.

Note:
- Ensure that the service name you specify (in the above step) while setting up your application in the Google or Microsoft developer platform matches the service name you specify when adding a connector in Mail360.
- Ensure that the redirect URL you provide while setting up your application in Google or Microsoft developer platform, matches the redirect URL displayed on the Connector page within Mail360.
The OAuth client credentials are successfully created.
Step 2: Integrating the Created Google application into Mail360.
Integrating the created Google application with Mail360 is necessary to utilize the functionalities of Google services (like Gmail and People API), and enable your application to efficiently manage email communications and access contact information through the Mail360 platform.
To integrate the created Google application to Mail360, follow the below steps:
- Log in to your Mail360 account.
- Go to Connectors on the left pane.
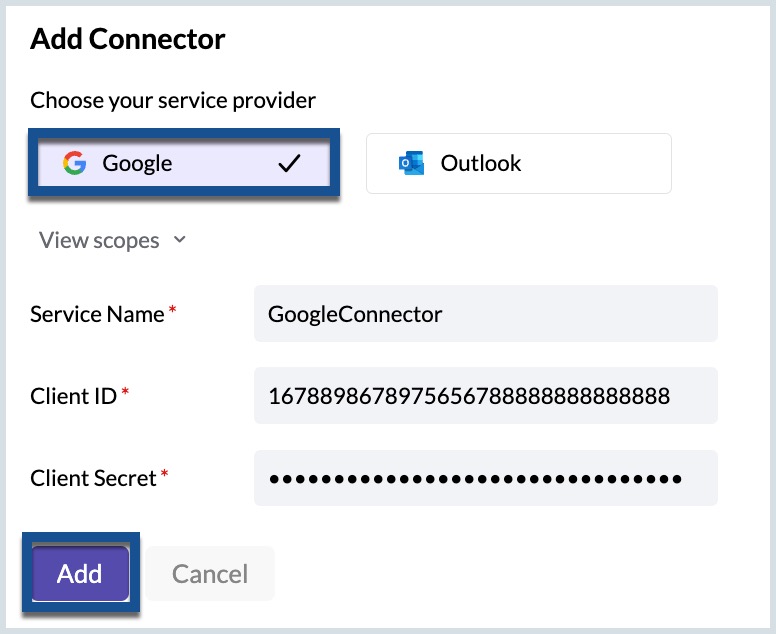
- Click Add connector.
- In the Add Connector window, choose Google as your service provider.
- Provide a Service Name.
- Enter the Client ID and the Client Secret.
- Click Add.

Congratulations! The Google connector has been successfully added to Mail360.


