
Integrate Zoho Billing with Zoho CRM
When you integrate Zoho Billing with Zoho CRM, you can view and manage customer and accounting information in one place. This integration improves collaboration between sales and finance teams in your business, allowing them to track deals, create quotes, and invoices without switching between applications.
Benefits of the Integration
- Capture all customer information in one place, so you can work on the same information at hand in both the apps.
- View customer’s key accounting metrics like sales information and outstanding receivables directly from Zoho CRM.
- Sync transactions between both apps.
- Automate workflows, like creating an invoice when a deal is won.
Set up the Integration
- Your organisation name, email address, and your country.
- All your users’ details.
To set up the CRM integration from Zoho Billing:
Go to Settings.
Select Zoho Apps under Integrations & Marketplace.
In the Zoho Apps page, click Connect next to Zoho CRM.

In the Connect to Zoho CRM page, click Select Organisation in the Zoho CRM Organisation section.

In the Connect Zoho CRM pop-up, select the required Organisation, and click Save.

A two-way sync will be set up, which means that data will be fetched from Zoho CRM into Zoho Billing and vice-versa.
Configure the Modules to be Synced
Once you set up the integration, you can configure the modules to sync between Zoho Billing and Zoho CRM. To do this:
- Go to Settings.
- Select Zoho Apps under Integrations & Marketplace.
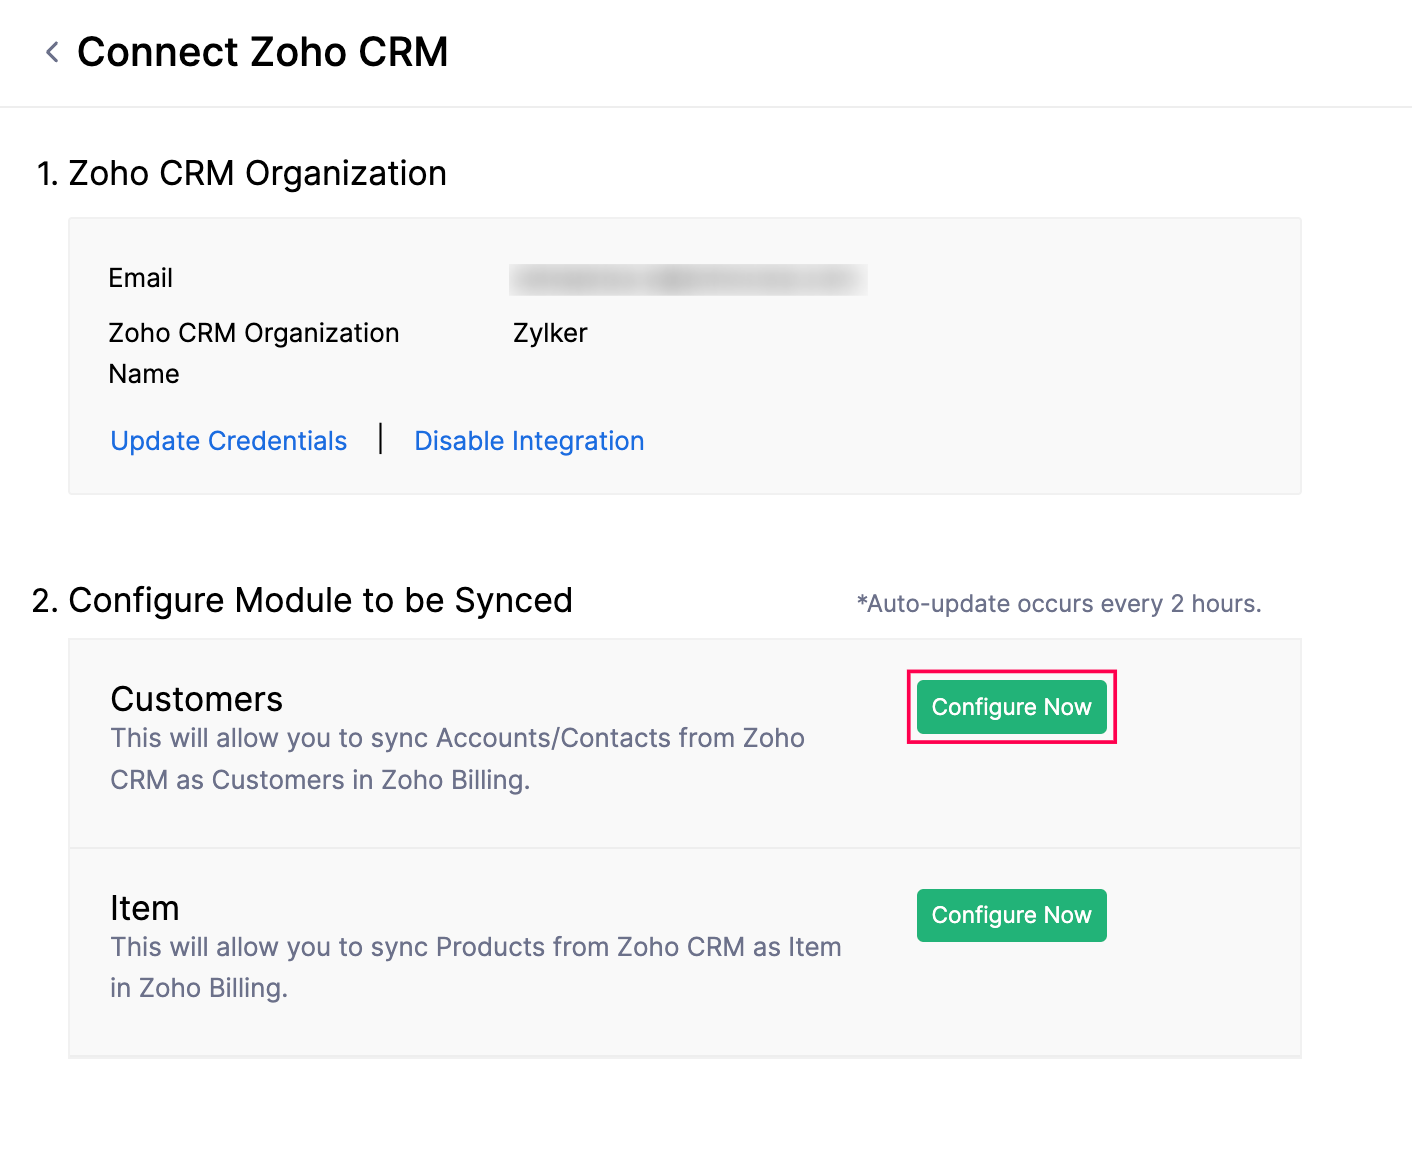
- In the Zoho Apps page, click Show Details next to Zoho CRM.
- In the Configure Module to be Synced section, click Configure Now next to the required module you want to sync from Zoho CRM into Zoho Billing.
You can sync data for the following modules from Zoho CRM into Zoho Billing:
Sync Customers
To sync customer data from Zoho CRM into Zoho Billing:
Go to Settings.
Select Zoho Apps under Integrations & Marketplace.
In the Zoho Apps page, click Show Details next to Zoho CRM.
In the Configure Module to be Synced section, click Configure Now next to Customers.
In the next page, configure the following preferences:
- Select Module in Zoho CRM: Select the module you want to sync between Zoho CRM and Zoho Billing.
- Accounts: The Accounts in Zoho CRM will be fetched as Customers in Zoho Billing with the Customer Type set as Business.
- Contacts: The Contacts in Zoho CRM will be fetched as Customers in Zoho Billing with the Customer Type set as Individual.
- Accounts & their Contacts: The Accounts and associated Contacts in Zoho CRM will be fetched as Customers and Contact Persons in Zoho Billing. Check Include contacts that are not associated to any accounts in Zoho CRM to sync contacts that are not associated with an account in Zoho CRM. These contacts will be fetched as Customers in Zoho Billing with the Customer Type set as Individual.
- Select the extent of sync: Choose how you want to sync records between both the apps.
- Fetch from CRM: The records in Zoho CRM will only be fetched into Zoho Billing. No Zoho Billing records will be fetched into Zoho CRM. However, any records already pushed to Zoho CRM will remain unaffected.
- Sync both ways: The records will be synced from Zoho CRM to Zoho Billing and vice-versa, in which Zoho CRM records will be fetched first.
- Select Module in Zoho CRM: Select the module you want to sync between Zoho CRM and Zoho Billing.
- Choose how to handle duplicate customers: When you sync records between Zoho CRM and Zoho Billing, there might be a record in Zoho CRM that is already present in Zoho Billing. To resolve this, duplicate records are identified by comparing Account Name in Zoho CRM and Customer Display Name in Zoho Billing. Choose how you want to handle duplicate records during the sync:
- Clone: The duplicate record will be cloned, and will be available along with the existing record.
- Overwrite: The duplicate record will replace the existing record in Zoho Billing.
- Skip: The duplicate record will not be synced, and the existing record will remain unchanged.
- Select the view to be synced: To sync specific records from Zoho CRM, you can create a view and sync that view into Zoho Billing. If you choose to sync Accounts & their Contacts, you can select both the Account view and the Contact view to sync records.
- Map Fields: Match the fields in Zoho Billing with the corresponding fields in Zoho CRM. Some fields are mapped automatically, while you must map the remaining fields manually. If certain fields from Zoho CRM can’t be mapped to the default Zoho Billing fields, create custom fields in Zoho Billing. These fields will appear during the mapping process.
- Click Save and Sync to start the sync process, or click Save and Sync Later if you want to save the preferences now and sync the records later.
The customers will be synced in a while, based on chosen preferences. To check the status of the sync, click Check Status under the Customers section.

Sync Items
You can sync the Items in Zoho Billing with the Products in Zoho CRM, similar to customers. To sync items:
- Go to Settings.
- Select Zoho Apps under Integrations & Marketplace.
- In the Zoho Apps page, click Show Details next to Zoho CRM.
- In the Configure Module to be Synced section, click Configure Now next to Items.
- In the next page, configure the following preferences:
- Select the extent of sync: Choose how information flows between the two apps.
- Fetch from CRM: The products in Zoho CRM will only be fetched as Items into Zoho Billing. No Zoho Billing records will be fetched into Zoho CRM. However, any records already pushed to Zoho CRM will remain unaffected.
- Sync both ways: The Items from Zoho Billing will be synced as Products into Zoho CRM, and vice-versa, in which records from Zoho Billing will be fetched first.
- Choose how to handle duplicate items: When you sync data between Zoho CRM and Zoho Billing, there might be a record in Zoho CRM that is already present in Zoho Billing. To resolve this, duplicate records are identified by comparing Product Name in Zoho CRM and Item Name in Zoho Billing, and the product’s SKU in both the apps. Choose how you want to handle duplicate records during the sync.
- Clone: The duplicate record will be cloned, and will be available along with the existing record.
- Overwrite: The duplicate record will replace the existing record in Zoho Billing.
- Skip: The duplicate record will not be synced, and the existing record will remain unchanged.
- Select the extent of sync: Choose how information flows between the two apps.
- Select the view to be synced: To sync specific records from Zoho CRM into Zoho Billing, you can create a view in Zoho CRM, add products, and sync the view. During the sync, click the click here to select a view option and select the required view in the Select a view dropdown.
- Map Fields: Match the fields in Zoho Billing with the corresponding fields in Zoho CRM. You can also create custom fields in Zoho Billing to match the fields in Zoho CRM, if required.
- Click Save and Sync to start the sync process, or click Save and Sync Later if you want to save the preferences now and sync the records later.
The items will be synced in a while, based on chosen preferences. To check the status of the sync, click Check Status under the Items section.
Sync Options
Once you’ve configured the integration, any new account, contact, or product you add in Zoho CRM will sync into Zoho Billing every two hours after the initial sync. If you choose to sync transaction modules, they will sync instantly. To do this:
- Go to Settings.
- Select Zoho Apps under Integrations & Marketplace.
- In the Zoho Apps page, click Show Details next to Zoho CRM.
- In the Configure Module to be Synced section, select the preferred sync option. They include:
- Instant Sync: If you’ve added new records and want to update them immediately in the other app, click Instant Sync.
- Show Sync History: You can view a detailed sync history, including the number of records added, updated, or deleted, along with the date and time of sync in Zoho Billing. It also displays if a sync has failed, along with the failure reason.
- Pause/Resume Sync: If you want to temporarily stop syncing records between Zoho Billing and Zoho CRM, click Pause Sync. To start syncing records between the apps again, click Resume Sync.
- Edit: You can modify the sync preferences, if required. The updated preferences will apply to the next automatic or manual sync.

Working With the Integration in Zoho Billing
Once you set up the integration, you can perform the following actions in Zoho Billing:
Access Zoho CRM Customers
Depending on how you choose to sync records, the accounts and contacts from Zoho CRM will be available as Customers in Zoho Billing.
Filter by CRM Customers
You can view all the accounts and contacts synced from Zoho CRM into Zoho Billing as Customers. Here’s how:
- Go to Sales on the left sidebar and select Customers.
- Click the All Customers filter at the top of the page and select CRM from the dropdown.
The respective CRM accounts and contacts will be displayed.
Search CRM Customers
The customers fetched from Zoho CRM will be available in Zoho Billing, and you can create transactions for them. However, you can also create transactions for customers not yet imported. Here’s how:
Select a transaction you want to create (for example, Invoices).
Click + New in the top right corner of the page.
In the New Invoice page, click the Advanced Customer Search icon in the Customer Name field.
In the Advanced Customer Search pop-up, the list of customers from Zoho Billing and Zoho CRM will be displayed. Select Zoho CRM at the top of the pop-up.
Enter the Account Name and click Search.
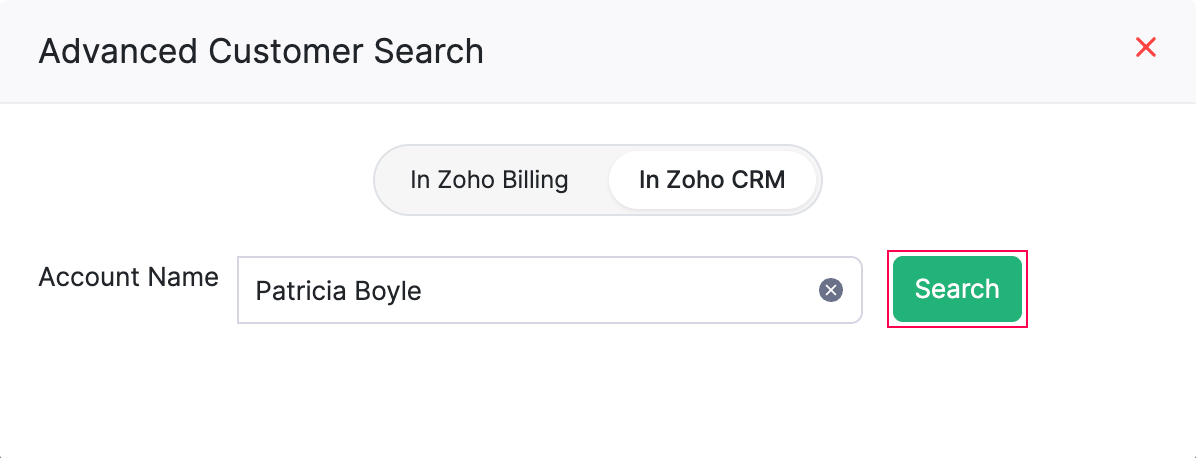
A list of contacts and accounts associated with the entered account name will be displayed. Select the required contact or account from the list.
Once done, the selected account or contact will be fetched as a customer in Zoho Billing. Now, you can create sales transactions for them.
Working with the Integration in Zoho CRM
When you integrate Zoho Billing with Zoho CRM, you can sync records between both apps and easily manage them from Zoho CRM. Let’s take a look at the actions you can perform in Zoho CRM.
Set up User Profiles in Zoho CRM
All Zoho CRM users are assigned a specific profile, such as Marketing, Sales, Support, etc., which controls what actions they can perform on records in Zoho CRM. An admin can create or modify profiles to grant or remove permissions and assign them to users.
You can also set permissions for actions like creating and sending sales transactions in Zoho Billing. This allows admins to assign permissions based on user’s roles and responsibilities.
For example, if you want a salesperson to create quotes and not send them to their prospects (or customers), you can remove the Send Email permission from the role assigned to the salesperson.
To configure these permissions:
- Log into your Zoho CRM organisation.
- Go to Setup, and select Profiles under Security Control.
- Click on the profile you want to allow or deny permissions.
- Scroll down to the Zoho Finance Permissions section.
Here, you can enable or disable access to transaction modules for the respective profile. You can also configure individual permissions like View, Create & Edit, and Send Email for each transaction.
For example, if a profile doesn’t have the Send Email permission for Quotes, users associated with that profile won’t be able to send quotes to customers in Zoho Billing.
Similarly, you can also restrict a profile from viewing the financial summary of Zoho CRM accounts and contacts (records synced from Zoho Billing into Zoho CRM). Here’s how:
- Log in to your Zoho CRM organisation.
- Go to Setup, and select Profiles under Security Control.
- Click on the profile you want to allow or deny permissions.
- Scroll down to the Zoho Finance Permissions section, and slide the toggle near Receivables and Payables Summary.
The users associated with the profile won’t be able to view the summary. Only the users associated with a profile that has this option enabled can view the financial summary of each account or contact in their respective Details page.

Create Transactions in Zoho CRM
Once integrated, you can create transactions for customers in Zoho Billing directly from Zoho CRM. Once created, they’ll sync instantly with Zoho Billing.
You can create a transaction in Zoho CRM in two ways:
From the Dedicated Module of That Transaction
To create a transaction:
- Log into the Zoho CRM organisation that is integrated with Zoho Billing.
- Go to the Zoho Finance module, and choose the transaction you want to create from the dropdown (for example, Invoices).
- Click Create Invoice in the top right corner.
- In the Create Invoice page, fill in the required details.
- Click Save and Send to send it to your customer, or click Save and send it later.
The invoice will be created.
From the Accounts or Contacts Module
To create a transaction:
- Click the module for which you want to create a transaction (for example, Accounts).
- Select the required account.
- In the Overview tab, scroll down to the respective transaction you want to create (for example, Invoices), and click New.
- In the Create Invoice page, fill in the required details.
- Click Save and Send to send it to your customer, or click Save and send it later.
The invoice will be created.
Create Quotes
The Create Quote page in Zoho CRM is similar to the one in Zoho Billing. The quote form is fetched from Zoho Billing, and fields like Quote Number and Customer Notes are automatically generated based on your Zoho Billing settings. Fill in the required details and save the quote.
Once done, click the Convert dropdown in the top right corner of the quote’s Details page, and select if you want to convert it to an Invoice. Similar to Zoho Billing, you can also perform actions like send email, print, mark as sent, and more. Once the quote is accepted, you can mark it as Accepted. If not, mark it as Declined.
Create Invoices
The Create Invoice page in Zoho CRM is similar to the one in Zoho Billing. The invoice form is fetched from Zoho Billing, and fields like Invoice Number and Customer Notes are automatically generated based on your Zoho Billing settings. Fill in the required details and save the invoice.
Similar to Zoho Billing, you can also perform actions like send email, print, mark as sent, and more.
Generate Reports
You can create customised reports in Zoho CRM for the transactions recorded in Zoho Billing. Here’s how:
- Go to Reports.
- In the next page, click Create Report in the top right corner.
- In the Create New Report pop-up, select the required module in the Zoho Finance section of the dropdown, and click Continue.
You can create custom reports or edit the predefined reports to include data from both Zoho Billing (including custom fields) and Zoho CRM. Learn how to create a report in Zoho CRM.
Collaboration Between Sales and Finance teams
When you integrate Zoho Billing with Zoho CRM, it allows your sales and finance teams to share data between the apps at the transaction level. The sales team can view comments related to a specific invoice or quote in Zoho CRM. Similarly, the finance team can see notes, events, and calls related to that transaction in Zoho Billing.
View Comments in Zoho Billing
Let’s consider an example where a sales transaction is created in Zoho CRM, and notes are added to it. Your finance team can view these details in Zoho Billing. Here’s how:
- Log into the Zoho Billing organisation integrated with Zoho CRM.
- Navigate to the transaction where you want to view comments.
- Click the Zoho CRM icon in the top right corner of the transaction’s Details page.
- In the CRM Details pane, click Notes.
You can the comments added for the respective transaction.
View Comments in Zoho CRM
Let’s consider an example where the finance team has commented on a transaction to communicate with the sales team. To view the comments:
- Log in to the Zoho CRM organisation integrated with Zoho Billing.
- Go to Zoho Finance at the top of the page.
- Navigate to the transaction where you want to view comments.
- In the transaction’s Details page, navigate to the Timeline tab.
You can view the comments added to the transaction in the History section.
Disable Integration
If you do not want to sync records between Zoho Billing and Zoho CRM, you can disable it temporarily.
To disable the integration:
Go to Settings.
Select Zoho Apps under Integrations & Marketplace.
In the Zoho Apps page, click Show Details next to Zoho CRM.
Click Disable Integration in the Zoho CRM Organisation section.
In the pop-up that appears, click Confirm.
The integration between Zoho CRM and Zoho Billing will be temporarily disabled. To re-enable the integration:
- Go to Settings.
- Select Zoho Apps under Integrations & Marketplace.
- In the Zoho Apps page, click Show Details next to Zoho CRM.
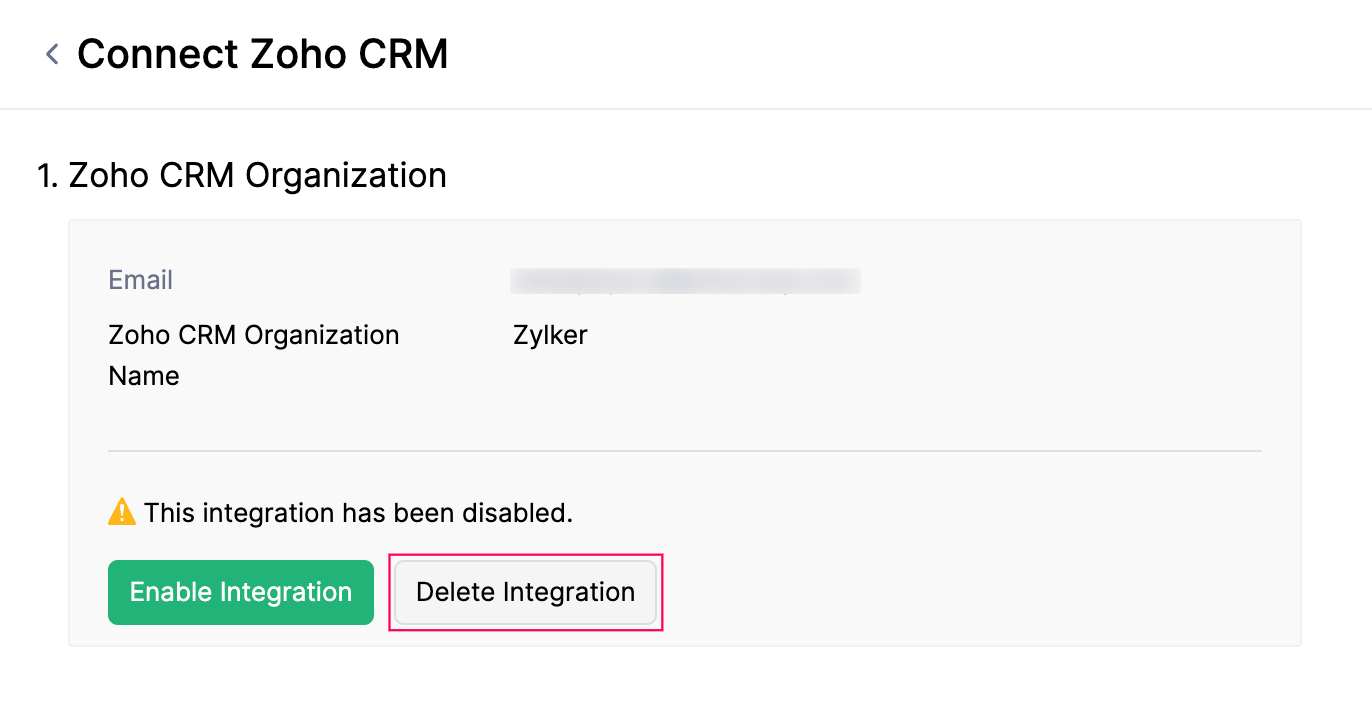
- Click Enable Integration in the Zoho CRM Organisation section.
- In the pop-up that appears, click Confirm.
- In the Connect Zoho CRM pop-up, check the Organisation you want to sync, and click Save.
The integration will be enabled again, and data will be synced from Zoho CRM into Zoho Billing.
Delete Integration
If you’ve disabled the integration between Zoho Billing and Zoho CRM and no longer want to sync records, you can delete the integration. Once deleted, the mapping between the records will be permanently removed. This action cannot be undone. If you’ve integrated your Zoho Billing organisation with other Zoho Finance apps, the integration will be removed from those apps as well.
To delete the integration:
Go to Settings.
Select Zoho Apps under Integrations and Marketplace.
Click Show Details next to Zoho CRM.
Click Delete Integration in the Zoho CRM Organisation section.
In the pop-up, select if you want to convert all synced Zoho CRM records to Zoho Billing records, or convert only the records with transactions and delete the remaining records.
Click Delete to confirm.
The integration will be deleted. You’ll also receive an in-app notification when the deletion is complete.
 Yes
No
Yes
No
Thank you for your feedback!