Workflow Rules
Using this feature, you can create workflow rules that can trigger actions such as email alerts, in-app notifications, custom functions, or webhooks, which will execute functions automatically whenever the transactions satisfy the conditions you’ve configured.
For example, you can set up a workflow rule in such a way that an email notification should be sent to the Finance Head automatically, whenever an expense report exceeds the threshold limit.
Set Up a New Workflow Rule
While setting up a workflow rule, you can configure the conditions based on which actions such as email alerts, in-app notifications, custom functions, or webhooks should be triggered. You can trigger more than one action in a workflow. To set up a workflow rule:
Click Admin View.
Go to Settings on the left sidebar.
(OR)
Click the Gear icon at the top right side.Navigate to Workflow Rules under Automation.
Click + New Workflow Rule at the top right corner of the page. You can now create a new workflow rule.

Name your workflow
- Workflow Rule Name: Give a name for the rule.
- Module: Select the module for which you want to create a workflow rule.
- Description: Give a small description for the workflow rule, if required.
- Click Next.
Choose when to trigger
Workflow rules are of two types:
- Event Based
- Date Based
You can choose to trigger the workflow when an event occurs (Event-based) or in a few days before or after a particular date (Date-based).
Event based
Let’s say you are creating a workflow rule for the Reports module.
- If you want to create an Event based workflow, select Event based on the Workflow Type dropdown.
- In the When a Report is dropdown, select when you want to trigger the workflow. For example, select Submitted, if you want the workflow to be triggered when the report is submitted.
- If you select the event as Edited (or) Created or Edited, you will have to configure the following additional preferences:
Execute the workflow when (Field Name):
Options Description When any field is updated Workflow will be executed whenever a field in the report gets updated. When any selected field is updated If you select this option, you can select three report fields, and the workflow will be executed whenever one of the fields you’ve selected gets updated in the report. When all selected fields are updated If you select this option, you can select three report fields. The workflow will be executed whenever all the fields you’ve selected get updated in the report. Date based
Let’s say you are creating a workflow rule for the Reports module.
- If you want your workflow to be Date based, select Date based on the Workflow Type dropdown. Date of Execution is the date at which the workflow will be triggered. You can choose to trigger the workflow on any number of days before or after the submitted date, the last submitted date and so on.
- In the Execution Time field, choose the exact time at which the workflow rule should be triggered by providing the hour (HH) and the minute (MM).
- In the Execution Cycle field, choose the frequency at which the workflow should be triggered. You can choose to trigger it just Once, Once in a Month (Monthly) or Once in a year (Yearly).
- Click Next.
Filter the triggers
Other than the Event and Date-based triggers, you can optimize the triggers by setting additional filters. These filters are optional and one or more conditions can be set in these filters based on which actions such as email alerts, in-app notifications, custom functions, and webhooks will be executed.
Multiple conditions can be set by using ‘AND’ (or) ‘OR,’ based on which you can specify whether both the conditions or at least one of the conditions should be satisfied. You can set up to 10 conditions for a criteria.
- Click + New Criteria to create a criteria for the workflow rule.
- In the right sidebar, select a field, the comparator, and enter the necessary value.
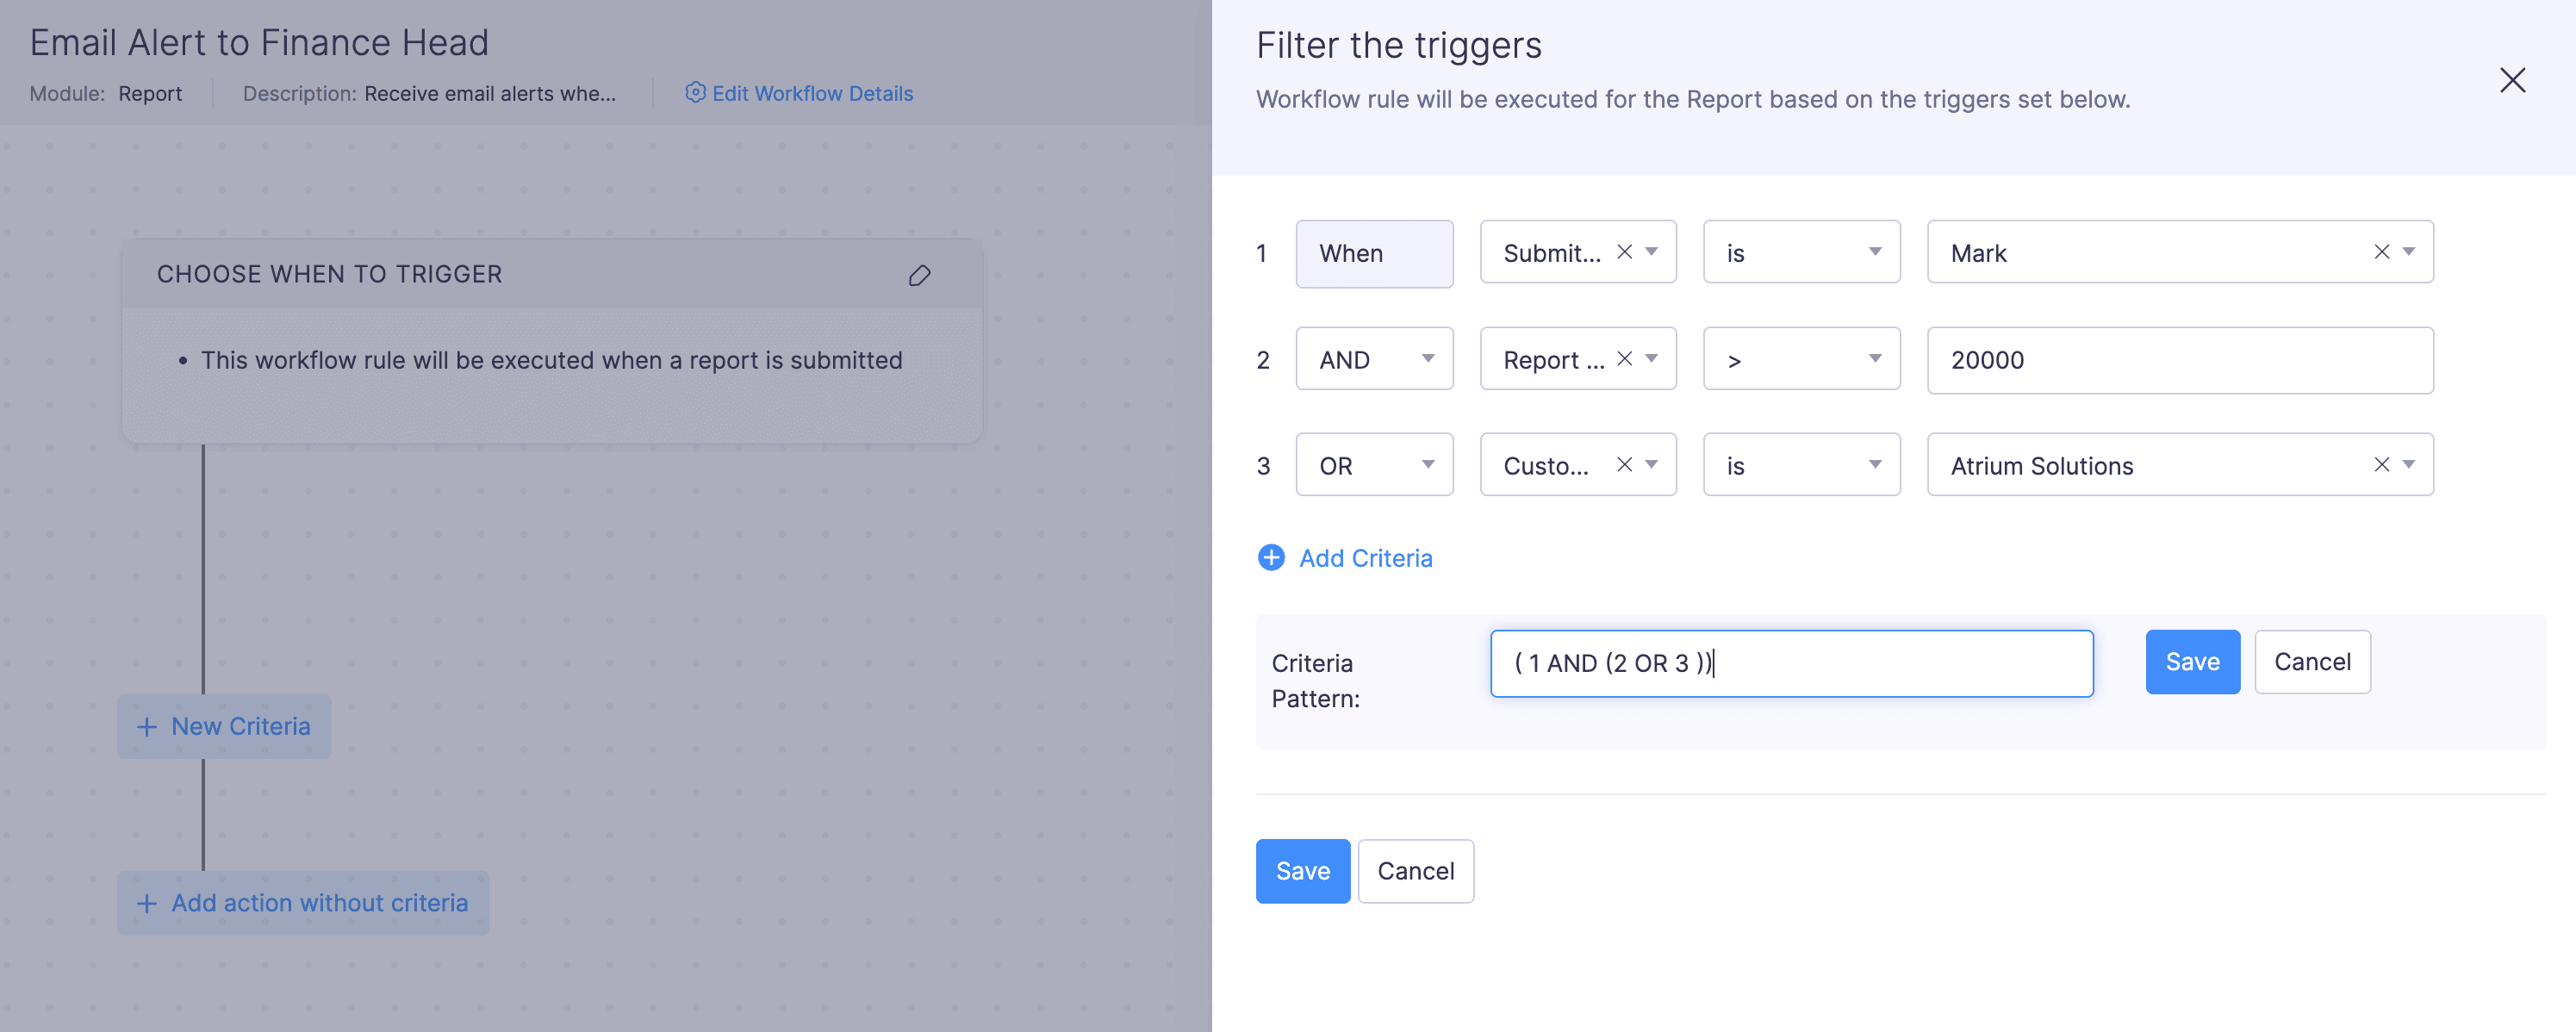
For example, let’s say you want to set up a workflow rule such that an email alert is sent to the Admin whenever Mark submits a report greater than $2000, or when Mark submits a report containing ‘Atrium Solutions’ as a customer. In a similar case, you can set it up as follows:
- When the owner of the report is MARK.
- AND the report total > $2000.
- OR the customer is Atrium Solutions.
According to the criteria, the workflow will be triggered if the first two conditions are satisfied (or) when the third condition alone is satisfied, i.e, the workflow will be triggered if the Owner of the report is Mark and the report total is greater than $2000. Or, it will be triggered when the customer is ‘Atrium Solutions’, irrespective of the owner of the report or the report total. Since that is not what you were looking for, you can edit the criteria pattern. Click Change Criteria and manually entering the criteria in the CRITERIA PATTERN field as shown below.
According to the edited criteria, the workflow will be triggered when the owner of the report is Mark AND when the report submitted either has a total greater than $2000 or contains ‘Atrium Solutions’ as its customer. Click Save to save the criteria.
- Click + Add Criteria to create additional criteria if necessary.
Note: You can also add immediate actions that execute directly, without any criteria. In such cases, the set actions will be executed immediately when the workflow rule is triggered.
Add Actions
Once you set up the triggers, the next step is to associate actions with the workflow. These include Email Alerts, Webhooks, and so on. You can customize the actions to suit your business needs and choose to trigger the actions immediately when the conditions (Immediate actions) are satisfied or at a particular time (Time-based actions).
Immediate Actions: The actions will occur immediately when the transaction meets the criteria mentioned in the workflow.
- Choose the type of action you want to associate with the workflow. The following actions can be triggered by satisfying the conditions in a workflow:
Actions Description Email Alerts An email will be sent to the selected recipients. Field Updates You can select a few fields in a report or a trip form and they will be updated with the values you configure. Webhooks You can communicate with third-party applications by sending instant web notifications from Zoho Expense. In-app Notifications The recipients you select will receive a notification in their Zoho Expense account. Custom Functions Custom functions in Zoho Expense allows you to simply drag and drop code to automate your business processes. - In the right sidebar, select the type of workflow action you want to associate with the workflow rule from the Type dropdown. Next, from the Name dropdown, choose the workflow action you created and configured, or click + New %Workflow Action% from the dropdown to add a new workflow action.
- Click + Add New Action to add more actions if necessary.
- Click Associate to finish associating actions with the criteria.

Time Based Actions: Triggers actions based on the scheduled time.
- In the right sidebar, in the **EXECUTION TIME section, set the time for when the action will be executed. It will execute the action on any number of days before or after the due date, Rule Trigger Date, Submitted Date, Last Submitted Date, and so on.
- Select the type of workflow action you want to associate with the workflow rule from the Type dropdown. Then, from the Name dropdown, choose the workflow action you created and configured, or click + New %Workflow Action% from the dropdown to add a new workflow action. Refer to the table above to learn about actions.
- Click + Add New Action to add more actions if necessary.
- Click Associate to finish associating actions with the criteria.
After setting up the workflow, click Save to finalize and save the workflow.
Now, once you’ve created the workflow rule, whenever an action occurs that matches the trigger you set in the workflow rule, the rule will execute, and the specified action will take place.
Note: You can create up to 5 criteria for one workflow, and within each criterion, you can add up to 10 conditions.
Edit a Workflow Rule
You can edit the workflow rules you’ve configured. To edit a workflow rule:
- Click Admin View.
- Go to Settings on the left sidebar.
(OR)
Click the Gear icon at the top right side. - Navigate to Workflow Rules under Automation.
- Hover over the workflow rule you want to edit and click the More icon at the right corner of the workflow rule.
- Select Edit.
- Make the necessary changes and click Save. The workflow rule will be updated.

Note: You cannot change the module for which you’ve configured the workflow rule. Also, you cannot change the workflow type.
Delete a Workflow Rule
You can delete the workflow rules you’ve created. To delete a workflow rule:
- Click Admin View.
- Go to Settings on the left sidebar.
(OR)
Click the Gear icon at the top right side. - Navigate to Workflow Rules under Automation.
- Hover over the workflow rule you want to delete and click the More icon at the right corner of the workflow rule.
- Select Delete if you want to delete the workflow rule.
- Click Delete again to confirm the action.

Mark a Workflow Rule As Inactive
If you won’t be using a workflow rule for a while but want to keep it for future use, you can mark it as inactive instead of deleting it. To mark it as inactive:
- Switch to Admin View.
- Go to Settings on the left sidebar.
(OR)
Click the Gear icon at the top right side. - Navigate to Workflow Rules under Automation.
- Hover over the workflow rule you want to mark as inactive and click the More icon at the right corner of the workflow rule.
- Select Mark as Inactive from the dropdown if you want to disable it temporarily.
Configure Notification Preferences
You can trigger a workflow alert up to 500 times per day. Admins will also receive in-app notifications when any workflow action crosses the specified threshold. You can set daily limits for workflow alert triggers and add email recipients to get notified when the daily threshold is reached. You can also configure how you receive failure log notifications when a workflow action fails. To configure:
- Log in to your Zoho Expense organization.
- Navigate to the Admin View.
- Go to Settings.
- Select Workflow Rules under Automation.
- Click the Gear icon in the top right corner.

- In the Configure Notification Preference popup, fill in the following fields:
Usage Limit Notifications: Choose a threshold for sending notifications for workflow actions like email alerts, webhooks, and custom functions.
Failure Log Notifications: Select the frequency and time for notifications, and specify the email recipients who will receive the failure log updates if needed.
- Click Save.
View Workflow Logs
You can view logs of the email alerts, in-app notifications, custom functions, and webhooks that were triggered from the workflows set in your organization. To do this:
- Click Admin View.
- Go to Settings on the left sidebar.
(OR)
Click the Gear icon at the top right side. - Navigate to Workflow Rules under Automation.
- Click View Workflow Logs on the top right side of the page.

- Navigate to the preferred tab, and click the log to view more details.
- You can also filter the email alerts, webhook, and custom function logs based on their execution status. If you’d like to view only the successfully executed logs, go to email alerts, Webhooks, or Custom Functions tab, click the Status dropdown and select Success. Only the successfully executed logs will be displayed.

Note: Zoho Expense displays only the workflow logs of the last three months.