Zoho CRM Implementation
Most companies only go as far as to procure a CRM system but fail to adopt it for their businesses. Poor planning and implementation before rolling it out to their employees are to blame. Let's do an activity to ensure you have an effective plan in place before implementation. Gather your team!
Activity
Define your business goals
Gather your team and have a clear outline of what you want to achieve by implementing CRM, key business priorities, and how you plan on achieving it.Document, analyze, and map your business processes
Make a list of the processes your organization follows, analyze them, evaluate their efficiency, and make any required modifications before moving them into CRM.Identify the key players in your business processes
It's crucial to involve the right people from the start. Individuals and teams across your organization that help shape your business processes are ones you need for a successful CRM implementation.
- Module 1: Admins guide to implementation
- Module 2: Set up organization details
- Module 3: Set up basic module customization
- Module 4: Set up roles and profiles
- Module 5: Set up email integration
- Module 6: Set up a lead generation process
- Module 7: Set up a basic automation process
- Module 8: Bring data to Zoho CRM
- Module 9: Determine the business metrics you want to see
"Zoho CRM had all of the functionality we needed and switching to it has led to a direct increase in profits for The NetMen Corp."
Netmen Corp
Module 1: Admins guide to implementation
Admins, roll up your sleeves!
As an admin, your role is to deliver a trusted ecosystem to your team where they can thrive. Let's look at a few examples of your core actions:
Help your employees learn and use the CRM features appropriately.
Customize the CRM platform according to your business needs.
Design automated processes to help sales representatives work faster and focus on things that matter more.
Give your sales representatives multiple channels to stay connected and interact with their customers.
Analyze business metrics and make the best use of the data.
Sign in to your account and use this checklist to set up your CRM account for your organization. Please note that you don't have to force-fit features you don't need, so try to customize your CRM account at all possible levels to align with your business processes. Happy onboarding!
Set up organization details.
Set up basic module customization.
Set up roles and profiles, and invite users.
Set up email integration.
Set up a lead generation process.
Set up a basic automation process.
Bring data to Zoho CRM.
Determine the business metric you want to see.
Looking for more information?
Tips for successful implementationModule 2: Set up organization details
Kick-start your onboarding by adding personal information and company details. Navigate to the Setup page and update fields such as phone number, address, currency, time zone, super admin, and business hours.
Navigation: Setup > General > Company Details
Looking for more information?
Set up your organization accountActivity
Let's begin with the basics. Sign in to your account and update your organization details.
"Zoho CRM has a user-friendly interface. As compared to my previous ERP, Zoho CRM gives me a faster process time to process documents when dispatching my trucks for delivery and doesn't need any VPN connection. I have observed that my process time has been reduced by 50%."
XpressGas Limited
Module 3: Set up basic module customization
The terminology and type of data collected vary from one business to another. In Zoho CRM, you can customize modules and create custom fields, layouts, and views to align with your business needs.
Navigation: Setup > Customization> Modules and Fields
Modules
Select the module you wish to rename and click on the more icon to edit the name of the standard module to align with your business.

In addition to standard modules, you can create new modules and select the fields to be added as per your business requirements.
Fields
Apart from custom fields, add system-defined fields to the layout, like terms and conditions, taxes, stage probability, and contact roles.
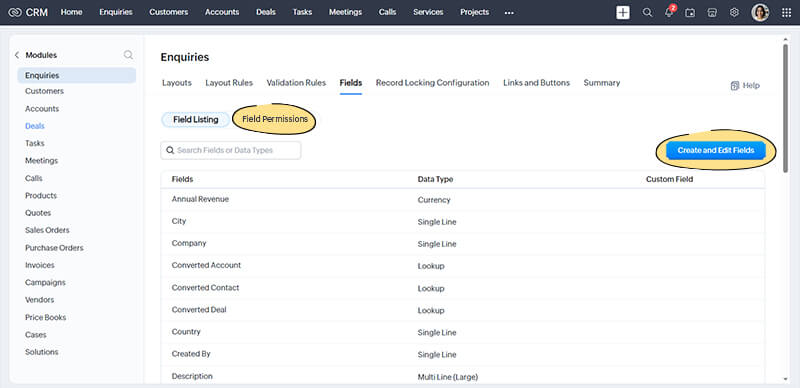
Identify the types of data collected in your business and add custom fields to the layout to avoid errors during data import.

When you edit the properties of a field, there are a range of available options that may be useful for your business, such as:
Make fields mandatory.
Mark fields unique to prevent duplicate records.
Set field permission to manage user edit access.
Create data validation rules.
Mark fields containing personal data.
Layouts
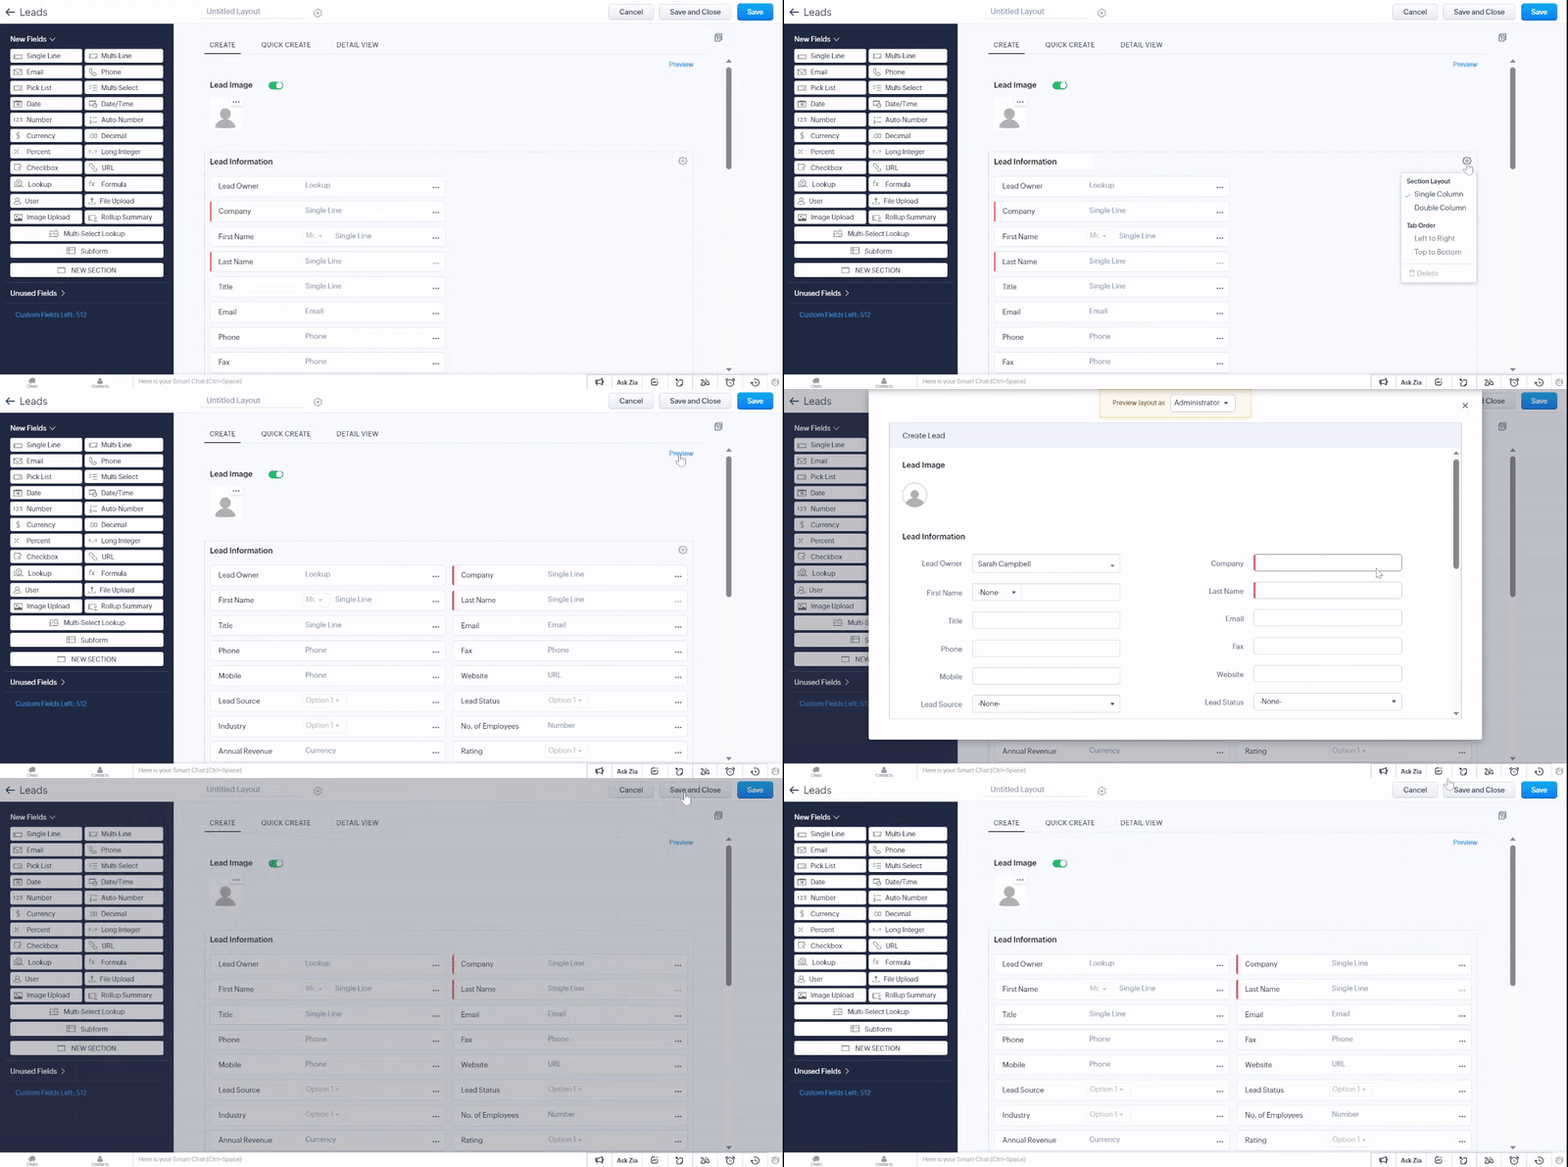
Layouts are specific to a module, so you can create them for the module that contains specific information. This allows you to get all the information in CRM while avoiding a cluttered database.
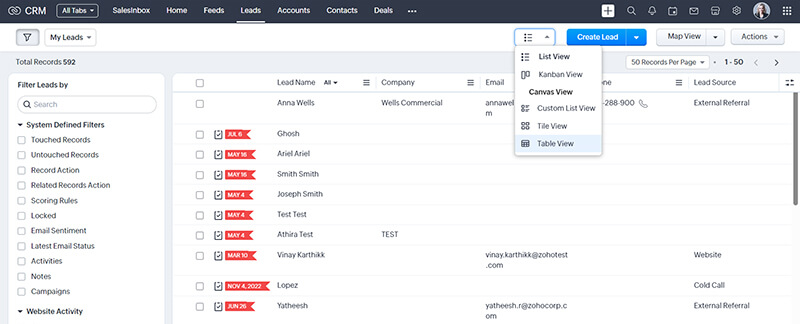
Records are arranged in a sequential order within a module called a "list view". The system-defined standard list view groups the records under various categories that cannot be modified, but you can create custom list views.
Kanban view is a card-based view that displays data in an organized manner for better comprehension. This sort of information gives better insights about potential bottlenecks and lets you fix them effectively.
Canvas view lets you completely personalize the way you view records. You can either choose from a gallery of design templates or create and customize one that suits your business needs.
Looking for more information?
Activity
Create a custom module with a couple of fields to capture information specific to your business process.
"The fact that Zoho is so well organized, customizable, and user-friendly really helps us keep the sales rolling in! When you're organized, you're unstoppable with outreach!"
Sales Associate
Module 4: Set up roles and profiles
Identify users from your organization who will access CRM and set up the role hierarchy and profile permissions for each user. The admin can also manage data visibility and accessibility rules for each CRM user.
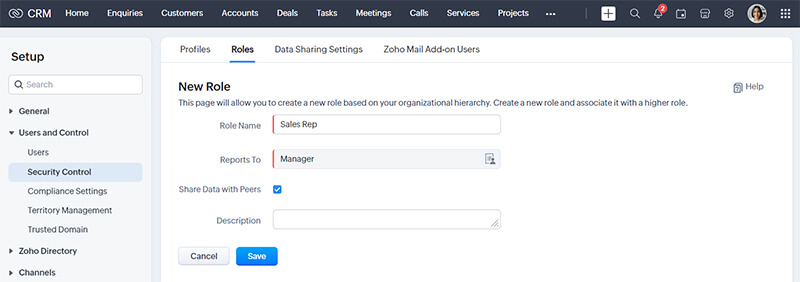
Roles provide access to data in your CRM account. Create roles for each user in CRM based on their organizational hierarchy.
Navigation: Setup > Users and Control > Security Control > Roles
Profiles help you define permissions for a set of users to access features in your CRM account. A user’s profile tells you what they can do in their account.
Navigation: Setup > Users and Control > Security Control > Profiles

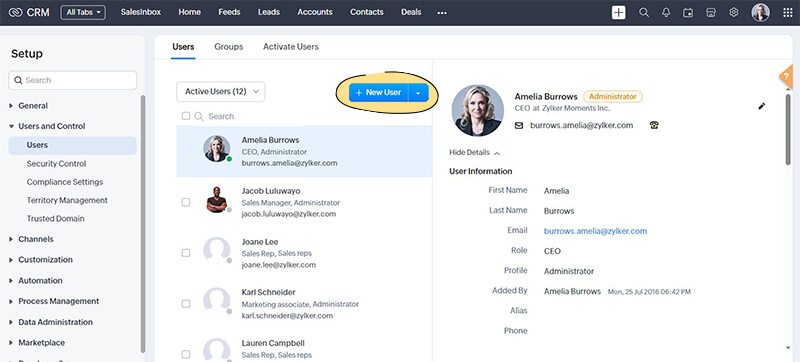
After creating roles and profiles, you can start adding users in CRM. They can access data and perform daily tasks independently.
Navigation: Setup > Users and Control > Users > Add New User
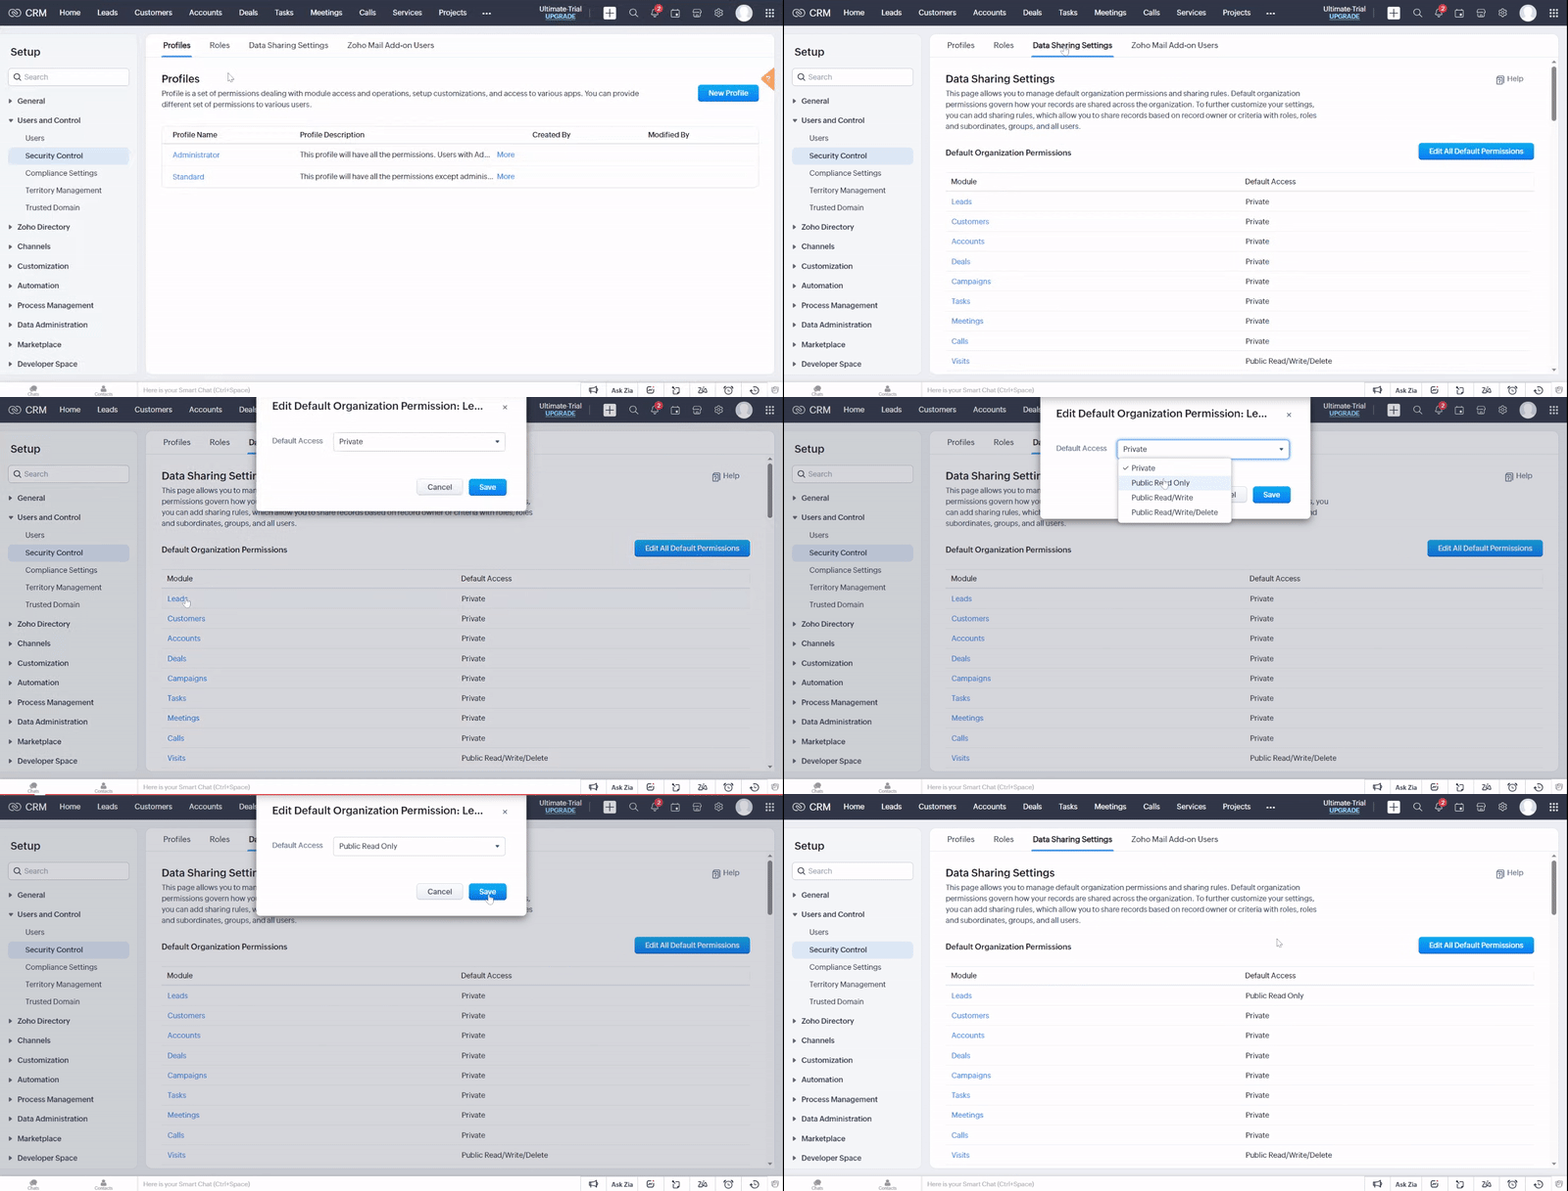
As mentioned, setting up role hierarchy and profile permissions will let you determine the default permissions for each CRM user. You can also extend accessibility for selected users by setting data sharing rules.
Navigation: Setup > Users & Control > Security Control > Data Sharing Settings.
Activity
Try creating a role and a profile with suitable permissions and assign it to a new user you add.
Module 5: Set up email integration
The next step is to centralize and manage all your customer correspondence within Zoho CRM through email integration. Once the integration is in place, outgoing and incoming emails will be available within the record.
Navigation: Setup > Channels > Email
The following email integration options are available in Zoho CRM:
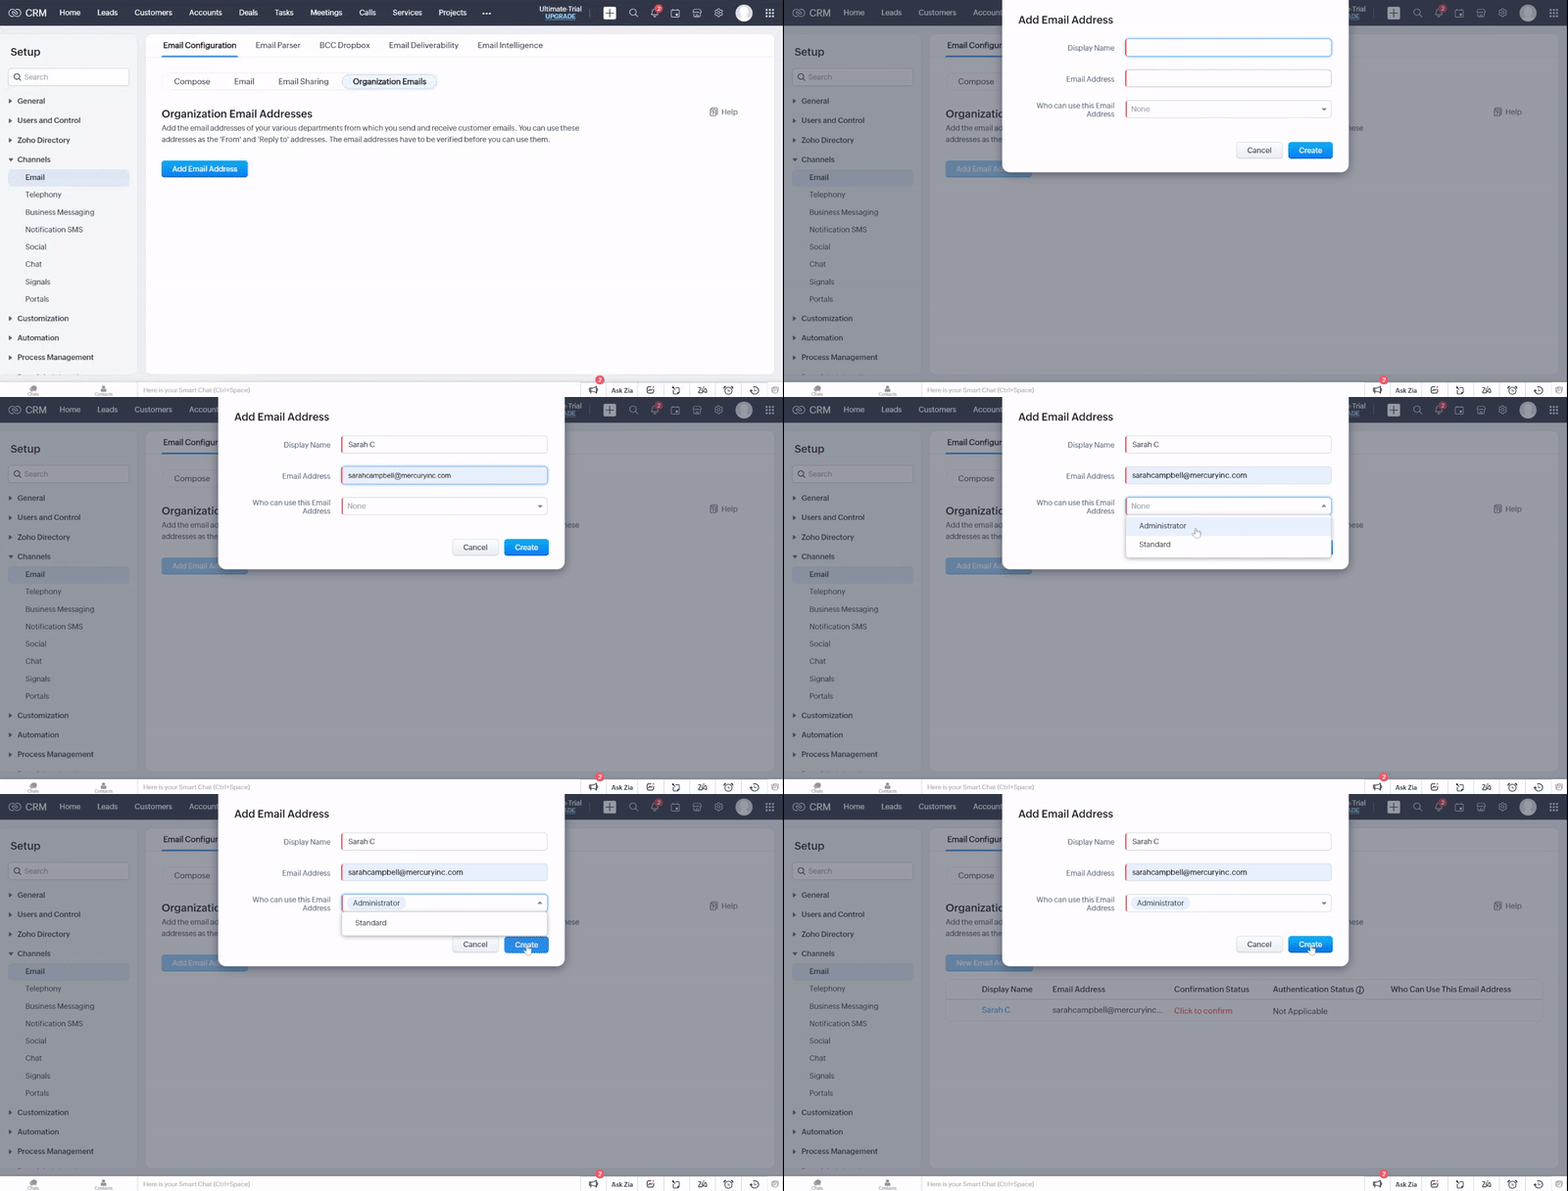
If you want to use a universal mailing address across the organization for all customer interactions, you can add a new email address.
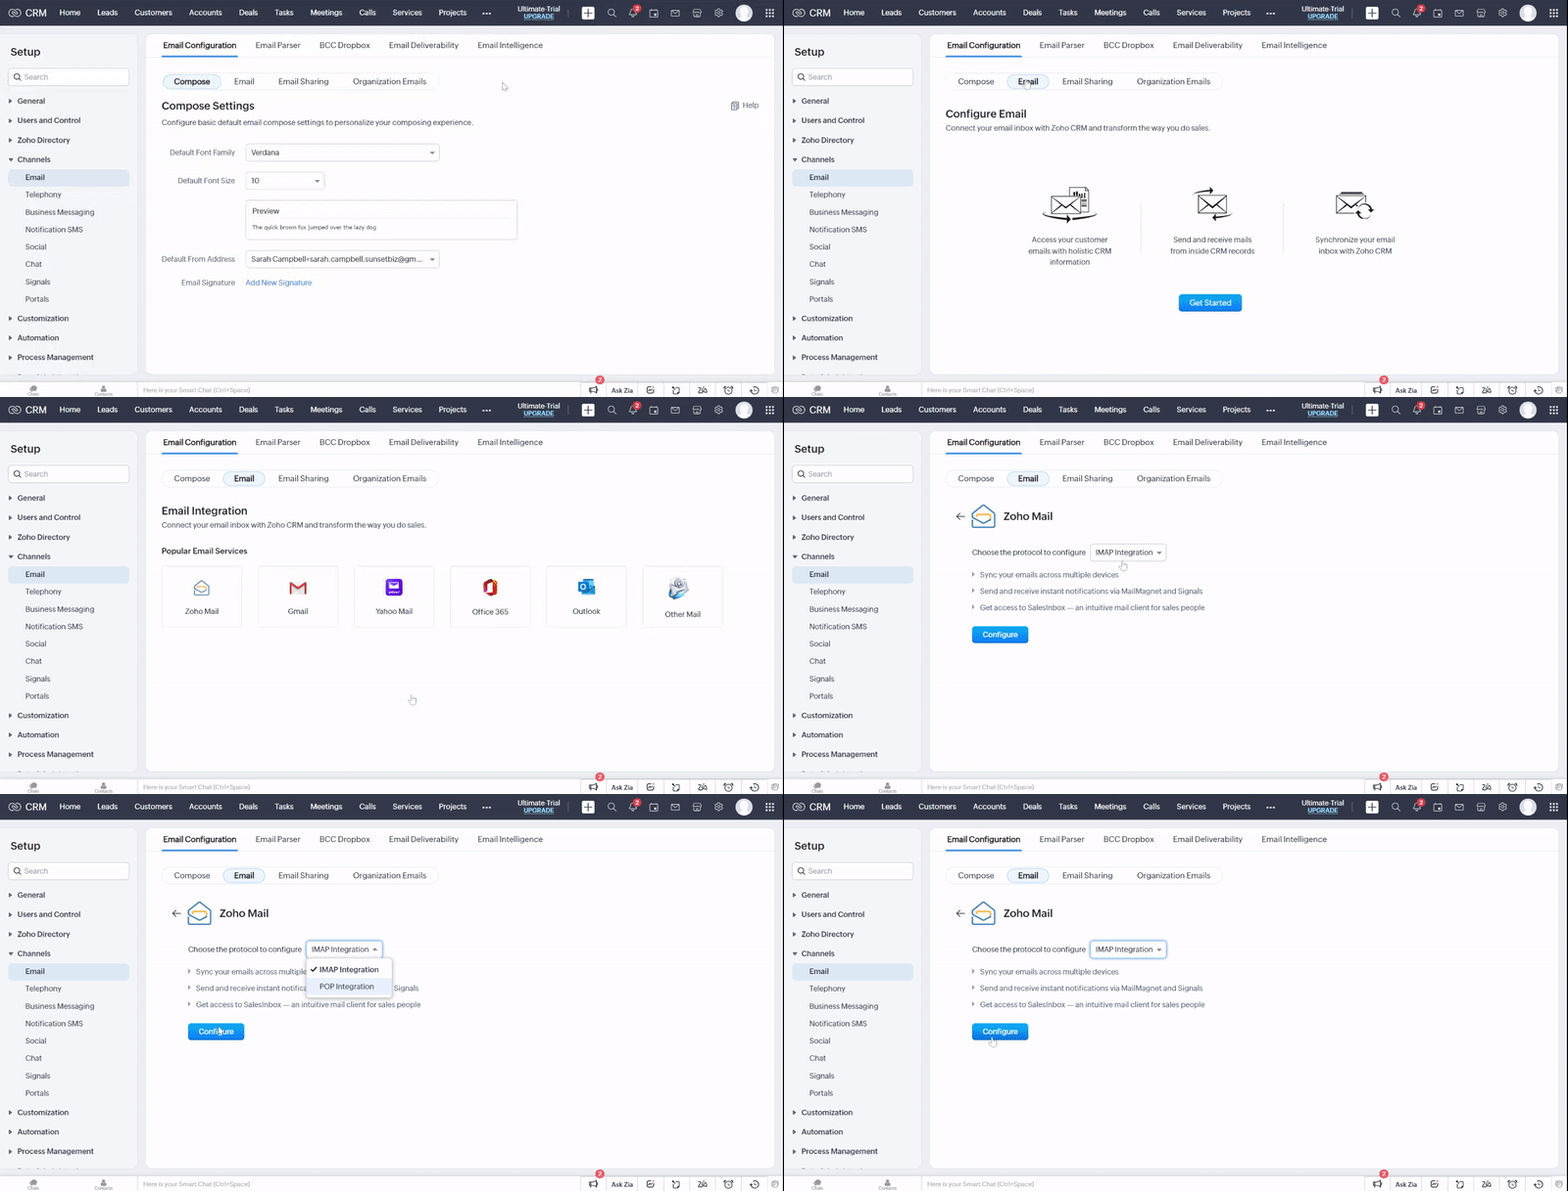
Configure your email account using POP3 or IMAP, or use popular email clients like Zoho Mail, Gmail, Yahoo Mail, Microsoft Outlook, or Office 365.
Integrate your Microsoft Outlook account with CRM to sync emails, contacts, tasks, and appointments.
Install the Chrome extension for Gmail to access your CRM account from Gmail. This will allow you to add leads, contacts, and notes to records in CRM from your Gmail account.
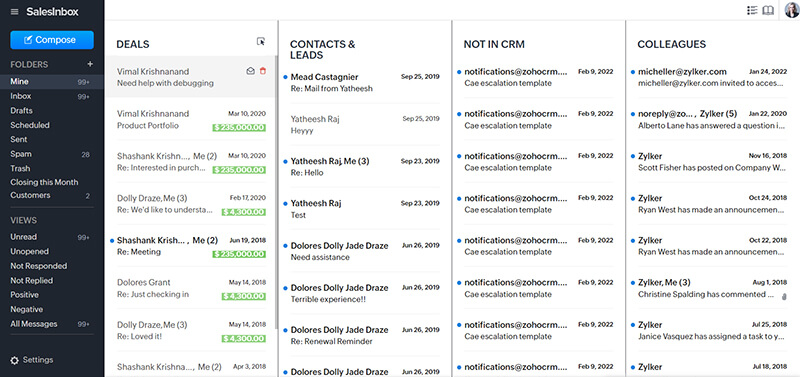
SalesInbox is well organized and helps representatives categorize emails based on the recipient, such as lead, contact, not in CRM, colleague, manager, and so on.
Design customized email templates in Zoho CRM. These templates can be used to send mass emails to leads or contacts, or send email notifications to Zoho CRM users.
Looking for more information?
Email + Zoho CRM for your businessActivity
Try creating an email template you want to send your leads.
Module 6: Set up a lead generation process
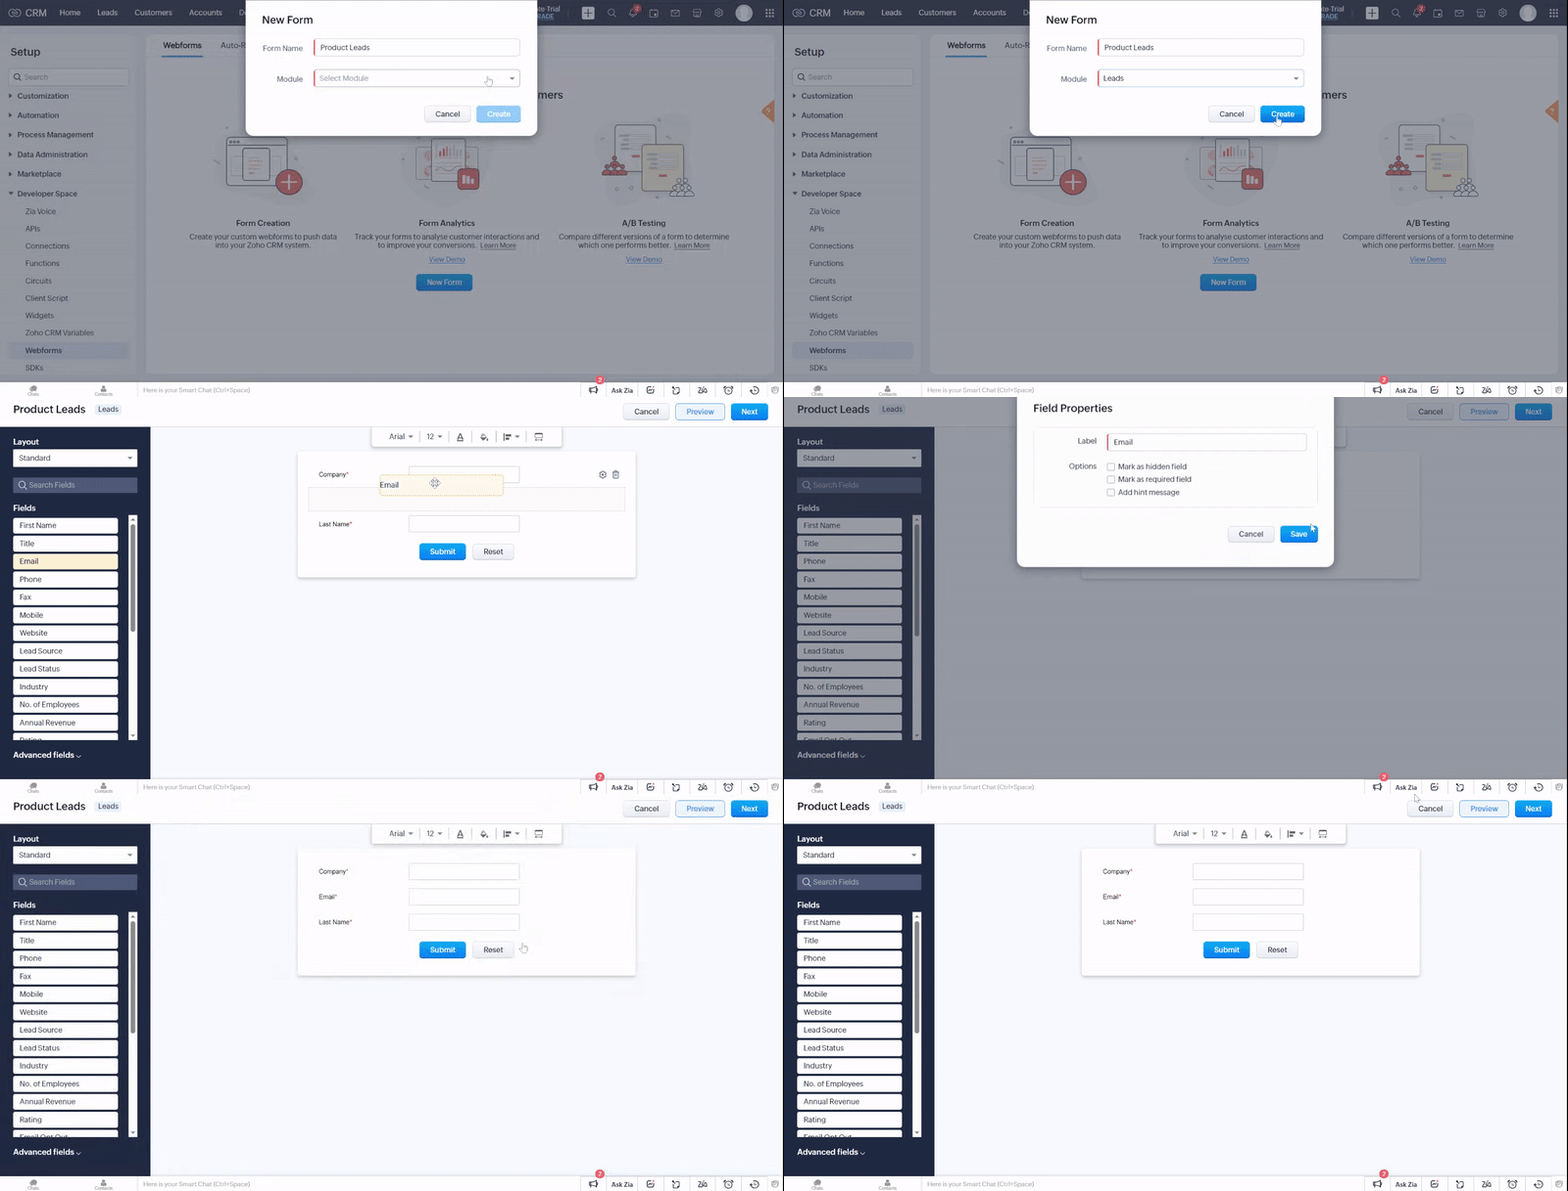
Streamline your lead generation process to effortlessly capture, nurture, and pursue leads. Automate sales activities with CRM tools, such as webforms, website visitor tracking, or by simply importing data into Zoho CRM.
Manually fill in lead details gathered from various external sources, such as trade shows, exhibitions, colleagues, business cards, and so on, in Zoho CRM.
In the Leads module, click Create Lead.
On the Create Lead page, enter the lead details. (Refer to this table)
Click Save.

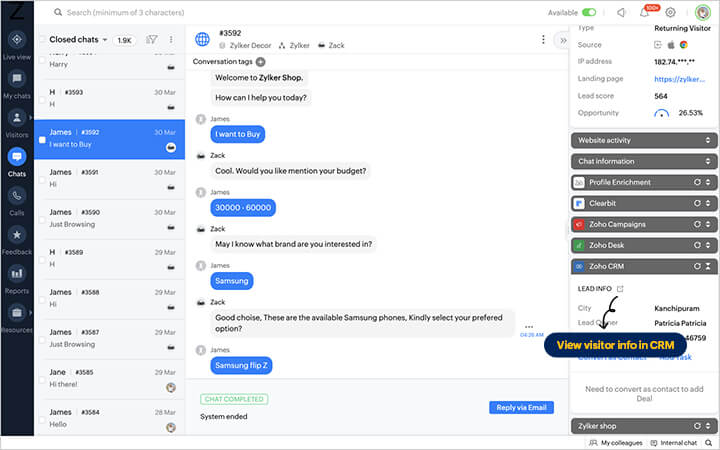
Track the number of visitors to your website, evaluate their level of interaction, and push data in Zoho CRM using the visitor tracking function through the Zoho SalesIQ integration.
Configure your telephone network to manage outbound and inbound calls from your CRM account. Your sales representatives can have access to all customer data, set call reminders, add notes, track communication history, and more.
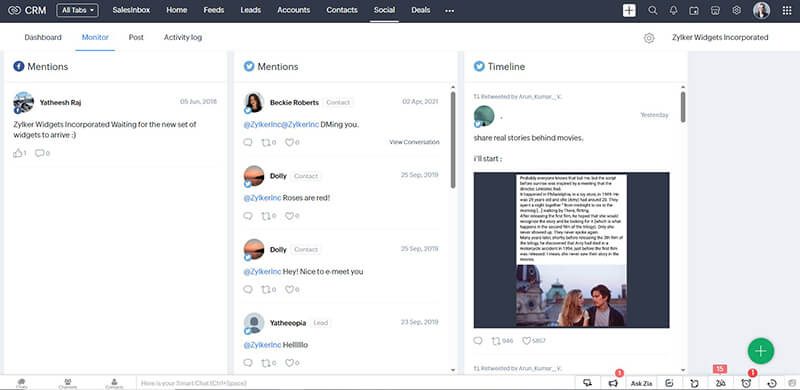
Understand the preferences of your target audience and analyze the way they interact with your brand through social media channels. Integrate your Twitter and Facebook account with Zoho CRM to direct leads from social interactions to your CRM database.
Activity
Set up your Social tab by configuring your social media accounts in CRM.
Module 7: Set up a basic automation process
Automate peripheral sales activities and enable your sales representatives to focus on selling. You can trigger instant actions at a particular date and time or when certain conditions are satisfied. For example, send reminder emails to subscribers, notify regional sales managers of a promising deal, assign leads to a sales representative, and more.
The following are some automation tools in Zoho CRM that will help reduce manual intervention and increase process efficiency. We recommend you configure these before you import your data into your CRM account:
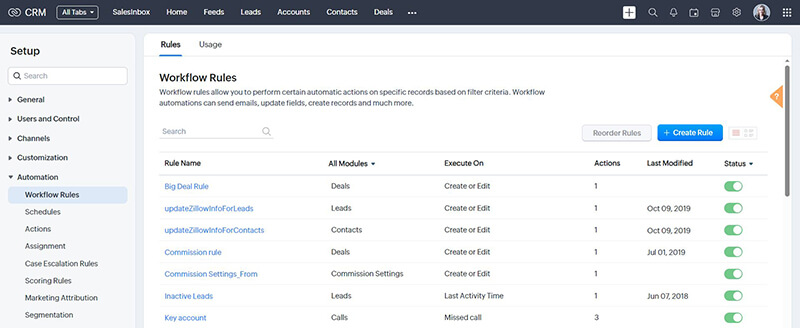
Automate a set of actions like email notifications, field updates, record creation, follow-up tasks, and actions defined through functions, and webhooks by creating workflow rules.
Navigation: Setup > Automation > Workflow Rules
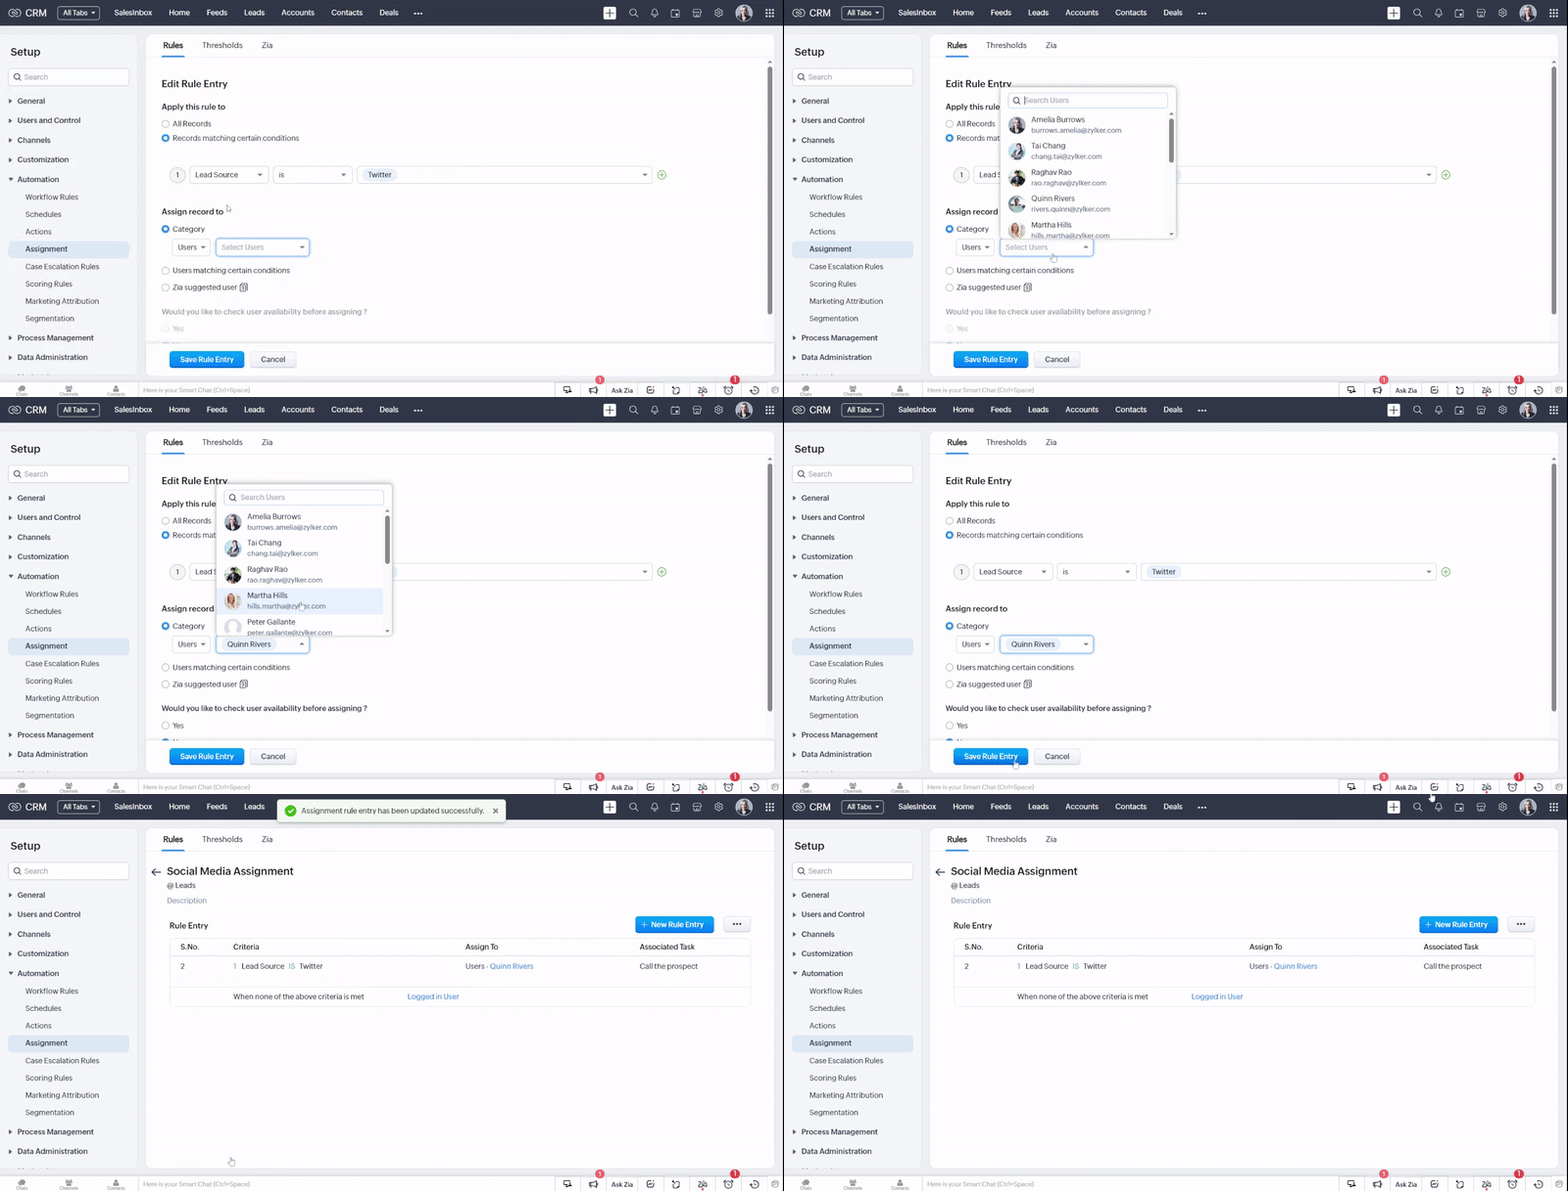
Automate the lead assignment process by defining rules based on which leads are assigned to a set of representatives.
Navigation: Setup > Automation > Assignment
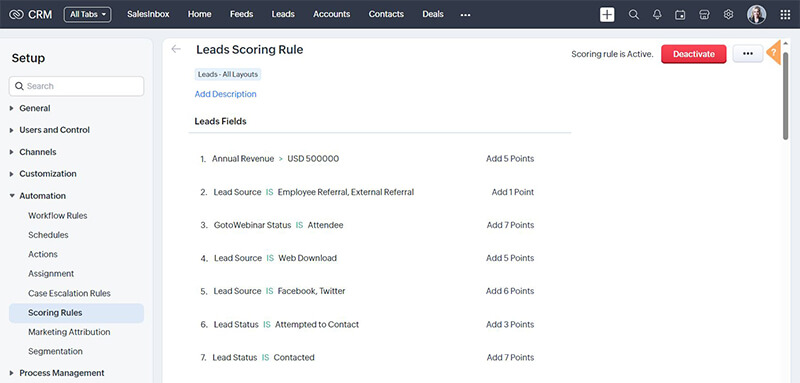
Enrich your CRM data by prioritizing leads based on multiple criteria through lead scoring. It helps you rank your leads based on various criteria and prioritize them accordingly.
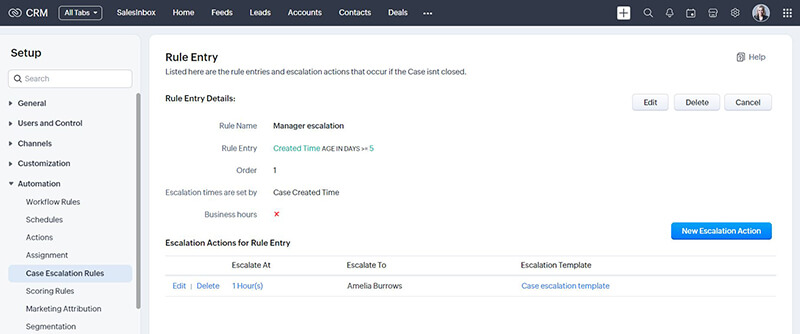
Configure rules to escalate cases to other members in your operational hierarchy. Notify sales managers or superiors on cases that require immediate attention or those that are close to the deadline.
Automate the submission of records for approval from one or more managers using the approval process. This saves time and creates a dependable, repeatable system.
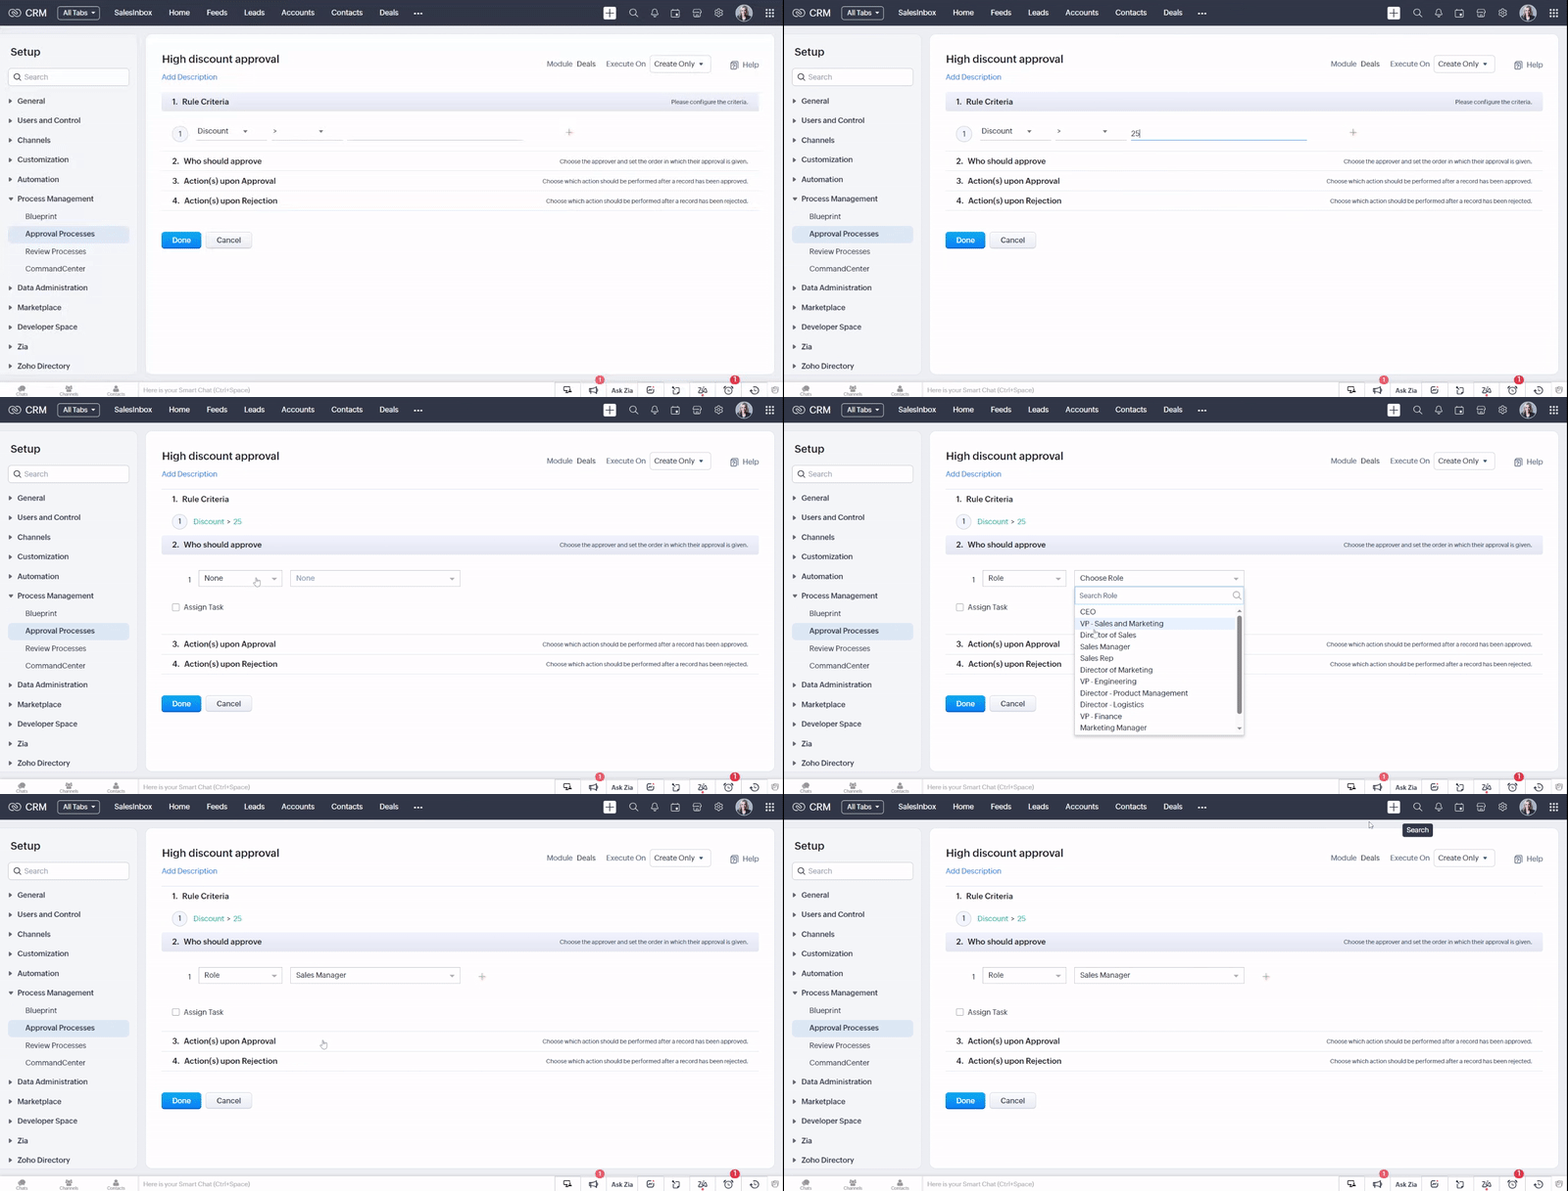
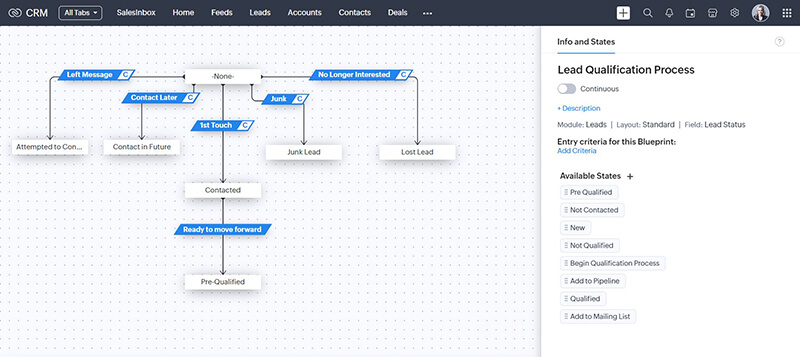
Blueprint enables you to implement guided methods in CRM to bring uniformity to the way different business processes are performed across the organization and individual teams. It facilitates automation, validation, and collaboration among teams, making your processes more efficient and free of loopholes.
Looking for more information?
Activity
Create a simple workflow rule for any one of your business activities. For example, you can create a rule to send an alert email to the sales manager when a high-priority lead is added in CRM.
"Zoho has helped us become more efficient and more effective within our current structure of employment. Zoho has increased our internal productive information sharing and capacity as much as 15 to 25%."
Chief Operating Officer
Module 8: Bring data to Zoho CRM
Great job, you're almost there! Let's begin importing data into your Zoho CRM account. Some of the methods you can use to get data are:
If your data is stored in different repositories, ensure you follow the file format supported in Zoho CRM before your begin the import process. You can import data and notes to individual modules provided your data is accurate, doesn’t have duplicate entries, and the field names are identifiable for field mapping. You can see the progress of the import from the history and audit log.

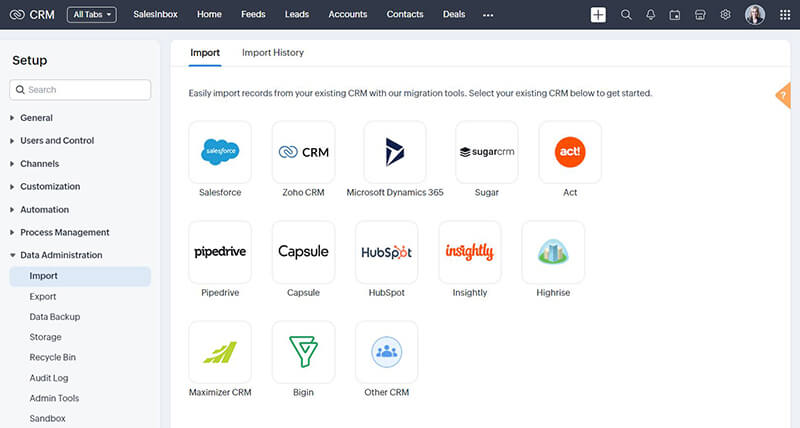
If you are migrating from a different CRM, you can use the data migration wizard. We support migration from these CRM applications: Salesforce, MS Dynamics CRM, Pipedrive, HubSpot, Insightly, Highrise, and more.
Zoho provides REST API support, which lets you integrate your CRM with any third-party application. For example, your field agents use an application developed by your organization to collect clients’ data. You can integrate that app with CRM to sync data between the systems and keep it up to date.
Activity
Prepare to import data to CRM. Review the import checklist and collate all your lead data in the suggested format.
Need assistance migrating data?
Fill out the form on this page to submit your request for assistance in migrating from your existing CRM to Zoho CRM.
Module 9: Determine the business metrics you want to see
The last step in your implementation process is to set up the system to reflect all the metrics defined in your business goals. In Zoho CRM, you can use various reports and dashboard tools to measure different aspects of your business performance.
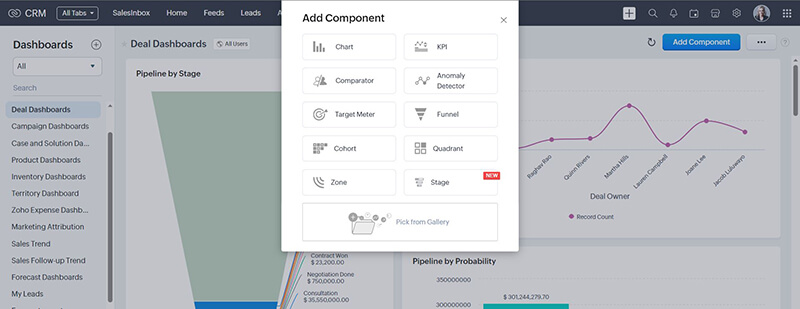
Zoho CRM provides different types of analytics components for the user dashboard, such as Anomaly Detector, Target Meter, KPIs, Charts, Funnels, and more.
Create detailed and module-specific reports linking some of the other cross-functional modules. They can either be used as is or customized further as per your business requirements.
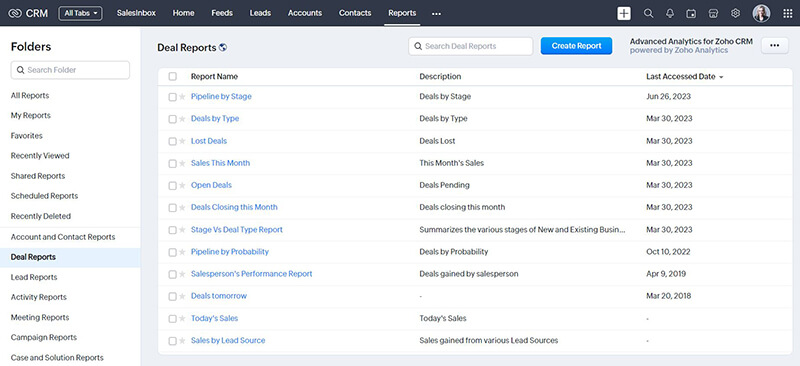
Add criteria to standard reports based on your business requirement. The Criteria Pattern Editor in the report helps you define advanced filters using simple logic like "and/or."
Create custom module-specific reports with the metric of your choice.
Automatically send reports to your colleagues, executives, and non-Zoho users by scheduling reports daily, weekly, monthly, or yearly.

Activity
Create a new dashboard and add one analytical component to measure any aspect of your data. For example, you can add a funnel chart to get a visual representation of your pipeline by stage.
"Zoho CRM's artificial intelligence, Zia, is extremely impressive. As a CRM manager, I can plug myself in directly to the sales team and make sure they never slip out of deals, with the help of working tips provided by Zia."
Workforce Manager
Fill in the form to request a callback from our product experts.
Book a demo and our team will help you navigate through the product.
Select the features you need and we'll help you identify the best CRM plan.