Import Data
You can import your existing data to Zoho Billing to help you add new customers, transactions, or other records quickly and efficiently. This is particularly useful if you are migrating from another app or bulk updating data.
Scenario 1: Patricia is migrating to Zoho Billing from another billing management app. Instead of creating all the existing customers and transactions, she can export all the existing data. Then, she can import them to Zoho Billing, making data synchronization easier and faster.
Scenario 2: Aaron Brown is merging his company with Zylker. However, they used the same prefix for their invoices, which could cause confusion if they were imported directly to Zoho Billing. Aaron can export the existing invoices and change the transaction prefix for all the invoices for his company. He can then import the updated invoices, ensuring error-free transactions.
Modules That Can Be Imported
You can import data for the following modules:
- Customers
- Customers
- Contact Persons
- Items
- Subscription Items
- Products
- Plans
- Addons
- Coupons
- Price Lists
- Quotes
- Invoices
- Invoices
- Bill of Supply
- Subscriptions
- Credit Notes
- Credit Notes
- Applied Credit Notes
- Refunds
- Payments Received
- Payments Received
- Applied Excess Payment
- Expenses
- Projects
- Projects
- Project Tasks
- Timesheet
Import Modules
The process of importing data is the same for all modules. It involves three simple steps. They are:
Step 1 - Configure Import Preferences
To select the import file and configure import preferences for a module:
Navigate to the desired module (For example, the Invoices module).
Click the More icon in the top right corner.
Select the option for importing the module (For example, if you want to import invoices, select Import Invoices).

Upload the import file.
Note: The import file should follow these regulations:
- File size - The import file size should be less than 25 MB.
- File format - The import file format should be CSV,TSV, or XLS.
Download the sample file from the import configuration screen to ensure that your import file matches the format supported in Zoho Billing.
Pro Tip: CSV (Comma-Separated Values) and TSV (Tab Separated Values) files have simple format, which makes it easier to process and import and export data faster.
| Options | Description |
|---|---|
| Drag & Drop | You can drag the import file from your machine and drop it in the box. |
| Choose File | To upload a file from your machine:
 To upload a file from the cloud:
 Insight:If you want to attach import files from Google Drive, One Drive, Dropbox or Box, you have to authenticate them first. |
Select the Character Encoding.
Character Encoding Description Ideal Usage UTF-8 (Unicode) A character encoding that represents every character in Unicode using 1 to 4 bytes. Importing transactions or customer names with diverse languages and special characters. It’s widely compatible and efficient for general data. UTF-16 (Unicode) A Unicode encoding that primarily uses 2 bytes for each character and 4 bytes for some complex characters. Scenarios where transactions or customer names contain many complex international characters, especially in detailed text processing applications. ISO-8859-1 A character encoding that covers Western European languages using 1 byte per character. Importing data that primarily includes Western European languages, like English, French, or German. It’s straightforward and efficient for those texts. ISO-8859-2 A character encoding for Central and Eastern European languages, using 1 byte per character. Handling transactions or customer names in languages like Polish, Czech, or Hungarian. It effectively supports specific regional characters. ISO-8859-9 (Turkish) A character encoding specifically for Turkish, using 1 byte per character. Importing data involving Turkish transactions or customer names, ensuring proper representation of unique Turkish characters. GB2312 (Simplified Chinese) A character encoding for Simplified Chinese characters, using 2 bytes per character. Transactions or customer names in Simplified Chinese, particularly relevant for businesses in Mainland China. Big5 (Traditional Chinese) A character encoding for Traditional Chinese characters, using 2 bytes per character. Importing data related to Traditional Chinese, particularly useful in Taiwan and Hong Kong for customer names and transactions. ShiftJIS (Japanese) A character encoding for Japanese characters, using a mix of 1 and 2 bytes per character. Situations where transactions or customer names involve Japanese text, ensuring accurate representation of Japanese characters. Select the module’s import preferences.
Click Next.

Once you have selected the import file and configured the import preferences, you can proceed to the next step Map Fields.
Step 2 - Map Fields
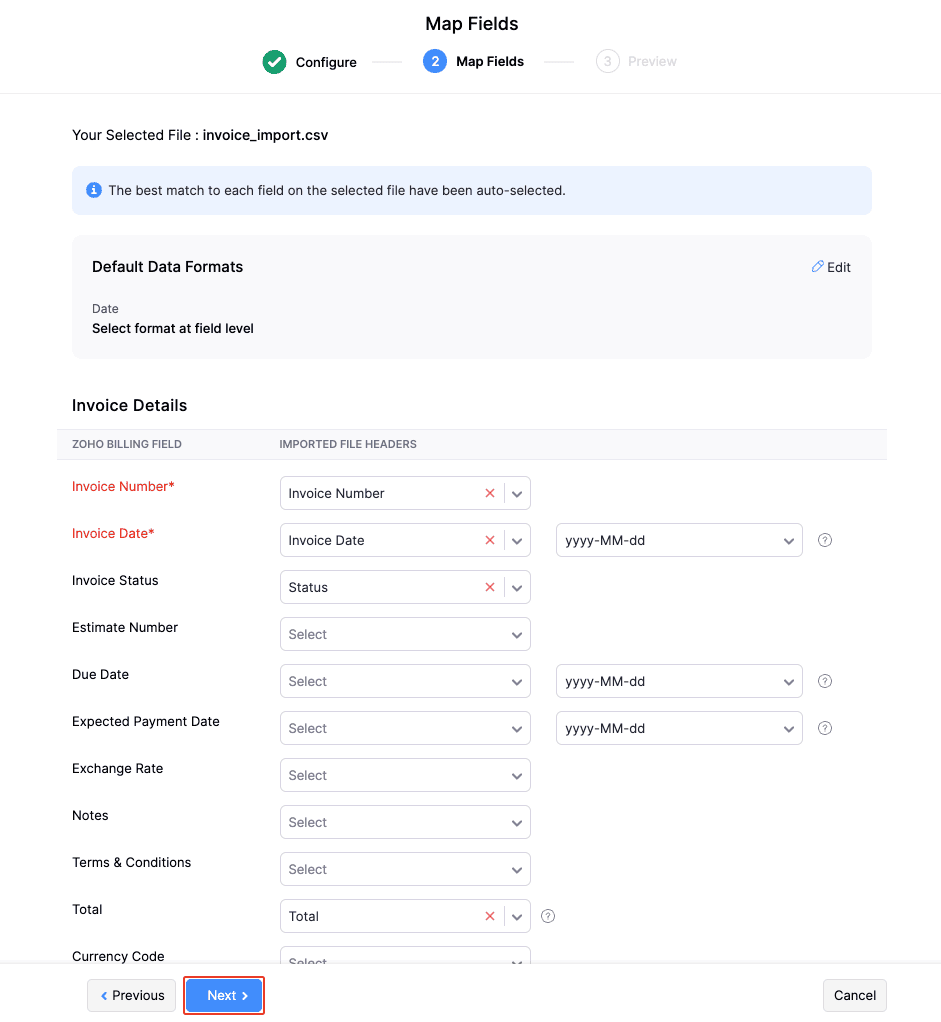
The Map Fields step is required to map the headers in your import file to the field names in Zoho Billing, ensuring proper import. By default, Zoho Billing finds similar fields in the import file and maps them automatically. You can make changes manually if needed.
To map fields manually:
Click the dropdown next to the fields that you want to map. Zoho Billing will list all the headers of the import file.
Select the correct header for the field.
If a field is mapped incorrectly and should be blank, click the Cross icon next to the mapped field.

Note: Fields marked in red are mandatory and cannot be left blank.
Select the field format to match the import file if applicable.

Insight:Some fields, like Date, require specific formats, such as dd/mm/yyyy. For example, if your import file has an Invoice Date formatted as 18/11/23 (18th November 2023), select dd/mm/yy when mapping the fields.
Pro Tip: If you have similar fields, like Date, in your import file, you can standardize them using Default Data Formats. To set Default Data Formats:
Click Edit next to Default Data Formats on the top.

Deselect Select Format at Field Level for the data type.
Select Default Format from the dropdown next to the data type.

Click Save.
This will apply the selected data format to all fields of the same data type. You will not be able to edit the data format for individual fields. Use this feature only if all fields of that data type in your import file are in the same format.
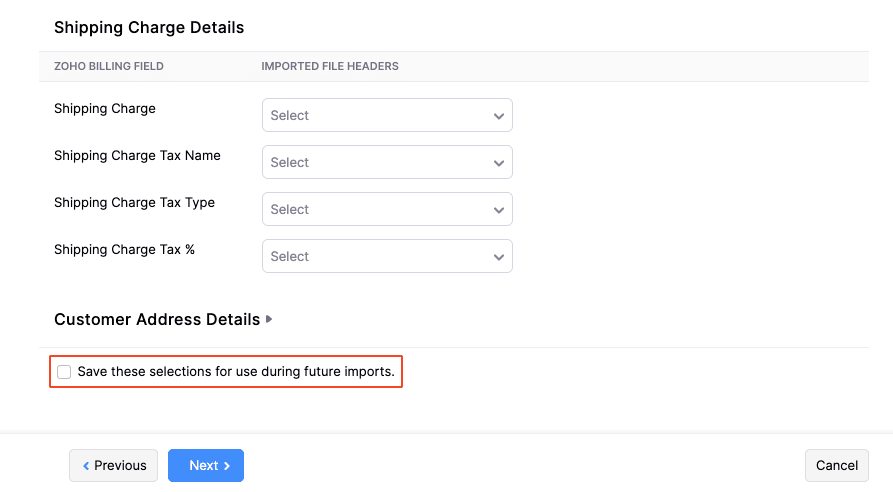
Select Save these selections for use during future imports to map the fields with the same headers during future imports automatically.

Click Next.

Now, you can proceed to the next step Preview.
Step 3 - Preview
The Preview screen gives you a summary of all the records that are ready to import, the number of skipped records, and unmapped fields. To finish importing:
Go through the summary of all the sections:

Options Description Records that are ready to be imported This section shows a list of all the records that can be imported directly into Zoho Billing without any changes or errors. No. of records skipped This section shows a summary of all the records that cannot be imported into Zoho Billing due to incorrect field mapping or errors in the import file, along with their reasons. Click Previous to go back to the Map Fields page to map fields correctly or make the necessary changes to your import file and upload the file from the Configure page. Insight: If you have a large import file, where some records are ready to be imported and some were skipped, it can be difficult to find and correct each record from the import file. In such cases, you can click Download skipped rows to download a CSV file with the records that were skipped and import the rest of the records. Make the necessary changes to the downloaded records and import the updated file from the Configure screen.
Unmapped Fields This section shows a list of all the headers that were not mapped to any Zoho Billing fields. The data under these headers will not be imported. If you want to import these fields into Zoho Billing: - Click Previous to go to the Map Fields page.
- Map these headers to the appropriate Zoho Billing fields.
- Click Next.
Click Import.

The records that were ready to be imported will be imported into Zoho Billing. This can take some time, depending on the file size.


 Yes
Yes