Serverless Functions - Using OAuth2
Table of Contents
OAuth2
Functions can be made accessible through OAuth2 protocol. OAuth2 method allows you to share specific data with any application while keeping your usernames and passwords private, by having specific scopes which grant access to specfic data.
In order to make a function available through OAuth2 method, you need to first register your client with Zoho CRM. Please take a look here to know how to register your client application.
However, there are some key points that need to be noted:
The scope for the client when using the HTTP GET Method should be:
ZohoCRM.functions.execute.READ
The scope for the client when using the HTTP POST Method should be:
ZohoCRM.functions.execute.CREATE
Once the authentication is done, you can proceed with creating your function.
See also:
- Functions in Zoho CRM.
- Integration tasks for Functions using the Version 2.0 of APIs.
- Deluge Script - Reference Guide.
- Connections - Connect your Zoho CRM with any third-party application by invoking their APIs in a function.
- Widgets - Embeddable UI components in Zoho CRM, which allows users to utilise information from third-party applications.
There are a lot of different situations where a function which is available as an API can be put to use. For instance, a function can be set to trigger whenever a certain limit has been crossed in statistical data of the performance of a company. This document is to give you a sample function which is triggered through external sources, where the function is provided as an API.
Sample function:
Scenario:
Say there is a requirement to get consent from customers and have them sign up for newsletters. This is to enable security and not infringe on their privacy.
You can have a button in View Page of a Contact record. The button can open a Widget, which pulls up a Subscription form(to be filled by your Agents). To create widgets, please refer our Widgets help.
Through the widget, the subscription form is submitted. Post which an email with the consent form is sent to the customer. After the customer accepts the consent form, the information about the contact is added to the MailChimp campaign list.
Required Applications:
- MailChimp - for Newsletter
- Google Drive - Consent Form
Requirements:
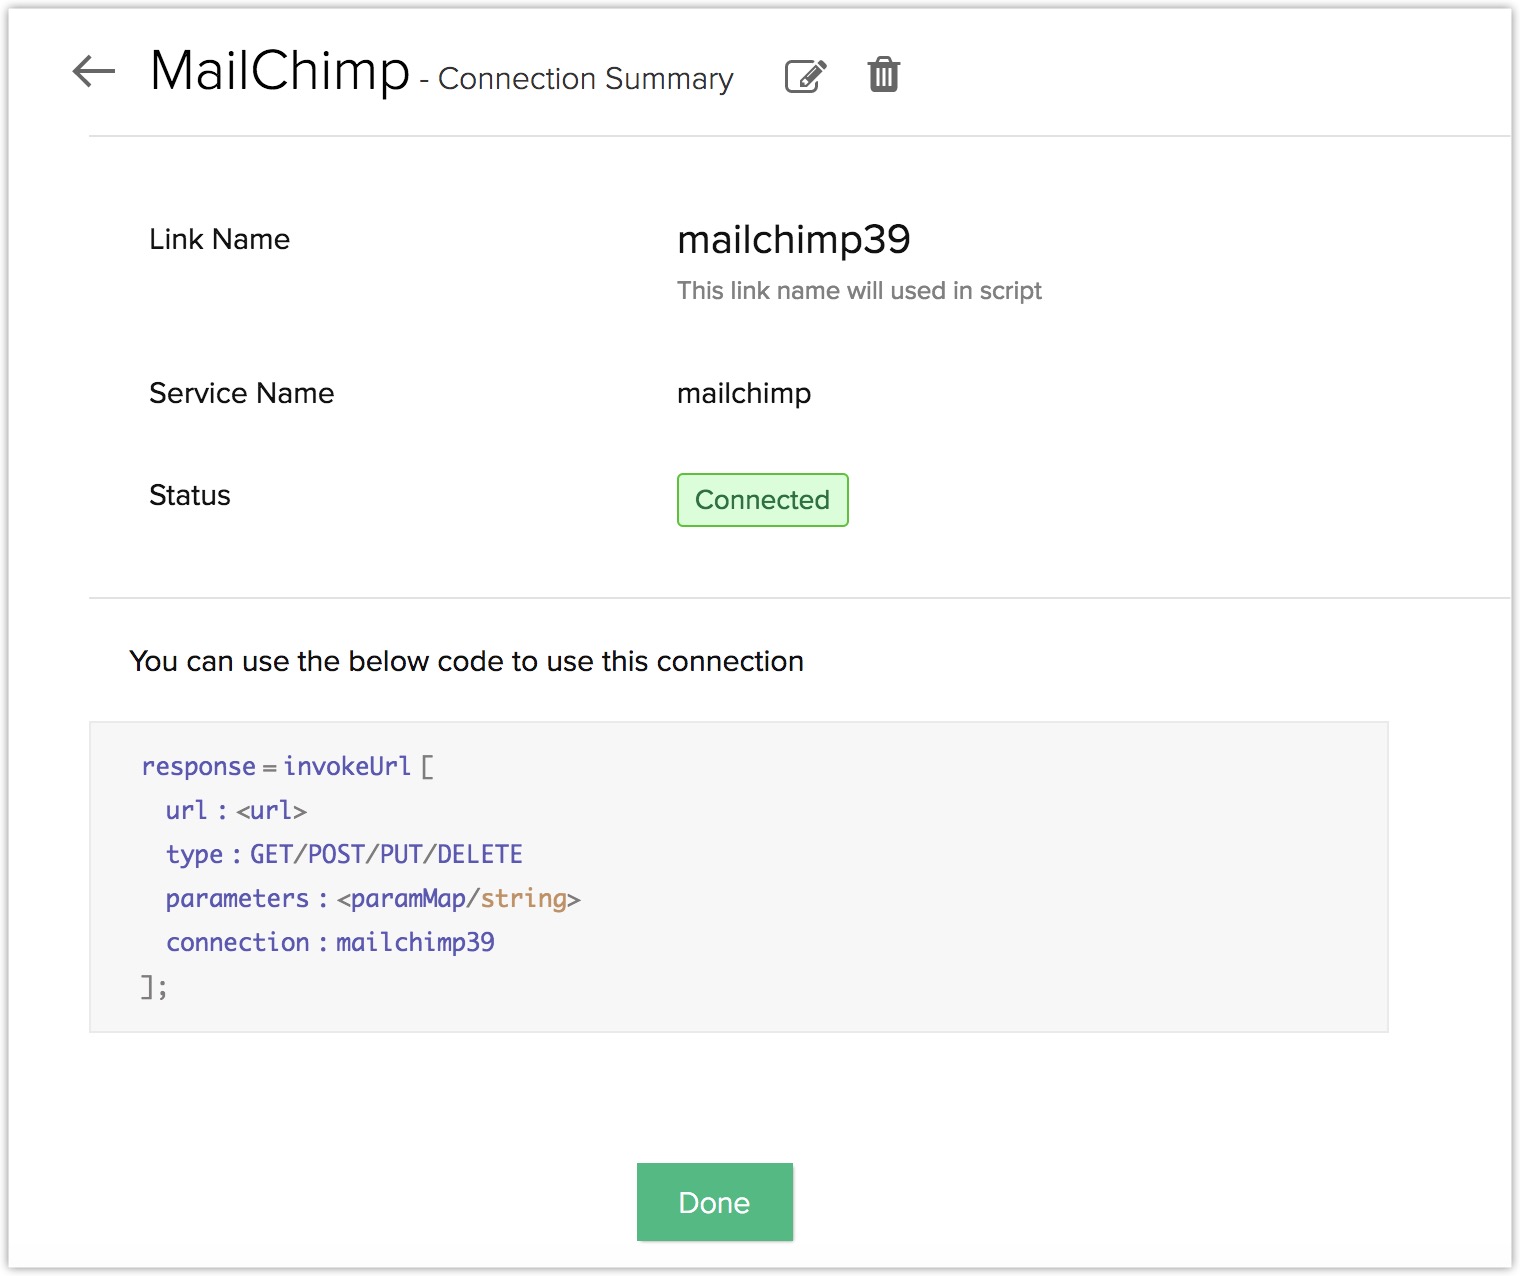
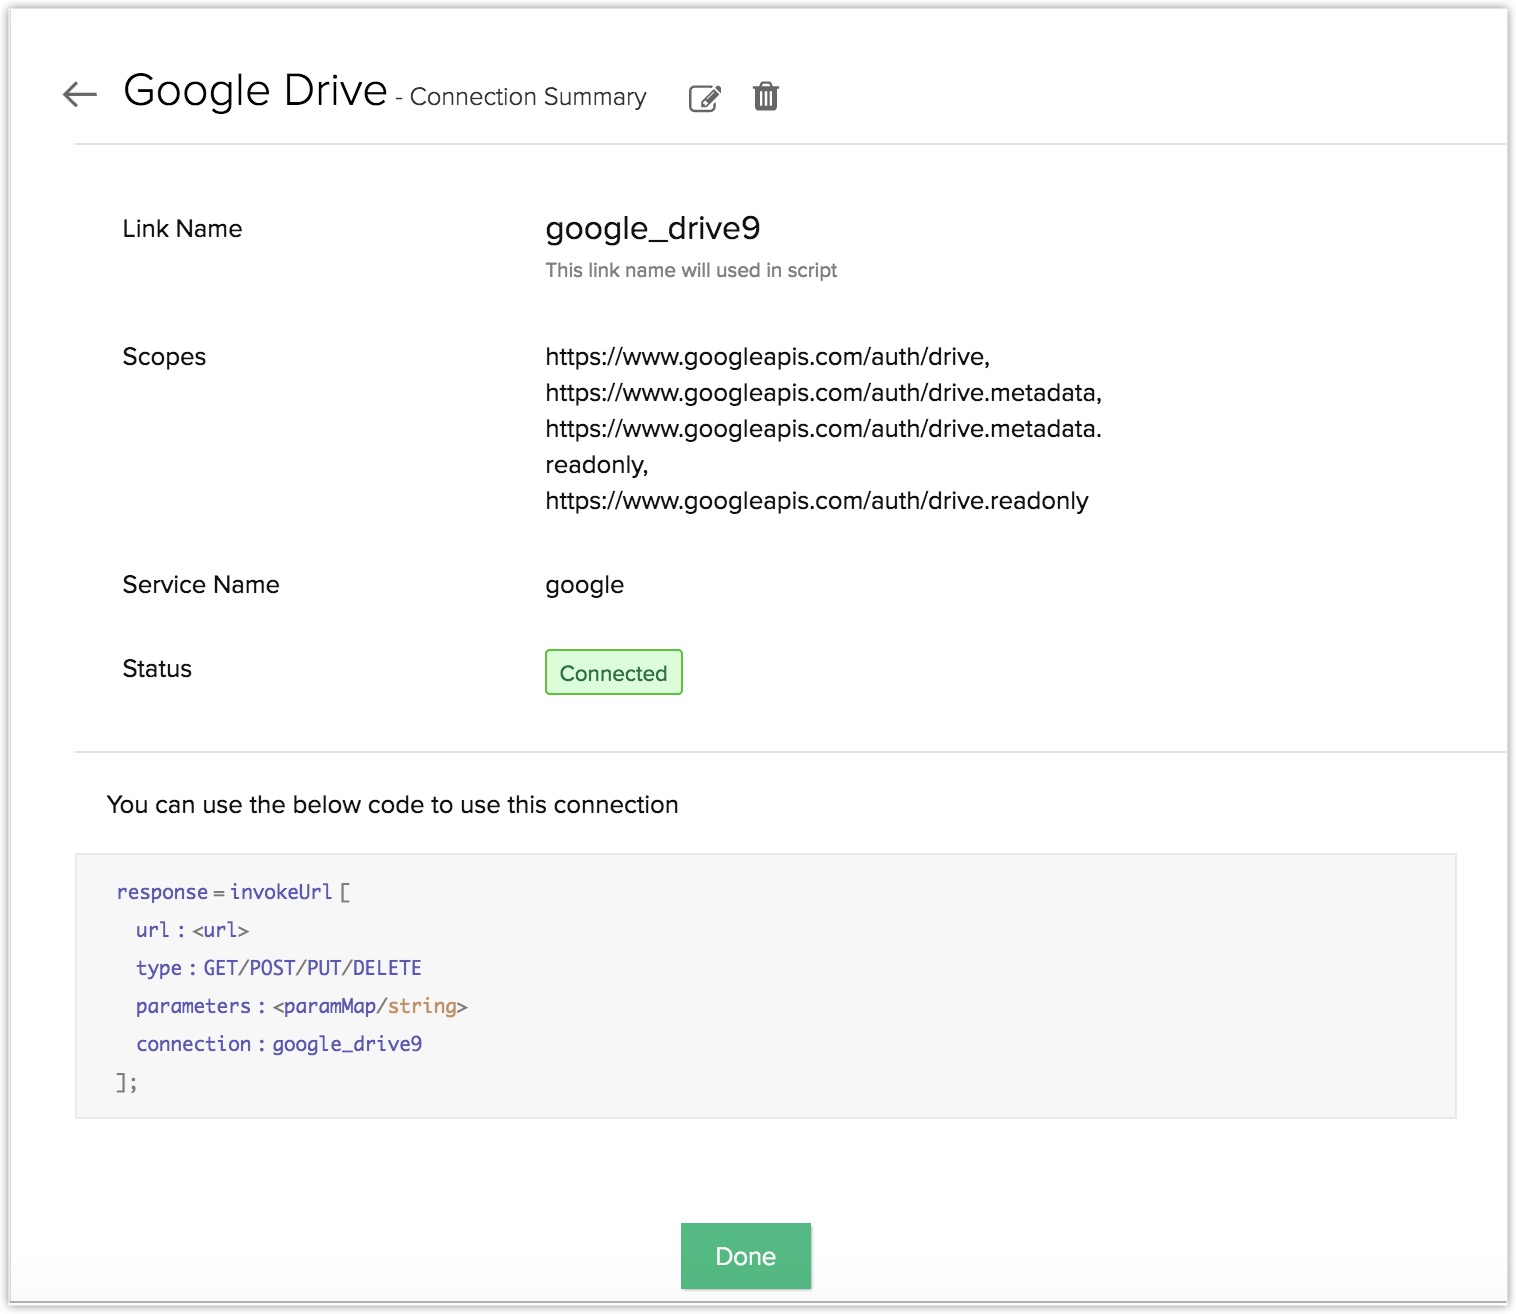
- Create Connections For MailChimp and Google Drive.
- Call MailChimp and Google Drive API in this Function.
- Turn the Function into an API.
- Create a Widget and invoke the Function within it.
Making the connections:
In order for the Function to make use of third-party applications and facilitate data transfer, you need to first set up a connection between Zoho CRM and the said third-party software. In this case, it would be MailChimp and Google Drive. Read more.
For MailChimp:
For Google Drive:
Create the Function:
The steps to create the function according to the requirement is split into 2 parts.
Part 1: Write the function code
Create a standalone function with the following code.
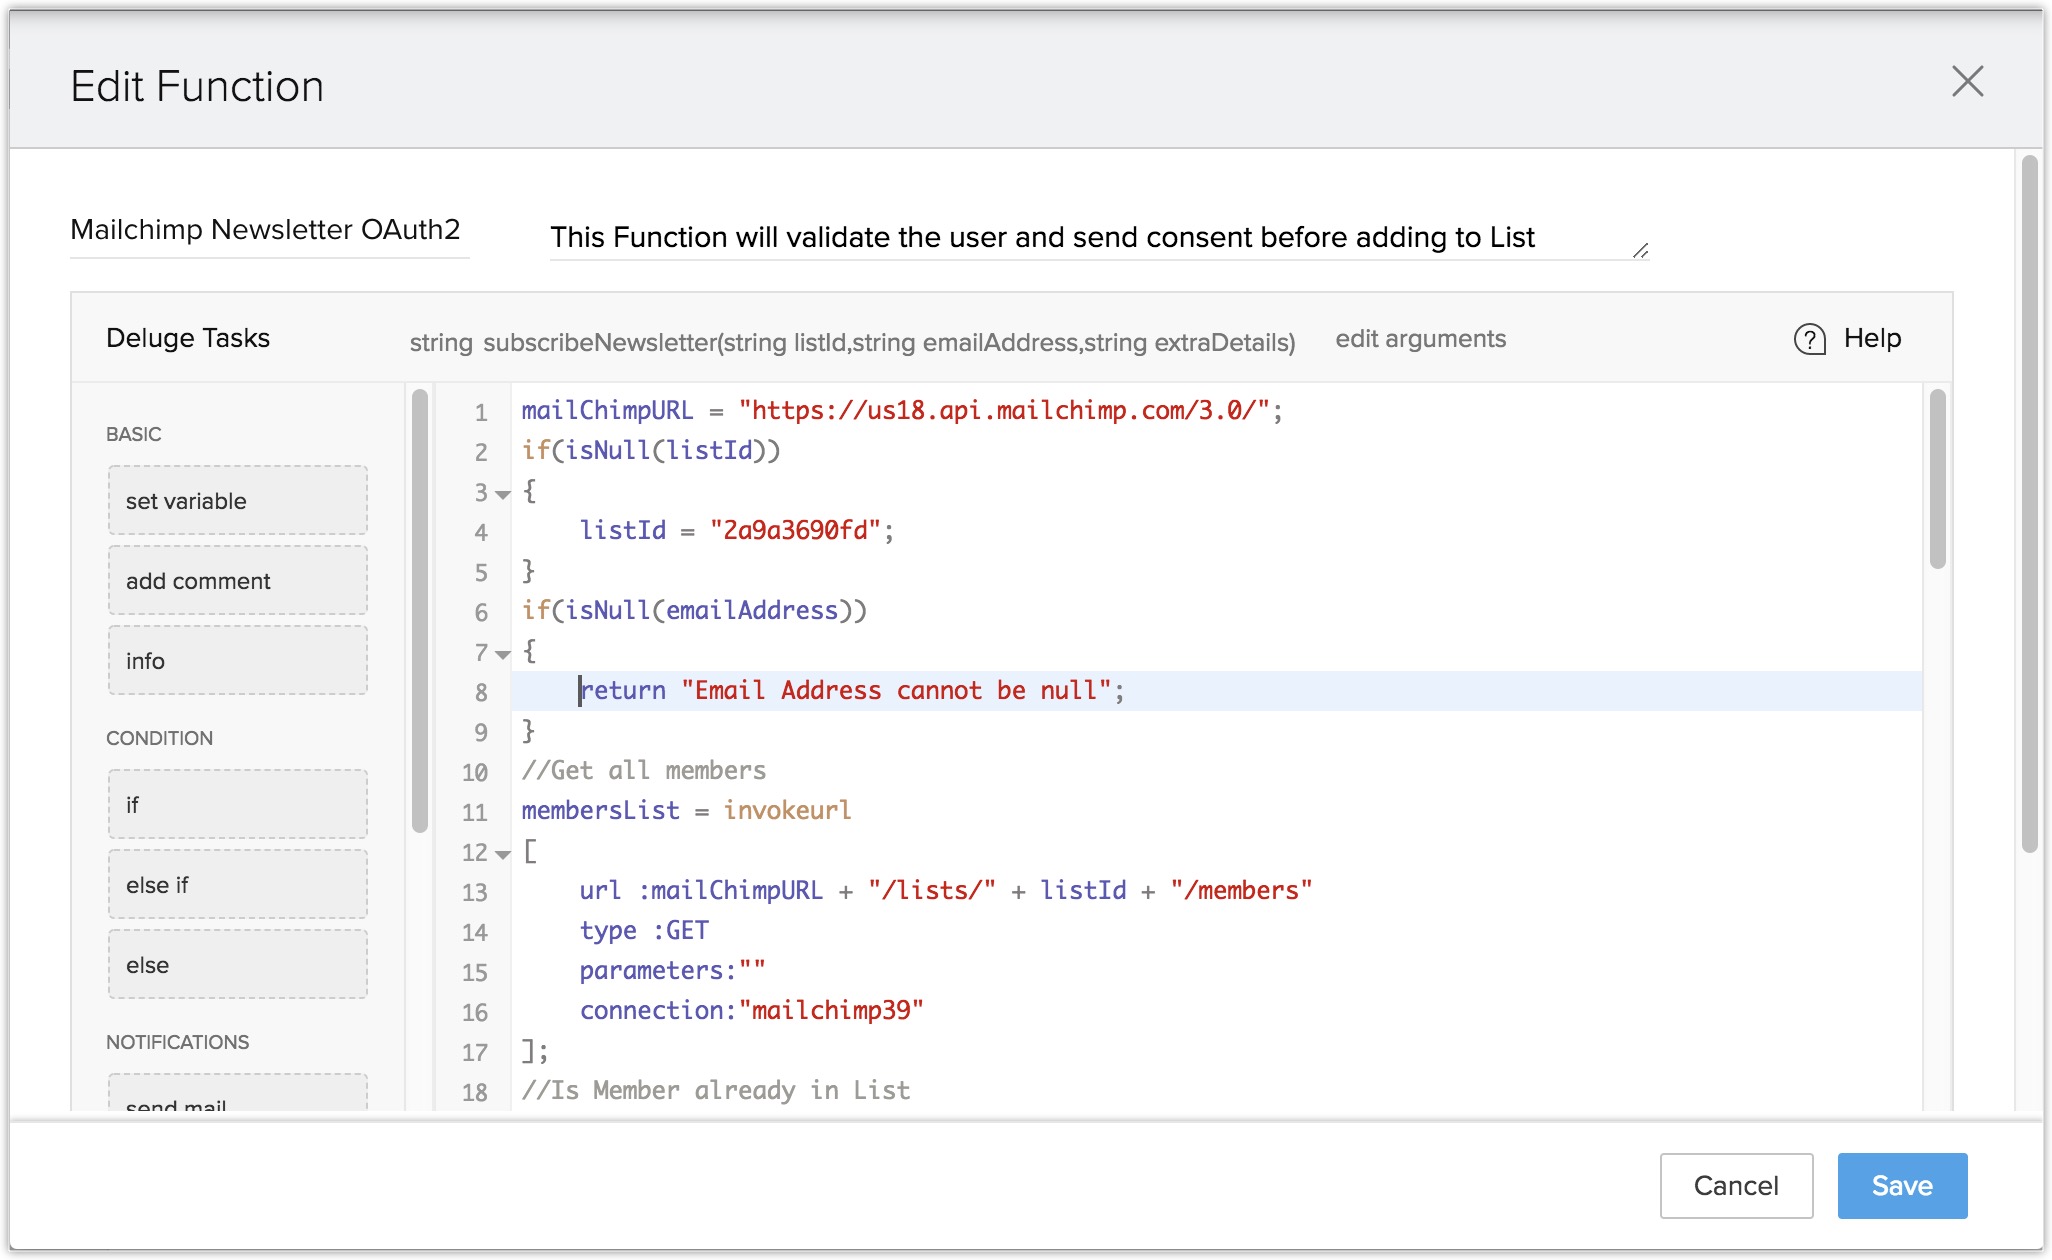
The Function Code is:
string subscribeNewsletter(string listId,string emailAddress,string extraDetails){
mailChimpURL = "https://us18.api.mailchimp.com/3.0/";
if(isNull(listId))
{
//Default List
listId = "2a9a3690fd";
}
if(isNull(emailAddress))
{
return "Email Address cannot be null";
}
//Get all members
membersList = invokeurl
[
url :mailChimpURL + "/lists/" + listId + "/members"
type :GET
parameters:""
connection:<CONNECTION_LINKNAME>
];
//Is Member already in List
for each memberInfo in membersList.get("members")
{
if(emailAddress.equals(memberInfo.get("email_address")))
{
return "The member is already subscribed to Zoho Newsletter";
}
}
//Get all Documents from Google Drive
gdriveURL = "https://www.googleapis.com/drive/v2/files";
fileList = invokeurl
[
url :gdriveURL
type :GET
parameters:""
connection:<CONNECTION_LINKNAME>
];
//Get Download URL of Consent Form
webContentLink = null;
for each fileInfo in fileList.get("items")
{
title = fileInfo.get("title");
if(title.equals("Consent-Form.docx"))
{
webContentLink = fileInfo.get("webContentLink");
break;
}
}
if(isNull(webContentLink))
{
return "No Document Found on Drive. Docuemnt Name ::: Consent-Form.docx";
}
//Send Notification -
name = "Guest";
signature = "Zoho";
if(!isNull(extraDetails))
{
if(extraDetails.contains("name"))
{
name = extraDetails.get("name");
}
if(extraDetails.contains("signature"))
{
signature = extraDetails.get("signature");
}
}
sendmail
[
from :zoho.adminuserid
to :emailAddress
subject :"consent form"
message :"Hi " + name + ",<expression></expression><div><br></div><div>Before subscribing to Zoho Newsletter, </div><br /><div>Please download the <br /><a target='_blank' href='" + webContentLink + "'>Consent Form</a> and mail it to newsletter@xyz.com</div><div><br></div><div><br></div><div>Regards,</div><div>" + signature + "<br></div>" ] if(extraDetails.contains("mobile"))
{
sendsms
[
to :extraDetails.get("mobile")
message:"Consent Form has been sent to your mail id :- " + emailAddress
];
}
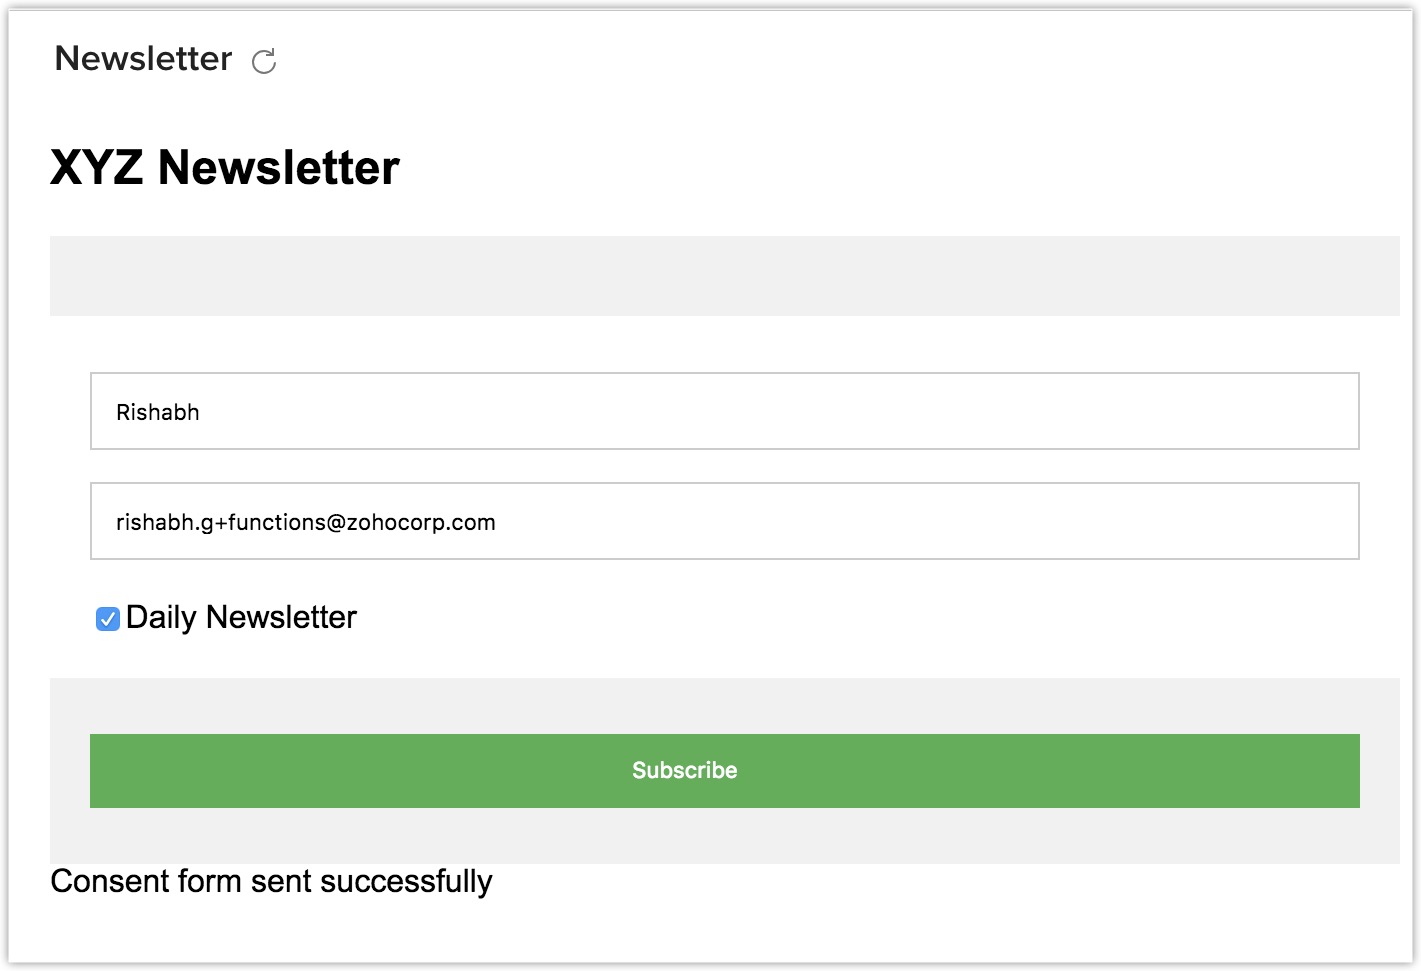
return "Consent form sent successfully"; }
Note:
- The entire request body will not be available inside the Function. It needs to be sent or received inside the arguments.
Configure an argument which contains the entire request body.
In the function given above, you can see that we have 'extraDetails' as one of our Function argument. It is used to get name and signature from the user. This will be helpful when there is no way of knowing the number of arguments that will be passed to your Function.
Since there is no way of knowing the number of arguments present in it, you can have the function contain the entire request body within a single argument, i'e "extraDetails" in this case.
Note:
- Value of 'listId' will be '2a9a3690fd'(in case of null).
- 'emailAddress' is mandatory.
- 'extraDetails' argument is provided to pass extra info, the one which contains the entire request body.
- 'listId', 'emailAddress' are of type STRING.
- 'extraDetails' is of type STRING and we are passing JSON in 'extraDetails'.
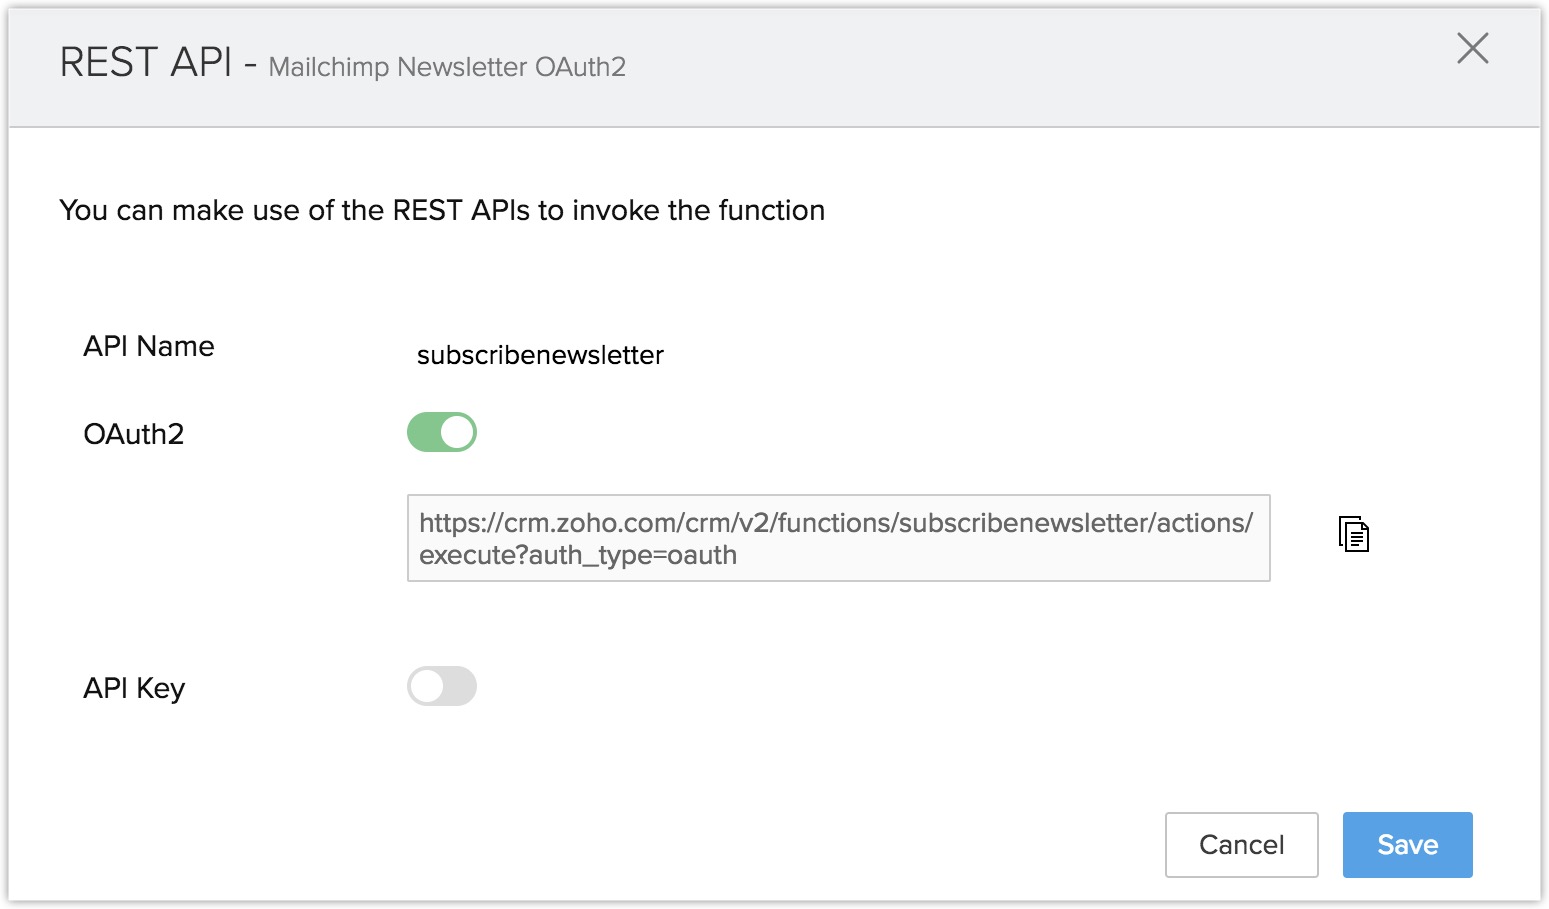
Part 2: Make the function available as an API
Once the function has been created, tested and saved, you can proceed to turn the function into an API.
- Go to Setup > Developer Hub > Functions.
- Click the Settings icon for the corresponding function which needs to be made an API.
- Click REST API.
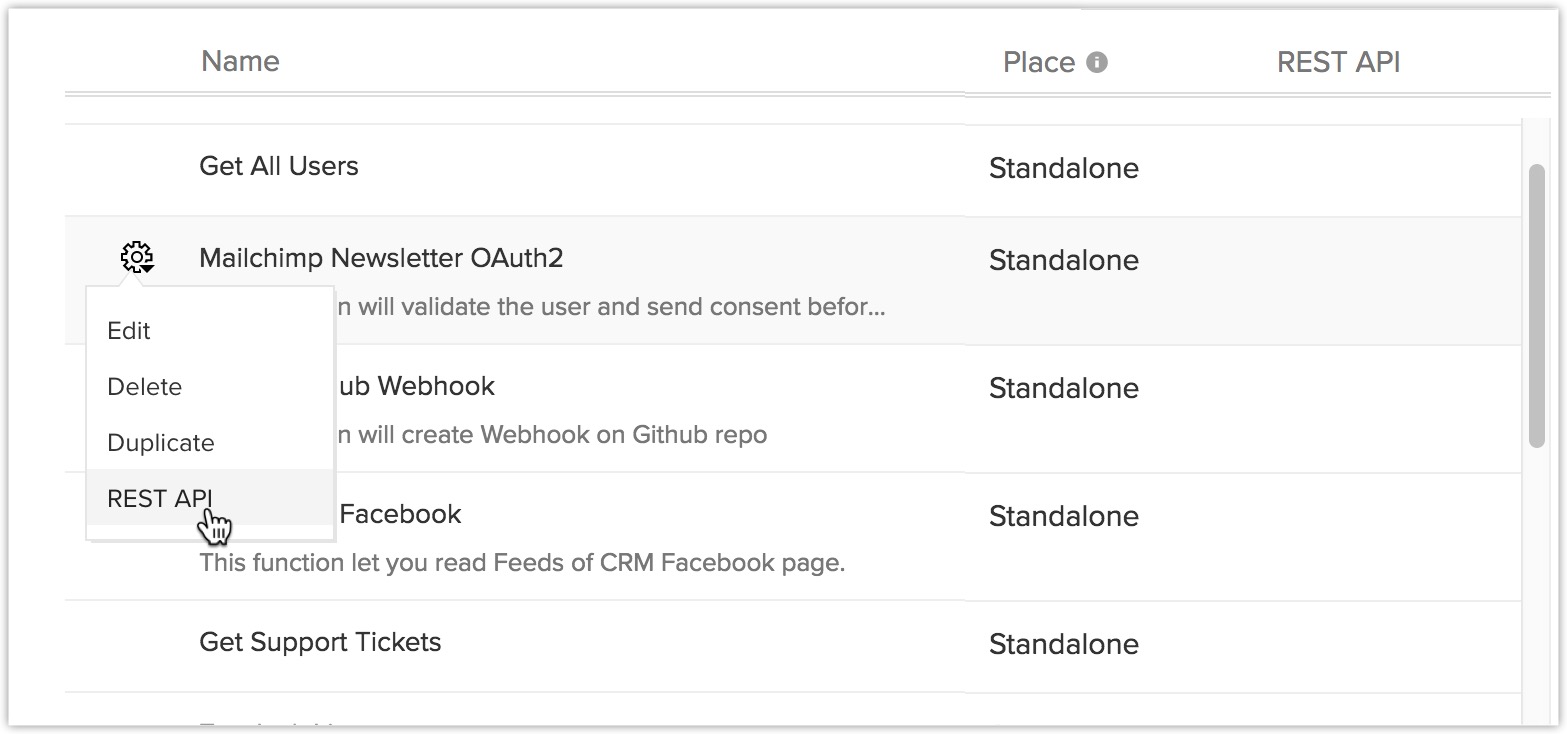
- Enable OAuth2 slider.
- Click Save.


Calling the function inside Widgets
Now comes the actual working part. Since the function has been turned into an API call, you can use the API code for the function in any widget, app or software and set it up to trigger based on your requirement.
Use the following HTML code (Consent Form of the Newsletter), to create a Widget. To learn how to create widgets, please click here.
HTML Code:
<h2>XYZ Newsletter</h2>
<div class="container">
<h2<Subscribe to our Newsletter</h2>
</div>
<div class="container" style="background-color:white">
<input type="text" id="name" placeholder="Name" name="name" required>
<input type="text" placeholder="Email address" name="mail" required id="email">
<label>
<input type="checkbox" checked="checked" name="subscribe">Daily Newsletter
</label>
</div>
<div class="container">
<input type="submit" value="Subscribe" id="subscribeButton">
</div>
<span id="res1">Click on the above button to Subscribe</span>
Script(Javascript):
<script type="text/javascript">
$("#subscribeButton").click(function() {
var extraDetails = {};
extraDetails.name = $("#name").val();
extraDetails.signature = "XYZ";
var arguments = {};
arguments.extraDetails = extraDetails;
arguments.emailAddress = $("#email").val();
var data = {
"arguments": JSON.stringify(arguments),
}
ZOHO.embeddedApp.init()
.then(function() {
ZOHO.CRM.FUNCTIONS.execute("subscribenewsletter", data)
.then(function(resp) {
$('#res1').text(JSON.stringify(resp));
}).catch(function(resp) {
$('#res1').text(JSON.stringify(resp));
})
});
});
Note:
- The above script only works for widgets placed inside the CRM.
- To learn more about the Integration Tasks for Functions, click here.
The Outcome:
Subscribing to the Newsletter:
Getting the subscription mail:
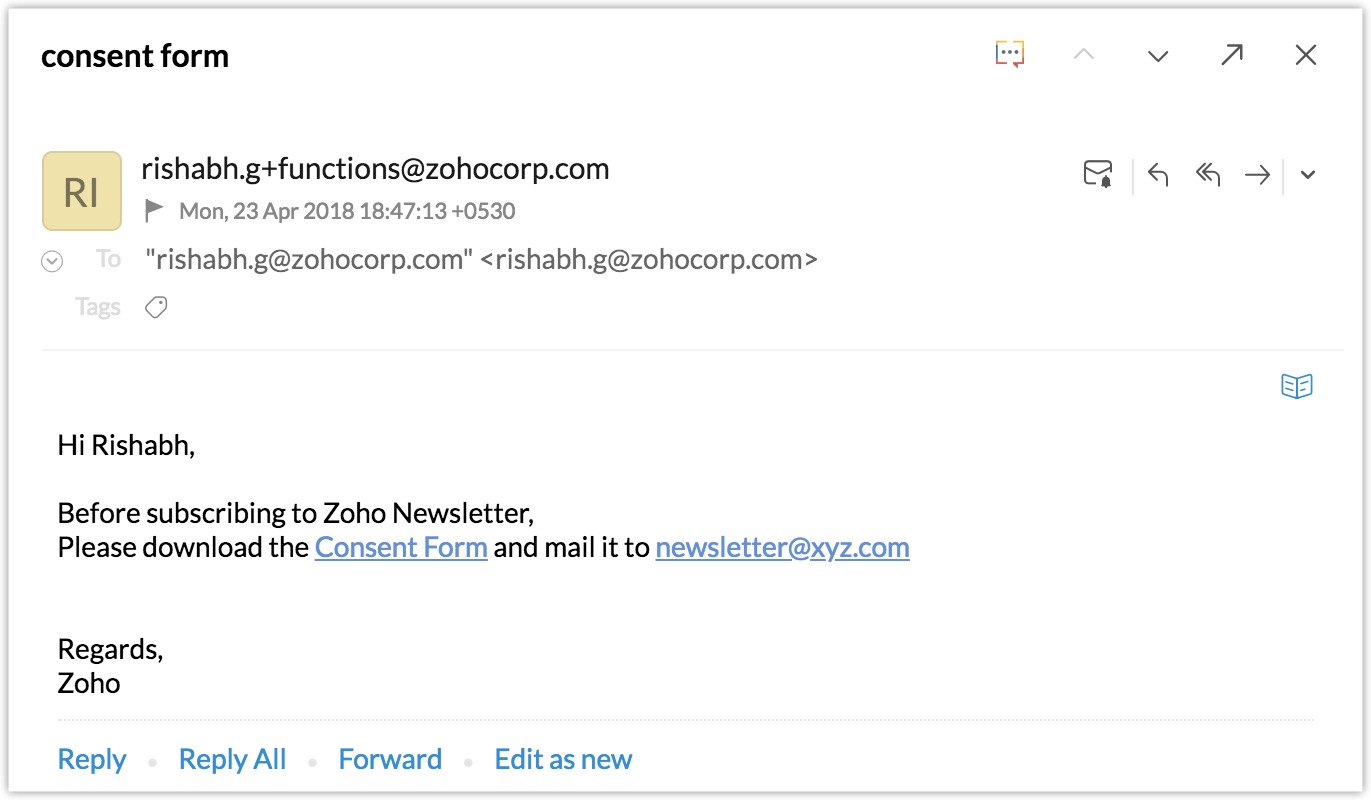
Once the Consent form is sent back to the mailer, the newsletter subscription will be enabled.
Disadvantages of not using Serverless functions:
The user has to manually:
- Register the application on MailChimp and Google Drive.
- Code to handle OAuth2 flow.
- Call Mailchimp API's to verify the user availability.
- Call Google Drive API, to retrieve document URL.
- Code to send Email and SMS to Customer.
As you can see from the above steps, there are a lot of steps involved, which requires you to manually write codes for the widget as well as the functionality of the widget. However, this method is time consuming and requires a ton of manual effort. You can avoid them by having the function as a serverless one.